P0327 Knock Sensor 1 Circuit Low Input (Bank 1 or Single Sensor)
Diagnostic trouble codes · Vehicles built Oct 2006 – May 2009
Also covers:
- P0328 Knock Sensor 1 Circuit High Input (Bank 1 or Single Sensor)
- P0332 Knock Sensor 2 Circuit Low Input (Bank 2)
- P0333 Knock Sensor 2 Circuit High Input (Bank 2)
Versions by build date: Oct 2006 – May 2009 from Jun 2009
DESCRIPTION
A flat type knock sensor (non-resonant type) has a structure that can detect vibrations over a wide band of frequencies: between approximately 6 kHz and 15 kHz.Knock sensors are fitted onto the engine block to detect engine knocking.
The knock sensor contains a piezoelectric element which generates a voltage when it becomes deformed.
The voltage is generated when the engine block vibrates due to knocking. Any occurrence of engine knocking can be suppressed by delaying the ignition timing.
| DTC No. |
DTC Detection Condition |
Trouble Area |
| P0327 P0332 |
Output voltage of knock sensor 1 or 2 is 0.5 V or less (1 trip detection logic) |
|
| P0328 P0333 |
Output voltage of knock sensor 1 or 2 is 4.5 V or more (1 trip detection logic) |
|
- HINT:
- When any of DTCs P0327, P0328, P0332 and P0333 are set, the ECM enters fail-safe mode. During fail-safe mode, the ignition timing is delayed to its maximum retardation. Fail-safe mode continues until the ignition switch is turned off.
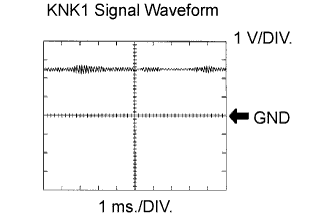

The correct waveform is as shown.
| Item |
Content |
| Terminals |
KNK1 - EKNK or KNK2 -EKN2 |
| Equipment Settings |
0.01 to 10 V/DIV. 0.01 to 10 ms./DIV. |
| Condition |
Keep engine speed at 4,000 rpm with warm engine |
WIRING DIAGRAM
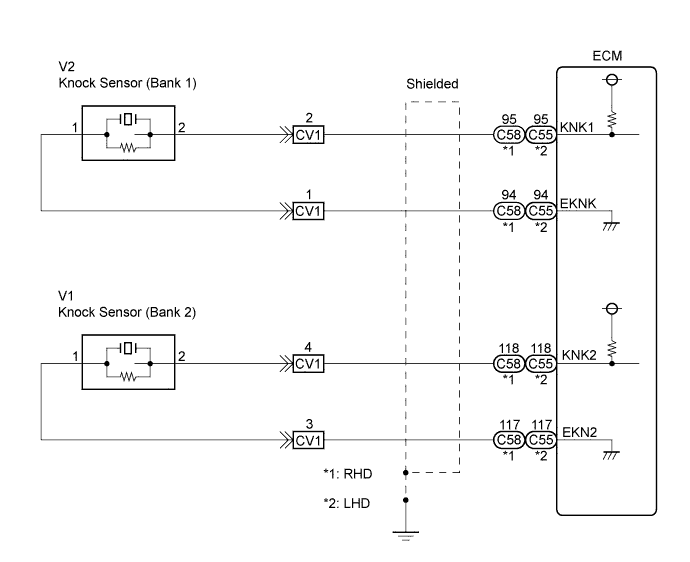
INSPECTION PROCEDURE
- HINT:
- DTCs P0327 and P0328 are for the bank 1 knock sensor circuit.
- DTCs P0332 and P0333 are for the bank 2 knock sensor circuit.
- Read freeze frame data using the intelligent tester. The ECM records vehicle and driving condition information as freeze frame data the moment a DTC is stored. When troubleshooting, freeze frame data can be helpful in determining whether the vehicle was running or stopped, whether the engine was warmed up or not, whether the air-fuel ratio was lean or rich, as well as other data recorded at the time of a malfunction (Click here).
- DTCs P0327 and P0328 are for the bank 1 knock sensor circuit.
| 1. READ OUTPUT DTC (CHECK KNOCK SENSOR CIRCUIT) |

Disconnect the CV1 connector.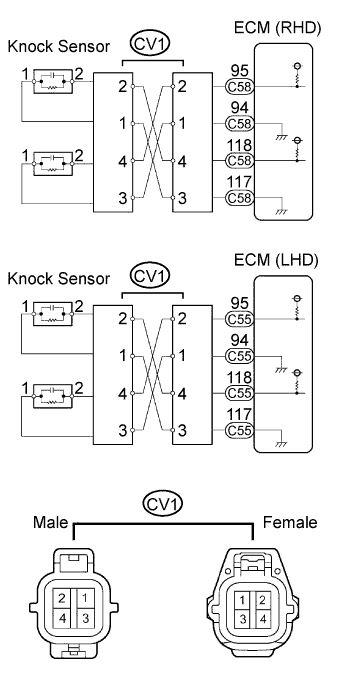
Using lead wires, connect the connectors as follows:
Male Connector - Female Connector
Terminal 2 - Terminal 4
Terminal 1 - Terminal 3
Terminal 4 - Terminal 2
Terminal 3 - Terminal 1
Warm up the engine.
Run the engine at 3,000 rpm for 10 seconds or more.
Connect the intelligent tester to the DLC3.
Turn the ignition switch on (IG) and turn the intelligent tester on.
Enter the following menus: Powertrain / Engine / DTC.
Read the DTCs.
- Result:
Display
Proceed to
DTCs same as when vehicle brought in P0327, P0328 → P0327, P0328 or P0332, P0333 → P0332, P0333
A
DTCs different from when vehicle brought in P0327, P0328 → P0332, P0333 or P0332, P0333 → P0327, P0328
B
Reconnect the CV1 connector.
|
|
||||

| A | |
 |
| 2. CHECK WIRE HARNESS AND CONNECTOR (CONNECTOR - ECM) |
Disconnect the CV1 connector.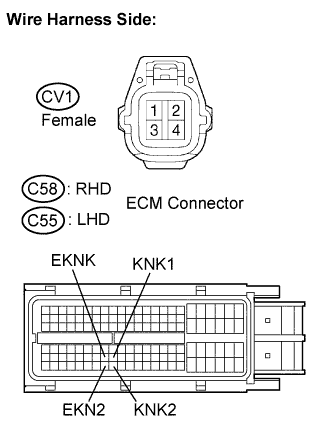
Disconnect the C58 (RHD) or C55 (LHD) ECM connector.
Measure the resistance according to the value(s) in the table below.
- Standard resistance (Check for open):
- RHD:
Tester Connection
Specified Condition
CV1 female connector 2 - KNK1 (C58-95)
Below 1 Ω
CV1 female connector 1 - EKNK (C58-94)
Below 1 Ω
CV1 female connector 4 - KNK2 (C58-118)
Below 1 Ω
CV1 female connector 3 - EKN2 (C58-117)
Below 1 Ω
- LHD:
Tester Connection
Specified Condition
CV1 female connector 2 - KNK1 (C55-95)
Below 1 Ω
CV1 female connector 1 - EKNK (C55-94)
Below 1 Ω
CV1 female connector 4 - KNK2 (C55-118)
Below 1 Ω
CV1 female connector 3 - EKN2 (C55-117)
Below 1 Ω
- Standard resistance (Check for short):
- RHD:
Tester Connection
Specified Condition
CV1 female connector 2 or KNK1 (C58-95) - Body ground
10 kΩ or higher
CV1 female connector 1 or EKNK (C58-94) - Body ground
10 kΩ or higher
CV1 female connector 4 or KNK2 (C58-118) - Body ground
10 kΩ or higher
CV1 female connector 3 or EKN2 (C58-117) - Body ground
10 kΩ or higher
- LHD:
Tester Connection
Specified Condition
CV1 female connector 2 or KNK1 (C55-95) - Body ground
10 kΩ or higher
CV1 female connector 1 or EKNK (C55-94) - Body ground
10 kΩ or higher
CV1 female connector 4 or KNK2 (C55-118) - Body ground
10 kΩ or higher
CV1 female connector 3 or EKN2 (C55-117) - Body ground
10 kΩ or higher
Reconnect the CV1 connector.
Reconnect the ECM connector.
|
|
||||

| OK | |
|
| 3. INSPECT ECM |
Disconnect the CV1 connector.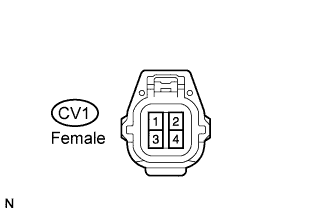
Turn the ignition switch on (IG).
Measure the voltage according to the value(s) in the table below.
- Standard voltage:
Tester Connection
Specified Condition
CV1 female connector 2 - 1
4.5 to 5.5 V
CV1 female connector 4 - 3
4.5 to 5.5 V
Reconnect the ECM connector.
|
|
||||
| OK | ||
 |
||
| ||
| 4. INSPECT KNOCK SENSOR |
Disconnect the CV1 connector.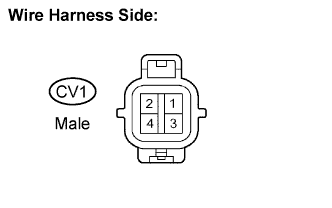
Measure the resistance according to the value(s) in the table below.
- Standard resistance:
Tester Connection
Specified Condition
CV1 male connector 1 - 2
120 to 280 kΩ
CV1 male connector 3- 4
120 to 280 kΩ
Reconnect the CV1 connector.
|
|
||||
| NG | |
|
| 5. CHECK HARNESS AND CONNECTOR (CONNECTOR - KNOCK SENSOR) |
- HINT:
- If DTC P0327 or P0328 has changed to P0332 or P0333, check the knock sensor circuit on the right bank side.
- If DTC P0332 or P0333 has changed to P0327 or P0328, check the knock sensor circuit on the left bank side.
- If DTC P0327 or P0328 has changed to P0332 or P0333, check the knock sensor circuit on the right bank side.
Disconnect the CV1 connector.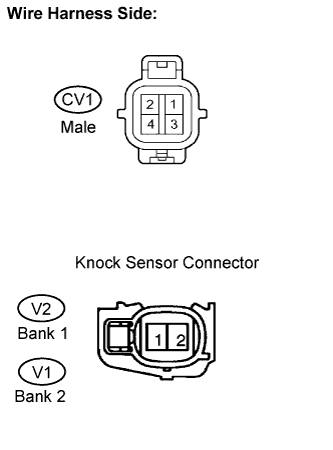
Disconnect the V2 and V1 knock sensor connectors.
Measure the resistance according to the value(s) in the table below.
- Standard resistance:
- Check for open:
Tester Connection
Specified Condition
CV1 male connector 2 - V2-2
Below 1 Ω
CV1 male connector 1 - V2-1
Below 1 Ω
CV1 male connector 4 - V1-2
Below 1 Ω
CV1 male connector 3 - V1-1
Below 1 Ω
- Check for short:
Tester Connection
Specified Condition
CV1 male connector 2 or V2-2 - Body ground
10 kΩ or higher
CV1 male connector 1 or V2-1 - Body ground
10 kΩ or higher
CV1 male connector 4 or V1-2 - Body ground
10 kΩ or higher
CV1 male connector 3 or V1-1 - Body ground
10 kΩ or higher
Reconnect the CV1 connector.
Reconnect the knock sensor connectors.
|
|
||||
| OK | ||
|
||
| ||