P0571 Brake Switch "A" Circuit
Diagnostic trouble codes · Vehicles built from Jun 2009
Versions by build date: Oct 2006 – May 2009 from Jun 2009
DESCRIPTION
When the brake pedal is depressed, the stop light switch sends a signal to the ECM. When the ECM receives this signal, it cancels the cruise control. The fail-safe function operates to enable normal driving even if there is a malfunction in the stop light signal circuit. The cancellation condition occurs when voltage is applied to terminal STP. When the brake is applied, voltage is normally applied to terminal STP of the ECM through the STOP SW fuse and the stop light switch, and the ECM turns the cruise control off.| DTC No. |
DTC Detection Condition |
Trouble Area |
| P0571 |
When voltage of STP terminal and that of ST1- terminal of ECM are less than 1 V for 0.5 sec. or more |
|
WIRING DIAGRAM
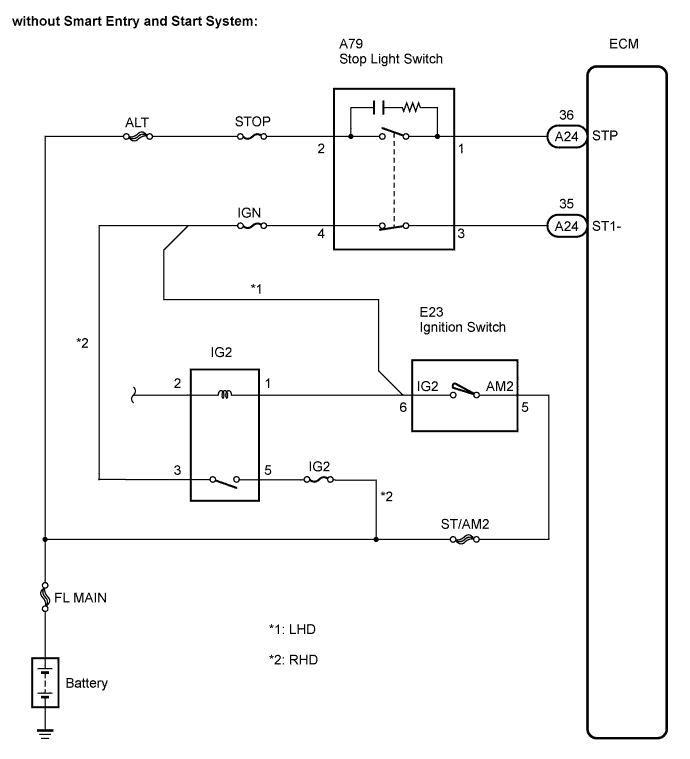

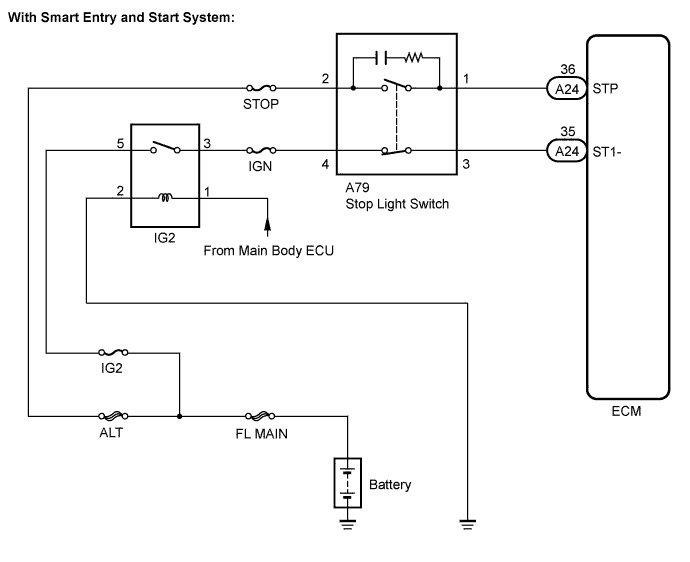
INSPECTION PROCEDURE
| 1. READ VALUE USING INTELLIGENT TESTER |

Connect the intelligent tester to the DLC3.
Turn the ignition switch on (IG), and turn the intelligent tester main switch on.
Check the DATA LIST for proper functioning of the stop light switch.
ECM (Cruise control): Tester Display
Measurement Item/Range
Normal Condition
Diagnostic Note
Stp Light SW M (STP)
Stop light switch signal (Main CPU) / ON or OFF
ON: Brake pedal depressed
OFF: Brake pedal released
-
Stp Light SW S2 (STP)
Stop light switch signal (Sub CPU) / ON or OFF
ON: Brake pedal depressed
OFF: Brake pedal released
-
Stp Light SW S1 (ST1-)
Stop light switch signal (Sub CPU) / ON or OFF
ON: Brake pedal depressed
OFF: Brake pedal released
-
- OK:
- When the brake pedal is operated, the display changes as shown above.
|
|
||||

| NG | |
 |
| 2. CHECK HARNESS AND CONNECTOR (STOP LIGHT SWITCH - BATTERY) |
Disconnect the A79 connector from the stop light switch.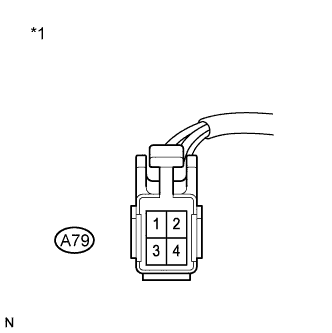
Measure the voltage according to the value(s) in the table below.
- Standard voltage:
Tester Connection
Condition
Specified Condition
A79-2 - Body ground
Always
10 to 14 V
A79-4 - Body ground
Ignition switch on (IG)
10 to 14 V
*1
Front view of wire harness connector
(to Stop Light Switch)
|
|
||||
| OK | |
|
| 3. INSPECT STOP LIGHT SWITCH |
Remove the stop light switch. (Click here)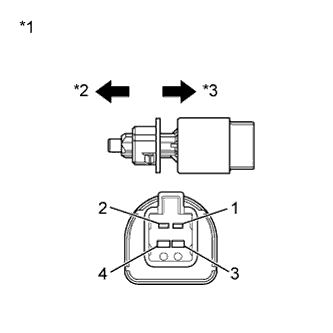
Measure the resistance according to the value(s) in the table below.
- Standard resistance:
Tester Connection
Switch Condition
Specified Condition
1 - 2
Switch pin not pushed
Below 1 Ω
3 - 4
Switch pin not pushed
10 kΩ or higher
1 - 2
Switch pin pushed
10 kΩ or higher
3 - 4
Switch pin pushed
Below 1 Ω
*1
Component without harness connected
(Stop Light Switch)
*2
Not Pushed
*3
Pushed
Install the stop light switch.
|
|
||||
| OK | |
|
| 4. CHECK ECM |
Reconnect the stop light switch connector.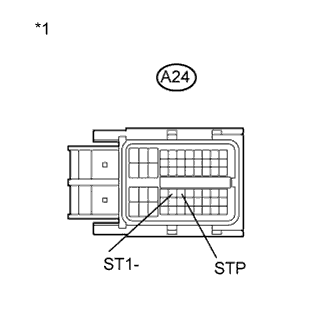
Disconnect the A24 connector from the ECM.
Turn the ignition switch on (IG).
Measure the voltage according to the value(s) in the table below.
- Standard voltage:
Tester Connection
Brake Pedal Condition
Specified Condition
A24-36 (STP) - Body ground
Depressed
10 to 14 V
A24-36 (STP) - Body ground
Released
Below 1 V
A24-35 (ST1-) - Body ground
Depressed
Below 1 V
A24-35 (ST1-) - Body ground
Released
10 to 14 V
*1
Front view of wire harness connector
(to ECM)
|
|
||||
| OK | ||
 |
||
| ||