Door Courtesy Switch Circuit
Circuit diagnosis · Vehicles built from Jun 2009
Versions by build date: Jun 2006 – May 2009 from Jun 2009
DESCRIPTION
The main body ECU detects the condition of the door courtesy switches.WIRING DIAGRAM
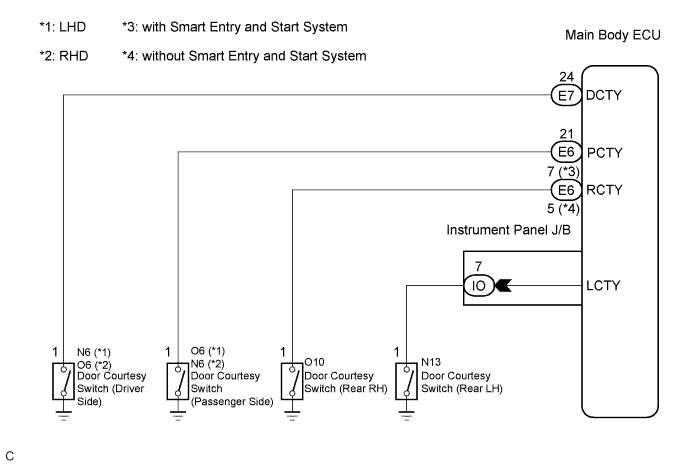

INSPECTION PROCEDURE
| 1. READ VALUE USING INTELLIGENT TESTER |

Connect the intelligent tester to the DLC3.
Turn the ignition switch to ON and turn the intelligent tester main switch on.
Select the items below in the DATA LIST, and read the display on the intelligent tester.
Main Body (Main Body ECU): Tester Display
Measurement Item/Range
Normal Condition
Diagnostic Note
D Door Courtesy SW
Driver side door courtesy switch signal / ON or OFF
ON: Driver side door is open
OFF: Driver side door is closed
-
P Door Courtesy SW
Passenger side door courtesy switch signal / ON or OFF
ON: Passenger side door is open
OFF: Passenger side door is closed
-
RR Door Courtesy SW
Rear RH door courtesy switch signal / ON or OFF
ON: Rear right door is open
OFF: Rear right door is closed
-
RL Door Courtesy SW
Rear LH door courtesy switch signal / ON or OFF
ON: Rear left door is open
OFF: Rear right door is closed
-
- OK:
- Normal conditions listed above are displayed.
|
|
||||

| NG | |
 |
| 2. INSPECT DOOR COURTESY SWITCH |
Inspect the front door courtesy switch (Click here).
Inspect the rear door courtesy switch (Click here).
- OK:
- Door courtesy switches are normal.
|
|
||||
| OK | |
|
| 3. CHECK HARNESS AND CONNECTOR (MAIN BODY ECU - DOOR COURTESY SWITCH) |
Check the harness and connector between the main body ECU and door courtesy switches (passenger side and rear RH).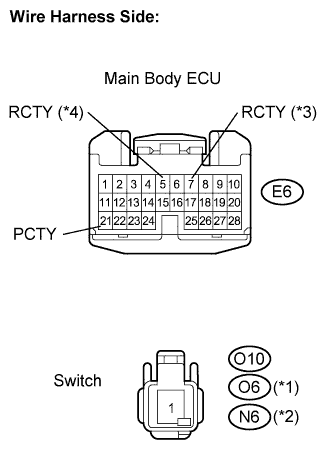
Disconnect the E6 main body ECU connector.
Disconnect the O10 rear RH door courtesy switch connector.
Disconnect the O6 or N6 passenger side door courtesy switch.
Measure the resistance according to the value(s) in the table below.
- Standard resistance:
Tester Connection
Condition
Specified Condition
E6-5 (RCTY) (*4) - O10-1 (Rear RH)
Always
Below 1 Ω
E6-7 (RCTY) (*3) - O10-1 (Rear RH)
Always
Below 1 Ω
E6-21 (PCTY) - O6-1 (*1)
Always
Below 1 Ω
E6-21 (PCTY) - N6-1 (*2)
Always
Below 1 Ω
E6-5 (RCTY) (*4) - Body ground
Always
10 kΩ or higher
E6-7 (RCTY) (*3) - Body ground
Always
10 kΩ or higher
E6-21 (PCTY) - Body ground
Always
10 kΩ or higher
- HINT:
- *1: LHD
- *2: RHD
- *3: with Smart Entry and Start System
- *4: without Smart Entry and Start System
Check the harness and connector between the instrument panel J/B assembly and rear LH door courtesy switch.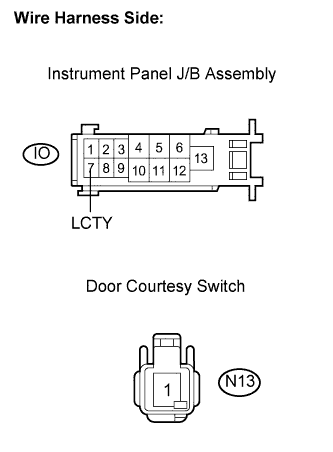
Disconnect the IO instrument panel J/B assembly connector.
Disconnect the N13 rear LH door courtesy switch connector.
Measure the resistance according to the value(s) in the table below.
- Standard resistance:
Tester Connection
Condition
Specified Condition
IO-7 (LCTY) - N13-1 (Rear LH)
Always
Below 1 Ω
IO-7 (LCTY) - Body ground
Always
10 kΩ or higher
Check the harness and connector between the main body ECU and driver side door courtesy switch.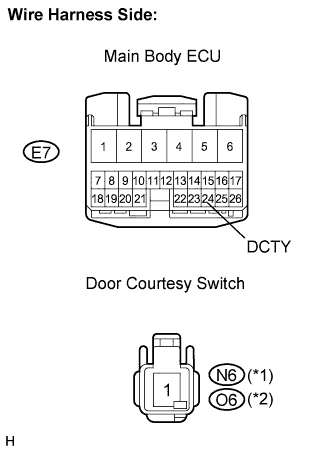
Disconnect the E7 main body ECU connector.
Disconnect the N6 or O6 driver side door courtesy switch connector.
Measure the resistance according to the value(s) in the table below.
- Standard resistance:
Tester Connection
Condition
Specified Condition
E7-24 (DCTY) - N6-1 (*1)
Always
Below 1 Ω
E7-24 (DCTY) - O6-1 (*2)
Always
Below 1 Ω
E7-24 (DCTY) - Body ground
Always
10 kΩ or higher
- HINT:
- *1: LHD
- *2: RHD
|
|
||||
| OK | ||
 |
||
| ||