Fuel Receiver Gauge Malfunction
Circuit diagnosis · Vehicles built Jun 2006 – Sep 2006
Versions by build date: Jun 2006 – Sep 2006 Oct 2006 – May 2009 from Jun 2009
DESCRIPTION
- The meter CPU uses the fuel sender gauge assembly to determine the level of the fuel in the fuel tank. The resistance of the fuel sender gauge will vary between approximately 15 Ω with the float at the full position, and 410 Ω with the float at the empty position. The meter outputs battery voltage through two 820 Ω resistors that are mounted in parallel inside the meter ECU. The meter CPU measures the voltage between the variable resistor in the fuel sender gauge and the two resistors mounted in parallel in the meter. Voltage measured at this point will vary as the float of the fuel sender gauge is moved. The highest voltage observed should be approximately half of battery voltage.
- HINT:
- The fuel level warning light will come on when the fuel level is below 10.5 liters.
WIRING DIAGRAM
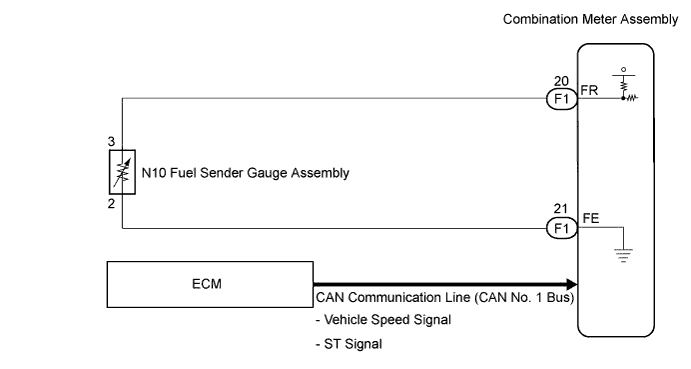

INSPECTION PROCEDURE
| 1. CHECK CAN COMMUNICATION SYSTEM |

Check if CAN communication DTC is output (Click here for LHD, Click here for RHD).
- Result:
Result
Proceed to
CAN communication DTC is not output.
A
CAN communication DTC is output.
B (Click here for LHD, Click here for RHD)
|
|
||||

| A | |
 |
| 2. PERFORM ACTIVE TEST USING INTELLIGENT TESTER |
Connect the intelligent tester to the DLC3.
Turn the ignition switch to the ON position.
Turn the tester on.
Enter the following menus: Body / Combination Meter / Active Test.
Check the operation by referring to the table below.
Combination Meter: Tester Display
Test Part
Control Range
Normal Condition
Fuel Meter Operation
Fuel receiver gauge
EMPTY, 1/2, FULL
-
- OK:
- Needle indication is normal.
|
|
||||
| OK | |
|
| 3. READ VALUE USING INTELLIGENT TESTER |
Connect the intelligent tester to the DLC3.
Turn the ignition switch to the ON position.
Turn the tester on.
Enter the following menus: Body / Combination Meter / Data List.
Check the values by referring to the table below.
Combination Meter: Tester Display
Measurement Item/Range
Normal Condition
Diagnostic Note
Fuel Input
Fuel input signal Min.: 0, Max.: 127.5
Fuel gauge indicates (F): 62.9 (L)
Fuel gauge indicates (3/4): 52.5 (L)
Fuel gauge indicates (1/2): 35.0 (L)
Fuel gauge indicates (3/4): 17.5 (L)
Fuel gauge indicates (E): 7.5 (L)
-
- OK:
- Fuel value signal displayed on the tester is almost the same as needle indication.
|
|
||||
| OK | |
|
| 4. CHECK HARNESS AND CONNECTOR (COMBINATION METER - FUEL SENDER GAUGE ASSEMBLY) |
Disconnect the F1 and N10 connectors.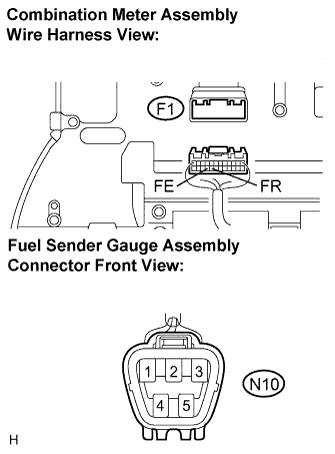
Measure the resistance according to the value(s) in the table below.
- Standard resistance:
Tester Connection
Condition
Specified Condition
F1-20 (FR) - N10-3
Always
Below 1 Ω
F1-21 (FE) - N10-2
Always
Below 1 Ω
N10-3 - Body ground
Always
10 kΩ or higher
F1-21 - Body ground
Always
10 kΩ or higher
|
|
||||
| OK | |
|
| 5. INSPECT FUEL SENDER GAUGE ASSEMBLY |
Disconnect the fuel sender gauge connector.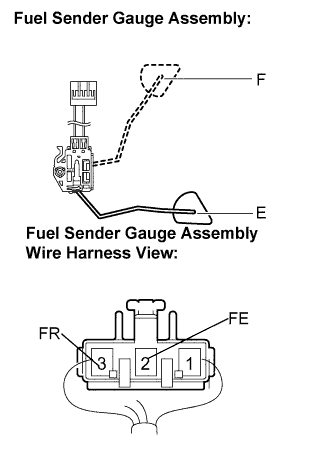
Remove the fuel sender gauge assembly.
Check that the float moves smoothly between F and E.
Measure the resistance between the terminals 2 (FE) and 3 (FR) of connector according to the value(s) in the table below.
- Standard resistance:
Float Level
Resistance (Ω)
F
13.5 to 16.5
Between E and F
13.5 to 414.5 (Gradually changes)
E
405.5 to 414.5
|
|
||||
| OK | |
|
| 6. REPLACE COMBINATION METER ASSEMBLY |
Replace the combination meter assembly with a new one or a normal one.
- OK:
- The operation of the combination meter assembly returns to normal.
|
|
||||
| OK | ||
 |
||
| ||