INSTALLATION
Removal / installation · Vehicles built from Jun 2009
Versions by build date: Oct 2006 – May 2009 from Jun 2009
| 1. INSPECT TORQUE CONVERTER CLUTCH ASSEMBLY |

- HINT:
- (Click here)
| 2. INSTALL TORQUE CONVERTER CLUTCH ASSEMBLY |
Engage the splines of the input shaft and turbine runner.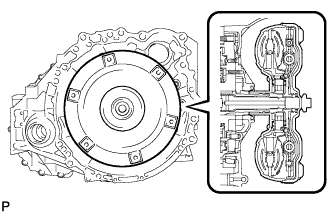

Engage the splines of the stator shaft and the stator while turning the torque converter clutch assembly.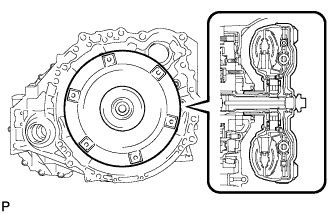
- HINT:
- If the stator shaft splines are difficult to engage with the stator splines, move the torque converter back approximately 10 mm and engage the splines while rotating the torque converter.
Turn the torque converter clutch assembly to engage the key of the oil pump drive gear into the slot on the torque converter clutch assembly.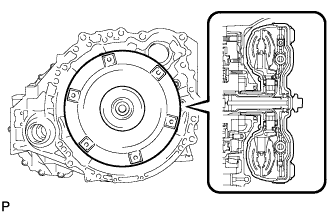
Using a vernier caliper and a straightedge, measure dimension "A" between the transaxle contact surface of the engine*1 and the torque converter contact surface of the drive plate*2. (#)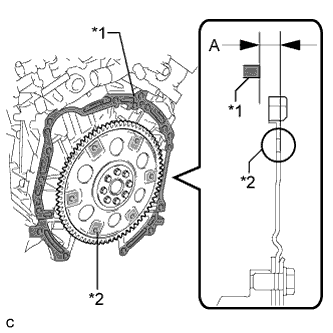
- NOTICE:
- Make sure to deduct the thickness of the straightedge.
Using a vernier caliper and a straightedge, measure dimension "B" shown in the illustration and check that "B" is greater than "A" which was measured in step (#).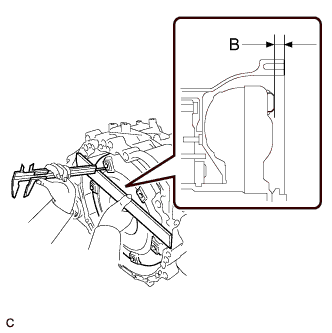
- Standard:
- A + 1 mm (0.0394 in.) or more
- NOTICE:
- Make sure to deduct the thickness of the straightedge.
- If the transaxle is installed to the engine with the torque converter not sufficiently inserted, the torque converter may be damaged.
- Make sure to deduct the thickness of the straightedge.
| 3. INSTALL OIL COOLER INLET HOSE |
Install the oil cooler inlet hose.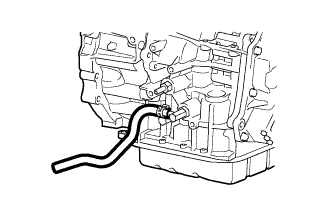
| 4. INSTALL OIL COOLER OUTLET HOSE |
Install the oil cooler outlet hose.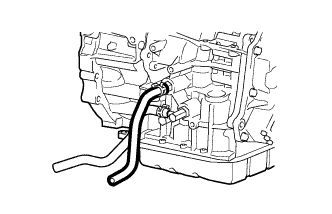
| 5. INSTALL NO. 1 TRANSMISSION CONTROL CABLE BRACKET |
Install the No. 1 transmission control cable bracket with the 2 bolts.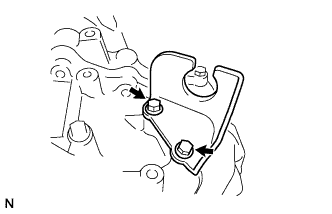
- Torque:
- 12 N*m{ 122 kgf*cm , 9 ft.*lbf }
| 6. INSTALL WIRE HARNESS CLAMP BRACKET (for LHD) |
Install the 4 clamp brackets and 4 bolts.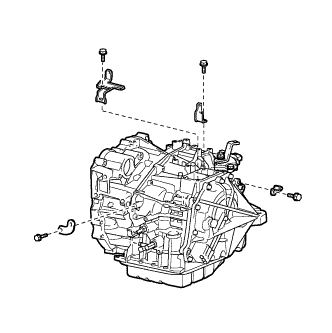
- Torque:
- 8.4 N*m{ 86 kgf*cm , 74 in.*lbf }
| 7. INSTALL WIRE HARNESS CLAMP BRACKET (for RHD) |
Install the 5 clamp brackets and 5 bolts.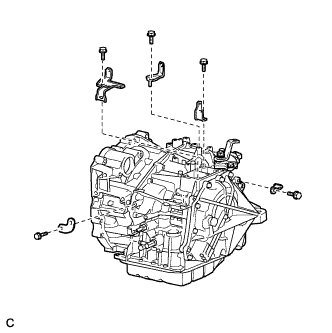
| 8. INSTALL SPEEDOMETER DRIVEN HOLE COVER SUB-ASSEMBLY |
Coat a new O-ring with ATF, and install it to the hole cover.
Install the hole cover to the transaxle case with the bolt.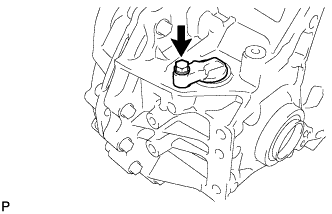
- Torque:
- 5.5 N*m{ 56 kgf*cm , 49 in.*lbf }
| 9. INSTALL TCM |
Install the TCM to the transaxle.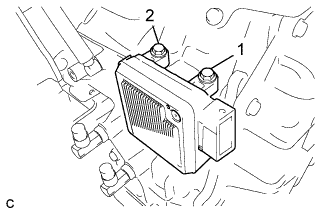
Install and tighten the 2 bolts in the order shown in the illustration.
- Torque:
- 11 N*m{ 112 kgf*cm , 9 ft.*lbf }
| 10. INSTALL ENGINE MOUNTING FRONT BRACKET |
Install the engine mounting front bracket to the automatic transaxle with the 3 bolts.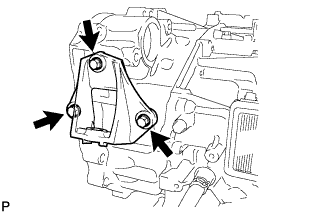
- Torque:
- 64 N*m{ 653 kgf*cm , 47 ft.*lbf }
| 11. INSTALL AUTOMATIC TRANSAXLE ASSEMBLY |
Apply clutch spline grease to the circumference of the crankshaft contact surface with the torque converter centerpiece.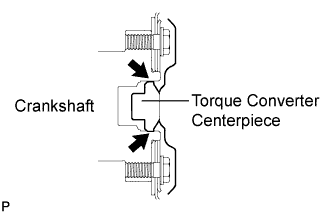
- Clutch spline grease:
- Toyota Genuine Clutch Spline Grease or equivalent
- Maximum spread:
- About 1 g (0.0353 oz.)
Keeping the engine and automatic transaxle assembly in a horizontal position, align the knock pins with each hole on the automatic transaxle assembly and tighten the 11 bolts shown in the illustration.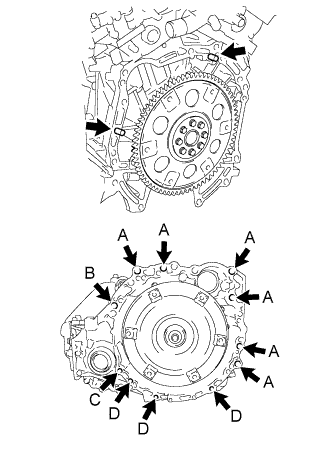
- Torque:
- Bolt A:
- 64 N*m{ 653 kgf*cm , 47 ft.*lbf }
- Bolt B:
- 64 N*m{ 653 kgf*cm , 47 ft.*lbf }
- Bolt C:
- 46 N*m{ 469 kgf*cm , 34 ft.*lbf }
- Bolt D:
- 43 N*m{ 439 kgf*cm , 32 ft.*lbf }
- NOTICE:
- Confirm that the 2 knock pins are installed on the engine block before installing the transaxle.
- Do not forcibly pry on the automatic transaxle assembly.
- Check that the torque converter rotates.
- Confirm that the 2 knock pins are installed on the engine block before installing the transaxle.
Install the breather bracket to the camshaft housing sub-assembly LH with the bolt.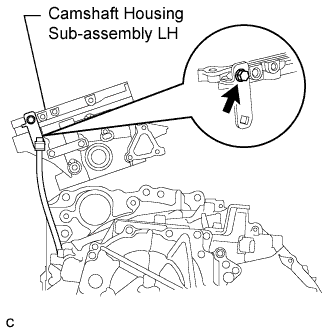
- Torque:
- 5.5 N*m{ 56 kgf*cm , 49 in.*lbf }
Install the breather hose to the breather bracket.
| 12. INSTALL STARTER ASSEMBLY |
Install the starter assembly with the 2 bolts.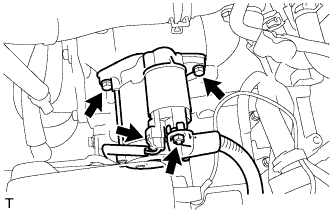
- Torque:
- 37 N*m{ 380 kgf*cm , 28 ft.*lbf }
Connect the wire harness to terminal 30 and install the nut. Then, attach the terminal cap.
- Torque:
- 9.8 N*m{ 100 kgf*cm , 87 in.*lbf }
Connect the terminal 50 connector to the starter assembly.
| 13. CONNECT CONNECTOR |
Connect the park/neutral position switch connector.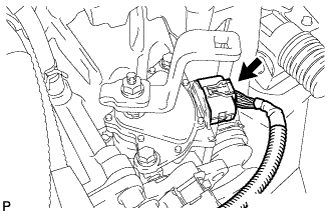
| 14. INSTALL WIRE HARNESS |
Connect the wire harness with the bolt.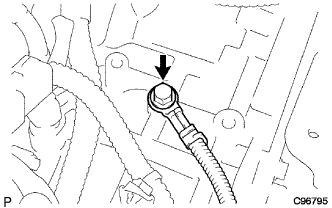
- Torque:
- 12 N*m{ 122 kgf*cm , 9 ft.*lbf }
| 15. INSTALL ENGINE WIRE |
| 16. INSTALL FRONT DRIVE SHAFT ASSEMBLY LH |
Coat the spline of the inboard joint shaft assembly with ATF.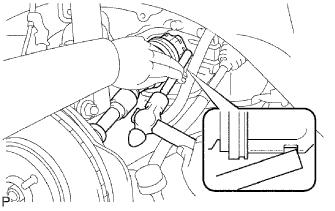
Align the shaft splines and install the drive shaft assembly LH with a brass bar and hammer.
- NOTICE:
- Set the shaft snap ring with the opening side facing down.
- Be careful not to damage the drive shaft dust cover, boot, and oil seal.
- Move the drive shaft assembly while keeping it level.
- Set the shaft snap ring with the opening side facing down.
| 17. INSTALL FRONT DRIVE SHAFT ASSEMBLY RH |
Coat the spline of the inboard joint shaft assembly with ATF.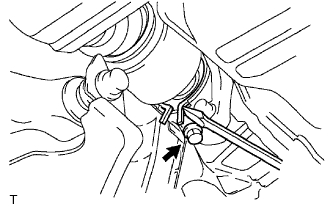
Install the front drive shaft assembly RH.
Using a screwdriver, install a new bearing bracket hole snap ring.
- NOTICE:
- Do not damage the boot and oil seal.
- Move the drive shaft assembly while keeping it level.
- Do not damage the boot and oil seal.
Install a new bolt.
- Torque:
- 32 N*m{ 330 kgf*cm , 24 ft.*lbf }
| 18. INSTALL FRONT FRAME ASSEMBLY |
Install the engine mounting insulators RH and LH with the 2 nuts.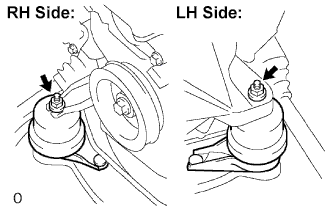
- Torque:
- 95 N*m{ 969 kgf*cm , 70 ft.*lbf }
Install the engine mounting insulator FR with the bolt.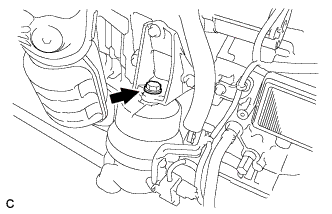
- Torque:
- 87 N*m{ 887 kgf*cm , 64 ft.*lbf }
Connect the connector and clamp.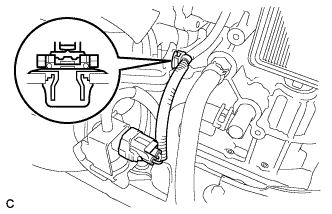
Connect the 2 clamps.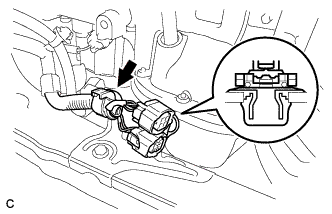
| 19. INSTALL VANE PUMP ASSEMBLY |
Install the vane pump with the 2 bolts.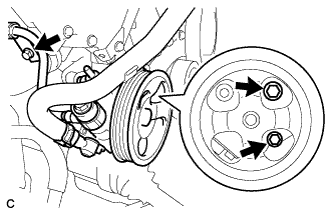
- Torque:
- 43 N*m{ 438 kgf*cm , 32 ft.*lbf }
Install the pressure feed tube clamp bolt.
- Torque:
- 9.8 N*m{ 100 kgf*cm , 87 in.*lbf }
Connect the power steering oil pressure switch connector.
| 20. INSTALL ENGINE ASSEMBLY WITH TRANSAXLE |
Set the engine assembly with transaxle on the engine lifter.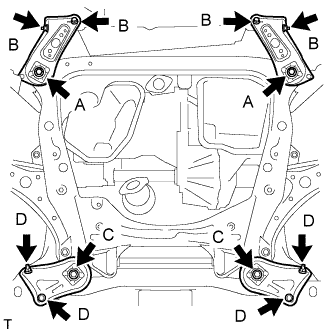
Install the engine assembly to the vehicle.
Install the frame side rail plates RH and LH with the 4 bolts and 2 nuts.
- Torque:
- A:
- 85 N*m{ 867 kgf*cm , 63 ft.*lbf }
- B:
- 32 N*m{ 329 kgf*cm , 24 ft.*lbf }
Install the front suspension member brace rear RH and LH with the 4 bolts and 2 nuts.
- Torque:
- C:
- 85 N*m{ 867 kgf*cm , 63 ft.*lbf }
- D:
- 32 N*m{ 329 kgf*cm , 24 ft.*lbf }
| 21. REMOVE ENGINE HANGERS |
Remove the 4 bolts and 2 engine hangers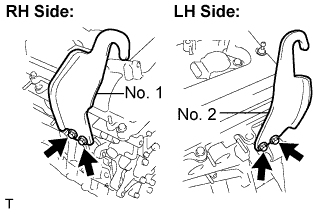
| 22. INSTALL COMPRESSOR AND MAGNETIC CLUTCH |
Temporarily install the cooler compressor with the 4 bolts.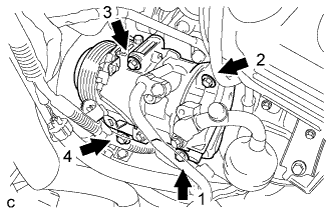
Install the compressor with the 4 bolts by tightening the bolts in the order shown in the illustration.
- Torque:
- 25 N*m{ 250 kgf*cm , 18 ft.*lbf }
Install the 2 connector clamps.
| 23. INSTALL GENERATOR ASSEMBLY |
Install the bracket with the bolt.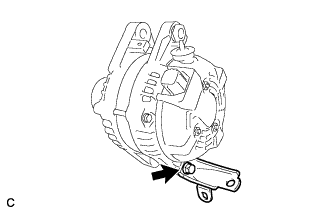
- Torque:
- 20 N*m{ 204 kgf*cm , 15 ft.*lbf }
Install the wire harness clamp stay.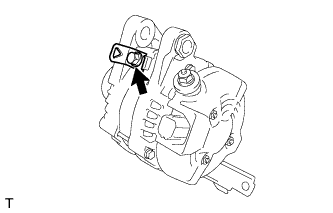
- Torque:
- 8.4 N*m{ 86 kgf*cm , 74 in.*lbf }
Connect the wire harness clamp.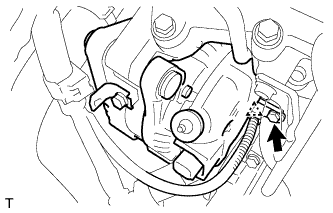
Install the generator assembly to the cylinder block with the bolt.
- Torque:
- 20 N*m{ 204 kgf*cm , 15 ft.*lbf }
Install the 2 bolts.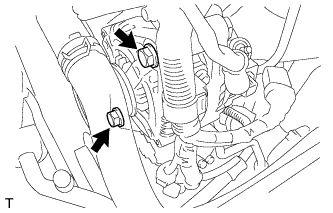
- Torque:
- 43 N*m{ 438 kgf*cm , 32 ft.*lbf }
Connect the generator connector to the generator assembly.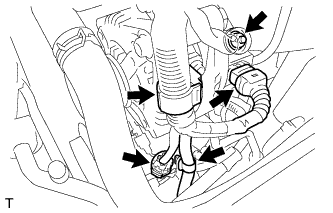
Install the generator wire with the nut.
- Torque:
- 9.8 N*m{ 100 kgf*cm , 87 in.*lbf }
Install the terminal cap.
Connect the 2 wire harness clamps.
Connect the magnetic clutch connector to the compressor and magnetic clutch.
| 24. CONNECT STEERING INTERMEDIATE SHAFT ASSEMBLY |
Align the matchmarks on the steering intermediate shaft and the power steering link assembly.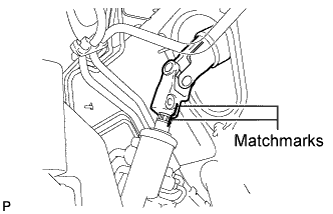
Install the bolt.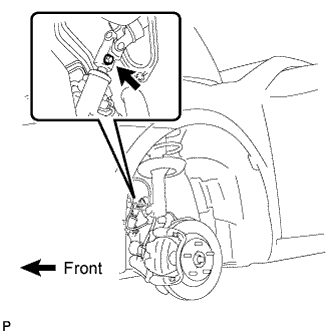
- Torque:
- 35 N*m{ 360 kgf*cm , 26 ft.*lbf }
| 25. INSTALL DRIVE PLATE AND TORQUE CONVERTER CLUTCH SETTING BOLT |
Apply a few drops of adhesive to 2 threads on the tip of the 6 torque converter clutch mounting bolts.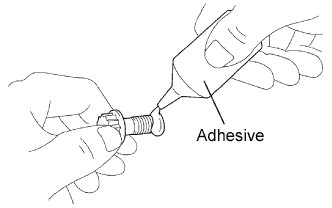
- Adhesive:
- Toyota Genuine Adhesive 1324, Three Bond 1324 or equivalent
Turn the crankshaft to position each bolt and install the 6 torque converter clutch mounting bolts.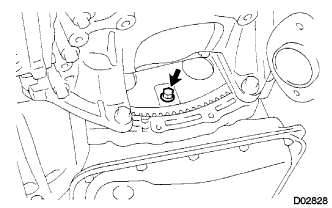
- Torque:
- 41 N*m{ 418 kgf*cm , 30 ft.*lbf }
- NOTICE:
- First install the black colored bolt, and then the silver colored 5 bolts.
| 26. INSTALL FLYWHEEL HOUSING UNDER COVER |
Install the flywheel housing under cover and exhaust pipe support bracket to the automatic transaxle with the 2 bolts.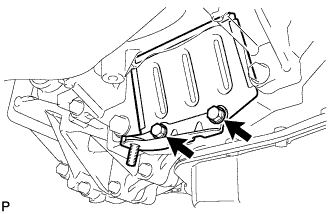
- Torque:
- 7.8 N*m{ 80 kgf*cm , 69 in.*lbf }
| 27. INSTALL NO. 1 EXHAUST PIPE SUPPORT BRACKET |
Install the No. 1 exhaust pipe support bracket with the bolt.
- Torque:
- 21 N*m{ 214 kgf*cm , 15 ft.*lbf }
| 28. INSTALL FRONT AXLE ASSEMBLY LH |
Align the matchmarks and install the front drive shaft assembly to the front axle hub sub-assembly.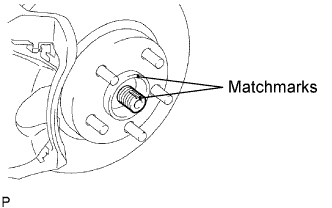
- NOTICE:
- Be careful not to damage the drive shaft boot and speed sensor rotor.
| 29. INSTALL FRONT AXLE ASSEMBLY RH |
- HINT:
- Use the same procedures as described for the LH side.
| 30. INSTALL FRONT SUSPENSION LOWER NO. 1 ARM LH |
Install the lower ball joint to the front suspension lower No. 1 arm with the bolt and 2 nuts.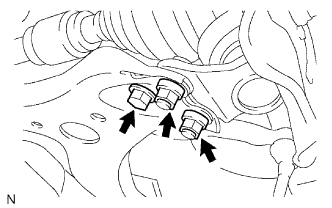
- Torque:
- 75 N*m{ 765 kgf*cm , 55 ft.*lbf }
| 31. INSTALL FRONT SUSPENSION LOWER NO. 1 ARM RH |
- HINT:
- Use the same procedures as described for the LH side.
| 32. INSTALL TIE ROD END SUB-ASSEMBLY LH |
Install the tie rod end sub-assembly to the steering knuckle with the nut.
- Torque:
- 49 N*m{ 500 kgf*cm , 36 ft.*lbf }
Install a new cotter pin.
- NOTICE:
- If the holes for the cotter pin are not aligned, tighten the nut up to 60° further.
| 33. INSTALL TIE ROD END SUB-ASSEMBLY RH |
- HINT:
- Use the same procedures as described for the LH side.
| 34. INSTALL FRONT SPEED SENSOR LH |
Install the front speed sensor to the steering knuckle with the bolt.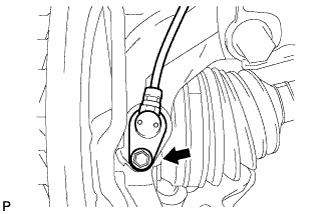
- Torque:
- 8.0 N*m{ 82 kgf*cm , 71 in.*lbf }
- NOTICE:
- Prevent foreign matter from adhering to the speed sensor.
- Be careful not to damage the speed sensor.
- Prevent foreign matter from adhering to the speed sensor.
Install the flexible hose and the speed sensor to the shock absorber with the bolt and set the sensor clip on the knuckle.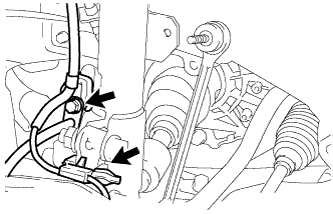
- Torque:
- 19 N*m{ 192 kgf*cm , 14 ft.*lbf }
- NOTICE:
- Be careful not to damage the speed sensor.
- Prevent foreign matter from adhering to the speed sensor.
- Do not twist the sensor wire when installing the speed sensor.
- Be careful not to damage the speed sensor.
| 35. INSTALL FRONT SPEED SENSOR RH |
- HINT:
- Use the same procedures as described for the LH side.
| 36. INSTALL FRONT STABILIZER LINK ASSEMBLY LH |
Install the stabilizer link assembly with the nut.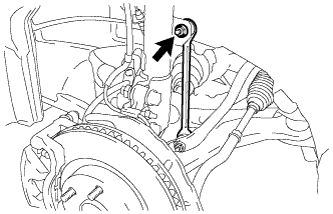
- Torque:
- 74 N*m{ 755 kgf*cm , 55 ft.*lbf }
- HINT:
- If the ball joint turns together with the nut, use a hexagon wrench (6 mm) to hold the stud.
| 37. INSTALL FRONT STABILIZER LINK ASSEMBLY RH |
- HINT:
- Use the same procedures as described for the LH side.
| 38. INSTALL FRONT AXLE HUB NUT LH |
Using a socket wrench (30 mm), install a new axle hub nut.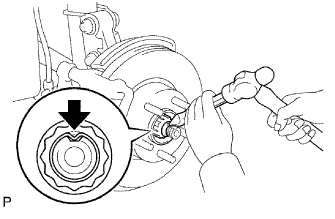
- Torque:
- 294 N*m{ 3,000 kgf*cm , 217 ft.*lbf }
Using a chisel and hammer, stake the front axle hub nut.
| 39. INSTALL FRONT AXLE HUB NUT RH |
- HINT:
- Use the same procedures as described for the LH side.
| 40. INSTALL EXHAUST FRONT PIPE ASSEMBLY |
Install 2 new gaskets to the exhaust front pipe.
Install the exhaust front pipe to the exhaust manifolds with the 2 nuts and 2 bolts.
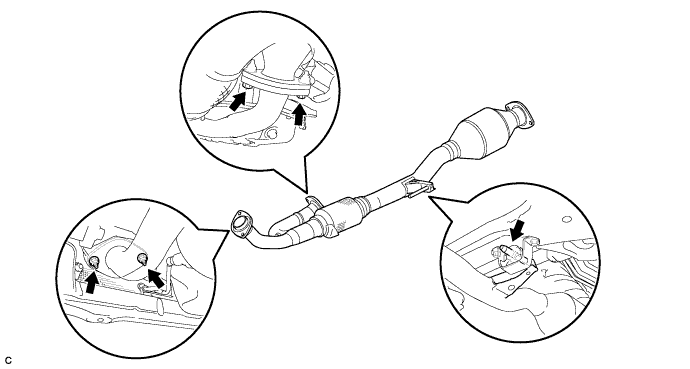
- Torque:
- 62 N*m{ 632 kgf*cm , 46 ft.*lbf }
| 41. INSTALL FRONT EXHAUST PIPE NO. 1 SUPPORT BRACKET |
Install the front support brackets with the 2 nuts.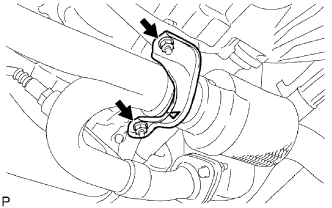
- Torque:
- 33 N*m{ 337 kgf*cm , 24 ft.*lbf }
- NOTICE:
- Be sure to install the support brackets in the correct direction.
| 42. CONNECT NO. 1 OIL RESERVOIR TO PUMP HOSE |
Connect the No. 1 oil reservoir to pump hose.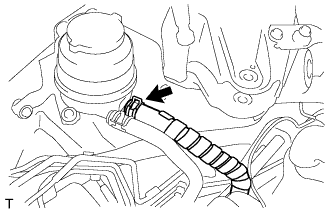
| 43. CONNECT RETURN TUBE SUB-ASSEMBLY |
Connect the return tube sub-assembly.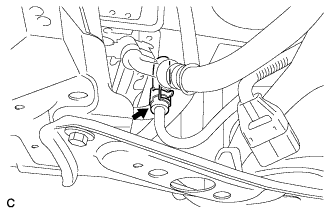
| 44. CONNECT FUEL TUBE SUB-ASSEMBLY |
Push in the fuel tube connector to the fuel pipe until the connector makes a "click" sound.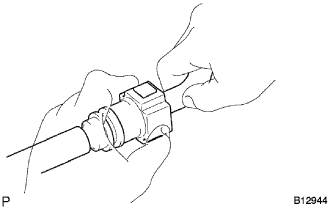
- NOTICE:
- Check for damage or contamination on the connected part of the pipe.
- Check if the pipe and the connector are securely connected by trying to pull them apart.
- Check for damage or contamination on the connected part of the pipe.
Install the No. 1 fuel pipe clamp.
| 45. CONNECT TRANSMISSION CONTROL CABLE ASSEMBLY |
Connect the cable to the transaxle with the clip and nut.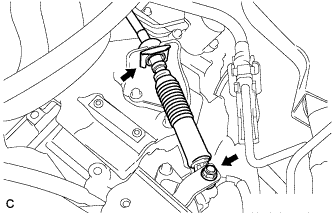
- Torque:
- 13 N*m{ 130 kgf*cm , 9 ft.*lbf }
| 46. CONNECT ENGINE WIRE |
Install the clamp to the bracket with the bolt.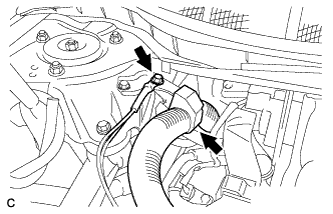
- Torque:
- 8.4 N*m{ 85 kgf*cm , 74 in.*lbf }
Install the 2 clamps to the body with the 2 bolts.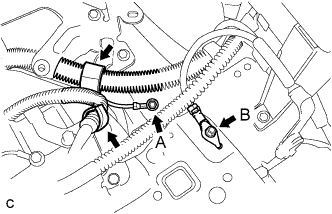
- Torque:
- Bolt A:
- 12 N*m{ 123 kgf*cm , 9 ft.*lbf }
- Bolt B:
- 8.4 N*m{ 85 kgf*cm , 74 in.*lbf }
Connect the engine wire connectors to the engine room junction block. Then, install it with the nut.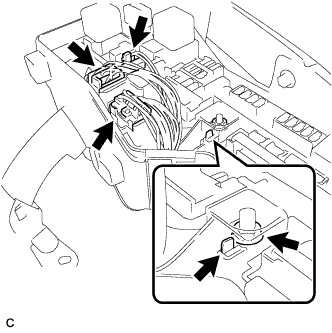
- Torque:
- 8.4 N*m{ 85 kgf*cm , 74 in.*lbf }
| 47. INSTALL RELAY BLOCK COVER UPPER |
| 48. INSTALL ECM |
Install the ECM bracket with the 4 screws.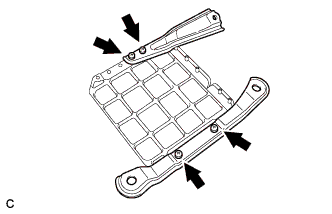
- Torque:
- 3.0 N*m{ 31 kgf*cm , 27 in.*lbf }
Connect the 2 connectors.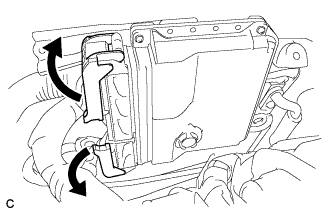
Install the ECM with the 3 nuts.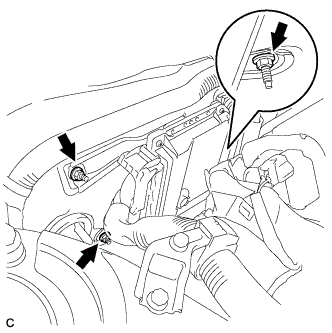
- Torque:
- 8.0 N*m{ 82 kgf*cm , 71 in.*lbf }
| 49. CONNECT HEATER WATER HOSE INLET |
Connect the heater inlet water hose.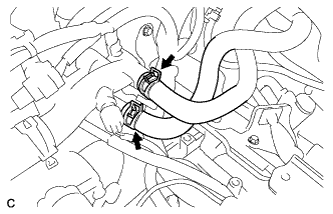
| 50. CONNECT HEATER WATER HOSE OUTLET |
Connect the heater outlet water hose.
| 51. CONNECT NO. 1 OIL COOLER INLET HOSE |
Connect the No. 1 oil cooler inlet hose to the radiator assembly.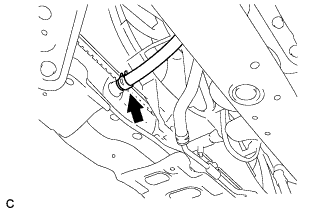
| 52. CONNECT NO. 1 OIL COOLER OUTLET HOSE |
Connect the No. 1 oil cooler outlet hose to the radiator assembly.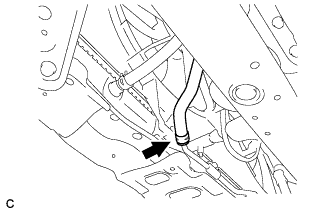
| 53. INSTALL RADIATOR INLET HOSE |
Connect the radiator inlet hose to the radiator assembly.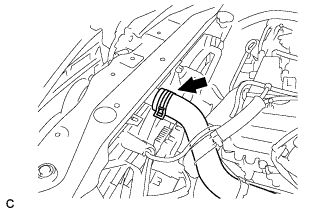
| 54. INSTALL RADIATOR OUTLET HOSE |
Connect the radiator outlet hose to the radiator assembly.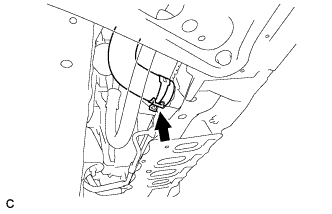
| 55. CONNECT CHECK VALVE TO BRAKE BOOSTER HOSE |
Connect the check valve to brake booster hose with the clamp.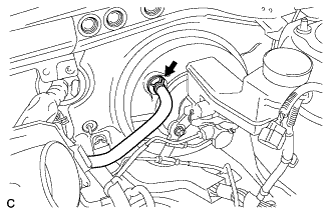
| 56. CONNECT NO. 1 FUEL VAPOR FEED HOSE |
Connect the No. 1 fuel vapor feed hose with the clamp.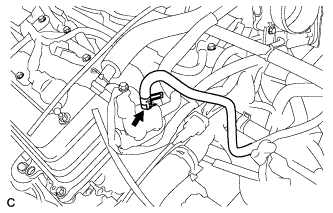
| 57. INSTALL ENGINE MOVING CONTROL ROD SUB-ASSEMBLY |
Temporarily install the engine moving control rod with the 4 bolts.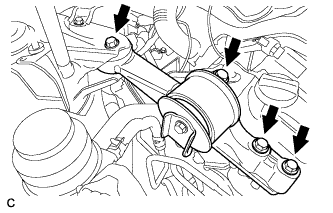
Tighten the 4 bolts.
- Torque:
- 38 N*m{ 388 kgf*cm , 28 ft.*lbf }
| 58. INSTALL NO. 2 B ENGINE MOUNTING STAY RH |
Temporarily install the No. 2 B engine mounting stay RH with the bolt and 2 nuts.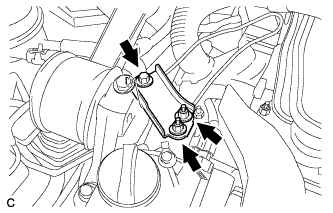
Tighten the bolt and 2 nuts.
- Torque:
- Bolt:
- 38 N*m{ 388 kgf*cm , 28 ft.*lbf }
- Nut:
- 23 N*m{ 235 kgf*cm , 17 ft.*lbf }
| 59. INSTALL INTAKE AIR RESONATOR SUB-ASSEMBLY |
Install the intake air resonator with the bolt and clip.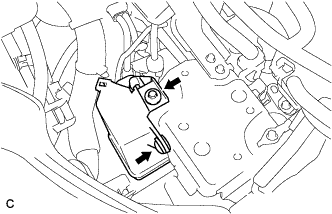
- Torque:
- 5.0 N*m{ 51 kgf*cm , 44 in.*lbf }
| 60. INSTALL BATTERY |
Install the battery and battery tray.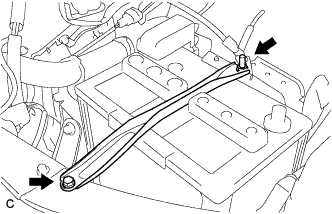
Install the battery clamp with the bolt and nut.
- Torque:
- Bolt:
- 9.0 N*m{ 92 kgf*cm , 80 in.*lbf }
- Nut:
- 3.5 N*m{ 36 kgf*cm , 31 in.*lbf }
| 61. INSTALL NO. 1 AIR CLEANER INLET |
Install the No. 1 air cleaner inlet with the bolt.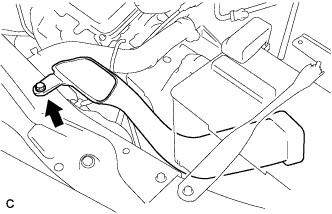
- Torque:
- 5.0 N*m{ 51 kgf*cm , 44 in.*lbf }
| 62. INSTALL AIR CLEANER CASE SUB-ASSEMBLY |
Install the air cleaner case with the 3 bolts.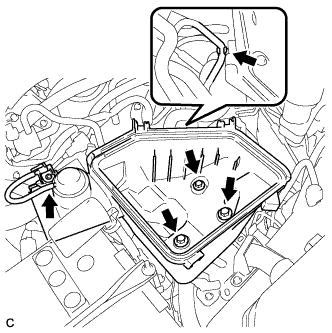
- Torque:
- 5.0 N*m{ 51 kgf*cm , 44 in.*lbf }
Connect the vacuum hose and hose clamp.
| 63. INSTALL AIR CLEANER CAP SUB-ASSEMBLY |
Install the air cleaner cap sub-assembly, and connect the 3 bands.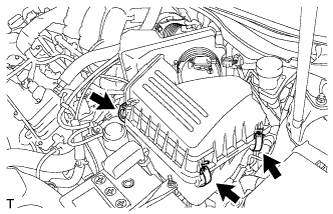
Connect the mass air flow meter connector (*1).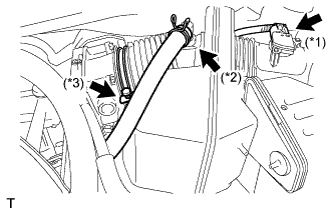
Connect the No. 2 ventilation hose (*2).
Connect the hose band (*3).
Connect the 3 vacuum hoses.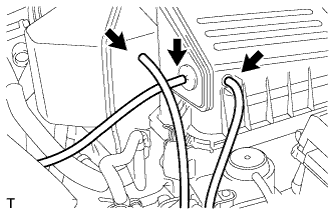
| 64. INSTALL AIR CLEANER INLET ASSEMBLY |
Install the air cleaner inlet with the clamp and 2 bolts.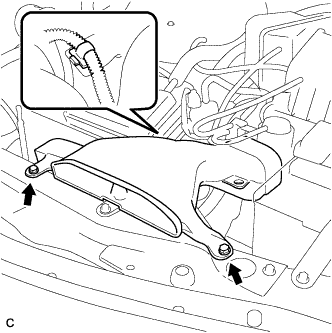
- Torque:
- 5.0 N*m{ 51 kgf*cm , 44 in.*lbf }
| 65. CONNECT VACUUM HOSES |
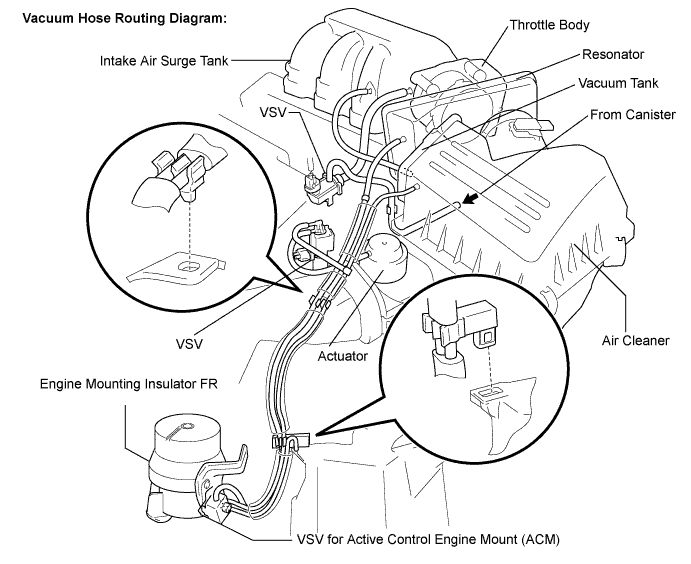
| 66. INSTALL V-RIBBED BELT |
Install the V-ribbed belt.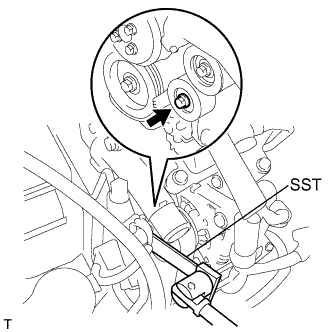
Using SST, turn the belt tensioner counterclockwise and remove the bar.
- SST
- 09249-63010
If it is difficult to install the V-ribbed belt, perform the following procedure: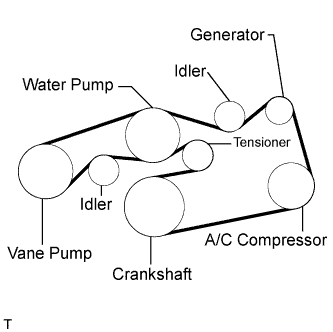
Put the V-ribbed belt on every pulley except the tensioner pulley as shown in the illustration.
While releasing the belt tension by turning the belt tensioner counterclockwise, put the V-ribbed belt on the tensioner pulley.
- NOTICE:
- Put the backside of the V-ribbed belt on the tensioner pulley and idler pulley.
- Check that the V-ribbed belt is properly set to each pulley.
- Put the backside of the V-ribbed belt on the tensioner pulley and idler pulley.
After installing the V-ribbed belt, check that it fits properly in the ribbed grooves. Confirm that the belt has not slipped out of the grooves on the bottom of the crank pulley by hand.
| 67. INSTALL COWL TOP OUTER FRONT PANEL SUB-ASSEMBLY |
Install the cowl top outer front panel sub-assembly with the 4 nuts, the 4 bolts and the clamp.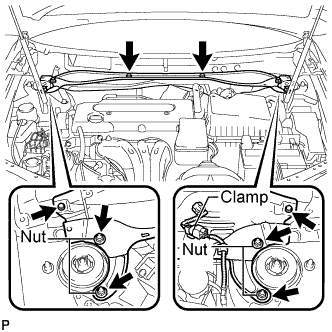
- Torque:
- Nut:
- 85 N*m{ 867 kgf*cm , 63 ft.*lbf }
- Bolt:
- 5.0 N*m{ 51 kgf*cm , 44 in.*lbf }
| 68. INSTALL WINDSHIELD WIPER MOTOR AND LINK ASSEMBLY |
- HINT:
- (Click here)
| 69. INSTALL FRONT WHEELS |
- Torque:
- 103 N*m{ 1,050 kgf*cm , 76 ft.*lbf }
| 70. CONNECT CABLE TO NEGATIVE BATTERY TERMINAL |
- Torque:
- 6.9 N*m{ 70 kgf*cm , 61 in.*lbf }
| 71. ADD ENGINE COOLANT |
Close the radiator drain cock plug and 2 cylinder block drain cock plugs.
- Torque:
- 13 N*m{ 130 kgf*cm , 9 ft.*lbf } for cylinder block drain cock plug
Slowly fill the radiator with TOYOTA Super Long Life Coolant (SLLC).
- Specified capacity:
- 9.0 liters (9.5 US qts, 7.9 lmp. qts)
- HINT:
- TOYOTA vehicles are filled with TOYOTA SLLC at the factory. In order to avoid damage to the engine cooling system and other technical problems, only use TOYOTA SLLC or similar high quality ethylene glycol based non-silicate, non-amine, non-nitrite, non-borate coolant with long-life hybrid organic acid technology (coolant with long-life hybrid organic acid technology consists of a combination of low phosphates and organic acids).
- TOYOTA vehicles are filled with TOYOTA SLLC at the factory. In order to avoid damage to the engine cooling system and other technical problems, only use TOYOTA SLLC or similar high quality ethylene glycol based non-silicate, non-amine, non-nitrite, non-borate coolant with long-life hybrid organic acid technology (coolant with long-life hybrid organic acid technology consists of a combination of low phosphates and organic acids).
- Contact your TOYOTA dealer for further details.
- Contact your TOYOTA dealer for further details.
Slowly pour coolant into the radiator reservoir tank until it reaches the FULL line.
Press the inlet and outlet radiator hoses several times by hand, and then check the level of the coolant.
If the coolant level is low, add coolant.
Install the radiator cap sub-assembly and reservoir tank cap.
Start the engine, and warm it up.
- HINT:
- Adjust the air conditioner set temperature to MAX (HOT).
Stop the engine, and wait until the engine coolant cools down.
Add engine coolant to the FULL line on the radiator reservoir.
| 72. ADD AUTOMATIC TRANSAXLE FLUID |
- HINT:
- (Click here)
| 73. ADD POWER STEERING FLUID |
| 74. BLEED POWER STEERING SYSTEM |
Check the fluid level (Click here).
Jack up the front of the vehicle and support it with stands.
Turn the steering wheel.
With the engine stopped, turn the steering wheel slowly from lock to lock several times.
Lower the vehicle.
Start the engine.
Run the engine at idle for a few minutes.
Turn the steering wheel.
With the engine idling, turn the steering wheel to the left or right to the full lock position and keep it in that position for 2 to 3 seconds, then turn the steering wheel to the opposite full lock position and keep it there for 2 to 3 seconds.
Repeat this procedure several times.
Stop the engine.
Check for foaming or emulsification.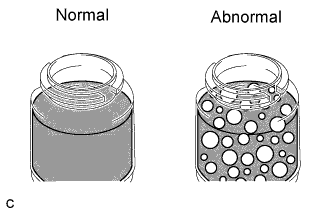
- HINT:
- If the system has to be bled twice because of forming or emulsification, be sure to check for fluid leaks in the system.
Check the fluid level (Click here).
| 75. INSPECT FOR FUEL LEAK |
Check fuel pump operation.
Connect the intelligent tester to the DLC3.
Turn the ignition switch on (IG) and push the intelligent tester main switch on.
- NOTICE:
- Do not start the engine.
Select the following menus: Powertrain / Engine / Active Test / Control the Fuel Pump /Speed.
Check for pressure in the fuel inlet tube from the fuel line. Check that sound of fuel flowing in the fuel tank can be heard. If no sound can be heard, check the engine room J/B (C/OPN relay), fuel pump, ECM and wiring connector.
Check for fuel leaks.
Check that there are no fuel leaks anywhere on the system after performing maintenance. If there is a fuel leak, repair or replace parts if necessary.
Turn the ignition switch off.
Disconnect the intelligent tester from the DLC3.
| 76. INSPECT FOR COOLANT LEAK |
- CAUTION:
- Do not remove the radiator cap while the engine and radiator are still hot. Pressurized, hot engine coolant and steam may be released and cause serious burns.
- NOTICE:
- Before performing each inspection, turn the A/C switch OFF.
Fill the radiator with coolant and attach a radiator cap tester.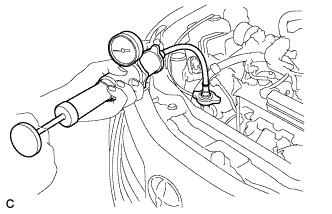
Warm up the engine.
Using a radiator cap tester, increase the pressure inside the radiator to 118 kPa (1.2 kgf/cm2, 17 psi), and check that the pressure does not drop.
If the pressure drops, check the hoses, radiator and water pump for leaks. If no external leaks are found, check the heater core, cylinder block and cylinder head.
| 77. INSPECT FOR EXHAUST GAS LEAK |
| 78. INSPECT SHIFT LEVER POSITION |
When shifting from the P to the R position with the ignition switch on (IG) and the brake pedal depressed, make sure that the shift lever moves smoothly and moves correctly into position.
Start the engine and make sure that the vehicle moves forward when shifting from the N to the D position and moves rearward when shifting to the R position.
If operation cannot be done as specified, inspect the park/neutral position switch assembly and check the shift lever assembly installation condition.
| 79. INSPECT AND ADJUST FRONT WHEEL ALIGNMENT |
- HINT:
- (Click here)
| 80. INSPECT IGNITION TIMING |
Warm up the engine.
When using the intelligent tester: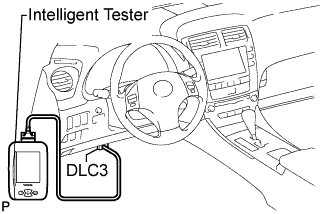
Check the ignition timing.Connect the intelligent tester to the DLC3.
Enter DATA LIST mode with the intelligent tester.
- Ignition timing:
- 7 to 24° BTDC at idle
- HINT:
- Refer to the intelligent tester operator's manual for help when selecting the DATA LIST.
When not using the intelligent tester: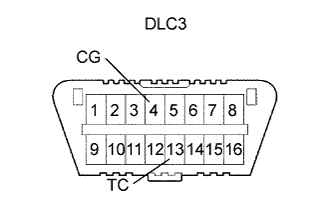
Check the ignition timing.Using SST, connect terminals 13 (TC) and 4 (CG) of the DLC3.
- SST
- 09843-18040
- NOTICE:
- Confirm the terminals before connecting them. Connecting the wrong terminals may result in damage to electrical components.
- Turn off all electrical systems before connecting the terminals.
- Perform this inspection after the cooling fan motor is turned off.
- Confirm the terminals before connecting them. Connecting the wrong terminals may result in damage to electrical components.
Remove the V-bank cover sub-assembly. (Click here)
Pull out the red lead wire harness.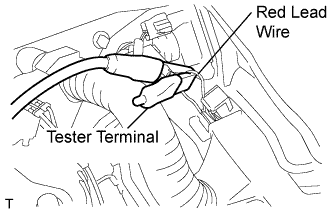
Connect the tester terminal of the timing light to the red lead wire as shown in the illustration.
- NOTICE:
- Use a timing light which can detect the first signal.
Check the ignition timing at idle.
- Ignition timing:
- 8 to 12° BTDC at idle
- NOTICE:
- When checking the ignition timing, the transmission should be in neutral.
- HINT:
- Run the engine at 1,000 to 1,300 rpm for 5 seconds, and then check that the engine rpm returns to idle speed.
Disconnect terminals 13 (TC) and 4 (CG) of the DLC3.
Check the ignition timing at idle.
- Ignition timing:
- 7 to 24° BTDC at idle
Confirm that the ignition timing moves to the advanced angle side when the engine rpm is increased.
Remove the timing light.
Install the V-bank cover sub-assembly. (Click here)
| 81. INSPECT ENGINE IDLE SPEED |
Warm up the engine.
When using the intelligent tester:
Check the idle speed.Connect the intelligent tester to the DLC3.
Enter DATA LIST mode with the intelligent tester.
- Idle speed:
- 550 to 650 rpm
- NOTICE:
- When checking the idle speed, the transmission should be in neutral.
- Check the idle speed with the cooling fan off.
- Switch off all accessories and air conditioning before connecting the intelligent tester.
- When checking the idle speed, the transmission should be in neutral.
- HINT:
- Refer to the intelligent tester operator's manual for further details.
When not using the intelligent tester: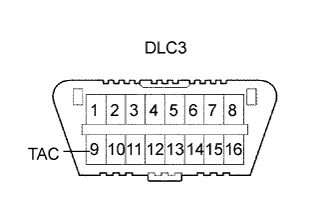
Check the idle speed.Using SST, connect the tachometer test probe to terminal 9 (TAC) of the DLC3.
- SST
- 09843-18030
Check the idle speed.
- Idle speed:
- 550 to 600 rpm
| 82. INSPECT CO/HC |
Start the engine.
Run the engine at 2,500 rpm for approximately 180 seconds.
Insert the CO/HC meter testing probe at least 40 cm (1.3 ft) into the tailpipe during idling.
Check CO/HC concentration at idle and/or 2,500 rpm.
- HINT:
- Check regulations and restrictions in your area when performing 2 mode CO/HC concentration testing (engine check both at idle speed and at 2,500 rpm).
- If the CO/HC concentration does not comply with regulations, perform troubleshooting in the order given below.
Check A/F sensor and heated oxygen sensor operation.
See the table below for possible causes, and then inspect and repair.
CO
HC
Problems
Causes
Normal
High
Rough idle
- Faulty ignition:
- Incorrect timing
- Fouled, shorted or improperly gapped plugs
- Incorrect valve clearance
- Leaks in intake and exhaust valves
- Leaks in cylinders
Low
High
Rough idle
(fluctuating HC reading)
- Vacuum leaks:
- PCV hoses
- Intake manifold
- Throttle body
- Brake booster line
- Lean mixture causing misfire
High
High
Rough idle
(black smoke from exhaust)
- Restricted air filter
- Plugged PCV valve
- Faulty SFI system:
- Faulty fuel pressure regulator
- Defective ECT sensor
- Defective MAF meter
- Faulty ECM
- Faulty injectors
- Faulty throttle position sensor
- Faulty ignition:
| 83. INSPECT THROTTLE BODY |
Inspect the throttle control motor for operating sounds.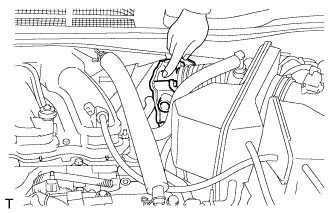
Turn the ignition switch on (IG).
When turning the accelerator pedal position sensor lever, check for running sounds of the motor. The motor should be running smoothly without friction sounds.
If operation is not as specified, check the throttle control motor, wiring and ECM (Click here).
Inspect the throttle position sensor.
Connect the intelligent tester to the DLC3.
Turn the ignition switch on (IG).
Check that the MIL is off.
Check that, under the CURRENT DATA, THROTTLE POS (throttle valve opening percentage) is within the standard range below.
- Standard throttle valve opening percentage:
- 60 % or more
| 84. INSTALL FRONT FENDER APRON SEAL RH |
| 85. INSTALL ENGINE UNDER COVER LH |
| 86. INSTALL ENGINE UNDER COVER RH |
| 87. INSTALL V-BANK COVER SUB-ASSEMBLY |
Fit the 3 retainers and install the V-bank cover.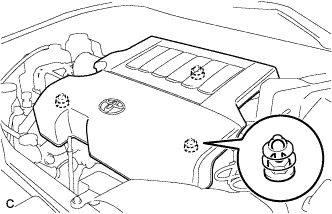
| 88. INSTALL COOL AIR INTAKE DUCT SEAL |
Install the intake duct seal with the 7 clips.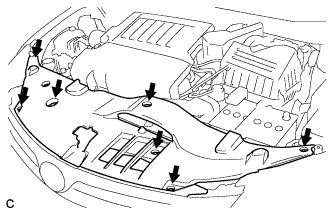
| 89. INSPECT ABS SPEED SENSOR SIGNAL |
VSC: (Click here)