2006-2011 Camry Aurion · Service Manual BODY ELECTRICAL

REMOVAL

Removal / installation · Vehicles built Jun 2006 – Sep 2006

Versions by build date: Jun 2006 – Sep 2006 Oct 2006 – May 2009 from Jun 2009


1. PRECAUTION
(Click here)

2. PLACE FRONT WHEELS FACING STRAIGHT AHEAD

3. DISCONNECT CABLE FROM NEGATIVE BATTERY TERMINAL

CAUTION:
Wait for 90 seconds after disconnecting the cable to prevent airbag deployment (Click here).


4. REMOVE FRONT DOOR SCUFF PLATE LH

  1. B132067
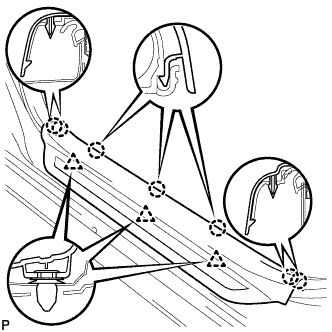
    Disengage the 7 claws and 3 clips, and remove the front door scuff plate LH.


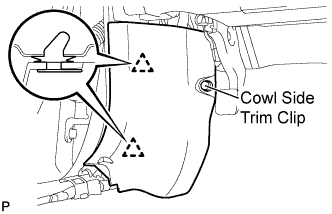
5. REMOVE COWL SIDE TRIM SUB-ASSEMBLY LH

  1. B132116E01
    Remove the cowl side trim clip.

  1. Disengage the 2 clips and remove the cowl side trim sub-assembly LH.


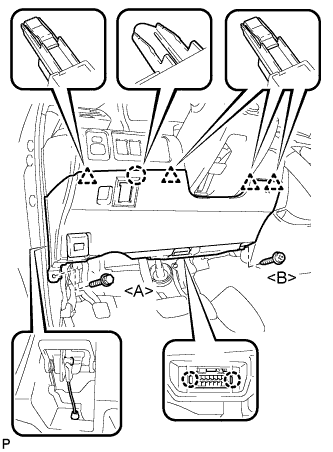
6. REMOVE LOWER NO. 1 INSTRUMENT PANEL FINISH PANEL

  1. B147264E01
    Remove the bolt <A> and the screw <B>.

  1. Disengage the 2 claws and the DLC3.

  1. Disconnect the hood lock control cable assembly.

  1. Disengage the claw and the 4 clips.

  1. Remove the air hose, disconnect the connector, and then remove the lower No. 1 instrument panel finish panel.


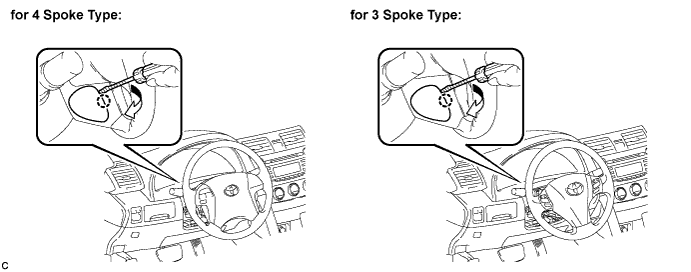
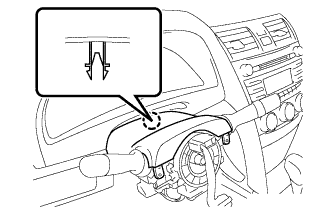
7. REMOVE LOWER NO. 3 STEERING WHEEL COVER

  1. Using a screwdriver, disengage the claw and remove the No. 3 lower steering wheel cover.

    C146012E01

    HINT:
    Tape up the screwdriver tip before use.


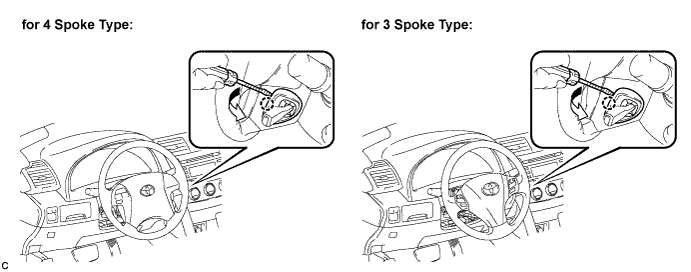
8. REMOVE LOWER NO. 2 STEERING WHEEL COVER

  1. Using a screwdriver, disengage the claw and remove the No. 2 lower steering wheel cover.

    C146013E01

    HINT:
    Tape up the screwdriver tip before use.


9. REMOVE STEERING PAD

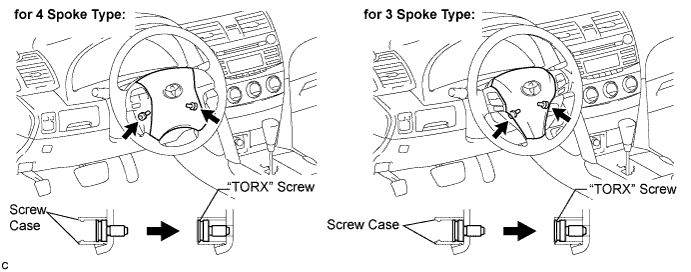
  1. Using a "TORX" socket (T30), loosen the 2 "TORX" screws until the groove along the screw circumference catches on the screw case.

    C146014E01

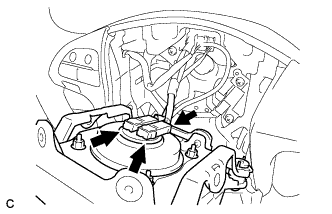
  1. C133859E01
    Pull out the steering pad from the steering wheel assembly and support the steering pad with one hand.

    NOTICE:
    When removing the steering pad, do not pull the airbag wire harness.

  1. Disconnect the horn connector from the steering pad.

  1. Disconnect the 2 airbag connectors and remove the steering pad.

    NOTICE:
    When handling the airbag connector, take care not to damage the airbag wire harness.


10. REMOVE STEERING WHEEL ASSEMBLY
  1. Remove the steering wheel assembly set nut.

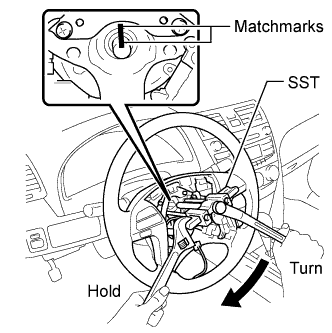
  1. Put matchmarks on the steering wheel assembly and the steering main shaft.

  1. Disconnect the connectors from the spiral cable.

  1. C145839E01
    Using SST, remove the steering wheel assembly.
    SST
    09950-50013   (09951-05010, 09952-05010, 09953-05020, 09954-05031)


11. REMOVE LOWER STEERING COLUMN COVER

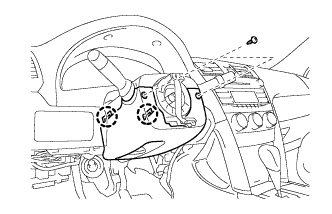
  1. C145841
    Remove the 2 screws.

  1. Disengage the 2 claws to remove the lower steering column cover.


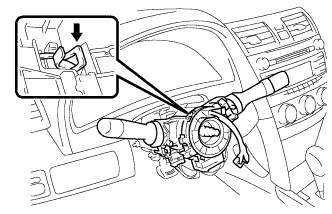
12. REMOVE UPPER STEERING COLUMN COVER

  1. C145842
    Disengage the claw to remove the upper steering column cover.


13. REMOVE TURN SIGNAL SWITCH ASSEMBLY WITH SPIRAL CABLE SUB-ASSEMBLY
  1. Disconnect the connectors from the turn signal switch assembly with spiral cable sub-assembly.

  1. C145843
    Using pliers, grip the claws of the clip and remove the turn signal switch assembly with spiral cable sub-assembly.


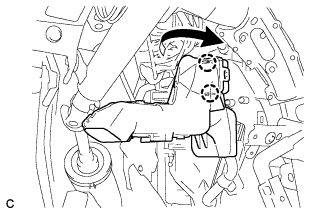
14. REMOVE NO. 1 AIR DUCT

  1. C132547E01
    Disengage the 2 claws and remove the No. 1 air duct.


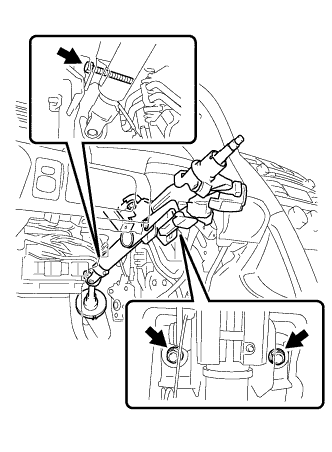
15. REMOVE STEERING COLUMN ASSEMBLY
  1. Disconnect the connectors and disengage the wire harness clamps from the steering column assembly.

  1. C145844E01
    Remove the bolt, 2 nuts, and the steering column assembly.


16. REMOVE TRANSPONDER KEY AMPLIFIER

  1. C115569
    Using a screwdriver, widen the claws hanging onto the upper bracket by approximately 1.0 mm (0.039 in.).

  1. Pull out the transponder key amplifier with the claw open.

    NOTICE:
    Using excessive force may damage the case.


17. REMOVE STEERING COLUMN UPPER WITH SWITCH BRACKET ASSEMBLY
  1. Secure the steering column assembly in a vise.

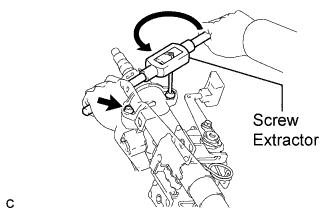
  1. Using a center punch, mark the center of the 2 tapered-head bolts.

  1. Using a 3 to 4 mm (0.12 to 0.16 in.) diameter drill bit, drill a hole in the 2 tapered-head bolts.

  1. C143940E01
    Using a screw extractor, remove the 2 tapered-head bolts, and then remove the steering column upper with switch bracket assembly and the steering lock bracket from the steering column assembly.


18. REMOVE IGNITION SWITCH LOCK CYLINDER ASSEMBLY
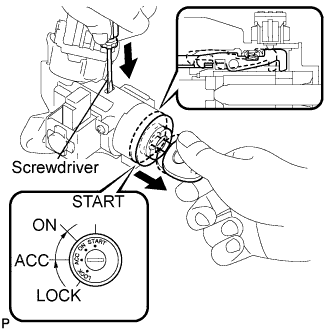
  1. Turn the ignition switch lock cylinder assembly to the ACC position.

  1. C105482E03
    Insert a screwdriver into the hole of the steering column upper with switch bracket assembly as shown in the illustration. Pull the ignition switch lock cylinder assembly until its claw contacts the stopper of the steering column upper with switch bracket assembly.

    NOTICE:
    Make sure to pull the ignition switch lock cylinder assembly until its claw contacts the stopper of the steering column bracket assembly upper. Failure to do so will affect later work operations.

  1. C105483E03
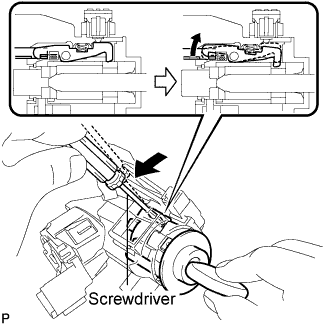
    Insert a screwdriver into the hole of the steering column upper with switch bracket assembly. Push the screwdriver downward as shown in the illustration to disengage the claw of the ignition switch lock cylinder assembly, and pull out the ignition switch lock cylinder assembly.


19. REMOVE UNLOCK WARNING SWITCH ASSEMBLY

  1. C104851E03
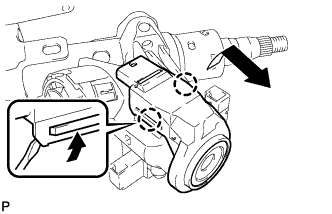
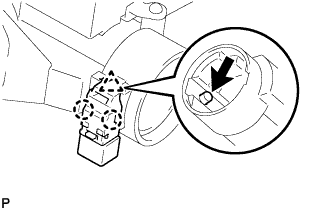
    Remove the unlock warning switch assembly by pushing up the center part and releasing the 2 claws.

← COMPONENTS (from Jun 2006)REMOVAL (Oct 2006 – May 2009) →