INSTALLATION
Removal / installation · Vehicles built from Jun 2009
Versions by build date: Oct 2006 – May 2009 from Jun 2009
| 1. INSTALL COMPRESSOR AND MAGNETIC CLUTCH |

Install the compressor and magnetic clutch with the 4 bolts.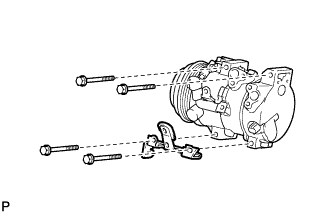

- Torque:
- 25 N*m{ 255 kgf*cm , 18 ft.*lbf }
- NOTICE:
- Tighten the bolts in the order shown in the illustration to install the compressor and magnetic clutch.
| 2. INSTALL NO. 1 COOLER REFRIGERANT SUCTION HOSE |
Remove the attached vinyl tape from the hose.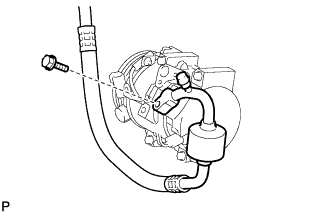
Apply sufficient compressor oil to a new O-ring and the fitting surface of the compressor and magnetic clutch.
- Compressor oil:
- ND-OIL 8 or equivalent
Install the O-ring onto the No. 1 cooler refrigerant suction hose.
Install the No. 1 cooler refrigerant suction hose onto the compressor and magnetic clutch with the bolt.
- Torque:
- 9.8 N*m{ 100 kgf*cm , 87 in.*lbf }
| 3. INSTALL NO. 1 COOLER REFRIGERANT DISCHARGE HOSE |
Remove the attached vinyl tape from the hose.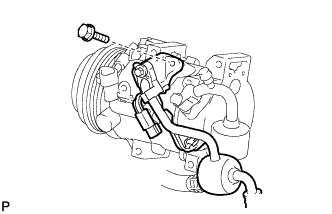
Apply sufficient compressor oil to a new O-ring and the fitting surface of the compressor and magnetic clutch.
- Compressor oil:
- ND-OIL 8 or equivalent
Install the O-ring onto the No. 1 cooler refrigerant discharge hose sub-assembly.
Install the No. 1 cooler refrigerant discharge hose onto the compressor and magnetic clutch with the bolt.
- Torque:
- 9.8 N*m{ 100 kgf*cm , 87 in.*lbf }
| 4. INSTALL PIPING CLAMP |
Install the piping clamp to the No. 1 cooler refrigerant suction hose and No. 1 cooler refrigerant discharge hose.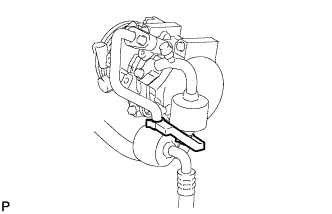
| 5. INSTALL GENERATOR ASSEMBLY |
Install the bracket with the bolt.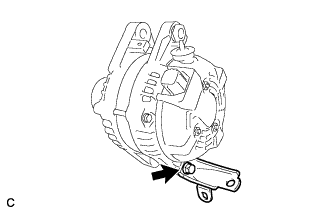
- Torque:
- 20 N*m{ 204 kgf*cm , 15 ft.*lbf }
Install the wire harness clamp stay.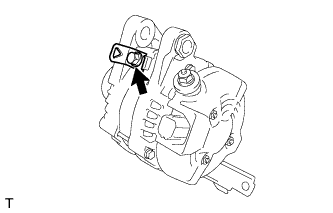
- Torque:
- 8.4 N*m{ 86 kgf*cm , 74 in.*lbf }
Connect the wire harness clamp.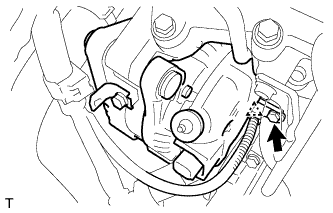
Install the generator assembly to the cylinder block with the bolt.
- Torque:
- 20 N*m{ 204 kgf*cm , 15 ft.*lbf }
Install the 2 bolts.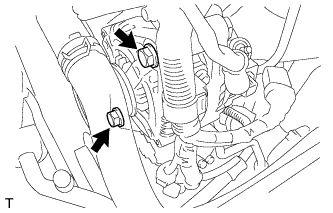
- Torque:
- 43 N*m{ 438 kgf*cm , 32 ft.*lbf }
Connect the generator connector to the generator assembly.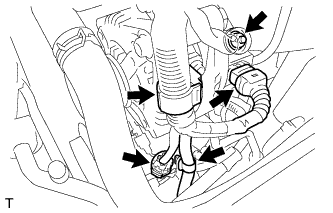
Install the generator wire with the nut.
- Torque:
- 9.8 N*m{ 100 kgf*cm , 87 in.*lbf }
Install the terminal cap.
Connect the 2 wire harness clamps.
Connect the magnetic clutch connector to the compressor and magnetic clutch.
| 6. INSTALL V-RIBBED BELT |
Install the V-ribbed belt.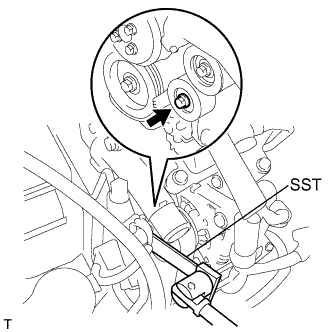
Using SST, turn the belt tensioner counterclockwise and remove the bar.
- SST
- 09249-63010
If it is difficult to install the V-ribbed belt, perform the following procedure: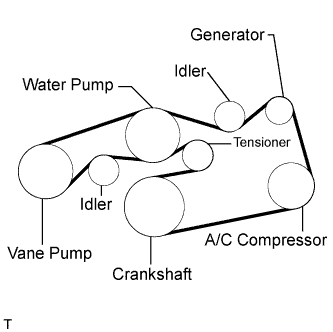
Put the V-ribbed belt on every pulley except the tensioner pulley as shown in the illustration.
While releasing the belt tension by turning the belt tensioner counterclockwise, put the V-ribbed belt on the tensioner pulley.
- NOTICE:
- Put the backside of the V-ribbed belt on the tensioner pulley and idler pulley.
- Check that the V-ribbed belt is properly set to each pulley.
- Put the backside of the V-ribbed belt on the tensioner pulley and idler pulley.
After installing the V-ribbed belt, check that it fits properly in the ribbed grooves. Confirm that the belt has not slipped out of the grooves on the bottom of the crank pulley by hand.
| 7. INSTALL RADIATOR ASSEMBLY |
Install the radiator to the body.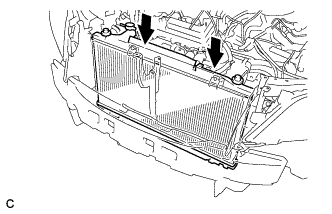
Install the condenser assembly with the 4 bolts.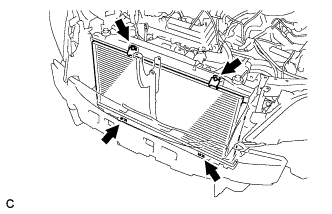
- Torque:
- 5.0 N*m{ 51 kgf*cm , 44 in.*lbf }
| 8. INSTALL FAN SHROUD |
Install the fan assembly with motor to the radiator with the 2 guides at the bottom and 3 snap fits on the top.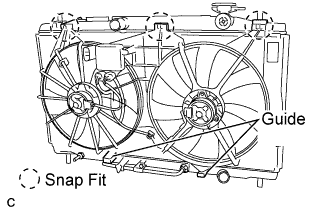
Connect the fan motor connector and 3 clamps.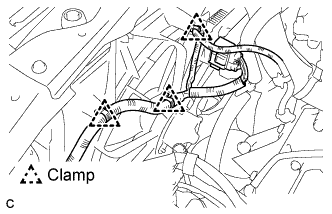
| 9. INSTALL RADIATOR SUPPORT UPPER |
Install the radiator support upper with the 5 bolts.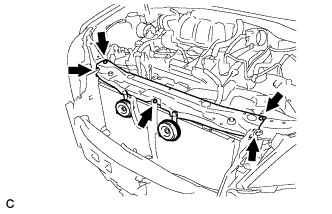
- Torque:
- 7.0 N*m{ 71 kgf*cm , 62 in.*lbf }
Connect the 2 horn connectors.
| 10. CONNECT NO. 1 OIL COOLER OUTLET HOSE |
Connect the No. 1 oil cooler outlet hose to the radiator assembly.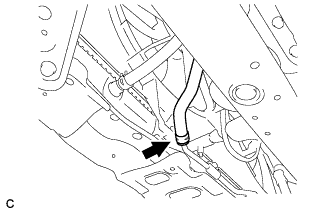
| 11. CONNECT NO. 1 OIL COOLER INLET HOSE |
Connect the No. 1 oil cooler inlet hose to the radiator assembly.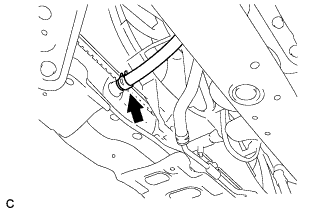
| 12. CONNECT RADIATOR OUTLET HOSE |
Connect the radiator outlet hose to the radiator assembly.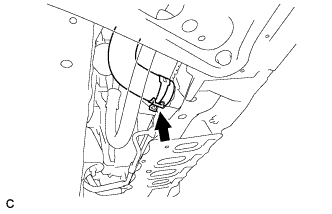
| 13. CONNECT RADIATOR INLET HOSE |
Connect the radiator inlet hose to the radiator assembly.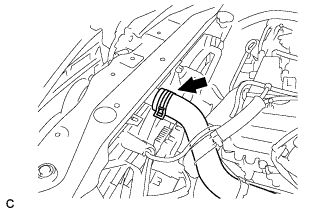
| 14. CONNECT RADIATOR RESERVE TANK HOSE |
Connect the radiator reservoir tank hose to the radiator assembly.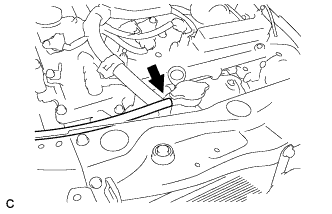
| 15. INSTALL FRONT BUMPER ENERGY ABSORBER |
Install the front bumper energy absorber to the front bumper reinforcement sub-assembly.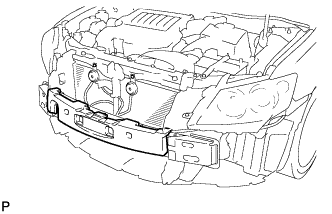
| 16. INSTALL FRONT BUMPER ASSEMBLY |
w/ Clearance Sonar System:
Connect the 2 connectors.
w/ Fog Light:
Connect the 2 connectors.
w/ Headlight Cleaner System:
Connect the 2 connectors.
Connect the headlight cleaner washer hose.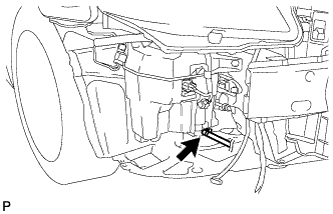
Engage the 2 claws.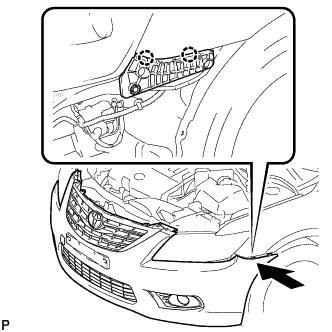
Install the front bumper assembly with the 8 screws, 3 clips and 2 radiator grille protectors.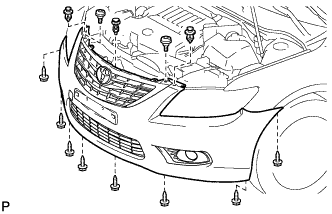
Install the pin hold clip.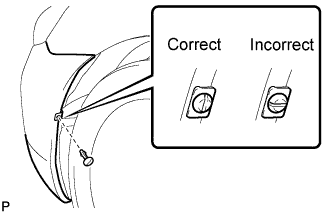
- NOTICE:
- Insert the pin hold clip with the slot aligned vertically. Do not rotate the clip after inserting it. After installation, confirm that the slot is aligned vertical.
- HINT:
- Use the same procedure for the RH side and LH side.
| 17. INSTALL NO. 1 AIR CLEANER INLET |
Install the No. 1 air cleaner inlet with the bolt.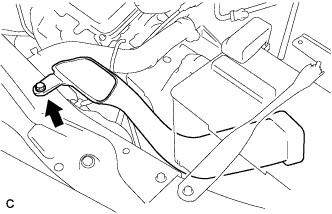
- Torque:
- 5.0 N*m{ 51 kgf*cm , 44 in.*lbf }
| 18. INSTALL AIR CLEANER CAP SUB-ASSEMBLY |
Install the air cleaner cap sub-assembly, and connect the 3 bands.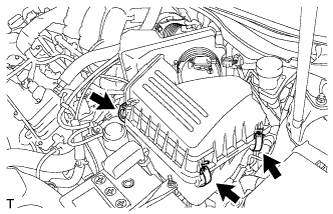
Connect the mass air flow meter connector (*1).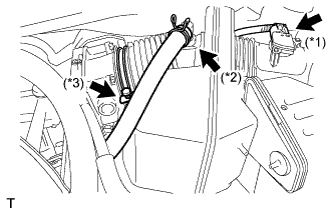
Connect the No. 2 ventilation hose (*2).
Connect the hose band (*3).
Connect the 3 vacuum hoses.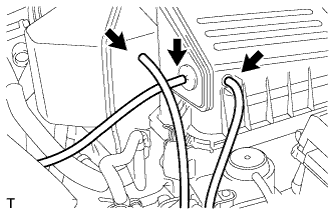
| 19. INSTALL AIR CLEANER INLET ASSEMBLY |
Install the air cleaner inlet with the clamp and 2 bolts.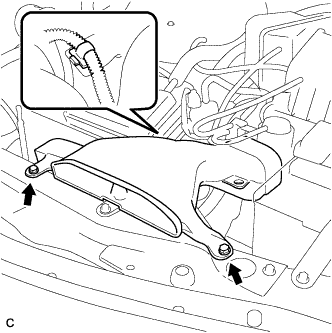
- Torque:
- 5.0 N*m{ 51 kgf*cm , 44 in.*lbf }
| 20. CONNECT BATTERY NEGATIVE TERMINAL |
| 21. ADD ENGINE COOLANT |
Close the radiator drain cock plug and 2 cylinder block drain cock plugs.
- Torque:
- 13 N*m{ 130 kgf*cm , 9 ft.*lbf } for cylinder block drain cock plug
Slowly fill the radiator with TOYOTA Super Long Life Coolant (SLLC).
- Specified capacity:
- 9.0 liters (9.5 US qts, 7.9 lmp. qts)
- HINT:
- TOYOTA vehicles are filled with TOYOTA SLLC at the factory. In order to avoid damage to the engine cooling system and other technical problems, only use TOYOTA SLLC or similar high quality ethylene glycol based non-silicate, non-amine, non-nitrite, non-borate coolant with long-life hybrid organic acid technology (coolant with long-life hybrid organic acid technology consists of a combination of low phosphates and organic acids).
- TOYOTA vehicles are filled with TOYOTA SLLC at the factory. In order to avoid damage to the engine cooling system and other technical problems, only use TOYOTA SLLC or similar high quality ethylene glycol based non-silicate, non-amine, non-nitrite, non-borate coolant with long-life hybrid organic acid technology (coolant with long-life hybrid organic acid technology consists of a combination of low phosphates and organic acids).
- Contact your TOYOTA dealer for further details.
- Contact your TOYOTA dealer for further details.
Slowly pour coolant into the radiator reservoir tank until it reaches the FULL line.
Press the inlet and outlet radiator hoses several times by hand, and then check the level of the coolant.
If the coolant level is low, add coolant.
Install the radiator cap sub-assembly and reservoir tank cap.
Start the engine, and warm it up.
- HINT:
- Adjust the air conditioner set temperature to MAX (HOT).
Stop the engine, and wait until the engine coolant cools down.
Add engine coolant to the FULL line on the radiator reservoir.
| 22. INSPECT FOR COOLANT LEAK |
- CAUTION:
- Do not remove the radiator cap while the engine and radiator are still hot. Pressurized, hot engine coolant and steam may be released and cause serious burns.
- NOTICE:
- Before performing each inspection, turn the A/C switch OFF.
Fill the radiator with coolant and attach a radiator cap tester.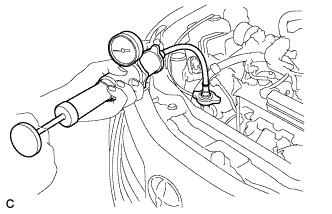
Warm up the engine.
Using a radiator cap tester, increase the pressure inside the radiator to 118 kPa (1.2 kgf/cm2, 17 psi), and check that the pressure does not drop.
If the pressure drops, check the hoses, radiator and water pump for leaks. If no external leaks are found, check the heater core, cylinder block and cylinder head.
| 23. CHARGE WITH REFRIGERANT |
Perform vacuum purging using a vacuum pump.
Charge with refrigerant HFC-134a (R134a).
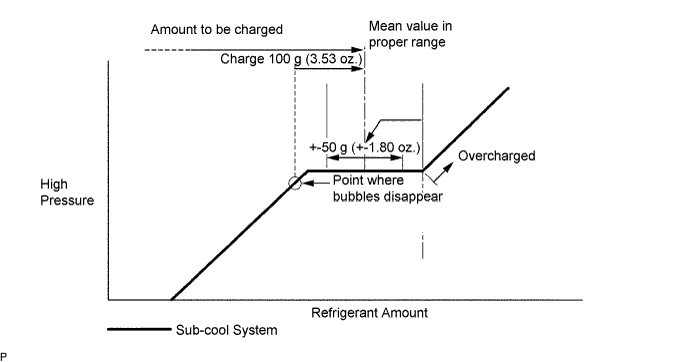
- Standard:
- 450 to 550 g (15.9 to 19.4 oz.)
- SST
- 07110-58060
(07117-58060, 07117-58070, 07117-58080, 07117-58090, 07117-78050, 07117-88060, 07117-88070, 07117-88080)
- NOTICE:
- Do not turn the A/C on before charging with refrigerant. Doing so will cause the cooler compressor to work without refrigerant, resulting in overheating of the cooler compressor.
- Approximately 100 g (3.53 oz.) of refrigerant may need to be charged after bubbles disappear.
The refrigerant amount should be checked by quantity, not with the sight glass.
- Do not turn the A/C on before charging with refrigerant. Doing so will cause the cooler compressor to work without refrigerant, resulting in overheating of the cooler compressor.
- HINT:
- Ensure that sufficient refrigerant is available to recharge the system when using a refrigerant recovery unit. Refrigerant recovery units are not always able to recover 100% of the refrigerant from the A/C system.
| 24. WARM UP ENGINE |
Keep the A/C switch on for at least 2 minutes to warm up the compressor.
- NOTICE:
- Be sure to warm up the compressor when turning the A/C on after removing and installing the cooler refrigerant lines (including the compressor), to prevent damage to the compressor.
| 25. INSPECT FOR REFRIGERANT LEAK |
After recharging with refrigerant gas, inspect for refrigerant gas leak using a halogen leak detector.
Carry out the test under the following conditions:
- IG OFF
- Secure good ventilation (the gas leak detector may react to volatile gases which are not refrigerant, such as evaporated gasoline and exhaust gas).
- Repeat the test 2 or 3 times.
- Make sure that there is some refrigerant remaining in the refrigeration system.
When the compressor is off: approx. 392 to 588 kPa (4 to 6 kgf/cm2, 57 to 85 psi)
- IG OFF
Using a gas leak detector, inspect for refrigerant line leaks.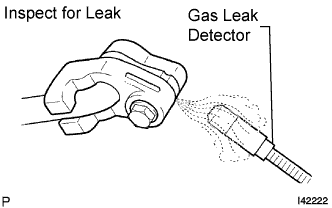
Bring the gas leak detector close to the drain hose with the detector's power off, and then turn the detector on.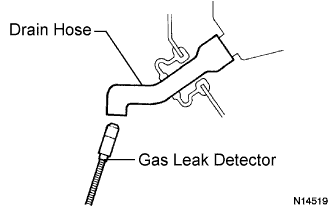
- HINT:
- After the blower motor has stopped, let the cooling unit stand for more than 15 minutes.
- Bring the gas leak detector sensor under the drain hose.
- When bringing the gas leak detector close to the drain hose, make sure that the gas leak detector does not react to volatile gases.
If it is not possible to avoid interference from volatile gases, the vehicle should be lifted up to allow testing.
- After the blower motor has stopped, let the cooling unit stand for more than 15 minutes.
If a gas leak is not detected from the drain hose, remove the blower motor control from the cooling unit. Insert the gas leak detector sensor into the unit and perform the test.
Disconnect the pressure switch connector and leave it for approximately 20 minutes. Bring the gas leak detector close to the pressure switch and perform the test.
| 26. INSTALL V-BANK COVER SUB-ASSEMBLY |
Fit the 3 retainers and install the V-bank cover.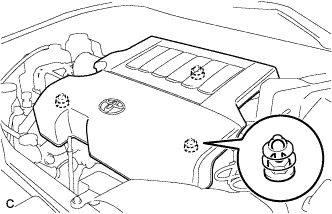
| 27. INSTALL COOL AIR INTAKE DUCT SEAL |
Install the intake duct seal with the 7 clips.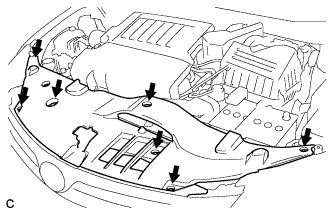
| 28. INSTALL FRONT FENDER APRON SEAL RH |
| 29. INSTALL ENGINE UNDER COVER RH |
| 30. INSTALL ENGINE UNDER COVER LH |
| 31. INSTALL FRONT WHEEL RH |
| 32. VEHICLE PREPARATION FOR FOG LIGHT AIM ADJUSTMENT |
Prepare the vehicle:
- Ensure that there is no damage or deformation to the body around the fog lights.
- Fill the fuel tank.
- Make sure that the oil is filled to the specified level.
- Make sure that the engine coolant is filled to the specified level.
- Inflate the tires to the appropriate pressure.
- Unload the trunk and vehicle, ensuring that the spare tire, tools, and jack are in their original positions.
- Sit a person of average weight (75 kg, 165 lb) in the driver's seat.
- Vehicles with height adjustable suspension should set the vehicle height to the lowest setting prior to adjusting the fog light aim.
- Ensure that there is no damage or deformation to the body around the fog lights.
| 33. PREPARATION FOR FOG LIGHT AIMING |
Prepare the vehicle: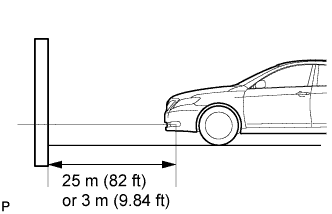
- Place the vehicle in a location that is dark enough to clearly observe the cutoff line. The cutoff line is a distinct line, below which light from the fog lights can be observed and above which it cannot.
- Place the vehicle at a 90° angle to the wall.
- Create a 25 m (82 ft) distance between the vehicle (fog light bulb center) and the wall.
- Make sure that the vehicle is on a level surface.
- Bounce the vehicle up and down to settle the suspension.
- NOTICE:
- A distance of 25 m (82 ft) between the vehicle (fog light bulb center) and the wall is necessary for proper aim adjustment. If sufficient space is not available, secure a distance of exactly 3 m (9.84 ft) to allow for checking and adjustment of fog light aim. (The size of the target zone will change with the distance, so follow the instructions in the illustration.)
- Place the vehicle in a location that is dark enough to clearly observe the cutoff line. The cutoff line is a distinct line, below which light from the fog lights can be observed and above which it cannot.
Prepare a piece of thick white paper (approximately 2 m (6.6 ft) (height) x 4 m (13.1 ft) (width)) to use as a screen.
Draw a vertical line down the center of the screen (V line).
Set the screen as shown in the illustration.
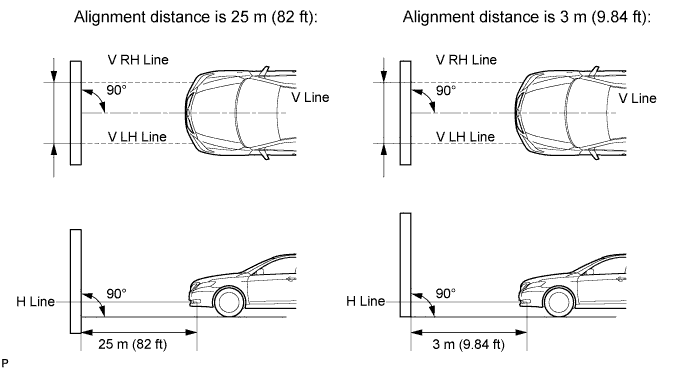
- HINT:
- Stand the screen perpendicular to the ground.
- Align the V line on the screen with the center of the vehicle.
- Stand the screen perpendicular to the ground.
Draw base lines (H, V LH, and V RH lines) on the screen as shown in the illustration.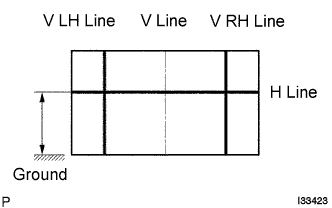
- HINT:
- Mark the fog light bulb center marks on the screen. If the center mark cannot be observed on the fog light, use the center of the fog light bulb or the manufacturer's name marked on the fog light as the center mark.
H Line (Fog light height):
Draw a horizontal line across the screen so that it passes through the center marks. The H line should be at the same height as the fog light bulb center marks of the fog lights.V LH Line, V RH Line (Center mark position of left-hand (LH) and right-hand (RH) fog lights):
Draw two vertical lines so that they intersect the H line at each center mark.
| 34. INSPECT FOG LIGHT AIMING |
Cover the fog light or disconnect the connector of the fog light on the opposite side to prevent light from the fog light that is not being inspected from affecting the fog light aiming inspection.
- NOTICE:
- Do not keep the fog light covered for more than 3 minutes. The fog light lens is made of synthetic resin, which may melt or be damaged due to excessive heat.
Start the engine.
Turn on the fog light and check if the cut off line falls within the specified area in the following illustration.
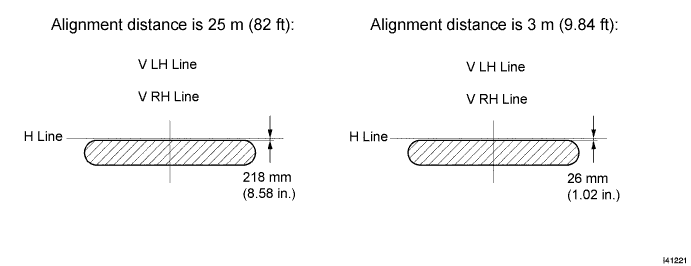
| 35. ADJUST FOG LIGHT AIMING |
Adjust the aim vertically: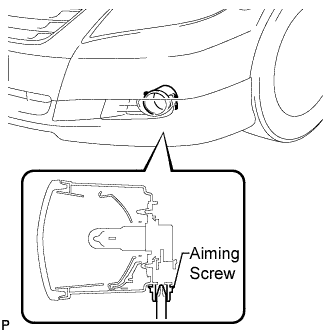
Adjust the aim of each fog light to the specified range by turning each aiming screw with a screwdriver.- NOTICE:
- The final turn of the aiming screw should be made in the clockwise direction. If the screw is tightened excessively, loosen it and then retighten it, so that the final turn of the screw is in the clockwise direction.
- HINT:
- If it is not possible to correctly adjust fog light aim, check bulb, fog light unit, and fog light unit reflector installation.