Home › BODY ELECTRICAL › LIGHTING › AUTOMATIC LIGHT CONTROL SENSOR (for 2GR-FE RHD)INSTALLATION
Removal / installation · Vehicles built Oct 2006 – May 2009
Versions by build date: Oct 2006 – May 2009 from Jun 2009
1.
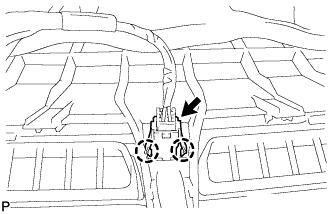
INSTALL AUTOMATIC LIGHT CONTROL SENSOR
Engage the 2 claws and install the automatic light control sensor. Connect the connector.
2.
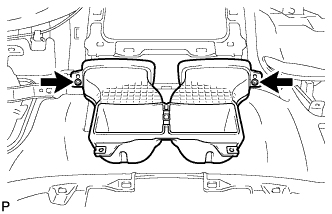
INSTALL NO. 2 HEATER TO REGISTER DUCT
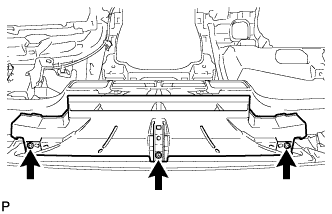
Install the No. 2 heater to register duct with the 2 screws <H>.
3.
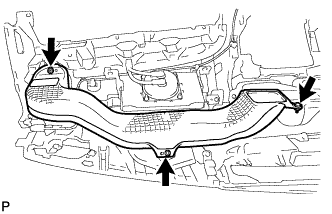
INSTALL NO. 3 HEATER TO REGISTER DUCT
Install the No. 3 heater to register duct with the 3 screws <H>.
4.
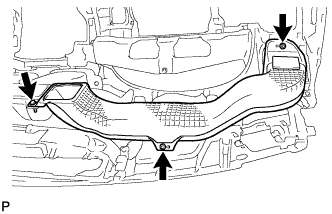
INSTALL NO. 1 HEATER TO REGISTER DUCT
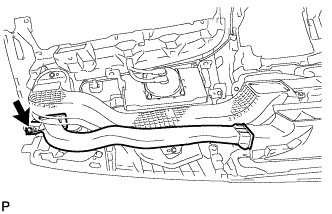
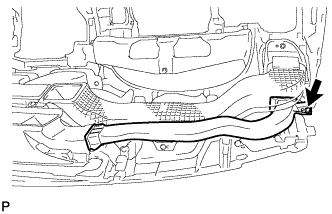
Install the No. 1 heater to register duct with the 3 screws <H>.
5.
INSTALL DEFROSTER NOZZLE ASSEMBLY
Install the defroster nozzle assembly with the 3 screws <H>.
6.
INSTALL SIDE NO. 2 DEFROSTER NOZZLE DUCT
Install the side No. 2 defroster nozzle duct with the screw <H>.
7.
INSTALL SIDE NO. 1 DEFROSTER NOZZLE DUCT
Install the side No. 1 defroster nozzle duct with the screw <H>.
8.
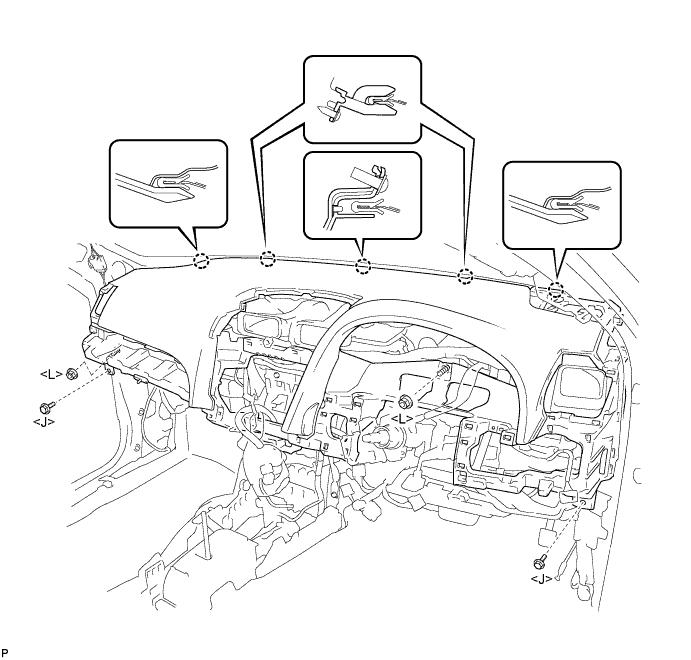
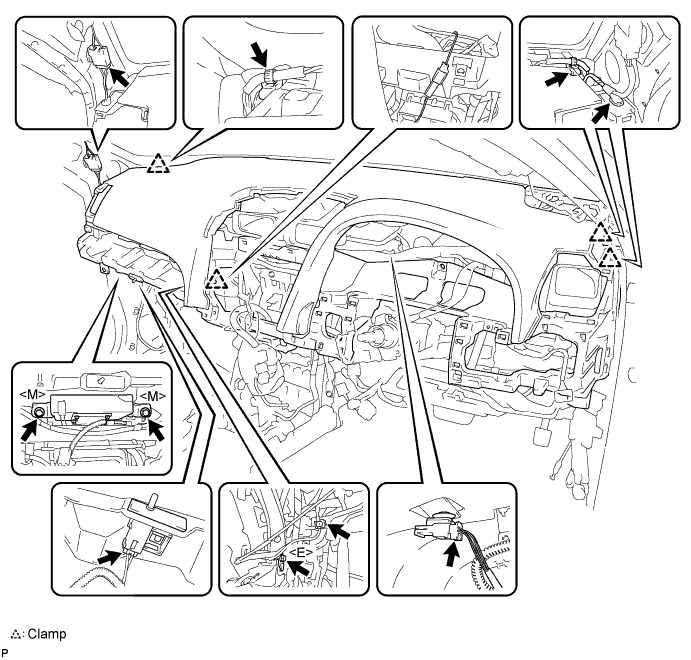
INSTALL INSTRUMENT PANEL SAFETY PAD ASSEMBLY
Engage the 5 claws.
NOTICE:
Do not allow the wire harness to get caught in the claws.
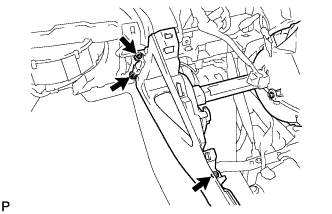
Install the 2 bolts <J> and 2 nuts <L>.
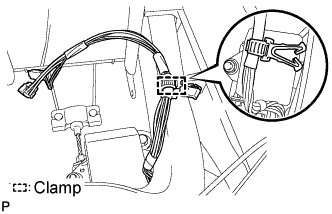
Engage each clamp.
Install the bolt <E>.
Torque:
7.0 N*m{
71 kgf*cm
, 62 in.*lbf
}
Install the 2 passenger airbag bolts <M>.
Torque:
20 N*m{
204 kgf*cm
, 15 ft.*lbf
}
Connect each connector and install the instrument panel safety pad assembly.
9.
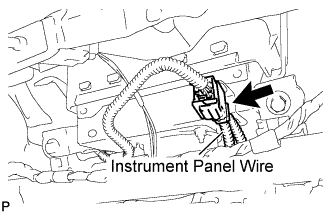
CONNECT INSTRUMENT PANEL WIRE ASSEMBLY
Connect the connector (yellow colored one).
10.
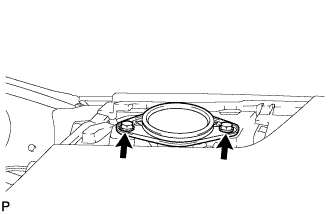
INSTALL FRONT NO. 2 SPEAKER ASSEMBLY (for LH Side)
Connect the connector.
Install the front No. 2 speaker assembly with the 2 bolts.
11.
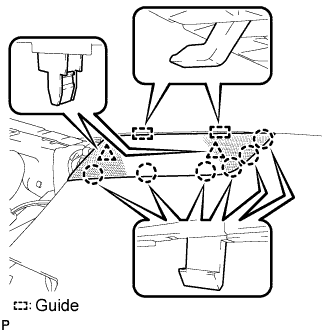
INSTALL INSTRUMENT PANEL NO. 1 SPEAKER PANEL SUB-ASSEMBLY
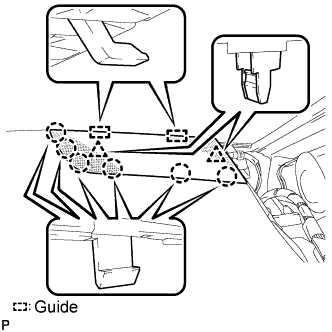
Engage the 2 guides. Engage the 6 claws and the 2 clips to install the instrument panel No. 1 speaker panel sub-assembly.
12.
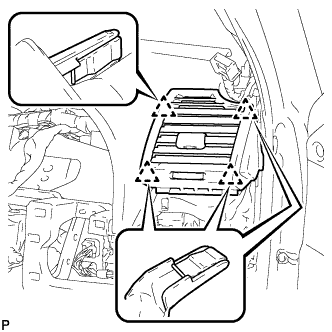
INSTALL INSTRUMENT PANEL NO. 1 REGISTER ASSEMBLY
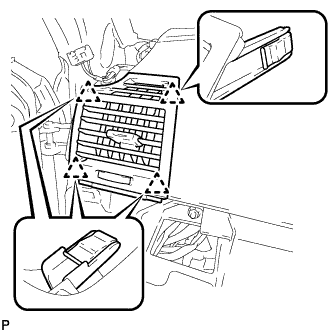
Engage the 4 clips and install the instrument panel No. 1 register assembly.
13.
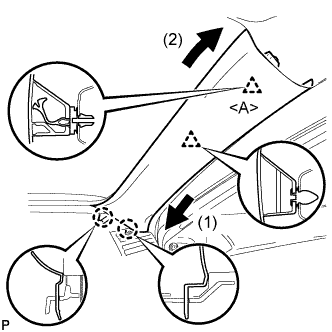
INSTALL FRONT PILLAR GARNISH LH
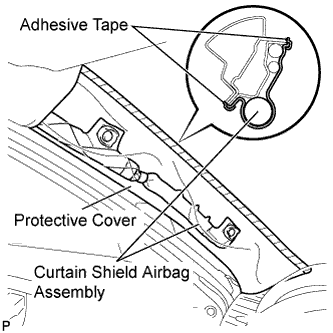
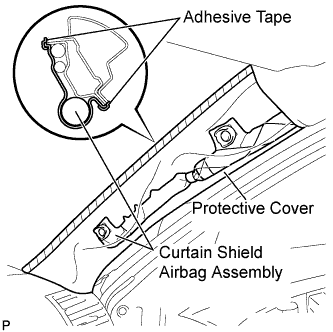
Remove the protective cover.
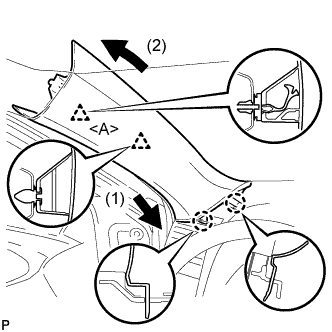
Install a new clip <A> on the front pillar garnish LH. Engage the 2 claws and 2 clips, then install the front pillar garnish LH.
14.
INSTALL FRONT NO. 2 SPEAKER ASSEMBLY (for RH Side)
HINT:
Use the same procedure for the RH side and the LH side (Click here ).
15.
INSTALL INSTRUMENT PANEL NO. 2 SPEAKER PANEL SUB-ASSEMBLY
Engage the 2 guides. Engage the 6 claws and the 2 clips to install the instrument panel No. 2 speaker panel sub-assembly.
16.
INSTALL INSTRUMENT PANEL NO. 3 REGISTER ASSEMBLY
Engage the 4 clips and install the instrument panel No. 3 register assembly.
17.
INSTALL FRONT PILLAR GARNISH RH
Remove the protective cover.
Install a new clip <A> on the front pillar garnish RH. Engage the 2 claws and 2 clips, then install the front pillar garnish RH.
18.
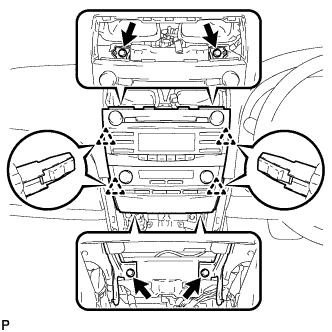
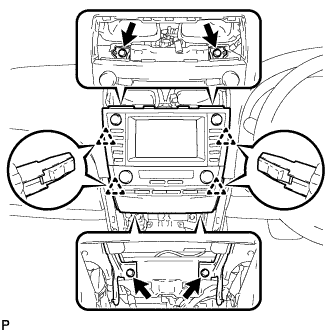
INSTALL RADIO RECEIVER WITH HEATER CONTROL PANEL ASSEMBLY (for Radio Receiver Type)
Connect each connector. Engage the 4 clips.
Install the radio receiver with heater control panel assembly with the 4 bolts.
19.
INSTALL NAVIGATION RECEIVER WITH HEATER CONTROL PANEL ASSEMBLY (w/ Navigation System)
Connect each connector.
Engage the 4 clips. Install the navigation receiver with heater control panel assembly with the 4 bolts.
20.
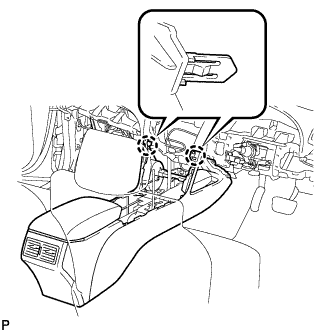
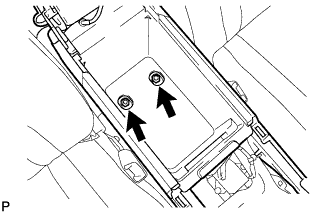
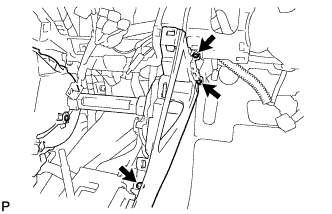
INSTALL CONSOLE BOX ASSEMBLY
Engage the 2 claws.
Install the 2 bolts <I>.
Install the 3 screws <H>.
Install the console box assembly with the 3 screws <H>.
Engage the clamp.
21.
INSTALL CONSOLE BOX CARPET
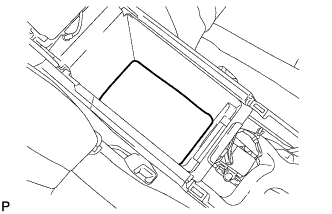
Install the console box carpet.
22.
INSTALL INSTRUMENT PANEL NO. 2 REGISTER ASSEMBLY
Connect each connector.
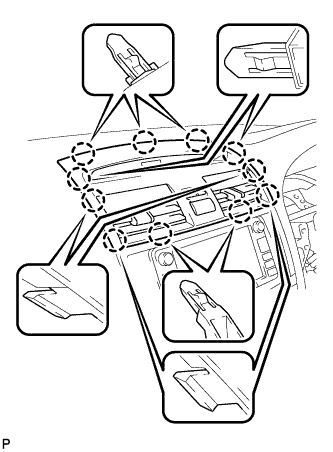
Engage the 11 claws and install the instrument panel No. 2 register assembly.
23.
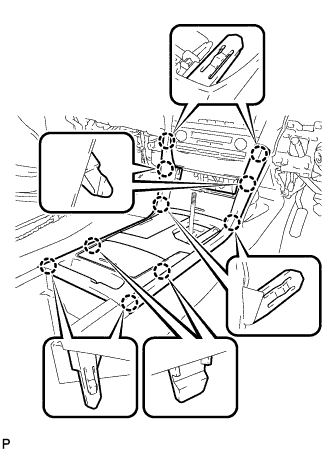
INSTALL UPPER CONSOLE PANEL SUB-ASSEMBLY
Connect the connector.
Engage the 10 claws and install the upper console panel sub-assembly.
24.
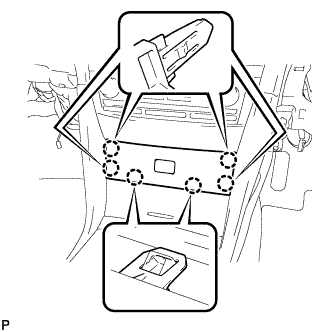
INSTALL UPPER CONSOLE PANEL FRONT GARNISH
Connect each connector. Engage the 6 claws and install the upper console panel front garnish.
25.
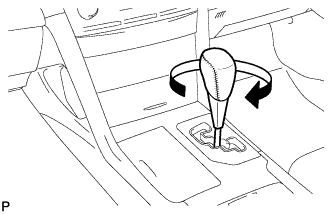
INSTALL SHIFT LEVER KNOB SUB-ASSEMBLY
Install the shift lever knob sub-assembly.
26.
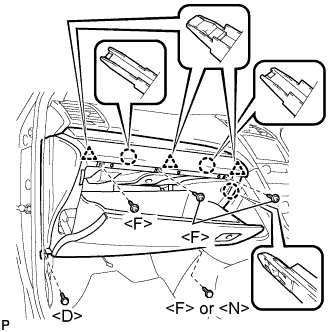
INSTALL LOWER INSTRUMENT PANEL SUB-ASSEMBLY
Engage the 3 claws and 3 clips. Install the screw <F> or <N>.
Install the 3 screws <F>.
Install the lower instrument panel sub-assembly with the bolt <D>.
27.
INSTALL INSTRUMENT PANEL NO. 2 UNDER COVER SUB-ASSEMBLY
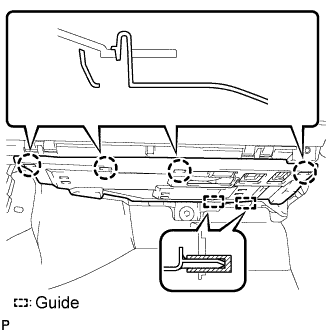
Engage the 4 claws and 2 guides and install the instrument panel No. 2 under cover sub-assembly.
28.
INSTALL COWL SIDE TRIM SUB-ASSEMBLY LH
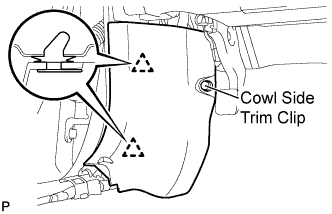
Engage the 2 clips. Install the cowl side trim sub-assembly LH with the cowl side trim clip.
29.
INSTALL FRONT DOOR SCUFF PLATE LH
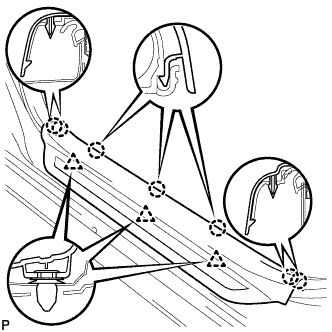
Engage the 7 claws and 3 clips, then install the front door scuff plate LH.
30.
INSTALL COMBINATION METER ASSEMBLY
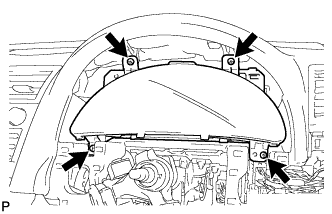
Connect each connector. Install the combination meter assembly with the 4 screws <B>, <C> or <H>.
31.
INSTALL INSTRUMENT CLUSTER FINISH PANEL SUB-ASSEMBLY
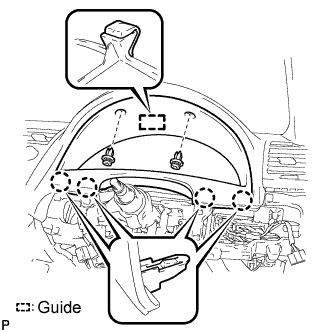
Engage the guide and the 4 claws. Install the instrument cluster finish panel sub-assembly with the 2 clips.
32.
INSTALL LOWER INSTRUMENT PANEL FINISH PANEL (w/o Smart Entry and Start System)
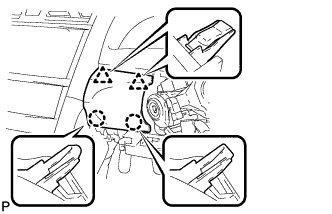
Engage the 2 claws and 2 clips to install the lower instrument panel finish panel.
33.
INSTALL LOWER INSTRUMENT PANEL FINISH PANEL (w/ Smart Entry and Start System)
Connect the connector.
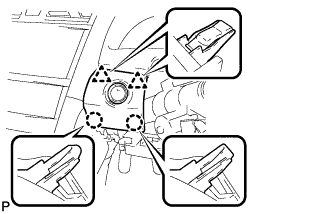
Engage the 2 claws and 2 clips to install the lower instrument panel finish panel.
34.
INSTALL NO. 1 INSTRUMENT PANEL SUB-ASSEMBLY
Connect each connector.
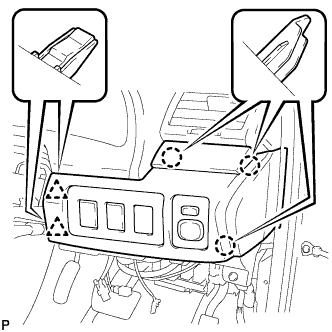
Engage the 3 claws and 2 clips to install the No. 1 instrument panel sub-assembly.
35.
INSTALL TURN SIGNAL SWITCH ASSEMBLY WITH SPIRAL CABLE SUB-ASSEMBLY
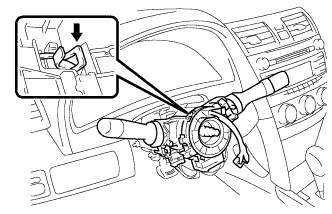
Install the turn signal switch assembly with spiral cable sub-assembly to the steering column assembly with the clamp. Connect the connectors to the turn signal switch assembly with spiral cable sub-assembly.
36.
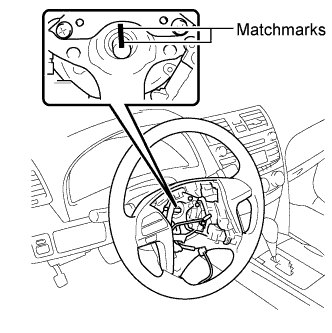
ADJUST SPIRAL CABLE
Check that the ignition switch is off.
Check that the battery negative (-) cable is disconnected.
CAUTION:
Wait for 90 seconds after disconnecting the cable to prevent airbag deployment.
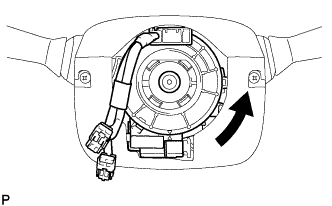
Rotate the spiral cable counterclockwise slowly by hand until it feels firm.
NOTICE:
Do not turn the spiral cable by the airbag wire harness.
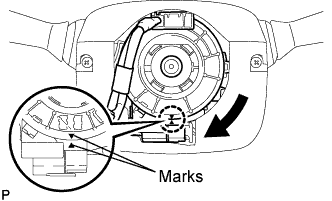
Rotate the spiral cable clockwise approximately 2.5 turns to align the marks.
NOTICE:
Do not turn the spiral cable by the airbag wire harness.
HINT:
The spiral cable will rotate approximately 2.5 turns to both the left and right from the center.
37.
INSTALL STEERING COLUMN COVER
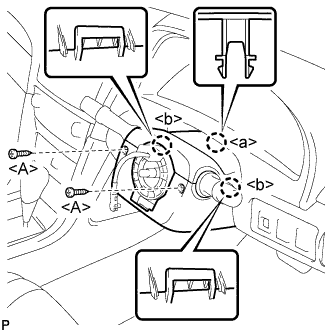
Engage the claw <a> and install the upper steering column cover. Engage the 2 claws <b> and install the lower steering column cover.
Install the steering column cover with the 2 screws <A>.
Torque:
2.0 N*m{
20 kgf*cm
, 18 in.*lbf
}
38.
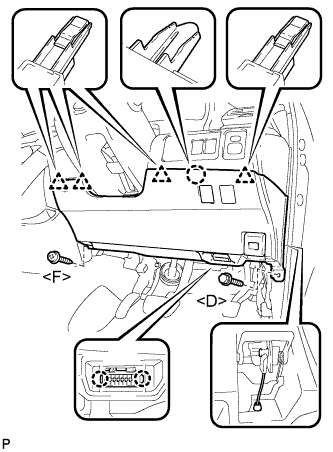
INSTALL LOWER NO. 1 INSTRUMENT PANEL FINISH PANEL
Install the air hose and connect each connector. Engage the claw and the 4 clips.
Engage the 2 claws and the DLC3.
Install the lower No. 1 instrument panel finish panel with the screw <F> and bolt <D>.
39.
INSTALL COWL SIDE TRIM SUB-ASSEMBLY RH
HINT:
Use the same procedure for the RH side and the LH side.
40.
INSTALL FRONT DOOR SCUFF PLATE RH
HINT:
Use the same procedure for the RH side and the LH side.
41.
INSTALL STEERING WHEEL ASSEMBLY
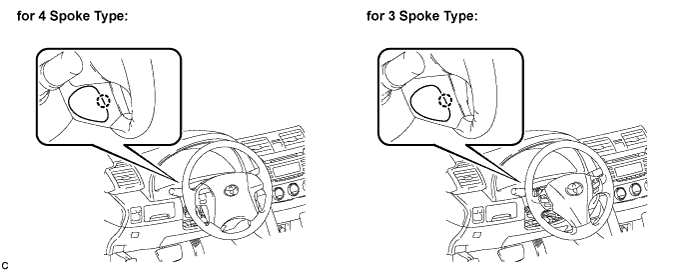
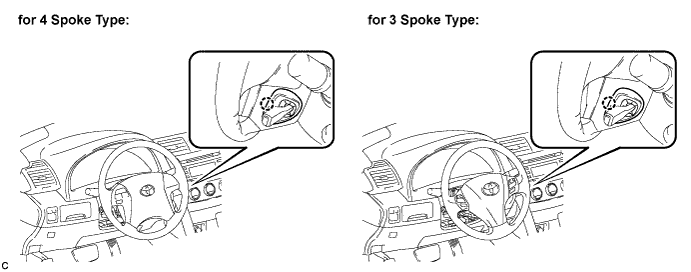
Align the matchmarks on the steering wheel assembly and steering main shaft. Install the steering wheel assembly set nut.
Torque:
50 N*m{
510 kgf*cm
, 37 ft.*lbf
}
Connect the connectors to the spiral cable sub-assembly.
42.
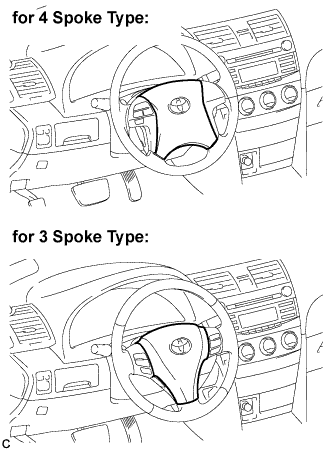
INSTALL STEERING PAD
Check that the ignition switch is off.
Check that the battery negative (-) cable is disconnected.
CAUTION:
Wait for 90 seconds after disconnecting the cable to prevent airbag deployment.
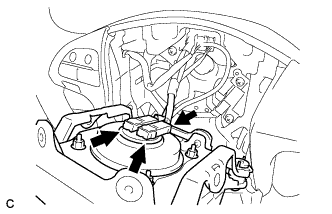
Support the steering pad with one hand. Connect the 2 airbag connectors to the steering pad.
NOTICE:
When handling the airbag connector, take care not to damage the airbag wire harness.
Connect the horn connector to the steering pad.
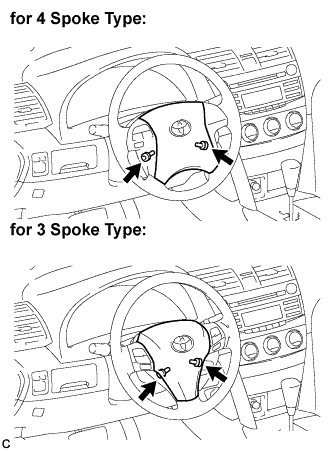
Confirm that the circumference groove of the "TORX" screw fits in the screw case, and place the steering pad onto the steering wheel assembly.
Using a "TORX" socket (T30), tighten the 2 "TORX" screws.
Torque:
8.8 N*m{
90 kgf*cm
, 78 in.*lbf
}
43.
INSTALL LOWER NO. 3 STEERING WHEEL COVER
Engage the claw and install the No. 3 lower steering wheel cover.
44.
INSTALL LOWER NO. 2 STEERING WHEEL COVER
Engage the claw and install the No. 2 lower steering wheel cover.
45.
CONNECT CABLE TO NEGATIVE BATTERY TERMINAL
46.
INSPECT STEERING PAD
With the steering pad installed on the vehicle, perform a visual check. If there are any defects as mentioned below, replace the steering pad with a new one: Cuts, minute cracks or marked discoloration on the steering pad top surface or in the grooved portion. Make sure that the horn sounds.
HINT:
If the horn does not sound, inspect the horn system (Click here ).
47.
INSPECT SRS WARNING LIGHT
Inspect the SRS warning light (Click here ).