Removal / installation · Vehicles built Jun 2006 – May 2009
HINT:
Use the same procedures for the RH side and the LH side.
The procedures listed below are for the LH side.
1.
REMOVE REAR WHEEL
2.
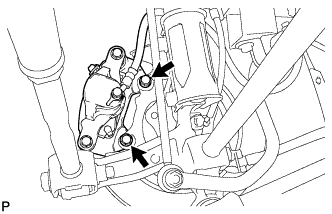
SEPARATE REAR DISC BRAKE CALIPER ASSEMBLY
Remove the 2 bolts and separate the rear disc brake caliper assembly.
HINT:
Do not disconnect the flexible hose from the disc brake caliper assembly
3.
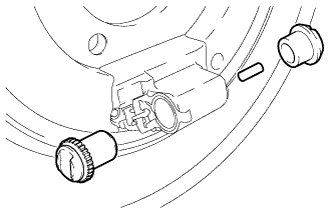
REMOVE PARKING BRAKE SHOE ADJUSTING HOLE PLUG
4.
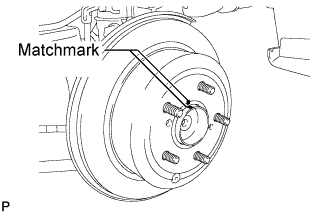
REMOVE REAR DISC
Release the parking brake and put matchmarks on the rear disc and the axle hub.
Remove the rear disc.
HINT:
If the rear disc cannot be removed easily, turn the shoe adjuster until the wheel turns freely.
5.
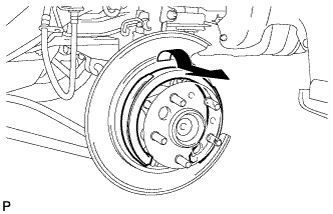
REMOVE PARKING BRAKE SHOE ASSEMBLY
Remove the parking brake shoe assembly as shown in the illustration.
6.
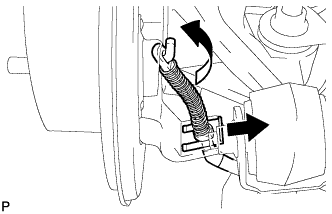
DISCONNECT NO. 3 PARKING BRAKE CABLE ASSEMBLY
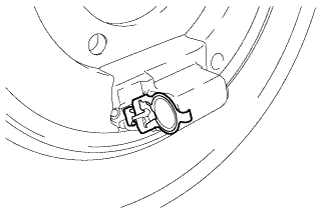
Using needle-nose pliers, remove the clip.
Turn and disconnect the No. 3 parking brake cable assembly as shown in the illustration.
7.
REMOVE REAR AXLE HUB & BEARING ASSEMBLY
Disconnect the skid control sensor connector.
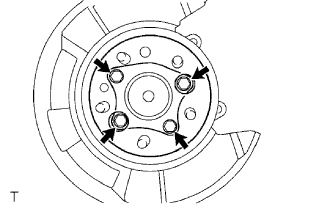
Remove the 4 bolts and hub and bearing assembly.
8.
REMOVE PARKING BRAKE PLATE SUB-ASSEMBLY
9.
REMOVE NUT AND SCREW ADJUSTING ASSEMBLY
Remove the nut and screw adjusting assembly, parking brake tappet and parking brake push rod.
10.
REMOVE ADJUSTMENT PAWL
Remove the adjustment pawl.
11.
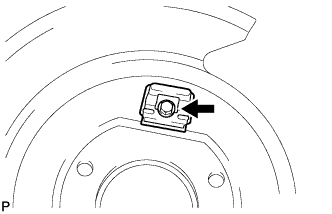
REMOVE PARKING BRAKE SHOE HOLD PLATE
Remove the parking brake shoe hold bolt and the parking brake shoe hold plate.
12.
SEPARATE DUST PLATE
Separate the dust plate from the parking brake plate sub-assembly.
13.
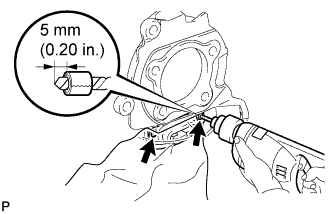
REMOVE DUST COVER
Put a 4 mm (0.16 in.) drill bit into a drill.
Tape the 4 mm (0.16 in.) drill bit with the portion of 5 mm (0.20 in.) from the tip uncovered.
HINT:
Tape the 4 mm (0.16 in.) drill bit to prevent the drill bit from going too deep.
Lightly press the drill against the rivets, drill off the flanges of the rivets, and remove the 2 rivets.
NOTICE:
Cover the dust cover with a piece of cloth to prevent rivet fragments and shavings from scattering.
Pressing the drill too firmly will cause the rivet to turn and result in the rivet not being drilled through.
Do not drill the rivet at an angle as this will cause damage to the drill and drill hole. Line up the drill and rivet, and carefully drill out the rivet head.
Be careful as the cut rivet will be very hot.
Remove the boot retainer and the dust cover.
Even if the flange is taken off, continue to drill the rivet and push out the remaining fragment using a drill.
Using a vacuum cleaner, remove the rivet fragments and shavings.