BACK WINDOW GLASS > INSTALLATION |
| 1. INSTALL NO. 2 BACK WINDOW GLASS STOPPER |
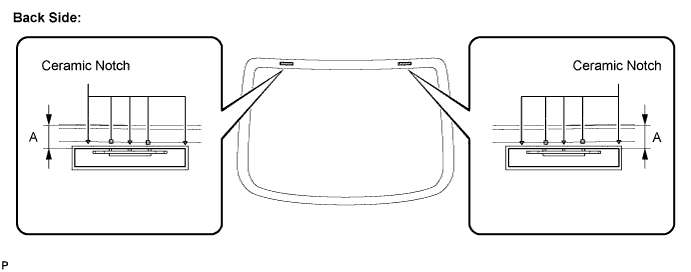
Using a brush or sponge, coat the application area of the No. 2 stoppers with Primer G.
Install 2 new No. 2 stoppers onto the back window glass, as shown in the illustration.
| Area | Dimension |
| A | 16.4 mm (0.645 in.) |
| 2. INSTALL NO. 1 BACK WINDOW GLASS STOPPER |
![]() |
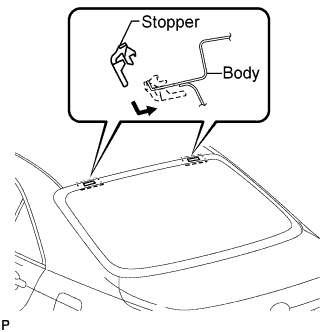
Install 2 new No. 1 stoppers to the vehicle body, as shown in the illustration.
| 3. INSTALL BACK WINDOW MOULDING |
![]() |
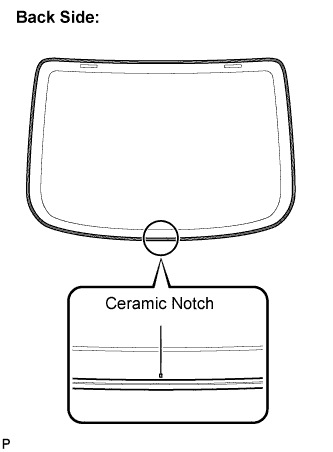
Using a brush or sponge, coat the application area of moulding with Primer G.
Install a new moulding onto the back window glass, as shown in the illustration.
| 4. INSTALL BACK WINDOW GLASS ASSEMBLY |
![]() |
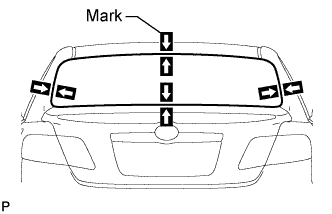
Position the back window glass assembly.
Using a suction cup, place the back window glass assembly in the correct position.
Check that the whole contact surface of the back window glass rim is perfectly even.
Align the matchmarks on the back window glass and vehicle body.
Remove the back window glass assembly.
![]() |
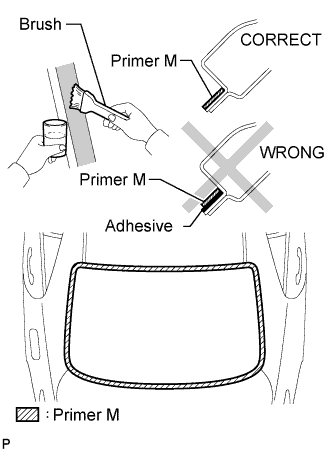
Using a brush, coat the installation surface on the vehicle body with Primer M.
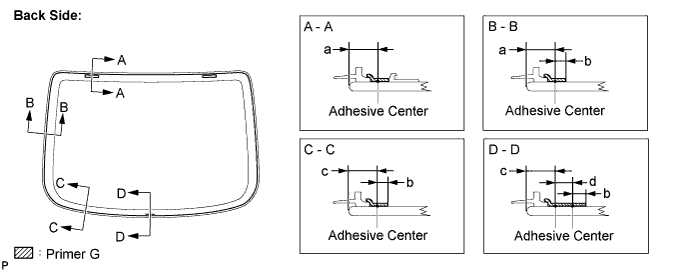
Using a brush or sponge, coat the application area of adhesive with Primer G.
| Area | Dimension |
| a | 10.75 mm (0.423 in.) |
| b | 7.0 mm (0.275 in.) |
| c | 10.25 mm (0.403 in.) |
| d | 8.0 mm (0.315 in.) |
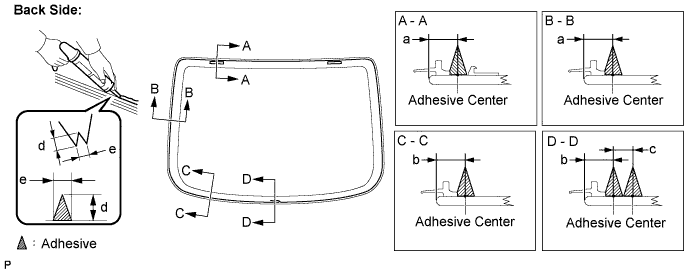
Apply adhesive (Adhesive: TOYOTA genuine windshield glass adhesive or equivalent).
Cut off the tip of the cartridge nozzle, as shown in the illustration.
| Temperature | Tack-free Time |
| 35°C (95°F) | 15 minutes |
| 20°C (68°F) | 1 hour and 40 minutes |
| 5°C (41°F) | 8 hours |
Load the sealer gun with cartridge.
Apply adhesive to the back window glass, as shown in the illustration.
| Area | Dimension |
| a | 10.75 mm (0.423 in.) |
| b | 10.25 mm (0.403 in.) |
| c | 8.0 mm (0.315 in.) |
| d | 12.0 mm (0.472 in.) |
| e | 8.0 mm (0.315 in.) |

![]() |
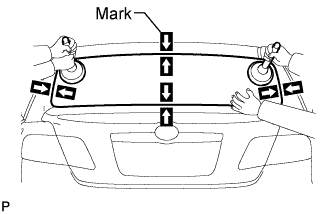
Install the back window glass assembly.
Using a suction cup, position the back window glass so that the matchmarks are aligned, and press it in gently along the rim.
Lightly press the front surface of the back window glass to ensure a close fit.
Hold the back window glass using protective tape until applied adhesive becomes hard.
| Temperature | Minimum time prior to driving vehicle |
| 35°C (95°F) | 1 hour and 30 minutes |
| 20°C (68°F) | 5 hours |
| 5°C (41°F) | 24 hours |
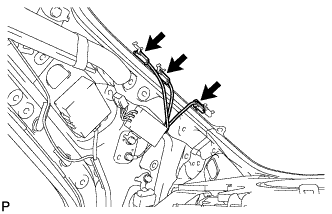
![]() |
Connect the connectors.
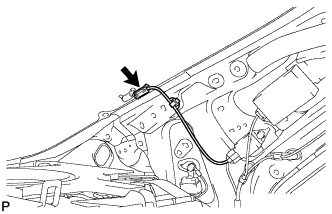
![]() |
Connect the connector.
| 5. CHECK FOR LEAKS AND REPAIR |
After the adhesive has hardened, apply water from the outside of the vehicle. Check that no water leaks into the cabin.
If water leaks into the cabin, allow the water to dry and add adhesive.
Remove the protective tape.
| 6. INSTALL ROOF HEADLINING ASSEMBLY (w/o Sliding Roof) |
| 7. INSTALL ROOF HEADLINING ASSEMBLY (w/ Sliding Roof) |
| 8. INSTALL SUNSHADE TRIM HOLDER (w/ Rear Sunshade) |
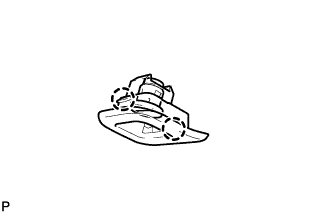
![]() |
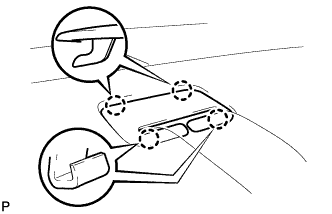
Engage the 2 claws.
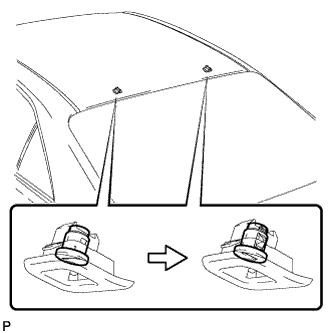
![]() |
Using a screwdriver, turn the pin of each sunshade trim holder 90°to install the sunshade trim holders.
| 9. INSTALL SPOT LIGHT ASSEMBLY (w/ Sliding Roof) |
![]() |
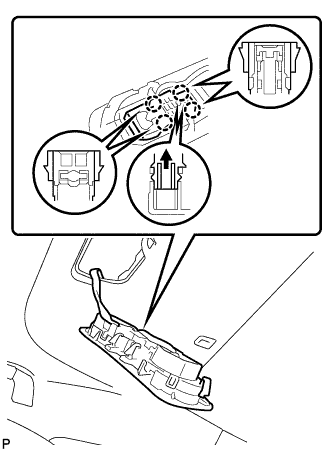
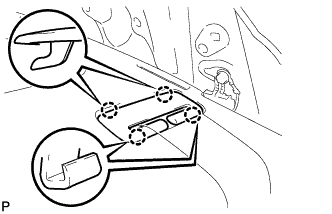
Push the light bulb holder in the direction indicated by the arrow in the illustration to engage the claw.
Engage the 4 claws.
![]() |
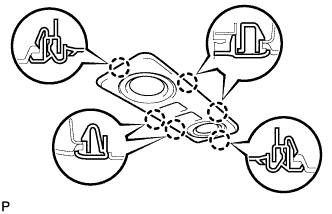
Engage the 6 claws and install the spot light assembly.
| 10. INSTALL REAR ASSIST GRIP SUB-ASSEMBLY |
| 11. INSTALL PACKAGE TRAY TRIM PANEL ASSEMBLY (for Fold Down Seat Type) |
![]() |
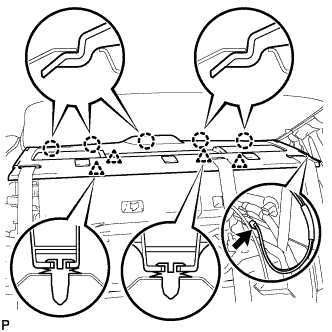
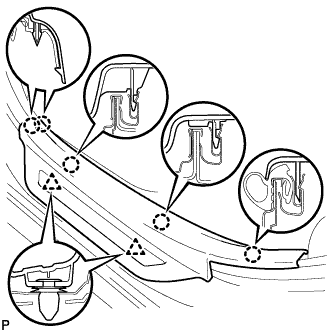
Pass the 3 rear seat belt floor anchors through the package tray trim panel assembly.
Engage the 4 clips and 5 claws and install the package tray trim panel assembly.
Connect the connector.
| 12. INSTALL PACKAGE TRAY TRIM PANEL ASSEMBLY (for Reclining Seat Type) |
![]() |
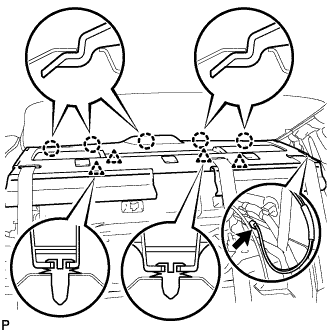
Pass the 3 rear seat belt floor anchors through the package tray trim panel assembly.
Engage the 4 clips and 5 claws and install the package tray trim panel assembly.
Connect the connector.
| 13. INSTALL REAR SEAT SHOULDER BELT HOLE COVER |
![]() |
Engage the 4 claws and install the rear seat shoulder belt hole cover.
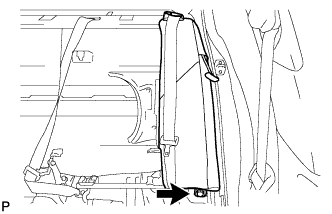
| 14. INSTALL REAR SEAT SHOULDER BELT COVER |
![]() |
Engage the 4 claws and install the rear seat shoulder belt cover.
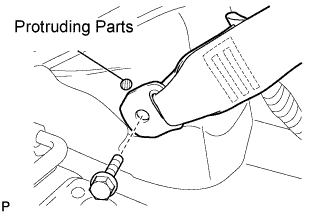
| 15. CONNECT REAR SEAT OUTER BELT ASSEMBLY (for LH Side) |
![]() |
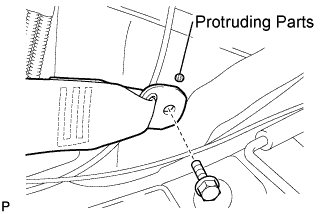
Install the floor end of the rear seat outer belt assembly with the bolt.
Check if the ELR locks.
With the belt assembly installed, check that the belt locks when it is pulled out quickly.
| 16. CONNECT REAR SEAT OUTER BELT ASSEMBLY (for RH Side) |
![]() |
Install the floor end of the rear seat outer belt assembly with the bolt.
Check if the ELR locks.
With the belt assembly installed, check that the belt locks when it is pulled out quickly.
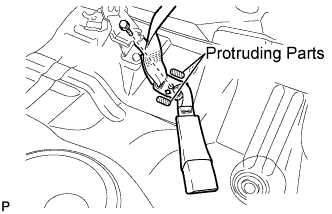
| 17. CONNECT REAR SEAT INNER WITH CENTER BELT ASSEMBLY LH |
![]() |
Install the floor end of the rear seat inner with center belt assembly LH with the bolt.
Check if the ELR locks.
With the belt assembly installed, check that the belt locks when it is pulled out quickly.
| 18. INSTALL CHILD RESTRAINT SEAT ANCHOR BRACKET SUB-ASSEMBLY LH |
![]() |
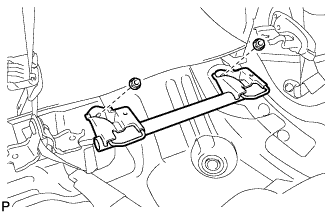
Install the child restraint seat anchor bracket sub-assembly with the 2 nuts.
| 19. INSTALL ROOF SIDE INNER GARNISH LH |
![]() |
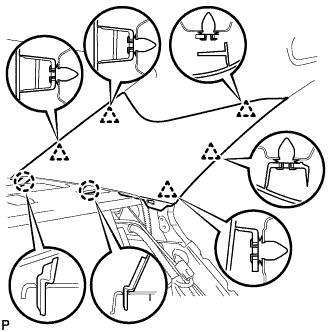
Engage the 5 clips and 2 claws, then install the roof side inner garnish LH.
| 20. INSTALL ROOF SIDE INNER GARNISH RH |
| 21. INSTALL RECLINING REMOTE CONTROL LEVER SUB-ASSEMBLY LH (for Reclining Seat Type) |
![]() |
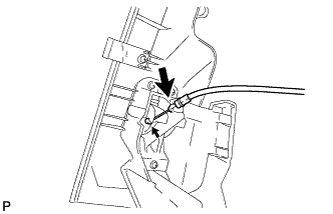
Install the rear seat reclining control cable.
![]() |
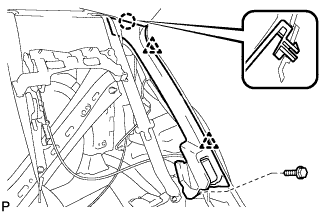
Engage the 2 clips and claw and then install the reclining remote control lever sub-assembly.
Install the bolt.
![]() |
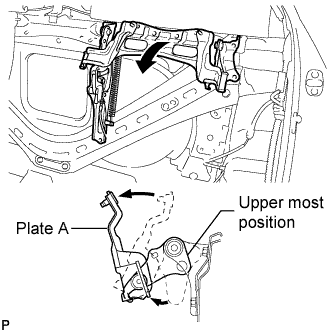
Adjust the control lever to set the rear reclining adjuster assembly to its upper most position.
Pull plate A toward the front of the vehicle to lock the plate.
| 22. INSTALL RECLINING REMOTE CONTROL LEVER SUB-ASSEMBLY RH (for Reclining Seat Type) |
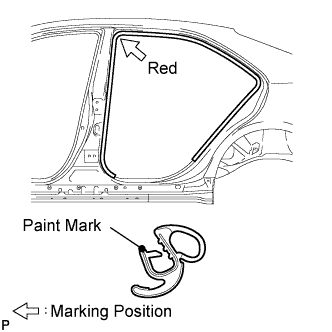
| 23. INSTALL REAR DOOR OPENING TRIM WEATHERSTRIP LH |
![]() |
Install the rear door opening trim weatherstrip LH as shown in the illustration.
| 24. INSTALL REAR DOOR SCUFF PLATE LH |
![]() |
Engage the 5 claws and 2 clips, then install the rear door scuff plate LH.
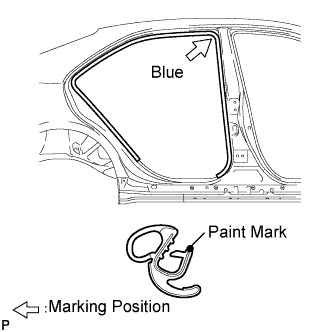
| 25. INSTALL REAR DOOR OPENING TRIM WEATHERSTRIP RH |
![]() |
Install the rear door opening trim weatherstrip RH as shown in the illustration.
| 26. INSTALL REAR DOOR SCUFF PLATE RH |
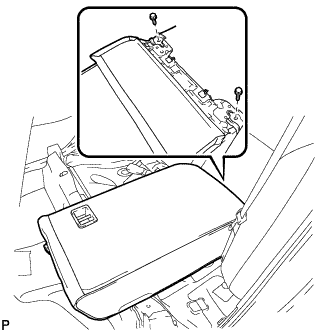
| 27. INSTALL CENTER SEATBACK ASSEMBLY (for Reclining Seat Type) |
![]() |
Install the center seatback assembly with the 2 bolts.
| 28. INSTALL SEPARATE TYPE REAR SEATBACK ASSEMBLY LH (for Reclining Seat Type) |
![]() |
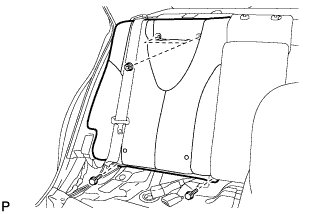
Install the separate type rear seatback assembly LH with the 2bolts and 2 nuts.
![]() |
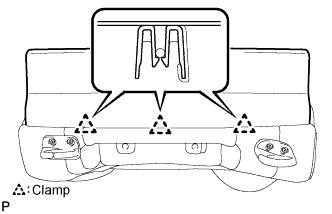
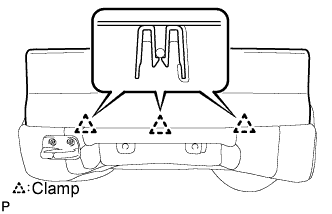
Engage the 3 clamps and install the cover.
![]() |
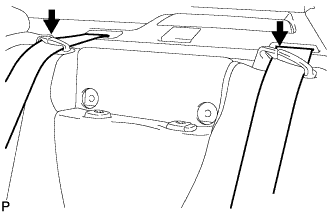
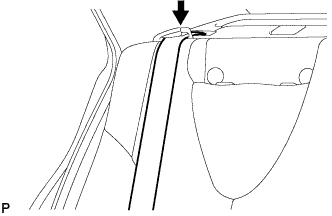
Install the 2 rear seat belts.
| 29. INSTALL SEPARATE TYPE REAR SEATBACK ASSEMBLY RH (for Reclining Seat Type) |
![]() |
Install the separate type rear seatback assembly RH with the 2 bolts and 2 nuts.
![]() |
Engage the 3 clamps and install the cover.
![]() |
Install the rear seat belt.
| 30. INSTALL REAR SEATBACK COVER (for Reclining Seat Type) |
| 31. INSTALL REAR SIDE SEATBACK ASSEMBLY LH (for Fold Down Seat Type) |
![]() |
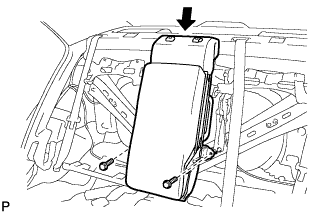
Install the rear side seatback assembly with the bolt.
| 32. INSTALL REAR SIDE SEATBACK ASSEMBLY RH (for Fold Down Seat Type) |
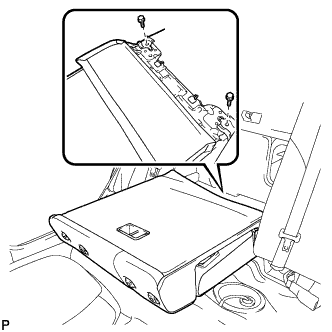
| 33. INSTALL SEPARATE TYPE REAR SEATBACK ASSEMBLY LH (for Fold Down Seat Type) |
![]() |
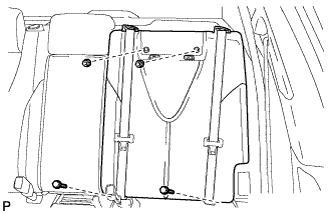
Install the separate type rear seatback assembly with the 2 bolts.
| 34. INSTALL SEPARATE TYPE REAR SEATBACK ASSEMBLY RH (for Fold Down Seat Type) |
![]() |
Install the separate type rear seat back assembly with the 2 bolts.
| 35. INSTALL REAR CENTER SEAT HEADREST ASSEMBLY |
| 36. INSTALL REAR SEAT HEADREST ASSEMBLY |
| 37. INSTALL REAR SEAT CUSHION ASSEMBLY |
| 38. CONNECT CABLE TO NEGATIVE BATTERY TERMINAL |
| 39. INSPECT SRS WARNING LIGHT |