Using a plastic hammer, tap in new straight pins to the cylinder block.
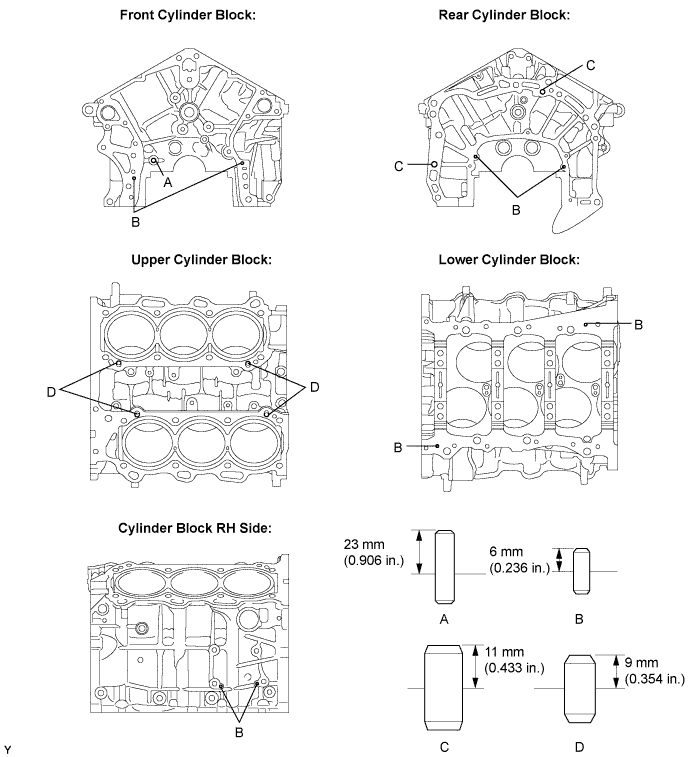
- Standard protrusion:
Item Protrusion Pin A 23 mm (0.906 in.) Pin B 6 mm (0.236 in.) Pin C 11 mm (0.433 in.) Pin D 9 mm (0.354 in.)
ENGINE UNIT > REASSEMBLY |
| 1. INSTALL STRAIGHT PIN |
Using a plastic hammer, tap in new straight pins to the cylinder block.
| Item | Protrusion |
| Pin A | 23 mm (0.906 in.) |
| Pin B | 6 mm (0.236 in.) |
| Pin C | 11 mm (0.433 in.) |
| Pin D | 9 mm (0.354 in.) |
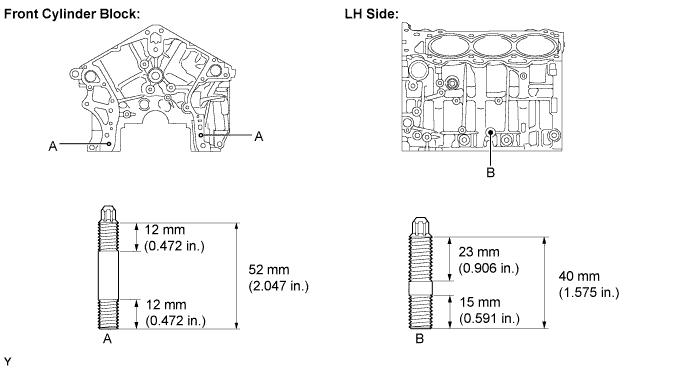
| 2. INSTALL STUD BOLT |
Using E8 and E10 "torx" sockets, install the stud bolts.
| 3. INSTALL NO. 1 OIL NOZZLE SUB-ASSEMBLY |
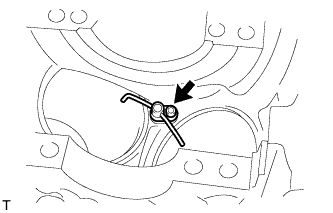 |
Using a 5 mm hexagon wrench, install the oil nozzles.
| 4. INSTALL PISTON SUB-ASSEMBLY WITH PIN |
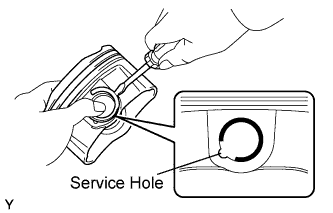 |
Using a screwdriver, install a new snap ring at one end of the piston pin hole.
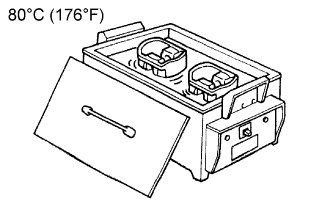 |
Gradually heat the piston to approximately 80°C (176°F).
Coat the piston pin with engine oil.
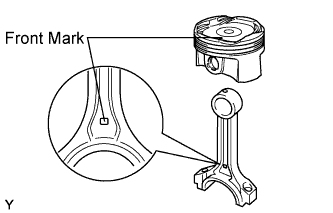 |
Align the front marks of the piston and connecting rod, and push in the piston pin with your thumb.
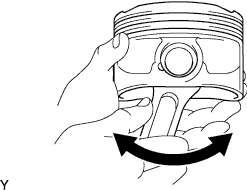 |
Check the fitting condition between the piston and piston pin by trying to move the piston back and forth on the piston pin.
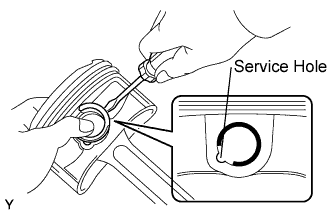 |
Using a screwdriver, install a new snap ring at the other end of the piston pin hole.
| 5. INSTALL PISTON RING SET |
Install the oil ring expander and 2 side rails by hand.
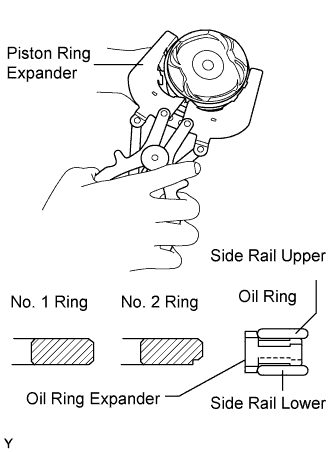 |
Using a piston ring expander, install the oil ring rail as shown in the illustration.
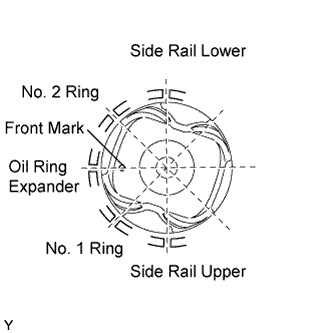 |
Position the piston rings so that the ring ends are as shown in the illustration.
| 6. INSTALL CRANKSHAFT BEARING |
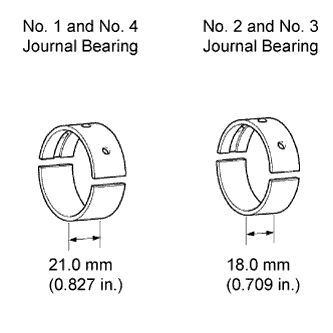 |
Clean the main journal and both surfaces of the bearing.
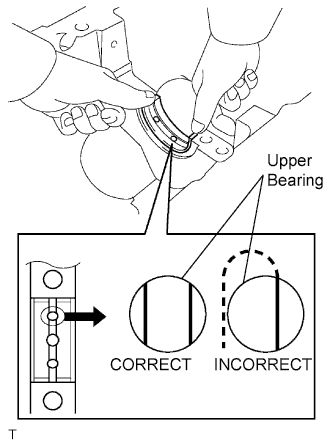 |
Install the upper bearing.
Install the upper bearings to the cylinder block as shown in the illustration.
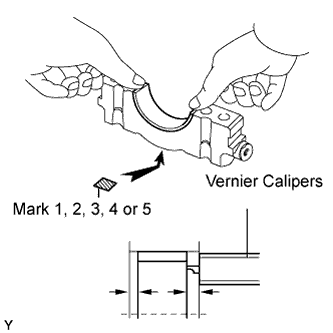 |
Install the lower bearing.
Install the lower bearings to the bearing caps.
Using vernier calipers, measure the distance between the bearing cap's edge and the lower bearing's edge.
| 7. INSTALL CRANKSHAFT THRUST WASHER SET |
Apply engine oil to the crankshaft thrust washer.
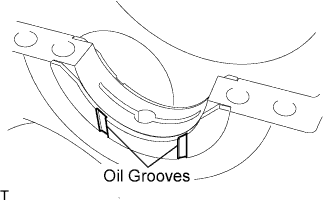 |
Install the 2 thrust washers under the No. 2 journal position of the cylinder block with the oil grooves facing outward.
| 8. INSTALL CRANKSHAFT |
Apply engine oil to the upper bearing, then place the crankshaft on the cylinder block.
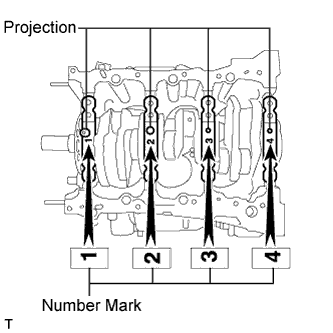 |
Confirm the projection and numbers of the main bearing caps and install the bearing caps on the cylinder block.
Apply a light coat of engine oil to the threads and under the heads of the bearing cap bolts.
Temporarily install the 8 main bearing cap bolts to the inside positions.
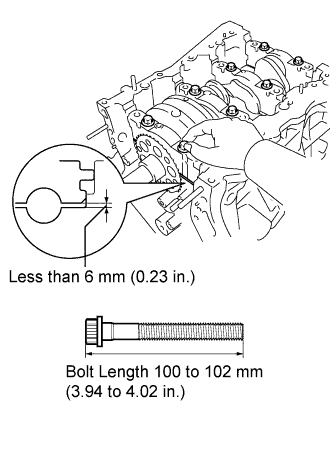 |
Insert the main bearing cap with your hand until the clearance between the main bearing cap and the cylinder block is less than 6 mm (0.23 in.) by marking the 2 internal bearing cap bolts as a guide.
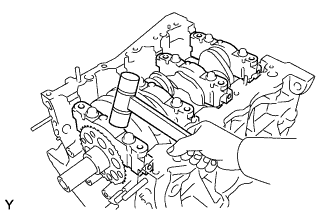 |
Using a plastic hammer, lightly tap the bearing cap to ensure a proper fit.
Apply a light coat of engine oil to the threads and under the heads of the 8 main bearing cap bolts.
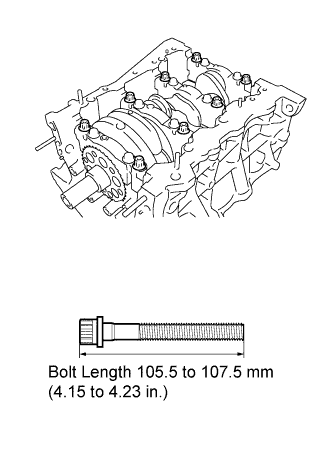 |
Install the 8 main bearing cap bolts to the outside positions.
Install the crankshaft bearing cap bolts.
Step 1
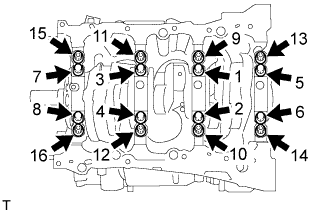 |
Install and uniformly tighten the 16 main bearing cap bolts in the sequence shown in the illustration.
Step 2
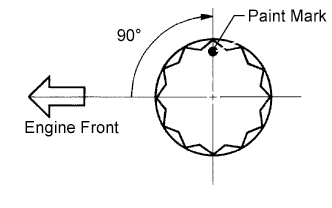 |
Mark the front of the bearing cap bolts with paint.
Retighten the bearing cap bolts by 90° in the order above.
Check that the painted mark is now at a 90° angle to the front.
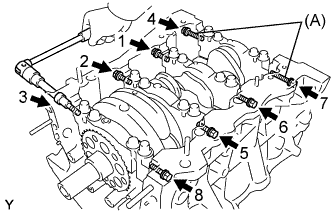 |
Install 8 new seal washers and uniformly tighten the 8 main bearing cap bolts in several steps and in the sequence shown in the illustration.
| Item | Length |
| Bolt A | 45 mm (1.77 in.) |
| Except bolt A | 30 mm (1.18 in.) |
Check that the crankshaft turns smoothly.
Check the crankshaft thrust clearance .
| 9. INSTALL CONNECTING ROD BEARING |
Install the connecting rod bearing to the connecting rod and bearing cap.
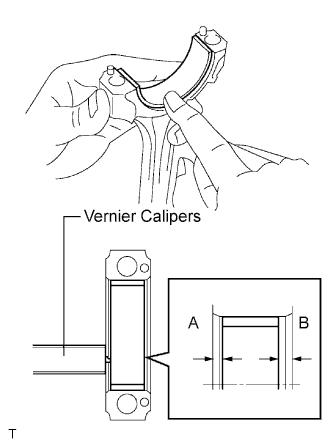 |
Using vernier calipers, measure the distance between the connecting rod's and bearing cap's edges and the connecting rod bearing's edge.
| 10. INSTALL PISTON SUB-ASSEMBLY WITH CONNECTING ROD |
Apply engine oil to the cylinder walls, the pistons, and the surfaces of the connecting rod bearings.
|
Position the piston rings so that the ring ends are as shown in the illustration.
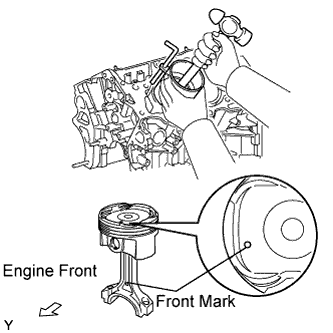 |
Using a piston ring compressor, push the correctly numbered piston and connecting rod assembly into the cylinder with the front mark of the piston facing forward.
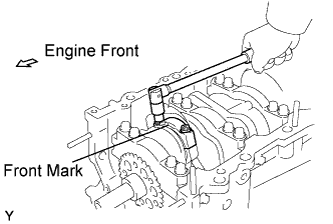 |
Check that the front mark of the connecting rod cap is facing forward.
Apply a light coat of engine oil to the threads and under the heads of the connecting rod cap bolts.
Install the connecting cap bolts.
Step 1
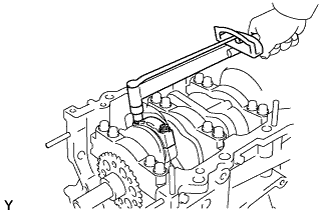 |
Install and alternately tighten the bolts of the connecting rod cap in several steps.
Step 2
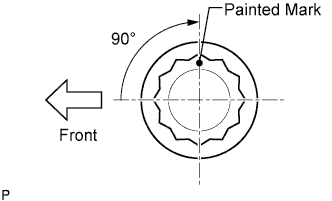 |
Mark the front side of each connecting cap bolt with paint.
Retighten the cap bolts by 90° as shown in the illustration.
Check the painted mark is now at a 90° angle to the front.
Check that the crankshaft turns smoothly.
Check the connecting rod thrust clearance .
| 11. INSTALL INTAKE VALVE GUIDE BUSH |
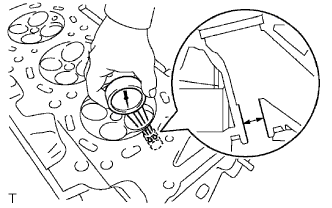 |
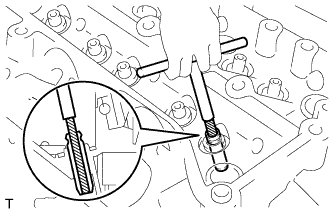
Using a caliper gauge, measure the bush bore diameter of the cylinder head.
| Bush size | Bush bore diameter |
| STD | 10.285 to 10.306 mm (0.4049 to 0.4057 in.) |
| O/S 0.05 | 10.335 to 10.356 mm (0.4069 to 0.4077 in.) |
Heat the cylinder head to 80 to 100°C (176 to 212°F).
Place the cylinder head on wooden blocks.
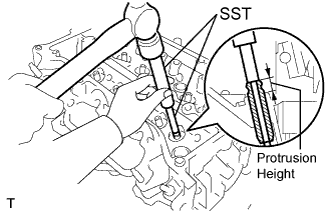 |
Using SST, tap in new valve guide bushes to the specified protrusion height.
 |
Using a sharp 5.5 mm reamer, ream the valve guide bushings to obtain the specified clearance.
| 12. INSTALL EXHAUST VALVE GUIDE BUSH |
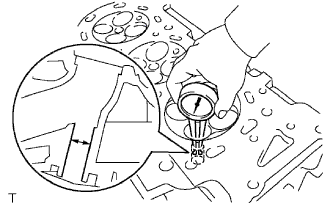 |
Using a caliper gauge, measure the bush bore diameter of the cylinder head.
| Bush size | Bush bore diameter |
| STD | 10.285 to 10.306 mm (0.4049 to 0.4057 in.) |
| O/S 0.05 | 10.335 to 10.356 mm (0.4069 to 0.4077 in.) |
Heat the cylinder head to 80 to 100°C (176 to 212°F).
Place the cylinder head on wooden blocks.
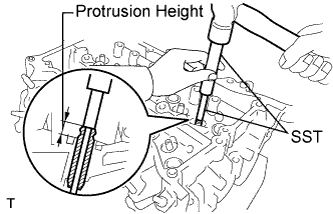 |
Using SST, tap in new valve guide bushes to the specified protrusion height.
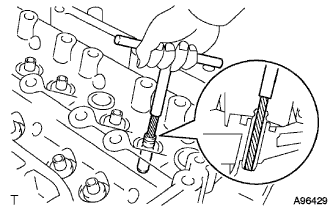 |
Using a sharp 5.5 mm reamer, ream the valve guide bushings to obtain the specified clearance.
| 13. INSTALL RING PIN |
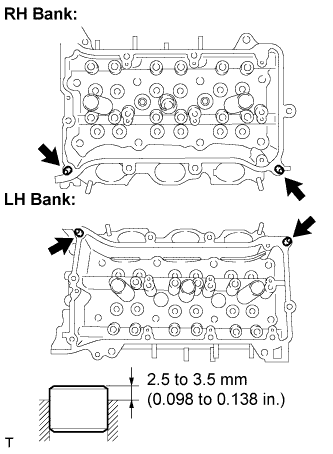 |
Using a plastic hammer, tap in new ring pins to the specified protrusion height.
| 14. INSTALL NO. 1 STRAIGHT SCREW PLUG |
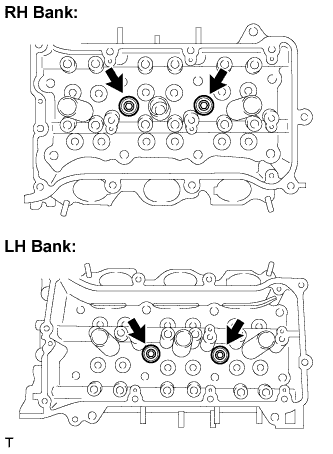 |
Using a 10 mm hexagon wrench, install 4 new gaskets and the straight screw plugs.
| 15. INSTALL NO. 2 STRAIGHT SCREW PLUG |
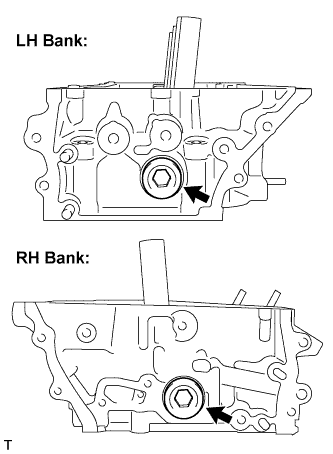 |
Using a 14 mm hexagon wrench, install 2 new gaskets and the 2 straight screw plugs.
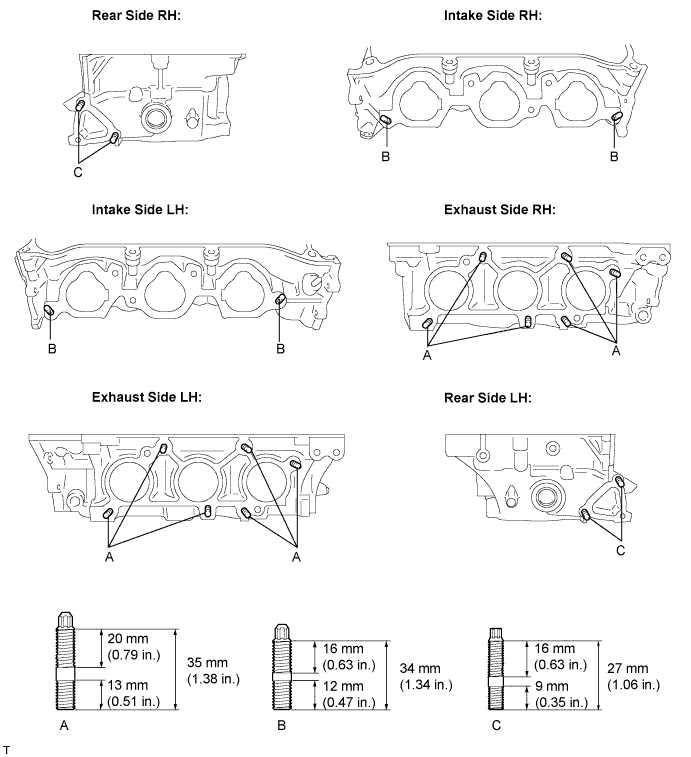
| 16. INSTALL STUD BOLT |
Using E6 and E8 "torx" sockets, install the stud bolts.
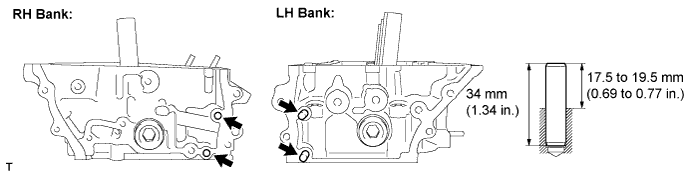
| 17. INSTALL STRAIGHT PIN |
Using a plastic hammer, tap in new straight pins as shown in the illustration.
| 18. INSTALL VALVE SPRING SEAT |
Install the valve spring seats to the cylinder head.
| 19. INSTALL VALVE STEM OIL SEAL |
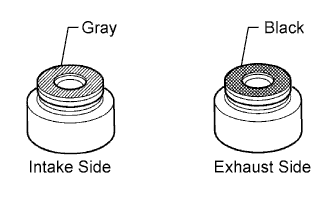 |
Apply a light coat of engine oil to new oil seals.
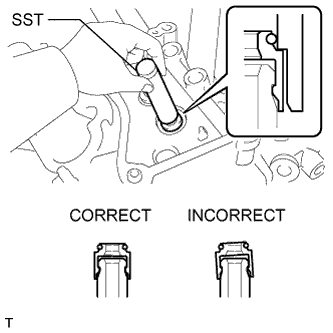 |
Using SST, push in the oil seals.
| 20. INSTALL EXHAUST VALVE |
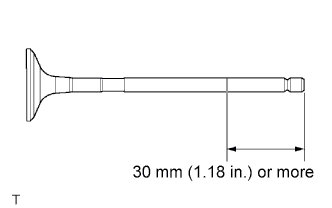 |
Apply a sufficient coat of engine oil to the tip area of the intake valve shown in the illustration.
Install the valve, compression spring and spring retainer to the cylinder head.
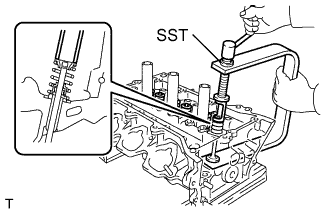 |
Using SST, compress the spring and install the 2 retainer locks.
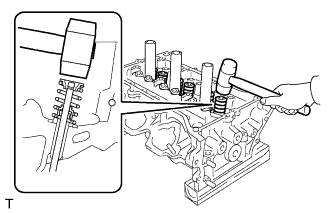 |
Using a plastic hammer, lightly tap the valve stem tip to ensure a proper fit.
| 21. INSTALL INTAKE VALVE |
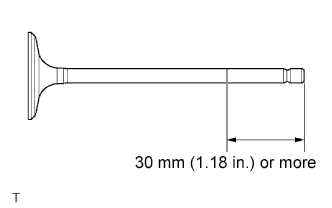 |
Apply a sufficient coat of engine oil to the tip area of the intake valve shown in the illustration.
Install the valve, compression spring and spring retainer to the cylinder head.
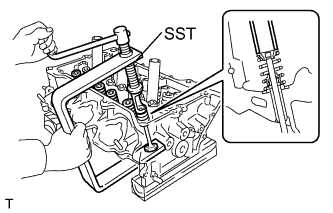 |
Using SST, compress the spring and install the 2 retainer locks.
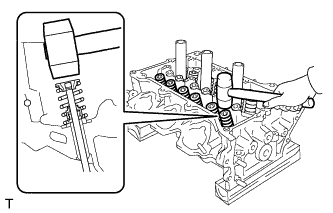 |
Using a plastic hammer, lightly tap the valve stem tip to ensure a proper fit.
| 22. INSTALL VALVE STEM CAP |
Apply a light coat of engine oil to the valve stem caps.
Install the valve stem caps on the valves.
| 23. INSTALL ENGINE REAR OIL SEAL |
Place the oil seal retainer on wooden blocks.
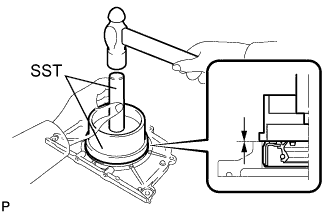 |
Using SST, tap in a new oil seal until its surface is flush with the oil seal retainer edge.
| 24. INSTALL ENGINE REAR OIL SEAL RETAINER |
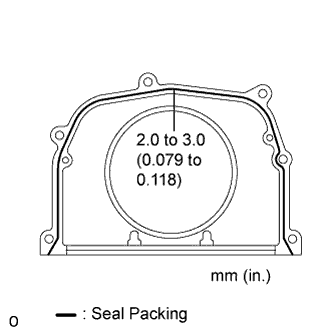 |
Apply seal packing in a continuous line as shown in the illustration.
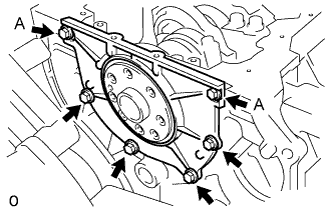 |
Install the oil seal retainer with the 6 bolts.
| 25. INSTALL WATER INLET PIPE |
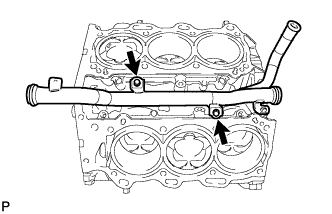 |
Install the water inlet pipe with the 2 bolts.
Install the water by-pass hose No. 1.
| 26. INSTALL CYLINDER HEAD SUB-ASSEMBLY RH |
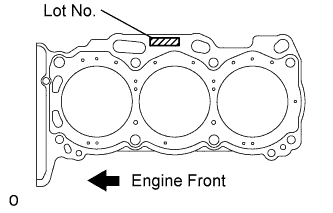 |
Place the cylinder head gasket on the cylinder block surface with the Lot No. stamp upward.
Place the cylinder head on the cylinder block.
Apply a light coat of engine oil to the threads and under the heads of the cylinder head bolts.
Step 1
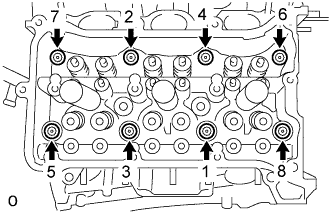 |
Using a 10 mm bi-hexagon wrench, install and uniformly tighten the 8 cylinder head bolts with the plate washers in several steps and in the sequence shown in the illustration.
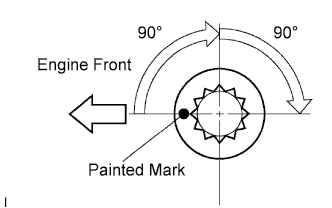 |
Step 2
Mark the cylinder head bolt head with paint as shown in the illustration.
Tighten the cylinder head bolts another 90°.
Step 3
Tighten the cylinder head bolts by an additional 90°.
Check that the painted mark is now facing rearward.
| 27. INSTALL CYLINDER HEAD SUB-ASSEMBLY LH |
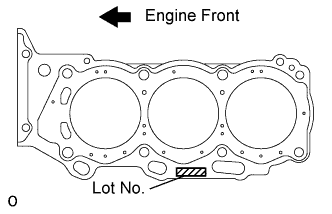 |
Place the cylinder head gasket on the cylinder block surface with the Lot No. stamp upward.
Place the cylinder head on the cylinder block.
Apply a light coat of engine oil to the threads and under the heads of the cylinder head bolts.
Step 1
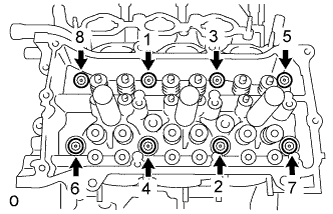 |
Using a 10 mm bi-hexagon wrench, install and uniformly tighten the 8 cylinder head bolts with the plate washers in several steps in the sequence shown in the illustration.
|
Step 2
Mark the cylinder head bolt head with paint as shown in the illustration.
Tighten the cylinder head bolts by 90°.
Step 3
Tighten the cylinder head bolts by an additional 90°.
Check that the painted mark is now facing rearward.
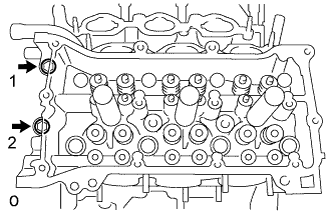 |
Tighten the 2 bolts in the order shown in the illustration.
| 28. INSTALL VALVE LASH ADJUSTER ASSEMBLY |
Place the lash adjuster into a container filled with engine oil.
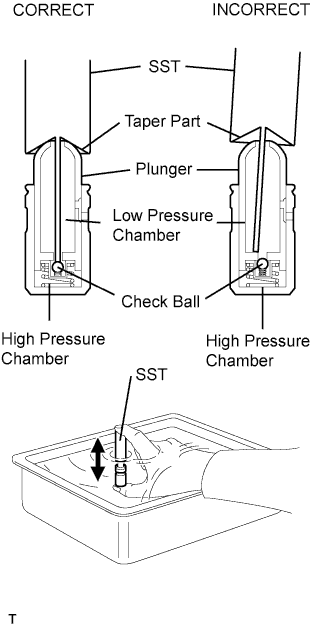 |
Insert the SST's tip into the lash adjuster's plunger and use the tip to press down on the check ball inside the plunger.
Squeeze the SST and lash adjuster together to move the plunger up and down 5 to 6 times.
Check the movement of the plunger and bleed the air.
After bleeding the air, remove the SST. Then, try to press the plunger quickly and firmly with a finger.
Install the lash adjusters.
| 29. INSTALL NO. 1 VALVE ROCKER ARM SUB-ASSEMBLY |
Apply engine oil to the lash adjuster tip and valve stem cap end.
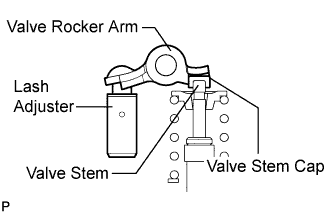 |
Make sure that the valve rocker arms are installed as shown in the illustration.
| 30. INSTALL CAMSHAFT BEARING CAP (for Bank 1) |
Apply engine oil to the camshaft journals, camshaft housing and bearing caps.
Install the camshaft and No. 2 camshaft to the camshaft housing RH.
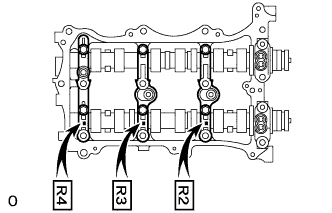 |
Make sure of the marks and numbers on the camshaft bearing caps and place them in each proper position and direction.
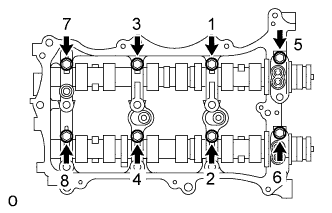 |
Temporarily tighten the 8 bolts in the order shown in the illustration.
| 31. INSTALL CAMSHAFT HOUSING SUB-ASSEMBLY RH |
|
Make sure that the valve rocker arm is installed as shown in the illustration.
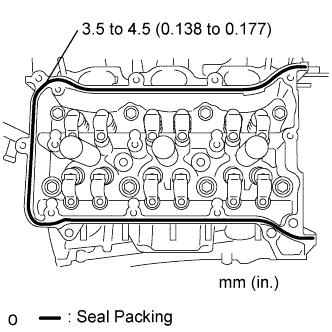 |
Apply seal packing in a continuous line as shown in the illustration.
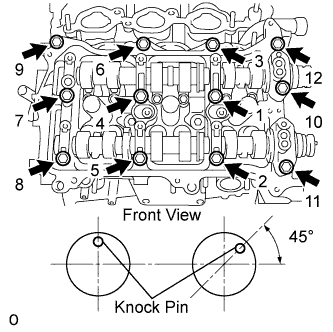 |
Install the camshaft housing RH and tighten the 12 bolts in the order shown in the illustration.
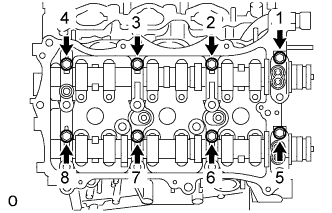 |
Tighten the 8 bolts in the order shown in the illustration.
| 32. INSTALL CAMSHAFT BEARING CAP (for Bank 2) |
Apply engine oil to the camshaft journals, camshaft housing and bearing caps.
Install the No. 3 camshaft and No. 4 camshaft to the camshaft housing LH.
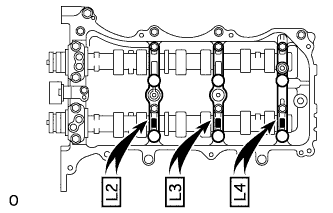 |
Make sure of the marks and numbers on the camshaft bearing caps and place them in each proper position and direction.
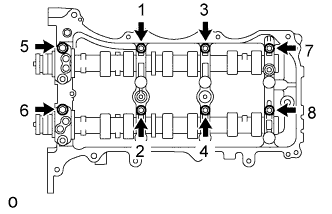 |
Temporarily tighten the 8 bolts in the order shown in the illustration.
| 33. INSTALL CAMSHAFT HOUSING SUB-ASSEMBLY LH |
|
Make sure that the valve rocker arm is installed as shown in the illustration.
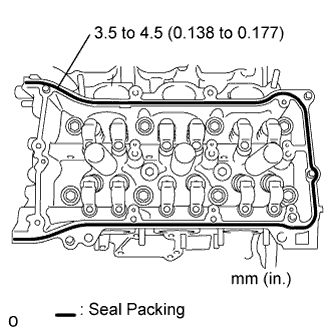 |
Apply seal packing in a continuous line as shown in the illustration.
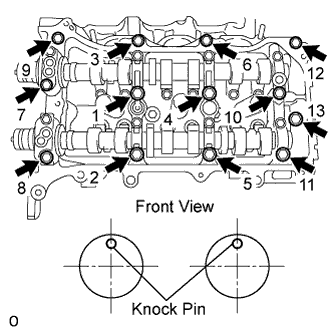 |
Install the camshaft housing LH and tighten the 13 bolts in the order shown in the illustration.
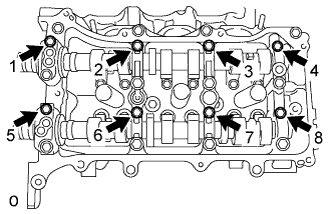 |
Tighten the 8 bolts in the order shown in the illustration.
| 34. INSTALL NO. 2 CHAIN TENSIONER ASSEMBLY |
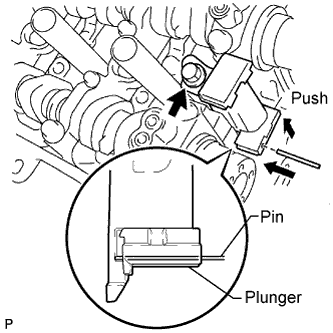 |
Install the No. 2 chain tensioner with the bolt.
While pushing in the tensioner, insert a pin of φ 1.0 mm (0.039 in.) into the hole to fix it.
| 35. INSTALL CAMSHAFT TIMING GEARS AND NO. 2 CHAIN (for Bank 1) |
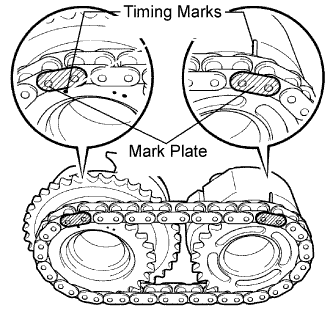 |
Align the mark plate (yellow) with the timing marks (1-dot mark) of the camshaft timing gears as shown in the illustration.
Apply a light coat of engine oil to the bolt threads and bolt-seating surface.
Align the knock pin of the camshaft with the pin hole of the camshaft timing gear. Install the camshaft timing gear and camshaft timing exhaust gear RH with the No. 2 chain installed.
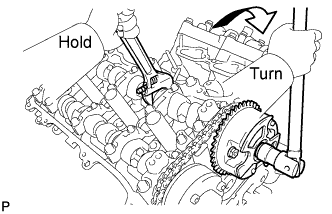 |
Hold the hexagonal portion of the camshaft with a wrench, and tighten the 2 bolts.
Remove the pin from the chain tensioner.
| 36. INSTALL NO. 3 CHAIN TENSIONER ASSEMBLY |
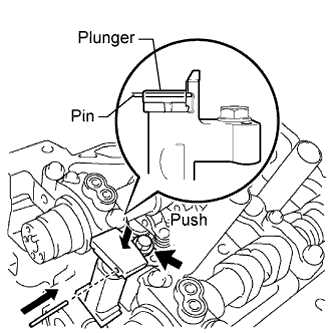 |
Install the chain tensioner with the bolt.
While pushing in the tensioner, insert a pin of φ 1.0 mm (0.039 in.) into the hole to hold it.
| 37. INSTALL CAMSHAFT TIMING GEARS AND NO. 2 CHAIN (for Bank 2) |
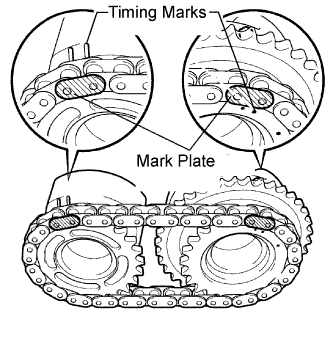 |
Align the mark plate (yellow) with the timing marks (2-dot mark) of the camshaft timing gears as shown in the illustration.
Apply a light coat of engine oil to the bolt threads and bolt-seating surface.
Align the knock pin of the camshaft with the pin hole of the camshaft timing gear. Install the camshaft timing gear and camshaft timing exhaust gear LH with the No. 2 chain installed.
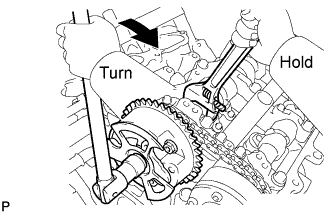 |
Hold the hexagonal portion of the camshaft with a wrench, and tighten the 2 bolts.
Remove the pin from the chain tensioner.
| 38. INSTALL NO. 1 CHAIN VIBRATION DAMPER |
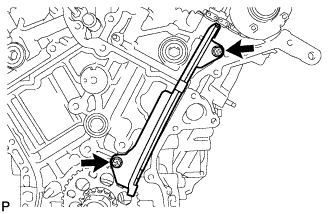 |
Install the chain vibration damper with the 2 bolts.
| 39. INSTALL NO. 2 CHAIN VIBRATION DAMPER |
Install the 2 chain vibration dampers.
| 40. INSTALL CRANKSHAFT TIMING SPROCKET |
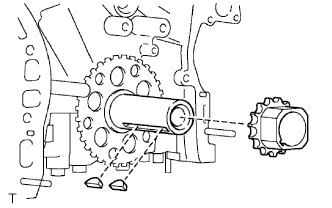 |
Install the 2 timing gear set keys and timing sprocket as shown in the illustration.
| 41. INSTALL IDLE SPROCKET ASSEMBLY |
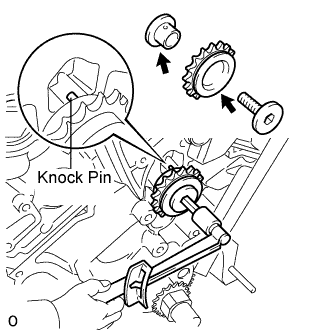 |
Apply a light coat of engine oil to the rotating surface of the No. 1 idle gear shaft.
Temporarily install the No. 1 idle gear shaft and idle sprocket with the No. 2 idle gear shaft while aligning the knock pin of the No. 1 idle gear with the knock pin groove of the cylinder block.
Using a 10 mm hexagon wrench, tighten the No. 2 idle gear shaft.
| 42. INSTALL CHAIN SUB-ASSEMBLY |
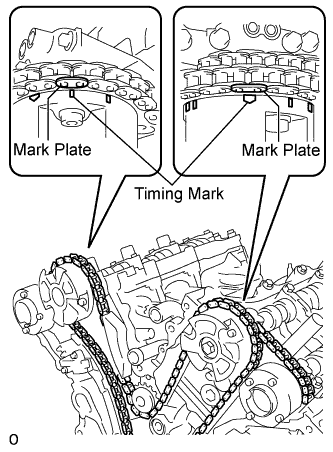 |
Align the mark plate and timing marks as shown in the illustration and install the chain.
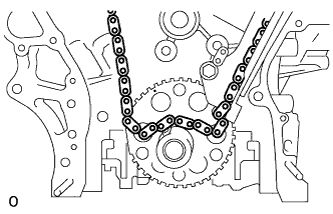 |
Do not pass the chain over the crankshaft, just put it on it.
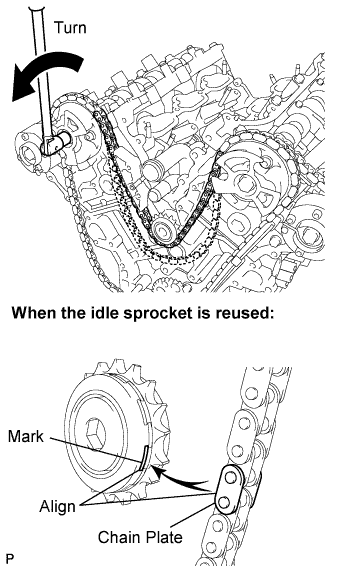 |
Turn the camshaft timing gear assembly on the RH bank counterclockwise to tighten the chain between the banks.
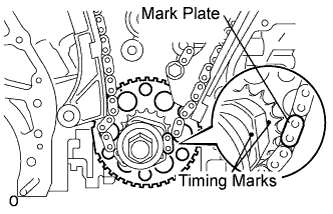 |
Align the mark plate and timing mark as shown in the illustration and install the chain onto the crankshaft timing sprocket.
Temporarily tighten the pulley set bolt.
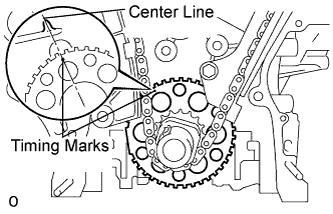 |
Turn the crankshaft clockwise to set it to the RH block bore center line (TDC / compression).
| 43. INSTALL CHAIN TENSIONER SLIPPER |
Install the chain tensioner slipper.
| 44. INSTALL NO. 1 CHAIN TENSIONER ASSEMBLY |
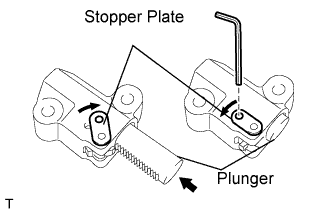 |
Move the stopper plate upward to release the lock, and push the plunger deep into the tensioner.
Move the stopper plate downward to set the lock, and insert a hexagon wrench into the hole of the stopper plate.
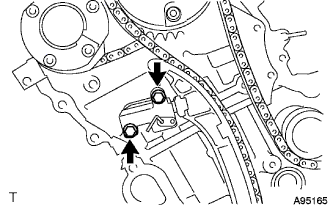 |
Install the chain tensioner with the 2 bolts.
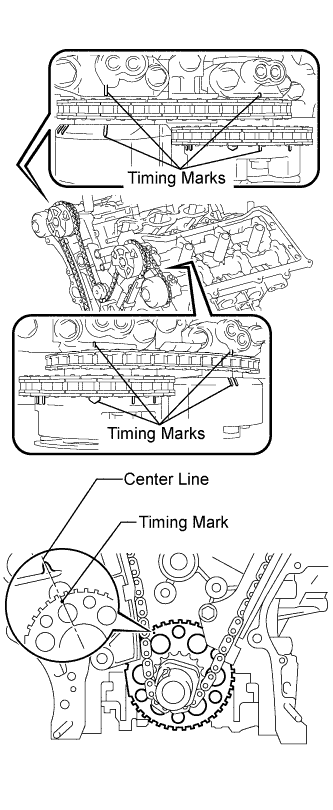 |
Remove the hexagon wrench of the chain tensioner. Check that each timing mark is aligned with the crankshaft at the TDC / compression.
Remove the pulley set bolt.
| 45. INSTALL TIMING CHAIN CASE OIL SEAL |
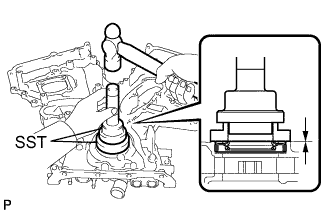 |
Using SST, tap in a new oil seal until its surface is flush with the timing gear case edge.
| 46. INSTALL WATER PUMP ASSEMBLY |
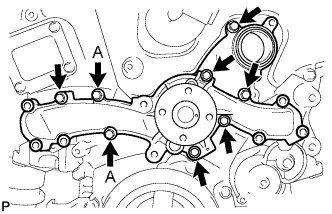 |
Install a new gasket and the water pump with the 8 bolts.
| 47. INSTALL TIMING CHAIN COVER SUB-ASSEMBLY |
Apply seal packing in a continuous line to the engine unit as shown in the following illustration.
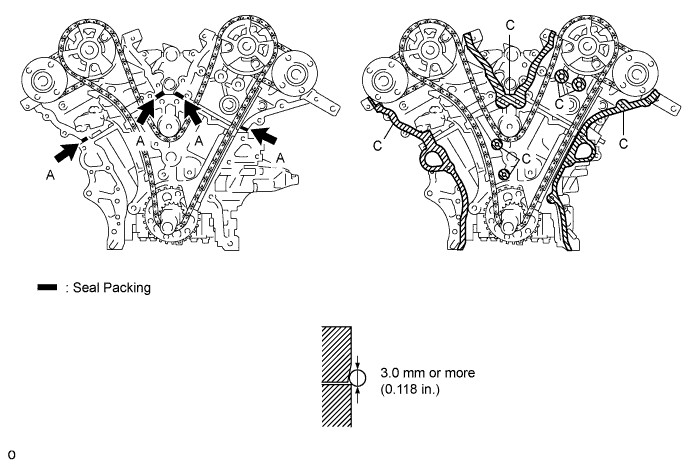
Apply seal packing in a continuous line to the timing chain cover as shown in the following illustration.
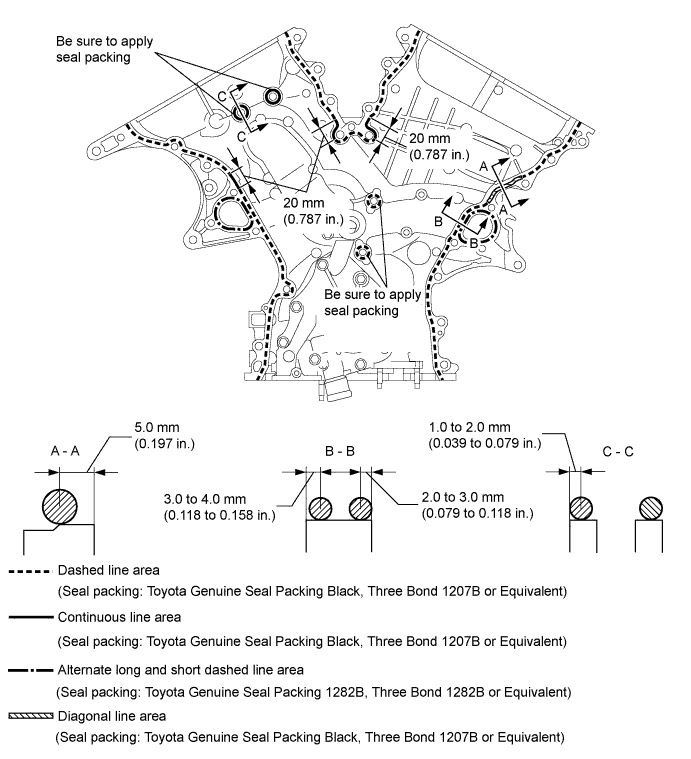
| Area | Seal Packing Diameter | Application Position from Inside Seal Line |
| Continuous Line Area | 4.5 mm or more (0.177 in.) | 3.0 to 4.0 mm (0.118 to 0.158 in.) |
| Alternate Long and Dashed Line Area | 3.5 mm or more (0.138 in.) | 2.0 to 3.0 mm (0.079 to 0.118 in.) |
| Dashed Line Area | 3.5 mm or more (0.138 in.) | 3.0 to 4.0 mm (0.118 to 0.158 in.) |
| Diagonal Line Area | 6.0 mm or more (0.236 in.) | 5.0 mm (0.197 in.) |
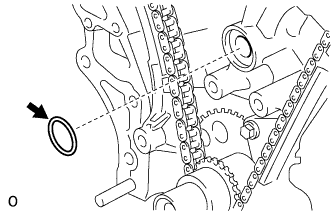 |
Install a new gasket.
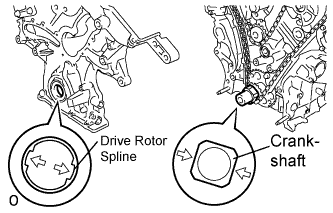 |
Align the oil pump's drive rotor spline and the crankshaft as shown in the illustration. Install the spline and chain cover to the crankshaft.
Temporarily tighten the timing chain cover with the 23 bolts and 2 nuts.
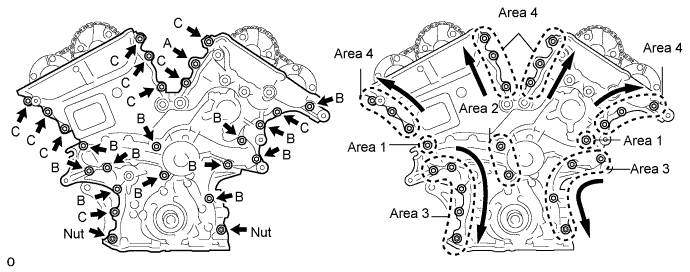
| Item | Length |
| Bolt A | 40 mm (1.57 in.) |
| Bolt B | 55 mm (2.17 in.) |
| Bolt C | 25 mm (0.98 in.) |
Fully tighten the bolts in this order: Area 1 and Area 2.
Fully tighten the bolts and nuts in this order: Area 3.
Fully tighten the bolts in this order: Area 4.
Install a new gasket and the chain cover plate with the 4 bolts.
| 48. INSTALL WATER INLET HOUSING |
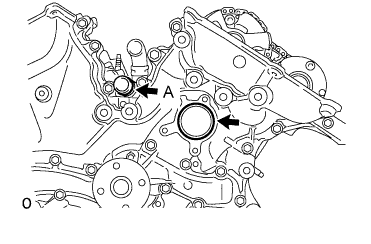 |
Install 2 new O-rings.
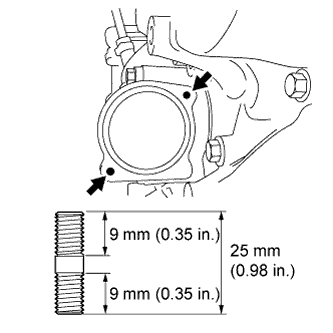 |
Install the stud bolts.
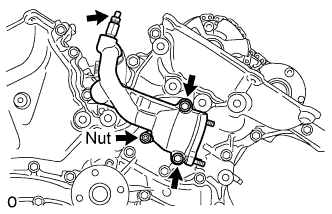 |
Install the water inlet with the 2 bolts and nut.
Connect the water by-pass hose No. 1.
Apply adhesive around the drain cock.
Install the housing drain cock to the water inlet housing.
Install the housing plug to the water drain cock.
Install a new gasket to the thermostat.
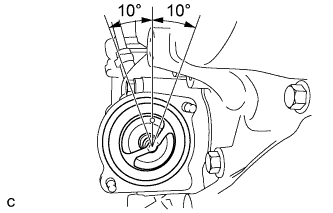 |
Align the thermostat jiggle valve with the upper stud bolt, and insert the thermostat in the water inlet housing.
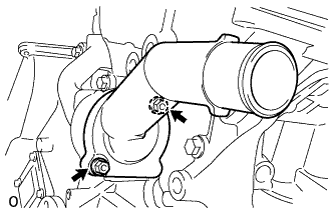 |
Install the water inlet with the 2 nuts.
| 49. INSTALL FRONT ENGINE MOUNTING BRACKET NO. 1 LH |
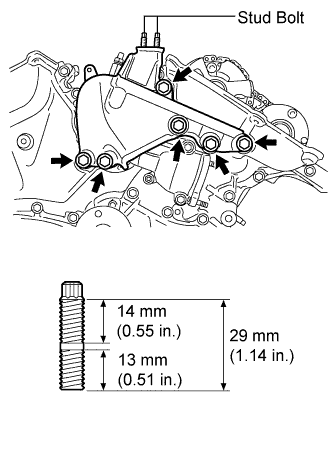 |
Install the engine mounting bracket with the 6 bolts.
When replacing a stud bolt, install it by using an E8 "torx" socket wrench.
| 50. INSTALL OIL PAN BAFFLE PLATE NO.1 |
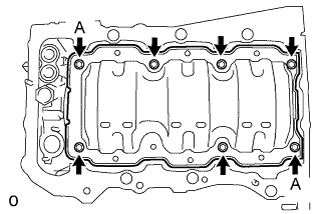 |
Install the oil pan baffle plate with the 7 bolts.
| 51. INSTALL OIL PAN SUB-ASSEMBLY |
When replacing a stud bolt, install it by using an E8 "torx" socket wrench.
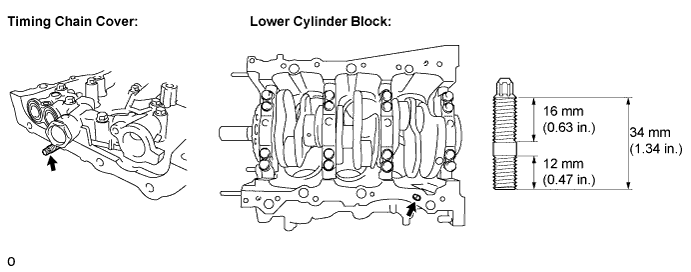
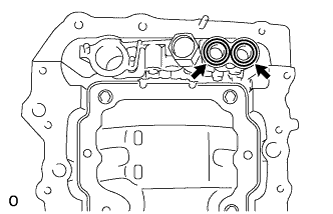 |
Install 2 new O-rings.
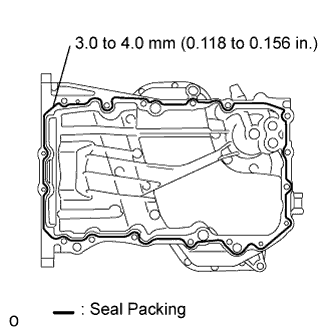 |
Apply seal packing in a continuous line as shown in the illustration.
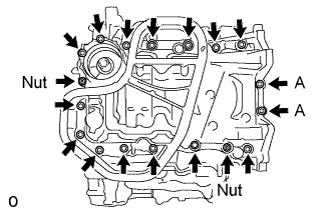 |
Install the oil pan with the 16 bolts and 2 nuts.
| 52. INSTALL OIL STRAINER SUB-ASSEMBLY |
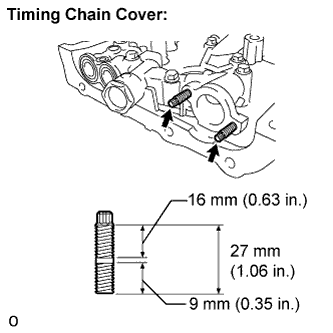 |
Using an E6 "torx" socket, install the stud bolts as shown in the illustration.
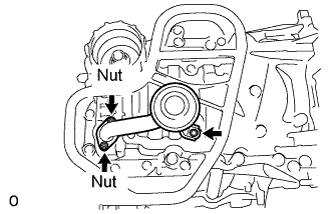 |
Install a new gasket and the oil strainer with the bolt and 2 nuts.
| 53. INSTALL NO. 2 OIL PAN SUB-ASSEMBLY |
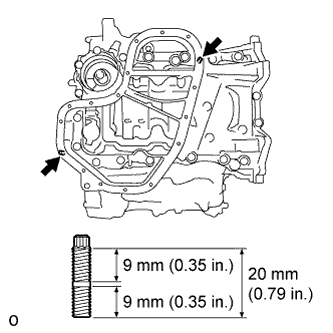 |
Using an E6 "torx" socket, install the stud bolts as shown in the illustration.
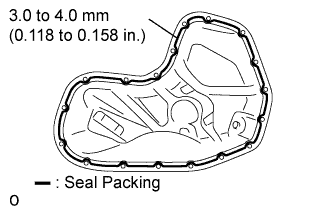 |
Apply seal packing in a continuous line as shown in the illustration.
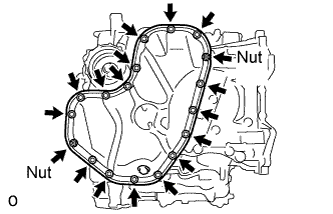 |
Install the oil pan with the 16 bolts and 2 nuts.
| 54. INSTALL OIL PAN DRAIN PLUG |
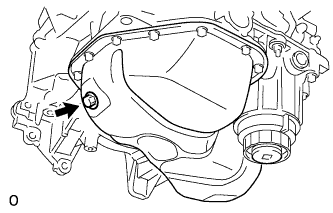 |
Install a new gasket and the drain plug.
| 55. INSTALL CYLINDER HEAD COVER SUB-ASSEMBLY (for Bank 1) |
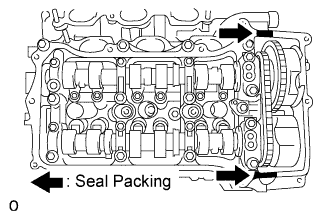 |
Apply seal packing as shown in the illustration.
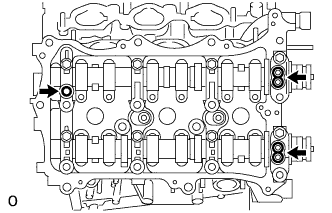 |
Install 3 new gaskets as shown in the illustration.
Install a new gasket to the head cover.
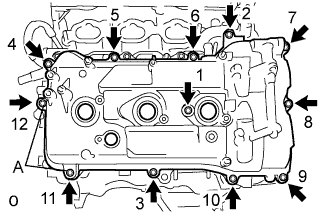 |
Install a head cover with the 12 bolts and a new washer.
| 56. INSTALL CYLINDER HEAD COVER SUB-ASSEMBLY (for Bank 2) |
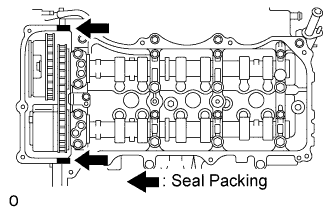 |
Apply seal packing as shown in the illustration.
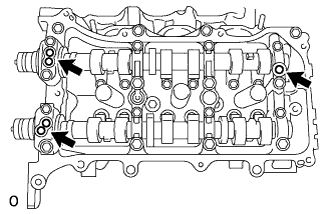 |
Install 3 new gaskets as shown in the illustration.
Install a new gasket to the head cover.
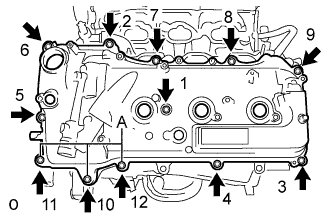 |
Install the head cover with the 12 bolts and a new washer.
| 57. INSTALL WATER OUTLET |
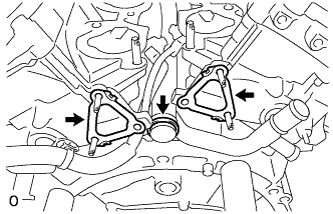 |
Install 2 new gaskets and a new O-ring.
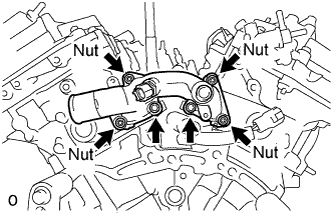 |
Install the water by-pass joint with the 2 bolts and 4 nuts.
| 58. INSTALL CRANKSHAFT PULLEY |
Align the pulley set key with the key groove of the pulley, and slide on the pulley.
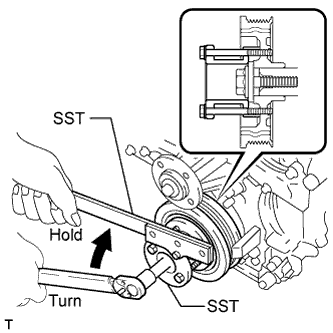 |
Using SST, install the pulley bolt.
| 59. INSTALL OIL FILTER ELEMENT |
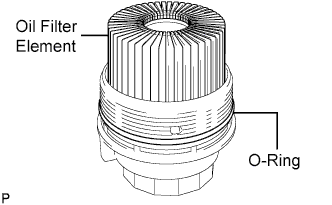 |
Clean the inside of the oil filter cap, the threads and O-ring groove.
Apply a light coat of engine oil to a new O-ring and install it to the oil filter cap.
Set a new oil filter element to the oil filter cap.
Remove dirt or foreign matter from the installation surface of the engine.
Apply a light coat of engine oil to the O-ring again and install the oil filter cap.
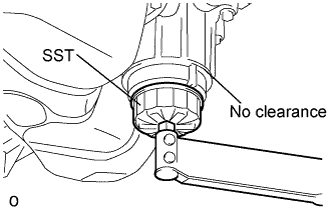 |
Using SST, tighten the oil filter cap.
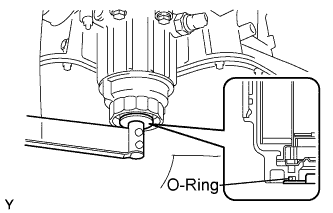 |
Apply a light coat of engine oil to a new O-ring and install it to the oil filter cap.
Install the oil filter drain plug to the oil filter cap.
| 60. INSTALL CYLINDER BLOCK WATER DRAIN COCK SUB-ASSEMBLY |
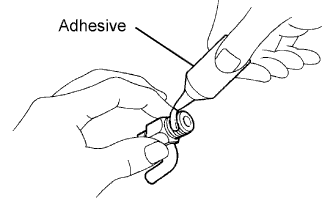 |
Apply adhesive around the drain cocks.
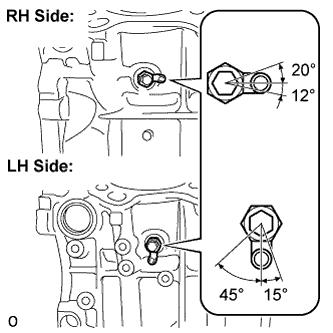 |
Install the water drain cocks as shown in the illustration.
Install the water drain cock plugs to the water drain cocks.
| 61. INSTALL NO. 1 OIL PIPE |
Make sure that there is no foreign matter on the mesh of the oil control valve filter LH.
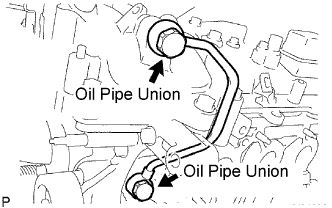 |
Install the oil control valve filter LH to the oil pipe union. Install new gaskets and temporarily install the oil pipe (on the head cover side).
Install a new gasket and temporarily install the oil pipe (on the cylinder head side) with the oil check valve bolt.
Tighten the oil pipe union (on the head cover side).
Tighten the oil pipe union (on the cylinder head side).
| 62. INSTALL OIL PIPE |
Make sure that there is no foreign matter on the mesh of the oil control valve filter RH.
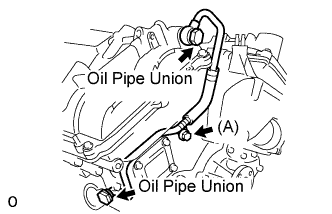 |
Install the oil control valve filter RH to the oil pipe union. Install new gaskets and temporarily install the oil pipe (on the head cover side).
Install a new gasket and temporarily install the oil pipe (on the cylinder head side) with the oil check valve bolt.
Install the bolt (A) to the cylinder head.
Tighten the oil pipe union (on the head cover side).
Tighten the oil pipe union (on the cylinder head side).
| 63. INSTALL CRANKSHAFT POSITION SENSOR |
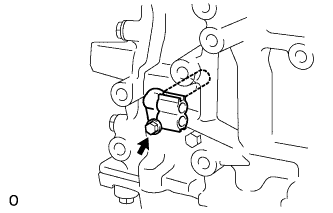 |
Install the sensor with the bolt.
| 64. INSTALL CAMSHAFT TIMING OIL CONTROL VALVE ASSEMBLY |
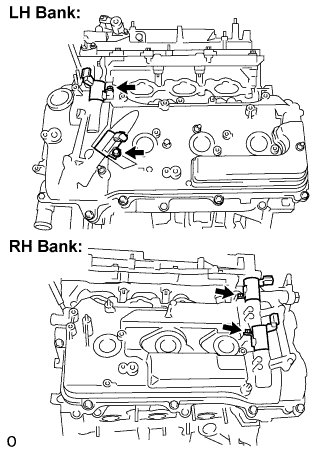 |
Install the 4 oil control valves with the 4 bolts.
| 65. INSTALL CAMSHAFT POSITION SENSOR |
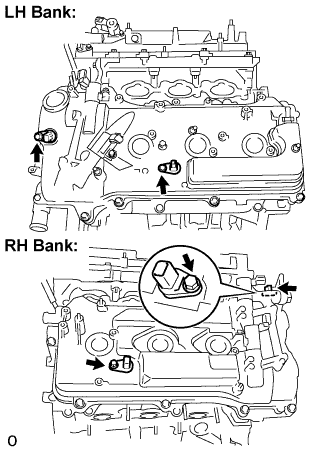 |
Install the 4 sensors with the 4 bolts.
| 66. INSTALL VENTILATION VALVE SUB-ASSEMBLY |
Apply adhesive around the ventilation valve.
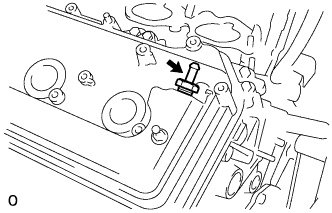 |
Install the ventilation valve.
| 67. INSTALL SPARK PLUG |
Install the 6 spark plugs.
| 68. INSTALL OIL FILLER CAP SUB-ASSEMBLY |
Install a new gasket.
Install the oil filler cap.