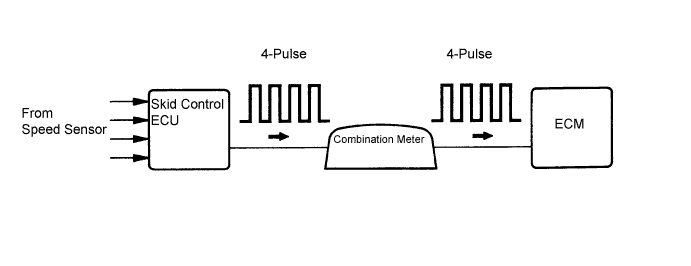
DTC P0500 Vehicle Speed Sensor "A" |
| DTC No. | DTC Detection Condition | Trouble Area |
| P0500 | Vehicle speed signal from vehicle speed sensor is cut for 0.14 sec. or more while cruise control is in operation |
|
| 1.READ VALUE USING INTELLIGENT TESTER (VEHICLE SPEED) |
Connect the intelligent tester to the DLC3.
Turn the ignition switch to the ON position.
Turn the tester on.
Select the following menu items: Powertrain / Engine / Date List / Vehicle Speed.
Drive the vehicle.
Read the value displayed on the tester.
|
| ||||
| OK | ||
 | ||
| ||
| 2.CHECK COMBINATION METER SYSTEM |
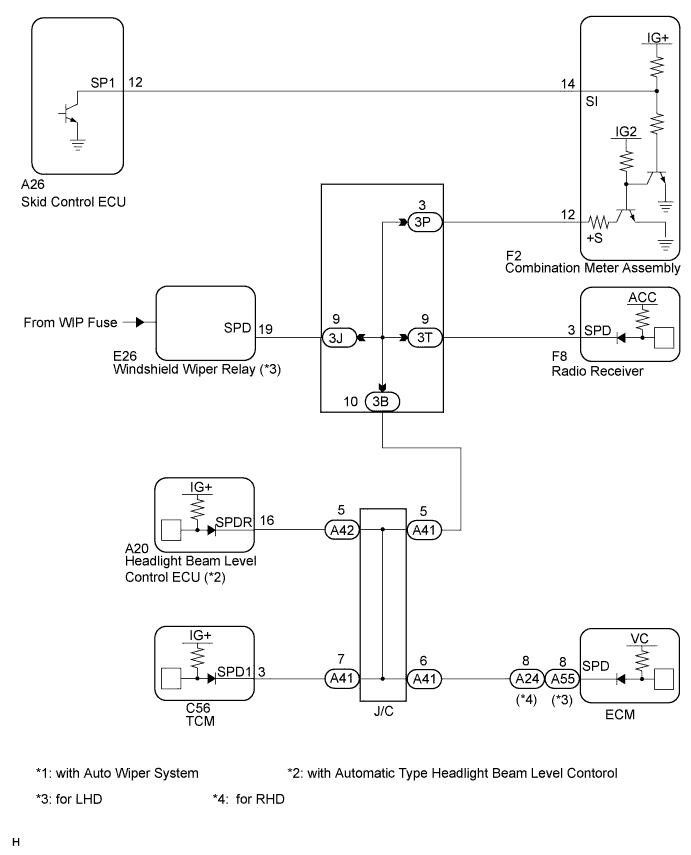
The circuits that send vehicle speed signals to this system are inspected in the meter system (Click here).
During inspection for the meter section, if there is an instruction that indicates to go back inspections for each system, proceed to the next step.
| NEXT | |
 |
| 3.CHECK HARNESS AND CONNECTOR (COMBINATION METER - ECM) |
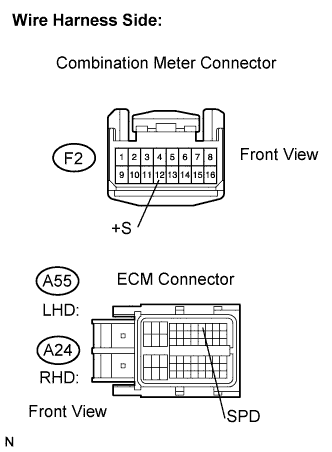 |
Disconnect the A24 or A55 ECM connector.
Disconnect the F2 combination meter connector.
Measure the resistance according to the value(s) in the table below.
Measure the resistance.
| Tester Connection | Specified Condition |
| +S (F2-12) - SPD (A24-8) | Below 1 Ω |
| Tester Connection | Specified Condition |
| +S (F2-12) - SPD (A55-8) | Below 1 Ω |
| Tester Connection | Specified Condition |
| +S (F2-12) or SPD (A24-8) - Body ground | 10 kΩ or higher |
| Tester Connection | Specified Condition |
| +S (F2-12) or SPD (A55-8) - Body ground | 10 kΩ or higher |
Reconnect the ECM connector.
Reconnect the combination meter connector.
|
| ||||
| OK | ||
| ||
| ||
| 4.CHECK HARNESS AND CONNECTOR (ECM - NO. 3 JUNCTION BLOCK) |
Disconnect the A24 or A55 ECM connector.
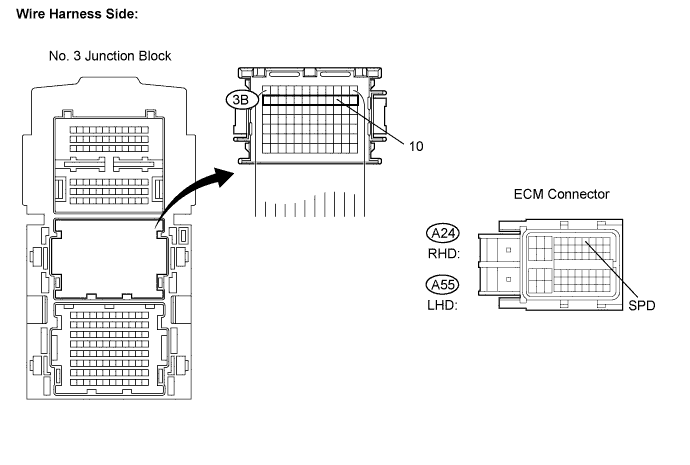
Disconnect the 3B No. 3 junction block connector.
Measure the resistance according to the value(s) in the table below.
| Tester Connection | Specified Condition |
| 3B-10 - SPD (A24-8) | Below 1 Ω |
| Tester Connection | Specified Condition |
| 3B-10 - SPD (A55-8) | Below 1 Ω |
Reconnect the ECM connector.
Reconnect the No. 3 junction block connector.
|
| ||||
| OK | ||
| ||
| ||

