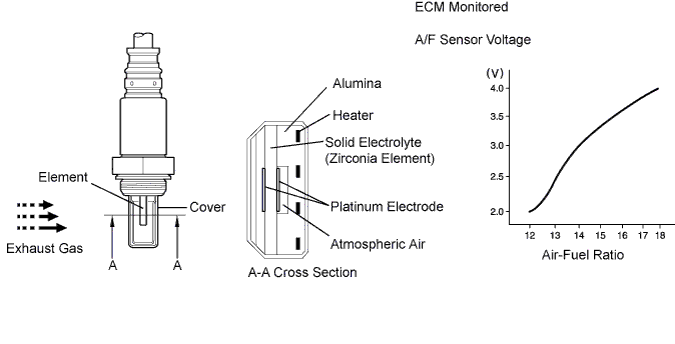
DTC P2195 Oxygen (A/F) Sensor Signal Stuck Lean (Bank 1 Sensor 1) |
DTC P2196 Oxygen (A/F) Sensor Signal Stuck Rich (Bank 1 Sensor 1) |
| DTC No. | DTC Detection Condition | Trouble Area |
| P2195 | Conditions (a) and (b) continue for 10 seconds or more (2 trip detection logic): (a) A/F sensor voltage more than 3.8 V (b) Heated Oxygen (HO2) sensor voltage 0.15 V or more |
|
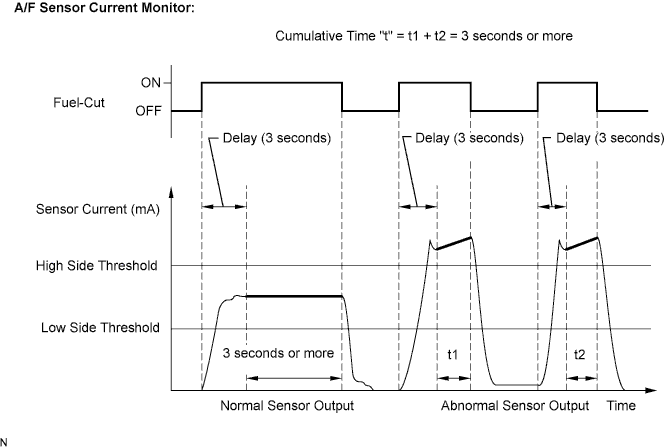
| While fuel-cut operation is performed (during vehicle deceleration), A/F sensor current 3.6 mA or more for 3 seconds (2 trip detection logic) |
| |
| P2196 | Conditions (a) and (b) continue for 10 seconds or more (2 trip detection logic): (a) A/F sensor voltage less than 2.8 V for 10 seconds (b) HO2 sensor voltage less than 0.6 V |
|
| While fuel-cut operation is performed (during vehicle deceleration), A/F sensor current less than 1.0 mA for 3 seconds (2 trip detection logic) |
|
| Tester Display (Sensor) | Injection Volume | Status | Voltage |
| AFS B1 S1 (A/F) | +25% | Rich | Less than 3.0 |
| -12.5% | Lean | More than 3.35 | |
| O2S B1 S2 (HO2) | +25% | Rich | More than 0.5 |
| -12.5% | Lean | Less than 0.4 |
| Case | A/F Sensor (Sensor 1) Output Voltage | HO2 Sensor (Sensor 2) Output Voltage | Main Suspected Trouble Area | ||
| 1 | Injection Volume +25% -12.5% |  | Injection Volume +25% -12.5% | | - |
| Output Voltage More than 3.35 V Less than 3.0 V |  | Output Voltage More than 0.5 V Less than 0.4 V |  | ||
| 2 | Injection Volume +25% -12.5% | | Injection Volume +25% -12.5% | |
|
| Output Voltage Almost no reaction |  | Output Voltage More than 0.5 V Less than 0.4 V | | ||
| 3 | Injection Volume +25% -12.5% | | Injection Volume +25% -12.5% | |
|
| Output Voltage More than 3.35 V Less than 3.0 V | | Output Voltage Almost no reaction | | ||
| 4 | Injection volume +25% -12.5% | | Injection Volume +25% -12.5% | |
|
| Output Voltage Almost no reaction | | Output Voltage Almost no reaction | | ||
| 1.CHECK ANY OTHER DTCS OUTPUT (IN ADDITION TO P2195 OR P2196) |
Connect the intelligent tester to the DLC3.
Turn the ignition switch to the ON position.
Turn the tester on.
Select the following menu items: Powertrain / Engine and ECT / DTC.
Read the DTCs.
| Display (DTC Output) | Proceed to |
| P2195 or P2196 | A |
| P2195 or P2196 and other DTCs | B |
|
| ||||
| A | |
 |
| 2.READ VALUE USING INTELLIGENT TESTER (TEST VALUE OF A/F SENSOR) |
Connect the intelligent tester to the DLC3.
Turn the ignition switch to the ON position and turn the tester on.
Clear the DTCs (Click here).
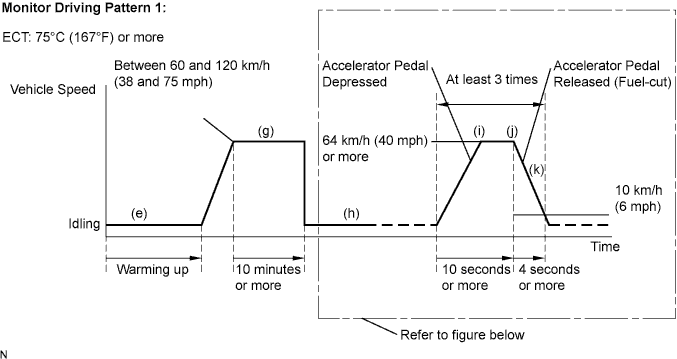
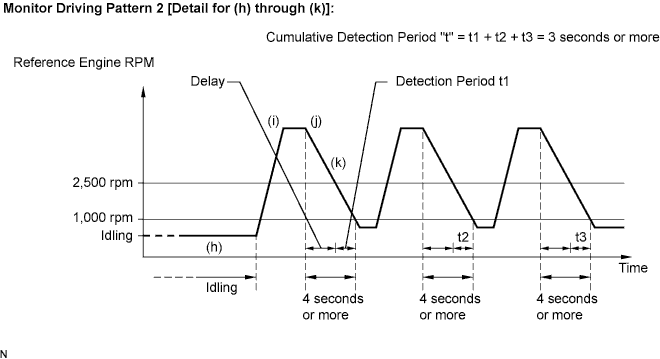
Drive the vehicle in accordance with the drive pattern described in the CONFIRMATION DRIVING PATTERN.
Select the following menu items: Powertrain / Engine and ECT / Data List / Monitor Status.
Check that the status of "O2S (A/FS) Monitor" is "Complete".
If the status is still "Incomplete", drive the vehicle according to the driving pattern again.
Select the following menu items: Powertrain / Engine and ECT / Data List / A/F Control System / AFS B1 S1.
Check the test value of the A/F sensor output current during fuel-cut (Refer to the Monitor Driving Pattern 2 [Detail for (h) through (k)] in the CONFIRMATION DRIVING PATTERN).
| Test Value | Proceed to |
| Within normal range (1.0 mA or more, and less than 3.6 mA) | A |
| Outside normal range (Less than 1.0 mA, or 3.6 mA or more) | B |
|
| ||||
| A | |
|
| 3.READ VALUE USING INTELLIGENT TESTER (OUTPUT VOLTAGE OF A/F SENSOR) |
Connect the intelligent tester to the DLC3.
Start the engine.
Turn the tester on.
Warm up the A/F sensor at an engine speed of 2,500 rpm for 90 seconds.
On the tester, select the following menu items: Powertrain / Engine and ECT / Data List / A/F Control System / Snapshot / AFS B1 S1 and Engine Speed.
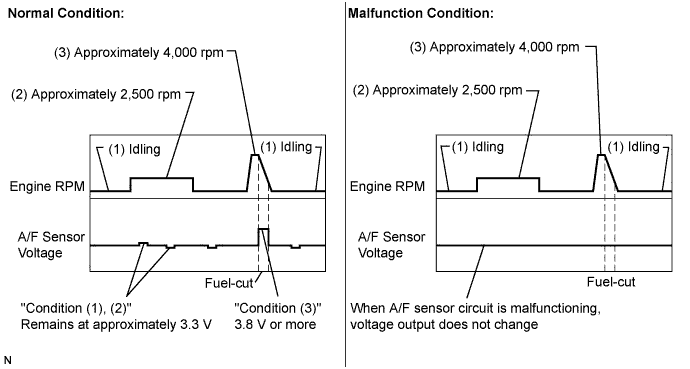
Check the A/F sensor voltage 3 times, when the engine is in each of the following conditions:
While idling (for at least 30 seconds)
At an engine speed of approximately 2,500 rpm (without any sudden changes in engine speed)
Raise the engine speed to 4,000 rpm and then quickly release the accelerator pedal so that the throttle valve is fully closed.
| Condition | A/F Sensor Voltage Variation | Reference |
| (1) and (2) | Remains at approximately 3.3 V | Between 3.1 V and 3.5 V |
| (3) | Increases to 3.8 V or more | This occurs during engine deceleration (when fuel-cut performed) |
|
| ||||
| OK | |
|
| 4.PERFORM CONFIRMATION DRIVING PATTERN |
| NEXT | |
|
| 5.CHECK WHETHER DTC OUTPUT RECURS (DTC P2195 OR P2196) |
Read the DTCs using the intelligent tester.
Select the following menu items: Powertrain / Engine and ECT / DTC.
| Display (DTC Output) | Proceed to |
| P2195 or P2196 | A |
| No output | B |
|
| ||||
| A | |
|
| 6.REPLACE AIR-FUEL RATIO SENSOR |
| NEXT | |
|
| 7.PERFORM CONFIRMATION DRIVING PATTERN |
| NEXT | |
|
| 8.CHECK WHETHER DTC OUTPUT RECURS (DTC P2195 OR P2196) |
Read the DTCs using the intelligent tester.
Select the following menu items: Powertrain / Engine and ECT / DTC.
| Display (DTC Output) | Proceed to |
| No output | A |
| P2195 or P2196 | B |
|
| ||||
| A | ||
 | ||
| ||
| 9.INSPECT AIR-FUEL RATIO SENSOR (HEATER RESISTANCE) |
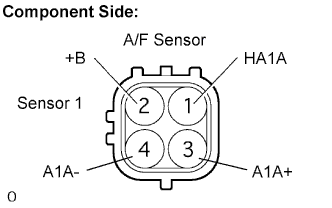 |
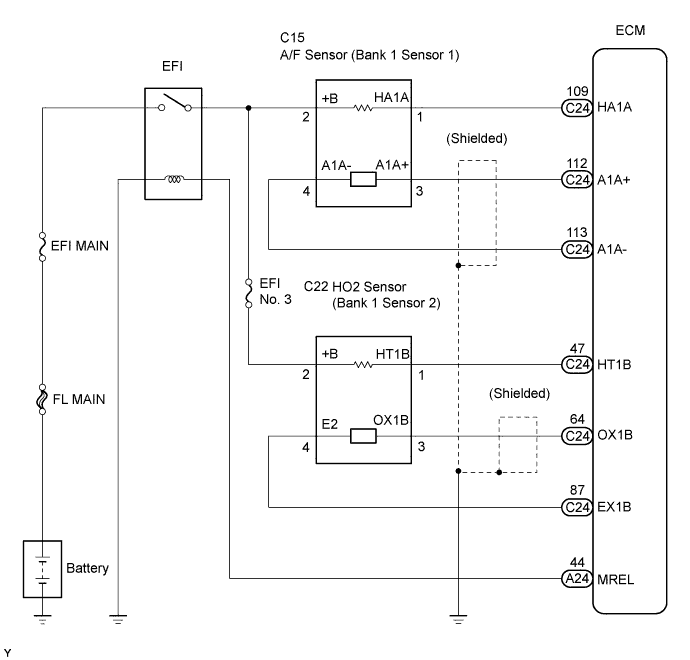
Disconnect the C15 A/F sensor connector.
Measure the resistance between the terminals of the A/F sensor connector.
| Tester Connection | Specified Condition |
| HA1A (1) - +B (2) | 1.8 to 3.4 Ω at 20°C (68°F) |
| HA1A (1) - A1A- (4) | 10 kΩ or higher |
Reconnect the A/F sensor connector.
|
| ||||
| OK | |
|
| 10.INSPECT ENGINE ROOM J/B (EFI RELAY, EFI MAIN FUSE) |
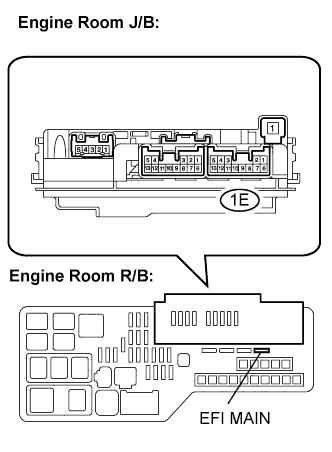 |
Inspect the EFI MAIN fuse.
Remove the EFI MAIN fuse from the engine room J/B.
Measure the EFI MAIN fuse resistance.
Reinstall the EFI MAIN fuse.
Inspect the EFI relay.
Remove the engine room J/B from the engine room R/B.
Measure the EFI relay resistance.
| Tester Connection | Specified Condition |
| 1E-7 - 1E-12 | 10 kΩ or higher |
| Below 1 Ω (Apply battery voltage between terminals 1E-9 and 1E-11) |
Reinstall the engine room J/B.
|
| ||||
| OK | |
|
| 11.CHECK HARNESS AND CONNECTOR (A/F SENSOR - ECM) |
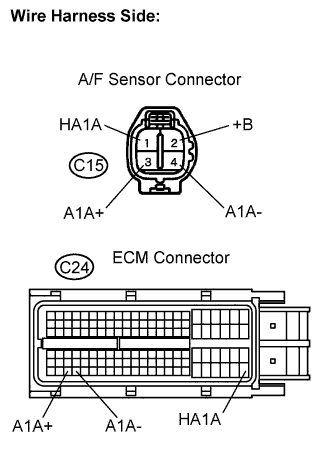 |
Disconnect the C15 A/F sensor connector.
Turn the ignition switch to the ON position.
Measure the voltage between the +B terminal of the A/F sensor connector and body ground.
| Tester Connection | Specified Condition |
| +B (C15-2) - Body ground | 9 to 14 V |
Turn the ignition switch off.
Disconnect the C24 ECM connector.
Measure the resistance between the terminals of the wire harness side connectors.
| Tester Connection | Specified Condition |
| HA1A (C15-1) - HA1A (C24-109) | Below 1 Ω |
| A1A+ (C15-3) - A1A+ (C24-112) | Below 1 Ω |
| A1A- (C15-4) - A1A- (C24-113) | Below 1 Ω |
| Tester Connection | Specified Condition |
| HA1A (C15-1) or HA1A (C24-109) - Body ground | 10 kΩ or higher |
| A1A+ (C15-3) or A1A+ (C24-112) - Body ground | 10 kΩ or higher |
| A1A- (C15-4) or A1A- (C24-113) - Body ground | 10 kΩ or higher |
Reconnect the ECM connector.
Reconnect the A/F sensor connector.
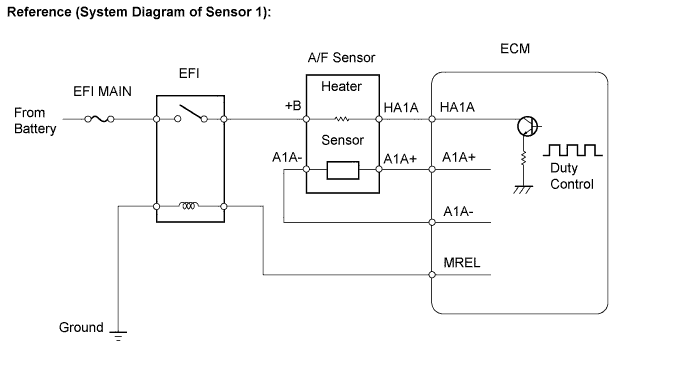
|
| ||||
| OK | |
|
| 12.REPLACE AIR-FUEL RATIO SENSOR |
| NEXT | |
|
| 13.PERFORM CONFIRMATION DRIVING PATTERN |
| NEXT | |
|
| 14.CHECK WHETHER DTC OUTPUT RECURS (DTC P2195 OR P2196) |
Read the DTCs using the intelligent tester.
Select the following menu items: Powertrain / Engine and ECT / DTC.
| Display (DTC Output) | Proceed to |
| No output | A |
| P2195 or P2196 | B |
|
| ||||
| A | ||
| ||
| ||

