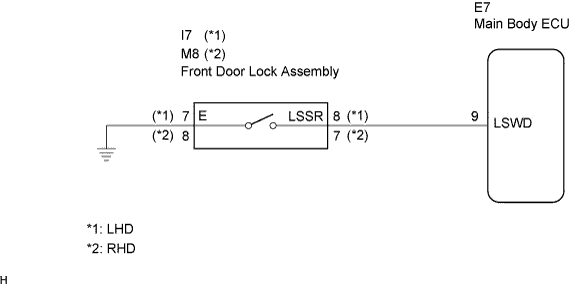
POWER DOOR LOCK CONTROL SYSTEM > Driver Side Door UNLOCK Detection Switch Circuit |
| 1.READ VALUE USING DATA LIST (DOOR UNLOCK DETECTION SWITCH) |
Check the DATA LIST to ensure proper function of the door unlock detection switch.
| Item | Measurement Item / Display (Range) | Normal Condition | Diagnostic Note |
| D-Door Lock Pos SW | Driver side door unlock detection switch signal /ON or OFF | ON: Driver side door is unlocked OFF: Driver side door is locked | - |
|
| ||||
| OK | ||
 | ||
| ||
| 2.INSPECT FRONT DOOR LOCK ASSEMBLY (DOOR UNLOCK DETECTION SWITCH) |
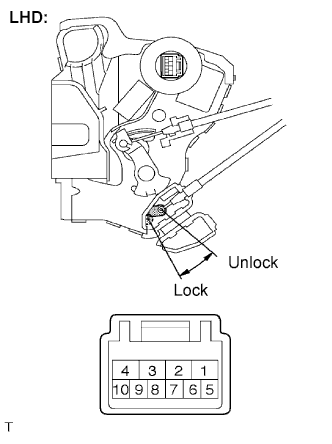 |
Inspect LHD models.
Remove the front door lock assembly LH.
Measure the resistance according to the value(s) in the table below.
| Tester Connection | Measurement Condition | Door Lock Condition | Specified Condition |
| 7 - 8 | Battery positive (+) → Terminal 4 Battery negative (-) → Terminal 1 | Lock | 10 kΩ or higher |
| 7 - 8 | Battery positive (+) → Terminal 1 Battery negative (-) → Terminal 4 | Unlock | Below 1 Ω |
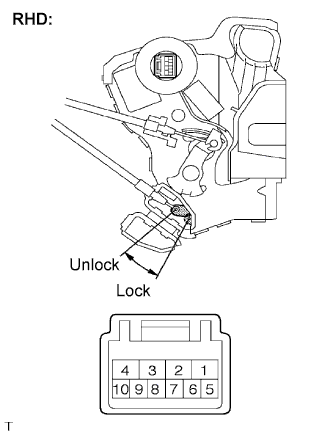 |
Inspect RHD models.
Remove the front door lock assembly RH.
Measure the resistance according to the value(s) in the table below.
| Tester Connection | Measurement Condition | Door Lock Condition | Specified Condition |
| 7 - 8 | Battery positive (+) → Terminal 4 Battery negative (-) → Terminal 1 | Lock | 10 kΩ or higher |
| 7 - 8 | Battery positive (+) → Terminal 1 Battery negative (-) → Terminal 4 | Unlock | Below 1 Ω |
|
| ||||
| OK | |
 |
| 3.CHECK WIRE HARNESS (FRONT DOOR LOCK ASSEMBLY - MAIN BODY ECU) |
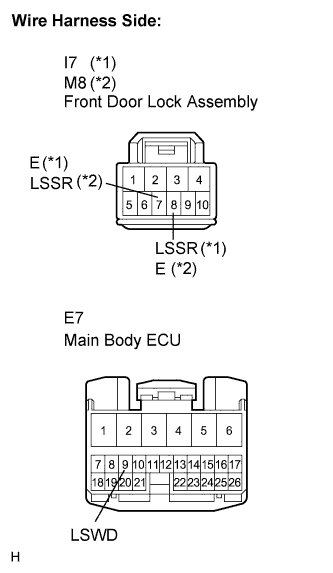 |
Disconnect the front door lock assembly connector.
Disconnect the main body ECU connector.
Measure the resistance according to the value(s) in the table below.
| Tester Connection (Symbols) | Condition | Specified Condition |
|
(*1) I7-8 (LSSR) - E7-9 (LSWD) | Always | Below 1 Ω |
|
(*1) I7-8 (LSSR) - Body ground | Always | 10 kΩ or higher |
|
(*1) I7-7 (E) - Body ground | Always | Below 1 Ω |
|
(*2) M8-7 (LSSR) - E7-9 (LSWD) | Always | Below 1 Ω |
|
(*2) M8-7 (LSSR) - Body ground | Always | 10 kΩ or higher |
|
(*2) M8-8 (E) - Body ground | Always | Below 1 Ω |
|
| ||||
| OK | ||
| ||
| ||

