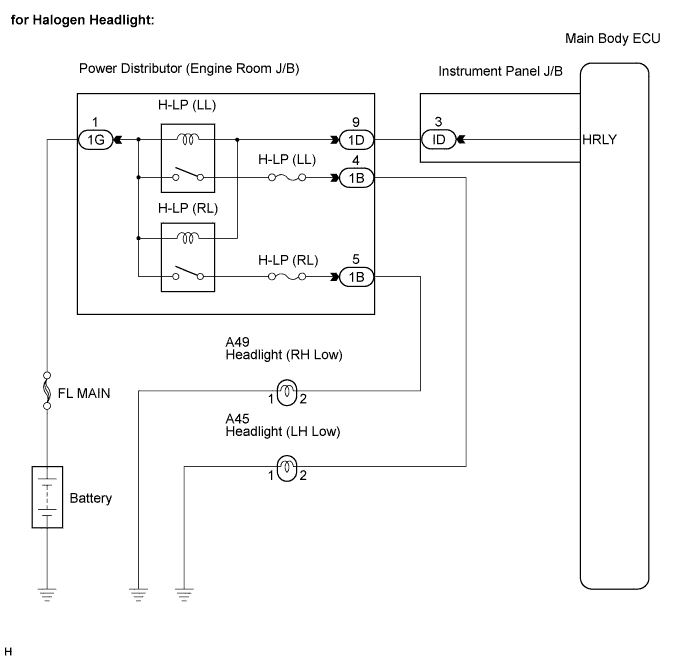
LIGHTING SYSTEM > Headlight Relay Circuit |
| 1.PERFORM ACTIVE TEST USING INTELLIGENT TESTER |
Connect the intelligent tester to the DLC3.
Turn the ignition switch to the ON position and turn the intelligent tester main switch on.
Select the item below in the ACTIVE TEST and then check that the relays operate.
| Item | Test Details | Diagnostic Note |
| HEAD RELAY | Headlight Relays ON / OFF | - |
|
| ||||
| NG | |
 |
| 2.INSPECT INSTRUMENT PANEL JUNCTION BLOCK ASSEMBLY |
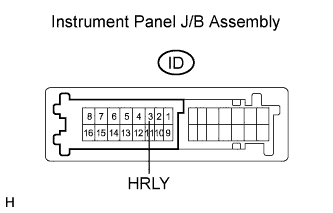 |
Measure the voltage according to the value(s) in the table below.
| Tester Connection | Condition | Specified Condition |
| ID-3 (HRLY) - Body ground | Light control switch OFF → HEAD | 10 to 14 V → Below 1 V |
|
| ||||
| NG | |
|
| 3.CHECK HARNESS AND CONNECTOR (BATTERY - ENGINE ROOM J/B ASSEMBLY) |
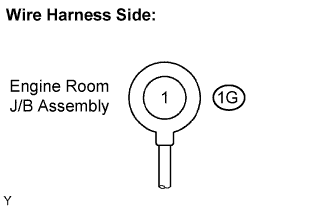 |
Disconnect the 1G engine room J/B assembly connector.
Measure the voltage according to the value(s) in the table below.
| Tester Connector | Condition | Specified Condition |
| 1G - Body ground | Always | 10 to 14 V |
|
| ||||
| OK | |
|
| 4.INSPECT ENGINE ROOM J/B BLOCK ASSEMBLY |
Reconnect the 1G engine room J/B assembly connector.
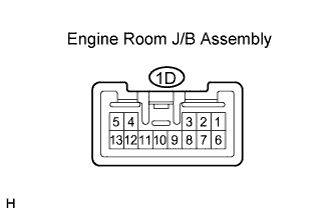 |
Disconnect the 1D engine room J/B assembly connector.
Measure the voltage according to the value(s) in the table below.
| Tester Connection | Condition | Specified Condition |
| 1D-9 - Body ground | Always | 10 to 14 V |
|
| ||||
| OK | |
|
| 5.CHECK HARNESS AND CONNECTOR (ENGINE ROOM J/B ASSEMBLY - INSTRUMENT PANEL J/B ASSEMBLY) |
Reconnect the 1D engine room J/B assembly connectors.
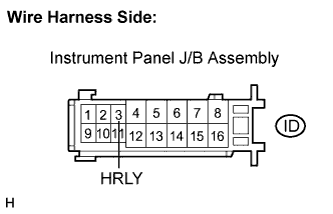 |
Disconnect the ID instrument panel J/B assembly connector.
Measure the voltage according to the value(s) in the table below.
| Tester Connection | Condition | Specified Condition |
| ID-3 (HRLY) - Body ground | Always | 10 to 14 V |
|
| ||||
| OK | ||
 | ||
| ||
| 6.INSPECT ENGINE ROOM JUNCTION BLOCK ASSEMBLY |
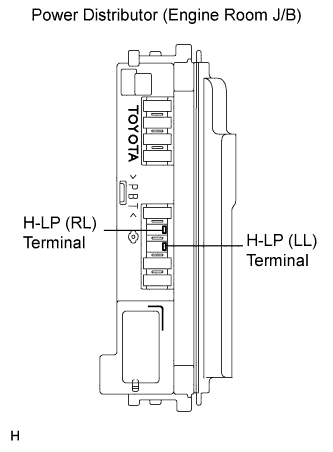 |
Remove the H-LP (RL) fuse and H-LP (LL) fuse from the engine room J/B assembly.
Measure the voltage between the loading slot of each fuse and body ground.
| Tester Connection | Condition | Specified Condition |
| H-LP (RL) Terminal - Body ground | Light control switch in HEAD | 10 to 14 V |
| H-LP (LL) Terminal - Body ground | Light control switch in HEAD | 10 to 14 V |
|
| ||||
| OK | ||
| ||
| ||

