Home › BODY › WINDSHIELD / WINDOWGLASS › POWER WINDOW CONTROL SYSTEM (for Models with Jam Protection Function on 4 Windows)

POWER WINDOW CONTROL SYSTEM (for Models with Jam Protection Function on 4 Windows) > TERMINALS OF ECU

for Preparation Click here


POWER WINDOW REGULATOR MASTER SWITCH ASSEMBLY


  1. Disconnect the M2 power window regulator master switch assembly connector.


    B150964E18

  2. Measure the voltage and resistance according to the value(s) in the table below.

    HINT:
    Measure the values on the wire harness side with the connector disconnected.


    Tester Connection
    Wiring Color
    Terminal Description
    Condition
    Specified Condition
    M2-11 (B) - M2-12 (GND)
    LG - W-B
    Power supply
    Ignition switch ON
    11 to 14 V
    M2-12 (GND) - Body ground
    W-B - Body ground
    Ground
    Always
    Below 1 Ω
    If the result is not as specified, there may be a malfunction in the wire harness.

  3. Reconnect the M2 power window regulator master switch assembly connector.

  4. Measure the voltage according to the value(s) in the table below.

    Tester Connection
    Wiring Color
    Terminal Description
    Condition
    Specified Condition
    M2-15 (DOWN) - M2-12 (GND)
    V - W-B
    Power window motor DOWN output
    Ignition switch ON, driver side power window regulator switch OFF
    11 to 14 V
    M2-15 (DOWN) - M2-12 (GND)
    V - W-B
    Power window motor DOWN output
    Ignition switch ON, driver door power window switch DOWN (Manual operation)
    Below 1 V
    M2-18 (LED) - M2-12 (GND)
    Y - W-B
    LED illumination signal
    Ignition switch ON
    11 to 14 V
    M2-18 (LED) - M2-12 (GND)
    Y - W-B
    LED illumination signal
    Approximately 45 seconds after ignition switch turned off
    Below 1 V
    M2-20 (UP) - M2-12 (GND)
    BE - W-B
    Power window motor UP output
    Ignition switch ON, driver door power window switch OFF
    11 to 14 V
    M2-20 (UP) - M2-12 (GND)
    BE - W-B
    Power window motor UP output
    Ignition switch ON, driver door power window switch UP (Manual operation)
    Below 1 V
    If the result is not as specified, the power window regulator master switch assembly may have a malfunction.


CHECK POWER WINDOW REGULATOR SWITCH ASSEMBLY (for Front Passenger Side)


  1. Disconnect the H13 power window regulator switch assembly (for front passenger side) connector.


    B176174E21

  2. Measure the resistance according to the value(s) in the table below.

    HINT:
    Measure the values on the wire harness side with the connector disconnected.


    Tester Connection
    Wiring Color
    Terminal Description
    Condition
    Specified Condition
    H13-1 (GND) - Body ground
    W-B - Body ground
    Ground
    Always
    Below 1 Ω
    If the result is not as specified, there may be a malfunction in the wire harness.

  3. Reconnect the H13 power window regulator switch assembly (for front passenger side) connector.

  4. Measure the voltage according to the value(s) in the table below.

    Tester Connection
    Wiring Color
    Terminal Description
    Condition
    Specified Condition
    H13-4 (LED) - H13-1 (GND)
    B - W-B
    LED illumination signal
    Ignition switch ON
    11 to 14 V
    H13-4 (LED) - H13-1 (GND)
    B - W-B
    LED illumination signal
    Approximately 45 seconds after ignition switch turned off
    Below 1 V
    H13-8 (AUTO) - H13-1 (GND)
    L - W-B
    Power window motor AUTO UP output
    Ignition switch ON, front passenger side power window fully open
    11 to 14 V
    H13-8 (AUTO) - H13-1 (GND)
    L - W-B
    Power window motor AUTO UP output
    Ignition switch ON, front passenger side power window fully UP (AUTO UP position)
    Below 1 V
    H13-8 (AUTO) - H13-1 (GND)
    L - W-B
    Power window motor AUTO UP output
    Ignition switch ON, front passenger side power window fully stopped (UP)
    11 to 14 V
    H13-8 (AUTO) - H13-1 (GND)
    L - W-B
    Power window motor AUTO DOWN output
    Ignition switch ON, front passenger side power window fully closed
    11 to 14 V
    H13-8 (AUTO) - H13-1 (GND)
    L - W-B
    Power window motor AUTO DOWN output
    Ignition switch ON, front passenger side power window fully DOWN (AUTO DOWN position)
    Below 1 V
    H13-8 (AUTO) - H13-1 (GND)
    L - W-B
    Power window motor AUTO DOWN output
    Ignition switch ON, front passenger side power window fully stopped (DOWN)
    11 to 14 V
    H13-7 (DOWN) - H13-1 (GND)
    R - W-B
    Power window motor DOWN output
    Ignition switch ON, power window regulator switch assembly (for front passenger side) OFF
    11 to 14 V
    H13-7 (DOWN) - H13-1 (GND)
    R - W-B
    Power window motor DOWN output
    Ignition switch ON, power window regulator switch assembly (for front passenger side) DOWN (Manual operation)
    Below 1 V
    H13-6 (UP) - H13-1 (GND)
    G - W-B
    Power window motor UP output
    Ignition switch ON, power window regulator switch assembly (for front passenger side) OFF
    11 to 14 V
    H13-6 (UP) - H13-1 (GND)
    G - W-B
    Power window motor UP output
    Ignition switch ON, power window regulator switch assembly (for front passenger side) UP (Manual operation)
    Below 1 V
    If the result is not as specified, the power window regulator switch assembly (for front passenger side) may have a malfunction.


CHECK POWER WINDOW REGULATOR SWITCH ASSEMBLY (for Rear LH Side)


  1. Disconnect the K6 power window regulator switch assembly (for rear LH side) connector.


    B176174E19

  2. Measure the resistance according to the value(s) in the table below.

    HINT:
    Measure the values on the wire harness side with the connector disconnected.


    Tester Connection
    Wiring Color
    Terminal Description
    Condition
    Specified Condition
    K6-1 (GND) - Body ground
    W-B - Body ground
    Ground
    Always
    Below 1 Ω
    If the result is not as specified, there may be a malfunction in the wire harness.

  3. Reconnect the K6 power window regulator switch assembly (for rear LH side) connector.

  4. Measure the voltage according to the value(s) in the table below.

    Tester Connection
    Wiring Color
    Terminal Description
    Condition
    Specified Condition
    K6-4 (LED) - K6-1 (GND)
    LG - W-B
    LED illumination signal
    Ignition switch ON
    11 to 14 V
    K6-4 (LED) - K6-1 (GND)
    LG - W-B
    LED illumination signal
    Approximately 45 seconds after ignition switch turned off
    Below 1 V
    K6-8 (AUTO) - K6-1 (GND)
    B - W-B
    Power window motor AUTO UP output
    Ignition switch ON, rear LH side power window fully open
    11 to 14 V
    K6-8 (AUTO) - K6-1 (GND)
    B - W-B
    Power window motor AUTO UP output
    Ignition switch ON, rear LH side power window fully UP (AUTO UP position)
    Below 1 V
    K6-8 (AUTO) - K6-1 (GND)
    B - W-B
    Power window motor AUTO UP output
    Ignition switch ON, rear LH side power window fully stopped (UP)
    11 to 14 V
    K6-8 (AUTO) - K6-1 (GND)
    B - W-B
    Power window motor AUTO DOWN output
    Ignition switch ON, rear LH side power window fully closed
    11 to 14 V
    K6-8 (AUTO) - K6-1 (GND)
    B - W-B
    Power window motor AUTO DOWN output
    Ignition switch ON, rear LH side power window fully DOWN (AUTO DOWN position)
    Below 1 V
    K6-8 (AUTO) - K6-1 (GND)
    B - W-B
    Power window motor AUTO DOWN output
    Ignition switch ON, rear LH side power window fully stopped (DOWN)
    11 to 14 V
    K6-7 (DOWN) - K6-1 (GND)
    R - W-B
    Power window motor DOWN output
    Ignition switch ON, power window regulator switch assembly (for rear LH side) OFF
    11 to 14 V
    K6-7 (DOWN) - K6-1 (GND)
    R - W-B
    Power window motor DOWN output
    Ignition switch ON, power window regulator switch assembly (for rear LH side) DOWN (Manual operation)
    Below 1 V
    K6-6 (UP) - K6-1 (GND)
    G - W-B
    Power window motor UP output
    Ignition switch ON, power window regulator switch assembly (for rear LH side) OFF
    11 to 14 V
    K6-6 (UP) - K6-1 (GND)
    G - W-B
    Power window motor UP output
    Ignition switch ON, power window regulator switch assembly (for rear LH side) UP (Manual operation)
    Below 1 V
    If the result is not as specified, the power window regulator switch assembly (for rear LH side) may have a malfunction.


CHECK POWER WINDOW REGULATOR SWITCH ASSEMBLY (for Rear RH Side)


  1. Disconnect the J6 power window regulator switch assembly (for rear RH side) connector.


    B176174E20

  2. Measure the resistance according to the value(s) in the table below.

    HINT:
    Measure the values on the wire harness side with the connector disconnected.


    Tester Connection
    Wiring Color
    Terminal Description
    Condition
    Specified Condition
    J6-1 (GND) - Body ground
    W-B - Body ground
    Ground
    Always
    Below 1 Ω
    If the result is not as specified, there may be a malfunction in the wire harness.

  3. Reconnect the J6 power window regulator switch assembly (for rear RH side) connector.

  4. Measure the voltage according to the value(s) in the table below.

    Tester Connection
    Wiring Color
    Terminal Description
    Condition
    Specified Condition
    J6-4 (LED) - J6-1 (GND)
    LG - W-B
    LED illumination signal
    Ignition switch ON
    11 to 14 V
    J6-4 (LED) - J6-1 (GND)
    LG - W-B
    LED illumination signal
    Approximately 45 seconds after ignition switch turned off
    Below 1 V
    J6-8 (AUTO) - J6-1 (GND)
    B - W-B
    Power window motor AUTO UP output
    Ignition switch ON, rear RH side power window fully open
    11 to 14 V
    J6-8 (AUTO) - J6-1 (GND)
    B - W-B
    Power window motor AUTO UP output
    Ignition switch ON, rear RH side power window fully open (AUTO UP position)
    Below 1 V
    J6-8 (AUTO) - J6-1 (GND)
    B - W-B
    Power window motor AUTO UP output
    Ignition switch ON, rear RH side power window fully stopped (UP)
    11 to 14 V
    J6-8 (AUTO) - J6-1 (GND)
    B - W-B
    Power window motor AUTO DOWN output
    Ignition switch ON, rear RH side power window fully closed
    11 to 14 V
    J6-8 (AUTO) - J6-1 (GND)
    B - W-B
    Power window motor AUTO DOWN output
    Ignition switch ON, rear RH side power window fully DOWN (AUTO DOWN position)
    Below 1 V
    J6-8 (AUTO) - J6-1 (GND)
    B - W-B
    Power window motor AUTO DOWN output
    Ignition switch ON, rear RH side power window fully stopped (DOWN)
    11 to 14 V
    J6-7 (DOWN) - J6-1 (GND)
    R - W-B
    Power window motor DOWN output
    Ignition switch ON, power window regulator switch assembly (for rear RH side) OFF
    11 to 14 V
    J6-7 (DOWN) - J6-1 (GND)
    R - W-B
    Power window motor DOWN output
    Ignition switch ON, power window regulator switch assembly (for rear RH side) DOWN (Manual operation)
    Below 1 V
    J6-6 (UP) - J6-1 (GND)
    G - W-B
    Power window motor UP output
    Ignition switch ON, power window regulator switch assembly (for rear RH side) OFF
    11 to 14 V
    J6-6 (UP) - J6-1 (GND)
    G - W-B
    Power window motor UP output
    Ignition switch ON, power window regulator switch assembly (for rear RH side) UP (Manual operation)
    Below 1 V
    If the result is not as specified, the power window regulator switch assembly (for rear RH side) may have a malfunction.


CHECK POWER WINDOW REGULATOR MOTOR ASSEMBLY (for Driver Side)


  1. Disconnect the I5 power window regulator motor assembly (for driver side) connector.


    B203471E10

  2. Measure the voltage and resistance according to the value(s) in the table below.

    HINT:
    Measure the values on the wire harness side with the connector disconnected.


    Tester Connection
    Wiring Color
    Terminal Description
    Condition
    Specified Condition
    I5-1 (GND) - Body ground
    W-B - Body ground
    Ground
    Always
    Below 1 Ω
    I5-2 (B) - Body ground
    GR - Body ground
    Power supply
    Always
    11 to 14 V
    If the result is not as specified, there may be a malfunction in the wire harness.

  3. Reconnect the I5 power window regulator motor assembly (for driver side) connector.

  4. Measure the voltage according to the value(s) in the table below.

    Tester Connection
    Wiring Color
    Terminal Description
    Condition
    Specified Condition
    I5-5 (LED) - I5-1 (GND)
    Y - W-B
    LED illumination signal
    Ignition switch ON
    11 to 14 V
    I5-5 (LED) - I5-1 (GND)
    Y - W-B
    LED illumination signal
    Approximately 45 seconds after ignition switch turned off
    Below 1 V
    I5-7 (DOWN) - I5-1 (GND)
    V - W-B
    Power window motor DOWN input
    Ignition switch ON, driver side power window regulator switch OFF
    11 to 14 V
    I5-7 (DOWN) - I5-1 (GND)
    V - W-B
    Power window motor DOWN input
    Ignition switch ON, driver door power window switch DOWN (Manual operation)
    Below 1 V
    I5-7 (DOWN) - I5-1 (GND)
    V - W-B
    Power window motor DOWN input
    Ignition switch ON, driver side power window fully closed
    11 to 14 V
    I5-7 (DOWN) - I5-1 (GND)
    V - W-B
    Power window motor DOWN input
    Ignition switch ON, driver side power window fully DOWN (AUTO DOWN position)
    Below 1 V
    I5-7 (DOWN) - I5-1 (GND)
    V - W-B
    Power window motor AUTO DOWN input
    Ignition switch ON, driver side power window fully stopped (DOWN)
    11 to 14 V
    I5-10 (UP) - I5-1 (GND)
    BE - W-B
    Power window motor UP input
    Ignition switch ON, driver door power window switch OFF
    11 to 14 V
    I5-10 (UP) - I5-1 (GND)
    BE - W-B
    Power window motor UP input
    Ignition switch ON, driver door power window switch UP (Manual operation)
    Below 1 V
    I5-10 (UP) - I5-1 (GND)
    BE - W-B
    Power window motor UP input
    Ignition switch ON, driver side power window fully open
    11 to 14 V
    I5-10 (UP) - I5-1 (GND)
    BE - W-B
    Power window motor UP input
    Ignition switch ON, driver side power window fully UP (AUTO UP position)
    Below 1 V
    I5-10 (UP) - I5-1 (GND)
    BE - W-B
    Power window motor UP input
    Ignition switch ON, driver side power window fully stopped (UP)
    11 to 14 V
    If the result is not as specified, the power window regulator motor assembly (for driver side) may have a malfunction.


CHECK POWER WINDOW REGULATOR MOTOR ASSEMBLY (for Front Passenger Side)


  1. Disconnect the H12 power window regulator motor assembly (for front passenger side) connector.


    B203471E19

  2. Measure the voltage and resistance according to the value(s) in the table below.

    HINT:
    Measure the values on the wire harness side with the connector disconnected.


    Tester Connection
    Wiring Color
    Terminal Description
    Condition
    Specified Condition
    H12-1 (GND) - Body ground
    W-B - Body ground
    Ground
    Always
    Below 1 Ω
    H12-2 (B) - Body ground
    GR - Body ground
    Power supply
    Always
    11 to 14 V
    If the result is not as specified, there may be a malfunction in the wire harness.

  3. Reconnect the H12 power window regulator motor assembly (for front passenger side) connector.

  4. Measure the voltage according to the value(s) in the table below.

    Tester Connection
    Wiring Color
    Terminal Description
    Condition
    Specified Condition
    H12-4 (AUTO) - H12-1 (GND)
    L - W-B
    Power window motor AUTO UP input
    Ignition switch ON, front passenger side power window fully open
    11 to 14 V
    H12-4 (AUTO) - H12-1 (GND)
    L - W-B
    Power window motor AUTO UP input
    Ignition switch ON, front passenger side power window fully UP (AUTO UP position)
    Below 1 V
    H12-4 (AUTO) - H12-1 (GND)
    L - W-B
    Power window motor AUTO UP input
    Ignition switch ON, front passenger side power window fully stopped (UP)
    11 to 14 V
    H12-4 (AUTO) - H12-1 (GND)
    L - W-B
    Power window motor AUTO DOWN input
    Ignition switch ON, front passenger side power window fully closed
    11 to 14 V
    H12-4 (AUTO) - H12-1 (GND)
    L - W-B
    Power window motor AUTO DOWN input
    Ignition switch ON, front passenger side power window fully DOWN (AUTO DOWN position)
    Below 1 V
    H12-4 (AUTO) - H12-1 (GND)
    L - W-B
    Power window motor AUTO DOWN input
    Ignition switch ON, front passenger side power window fully stopped (DOWN)
    11 to 14 V
    H12-5 (LED) - H12-1 (GND)
    B - W-B
    LED illumination signal
    Ignition switch ON
    11 to 14 V
    H12-5 (LED) - H12-1 (GND)
    B - W-B
    LED illumination signal
    Approximately 45 seconds after ignition switch turned off
    Below 1 V
    H12-7 (DOWN) - H12-1 (GND)
    R - W-B
    Power window motor DOWN input
    Ignition switch ON, power window regulator switch assembly (for front passenger side) OFF
    11 to 14 V
    H12-7 (DOWN) - H12-1 (GND)
    R - W-B
    Power window motor DOWN input
    Ignition switch ON, power window regulator switch assembly (for front passenger side) DOWN (Manual operation)
    Below 1 V
    H12-7 (DOWN) - H12-1 (GND)
    R - W-B
    Power window motor DOWN input
    Ignition switch ON, front passenger side power window fully closed
    11 to 14 V
    H12-7 (DOWN) - H12-1 (GND)
    R - W-B
    Power window motor DOWN input
    Ignition switch ON, front passenger side power window fully DOWN (AUTO DOWN position)
    Below 1 V
    H12-7 (DOWN) - H12-1 (GND)
    R - W-B
    Power window motor DOWN input
    Ignition switch ON, front passenger side power window fully stopped (DOWN)
    11 to 14 V
    H12-10 (UP) - H12-1 (GND)
    G - W-B
    Power window motor UP input
    Ignition switch ON, power window regulator switch assembly (for front passenger side) OFF
    11 to 14 V
    H12-10 (UP) - H12-1 (GND)
    G - W-B
    Power window motor UP input
    Ignition switch ON, power window regulator switch assembly (for front passenger side) UP (Manual operation)
    Below 1 V
    H12-10 (UP) - H12-1 (GND)
    G - W-B
    Power window motor UP input
    Ignition switch ON, front passenger side power window fully open
    11 to 14 V
    H12-10 (UP) - H12-1 (GND)
    G - W-B
    Power window motor UP input
    Ignition switch ON, front passenger side power window fully UP (AUTO UP position)
    Below 1 V
    H12-10 (UP) - H12-1 (GND)
    G - W-B
    Power window motor UP input
    Ignition switch ON, front passenger side power window fully stopped (UP)
    11 to 14 V
    If the result is not as specified, the power window regulator motor assembly (for front passenger side) may have a malfunction.


CHECK POWER WINDOW REGULATOR MOTOR ASSEMBLY (for Rear LH Side)


  1. Disconnect the K7 power window regulator motor assembly (for rear LH side) connector.


    B203471E17

  2. Measure the voltage and resistance according to the value(s) in the table below.

    HINT:
    Measure the values on the wire harness side with the connector disconnected.


    Tester Connection
    Wiring Color
    Terminal Description
    Condition
    Specified Condition
    K7-1 (GND) - Body ground
    W-B - Body ground
    Ground
    Always
    Below 1 Ω
    K7-2 (B) - Body ground
    R - Body ground
    Power supply
    Always
    11 to 14 V
    If the result is not as specified, there may be a malfunction in the wire harness.

  3. Reconnect the K7 power window regulator motor assembly (for rear LH side) connector.

  4. Measure the voltage according to the value(s) in the table below.

    Tester Connection
    Wiring Color
    Terminal Description
    Condition
    Specified Condition
    K7-4 (AUTO) - K7-1 (GND)
    B - W-B
    Power window motor AUTO UP input
    Ignition switch ON, rear LH side power window fully open
    11 to 14 V
    K7-4 (AUTO) - K7-1 (GND)
    B - W-B
    Power window motor AUTO UP input
    Ignition switch ON, rear LH side power window fully UP (AUTO UP position)
    Below 1 V
    K7-4 (AUTO) - K7-1 (GND)
    B - W-B
    Power window motor AUTO UP input
    Ignition switch ON, rear LH side power window fully stopped (UP)
    11 to 14 V
    K7-4 (AUTO) - K7-1 (GND)
    B - W-B
    Power window motor AUTO DOWN input
    Ignition switch ON, rear LH side power window fully closed
    11 to 14 V
    K7-4 (AUTO) - K7-1 (GND)
    B - W-B
    Power window motor AUTO DOWN input
    Ignition switch ON, rear LH side power window fully DOWN (AUTO DOWN position)
    Below 1 V
    K7-4 (AUTO) - K7-1 (GND)
    B - W-B
    Power window motor AUTO DOWN input
    Ignition switch ON, rear LH side power window fully stopped (DOWN)
    11 to 14 V
    K7-5 (LED) - K7-1 (GND)
    LG - W-B
    LED illumination signal
    Ignition switch ON
    11 to 14 V
    K7-5 (LED) - K7-1 (GND)
    LG - W-B
    LED illumination signal
    Approximately 45 seconds after ignition switch turned off
    Below 1 V
    K7-7 (DOWN) - K7-1 (GND)
    R - W-B
    Power window motor DOWN input
    Ignition switch ON, power window regulator switch assembly (for rear LH side) OFF
    11 to 14 V
    K7-7 (DOWN) - K7-1 (GND)
    R - W-B
    Power window motor DOWN input
    Ignition switch ON, power window regulator switch assembly (for rear LH side) DOWN (Manual operation)
    Below 1 V
    K7-7 (DOWN) - K7-1 (GND)
    R - W-B
    Power window motor DOWN input
    Ignition switch ON, rear LH side power window fully closed
    11 to 14 V
    K7-7 (DOWN) - K7-1 (GND)
    R - W-B
    Power window motor DOWN input
    Ignition switch ON, rear LH side power window fully DOWN (AUTO DOWN position)
    Below 1 V
    K7-7 (DOWN) - K7-1 (GND)
    R - W-B
    Power window motor DOWN input
    Ignition switch ON, rear LH side power window fully stopped (DOWN)
    11 to 14 V
    K7-10 (UP) - K7-1 (GND)
    G - W-B
    Power window motor UP input
    Ignition switch ON, power window regulator switch assembly (for rear LH side) OFF
    11 to 14 V
    K7-10 (UP) - K7-1 (GND)
    G - W-B
    Power window motor UP input
    Ignition switch ON, power window regulator switch assembly (for rear LH side) UP (Manual operation)
    Below 1 V
    K7-10 (UP) - K7-1 (GND)
    G - W-B
    Power window motor UP input
    Ignition switch ON, rear LH side power window fully open
    11 to 14 V
    K7-10 (UP) - K7-1 (GND)
    G - W-B
    Power window motor UP input
    Ignition switch ON, rear LH side power window fully UP (AUTO UP position)
    Below 1 V
    K7-10 (UP) - K7-1 (GND)
    G - W-B
    Power window motor UP input
    Ignition switch ON, rear LH side power window fully stopped (UP)
    11 to 14 V
    If the result is not as specified, the power window regulator motor assembly (for rear LH side) may have a malfunction.


CHECK POWER WINDOW REGULATOR MOTOR ASSEMBLY (for Rear RH Side)


  1. Disconnect the J7 power window regulator motor assembly (for rear RH side) connector.


    B203471E18

  2. Measure the voltage and resistance according to the value(s) in the table below.

    HINT:
    Measure the values on the wire harness side with the connector disconnected.


    Tester Connection
    Wiring Color
    Terminal Description
    Condition
    Specified Condition
    J7-1 (GND) - Body ground
    W-B - Body ground
    Ground
    Always
    Below 1 Ω
    J7-2 (B) - Body ground
    R - Body ground
    Power supply
    Always
    11 to 14 V
    If the result is not as specified, there may be a malfunction in the wire harness.

  3. Reconnect the J7 power window regulator motor assembly (for rear RH side) connector.

  4. Measure the voltage according to the value(s) in the table below.

    Tester Connection
    Wiring Color
    Terminal Description
    Condition
    Specified Condition
    J7-4 (AUTO) - J7-1 (GND)
    B - W-B
    Power window motor AUTO UP input
    Ignition switch ON, rear RH side power window fully open
    11 to 14 V
    J7-4 (AUTO) - J7-1 (GND)
    B - W-B
    Power window motor AUTO UP input
    Ignition switch ON, rear RH side power window fully open (AUTO UP position)
    Below 1 V
    J7-4 (AUTO) - J7-1 (GND)
    B - W-B
    Power window motor AUTO UP input
    Ignition switch ON, rear RH side power window fully stopped (UP)
    11 to 14 V
    J7-4 (AUTO) - J7-1 (GND)
    B - W-B
    Power window motor AUTO DOWN input
    Ignition switch ON, rear RH side power window fully closed
    11 to 14 V
    J7-4 (AUTO) - J7-1 (GND)
    B - W-B
    Power window motor AUTO DOWN input
    Ignition switch ON, rear RH side power window fully DOWN (AUTO DOWN position)
    Below 1 V
    J7-4 (AUTO) - J7-1 (GND)
    B - W-B
    Power window motor AUTO DOWN input
    Ignition switch ON, rear RH side power window fully stopped (DOWN)
    11 to 14 V
    J7-5 (LED) - J7-1 (GND)
    LG - W-B
    LED illumination signal
    Ignition switch ON
    11 to 14 V
    J7-5 (LED) - J7-1 (GND)
    LG - W-B
    LED illumination signal
    Approximately 45 seconds after ignition switch turned off
    Below 1 V
    J7-7 (DOWN) - J7-1 (GND)
    R - W-B
    Power window motor DOWN input
    Ignition switch ON, power window regulator switch assembly (for rear RH side) OFF
    11 to 14 V
    J7-7 (DOWN) - J7-1 (GND)
    R - W-B
    Power window motor DOWN input
    Ignition switch ON, power window regulator switch assembly (for rear RH side) DOWN (Manual operation)
    Below 1 V
    J7-7 (DOWN) - J7-1 (GND)
    R - W-B
    Power window motor DOWN input
    Ignition switch ON, rear RH side power window fully closed
    11 to 14 V
    J7-7 (DOWN) - J7-1 (GND)
    R - W-B
    Power window motor DOWN input
    Ignition switch ON, rear RH side power window fully DOWN (AUTO DOWN position)
    Below 1 V
    J7-7 (DOWN) - J7-1 (GND)
    R - W-B
    Power window motor DOWN input
    Ignition switch ON, rear RH side power window fully stopped (DOWN)
    11 to 14 V
    J7-10 (UP) - J7-1 (GND)
    G - W-B
    Power window motor UP input
    Ignition switch ON, power window regulator switch assembly (for rear RH side) OFF
    11 to 14 V
    J7-10 (UP) - J7-1 (GND)
    G - W-B
    Power window motor UP input
    Ignition switch ON, power window regulator switch assembly (for rear RH side) UP (Manual operation)
    Below 1 V
    J7-10 (UP) - J7-1 (GND)
    G - W-B
    Power window motor UP input
    Ignition switch ON, rear RH side power window fully open
    11 to 14 V
    J7-10 (UP) - J7-1 (GND)
    G - W-B
    Power window motor UP input
    Ignition switch ON, rear RH side power window fully UP (AUTO UP position)
    Below 1 V
    J7-10 (UP) - J7-1 (GND)
    G - W-B
    Power window motor UP input
    Ignition switch ON, rear RH side power window fully stopped (UP)
    11 to 14 V
    If the result is not as specified, the power window regulator motor assembly (for rear RH side) may have a malfunction.


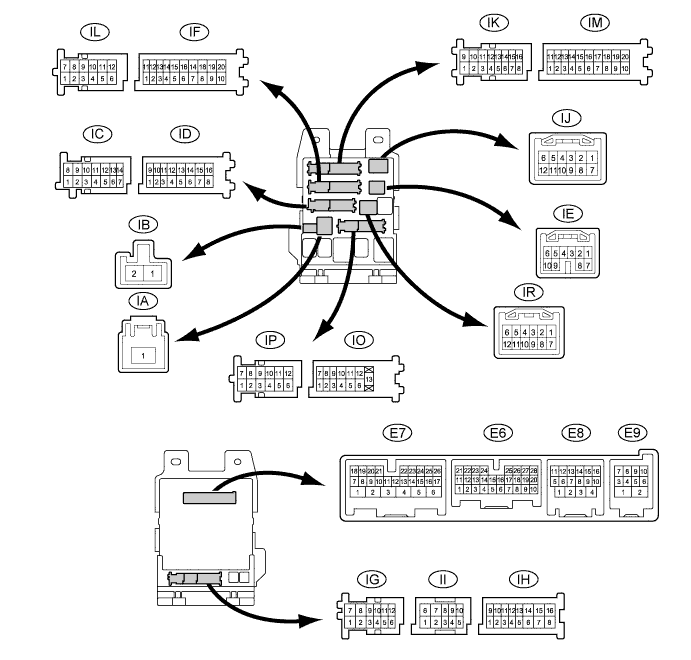
CHECK MAIN BODY ECU (INSTRUMENT PANEL J/B)


  1. Disconnect the ID, IM and IR main body ECU (instrument panel J/B) connectors.


    B219208E01

  2. Measure the voltage and resistance according to the value(s) in the table below.

    HINT:
    Measure the values on the wire harness side with the connectors disconnected.


    Tester Connection
    Wiring Color
    Terminal Description
    Condition
    Specified Condition
    ID-10 (BECU) - Body ground*1
    BE - Body ground
    Battery power supply
    Always
    11 to 14 V
    ID-16 (ALTB) - Body ground
    W - Body ground
    Battery power supply
    Always
    11 to 14 V
    IM-9 (GND2) - Body ground
    W-B - Body ground
    Ground
    Always
    Below 1 Ω
    IR-1 (GND1) - Body ground
    W-B - Body ground
    Ground
    Always
    Below 1 Ω
    *1: w/ Entry and Start System
    If the result is not as specified, there may be a malfunction in the wire harness.

  3. Reconnect the ID, IM and IR main body ECU (instrument panel J/B) connectors.

  4. Measure the voltage according to the value(s) in the table below.

    Tester Connection
    Wiring Color
    Terminal Description
    Condition
    Specified Condition
    E7-24 (DCTY) - Body ground
    L - Body ground*1
    Y - Body ground*2
    Driver side door courtesy switch input
    Driver side door open
    Below 1 V
    E7-24 (DCTY) - Body ground
    L - Body ground*1
    Y - Body ground*2
    Driver side door courtesy switch input
    Driver side door closed
    11 to 14 V
    E6-21 (PCTY) - Body ground
    Y - Body ground*1
    L - Body ground*2
    Front passenger side door courtesy switch input
    Front passenger side door open
    Below 1 V
    E6-21 (PCTY) - Body ground
    Y - Body ground*1
    L - Body ground*2
    Front passenger side door courtesy switch input
    Front passenger side door closed
    11 to 14 V
    IK-7 (UL2) - Body ground
    GR - Body ground
    Driver door key-linked door unlock input
    Driver door lock cylinder is turned off
    10 to 14 V
    IK-7 (UL2) - Body ground
    GR - Body ground
    Driver door key-linked door unlock input
    Unlock with mechanical key
    Below 1 V
    IK-16 (L2) - Body ground
    BR - Body ground
    Driver door key-linked door lock input
    Driver door lock cylinder is turned off
    10 to 14 V
    IK-16 (L2) - Body ground
    BR - Body ground
    Driver door key-linked door lock input
    Lock with mechanical key
    Below 1 V

    1. *1: for LHD
    2. *2: for RHD
    If the result is not as specified, the main body ECU (instrument panel J/B) may have a malfunction.


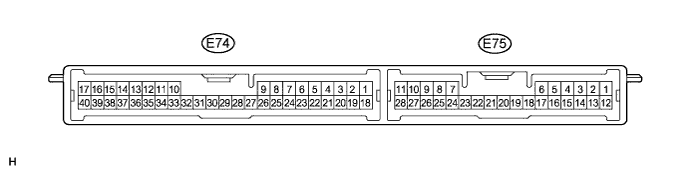
CHECK CERTIFICATION ECU (SMART KEY ECU ASSEMBLY) (w/ Entry and Start System)


  1. Disconnect the E74 certification ECU (smart key ECU assembly) connector.


    E125964E13

  2. Measure the voltage and resistance according to the value(s) in the table below.

    HINT:
    Measure the values on the wire harness side with connector disconnected.


    Tester Connection
    Wiring Color
    Terminal Description
    Condition
    Specified Condition
    E74-1 (+B) - Body ground
    W - Body ground
    +B power supply
    Always
    11 to 14 V
    E74-17 (E) - Body ground
    W-B - Body ground
    Ground
    Always
    Below 1 Ω
    If the result is not as specified, there may be a malfunction in the wire harness.

  3. Reconnect the E74 certification ECU (smart key ECU assembly) connector.

  4. Measure the voltage according to the value(s) in the table below.

    Tester Connection
    Wiring Color
    Terminal Description
    Condition
    Specified Condition
    E74-3 (TSW1) - E74-17 (E)
    GR - W-B*1
    L - W-B*2
    Entry lock switch (for driver side) signal
    Entry lock switch (for driver side) not pushed
    11 to 14 V
    (Intermittent operation)
    E74-3 (TSW1) - E74-17 (E)
    GR - W-B*1
    L - W-B*2
    Entry lock switch (for driver side) signal
    Entry lock switch (for driver side) pushed
    Below 2 V
    E74-4 (TSW2) - E74-17 (E)
    L - W-B*1
    GR - W-B*2
    Entry lock switch (for front passenger side) signal
    Entry lock switch (for front passenger side) not pushed
    11 to 14 V
    (Intermittent operation)
    E74-4 (TSW2) - E74-17 (E)
    L - W-B*1
    GR - W-B*2
    Entry lock switch (for front passenger side) signal
    Entry lock switch (for front passenger side) pushed
    Below 2 V
    E74-18 (IG) - Body ground
    LG - Body ground
    Ignition power supply
    Engine switch off
    Below 1 V
    E74-18 (IG) - Body ground
    LG - Body ground
    Ignition power supply
    Engine switch on (IG)
    11 to 14 V
    E74-19 (ACC) - Body ground
    L - Body ground
    ACC power supply
    Engine switch off
    Below 1 V
    E74-19 (ACC) - Body ground
    L - Body ground
    ACC power supply
    Engine switch on (ACC)
    11 to 14 V
    E74-29 (RC0) - E74-17 (E)
    G - W-B
    Door control receiver power source
    Engine switch off, all doors closed and electrical key switch on
    4.5 to 5.5 V
    E74-29 (RC0) - E74-17 (E)
    G - W-B
    Door control receiver power source
    Engine switch off, all doors closed and electrical key switch off
    Below 1 V
    E74-38 (RDA) - E74-17 (E)
    Y - W-B
    Door control receiver data input signal
    Engine switch off, all doors closed and electrical key switch off
    11 to 14 V
    E74-38 (RDA) - E74-17 (E)
    Y - W-B
    Door control receiver data input signal
    Engine switch off, all doors closed and electrical key switch on
    Pulse generation
    E74-38 (RDA) - Body ground
    Y - Body ground
    Tuner input signal
    Engine switch off, all doors closed, electrical key not in detection area
    11 to 14 V
    E74-38 (RDA) - Body ground
    Y - Body ground
    Tuner input signal
    Electrical key in detection area
    Pulse generation
    E74-39 (RSSI) - E74-17 (E)
    R - W-B
    Door control receiver electric wave existence signal
    Engine switch off, all doors closed, electrical key not in detection area
    11 to 14 V
    E74-39 (RSSI) - E74-17 (E)
    R - W-B
    Door control receiver electric wave existence signal
    Engine switch off, all doors closed, electrical key in detection area
    Below 1 V

    1. *1: for LHD
    2. *2: for RHD
    If the result is not as specified, the certification ECU (smart key ECU assembly) may have a malfunction.