Home › BODY ELECTRICAL › LIGHTING › HEADLIGHT LEVELING SWITCH

HEADLIGHT LEVELING SWITCH > INSPECTION

for Preparation Click here


1. INSPECT HEADLIGHT LEVELING SWITCH


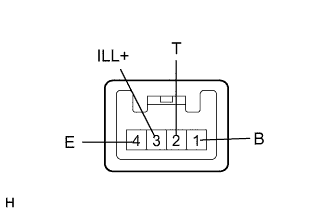
    E133257E01
  1. Measure the voltage of the switch.

    1. Remove the headlight leveling switch.

    2. Apply battery voltage to the headlight leveling switch connector.

    3. Measure the voltage according to the value(s) in the table below.

      Standard voltage:

      Measurement Condition
      Tester Connection
      Switch Condition
      Specified Condition
      (Battery voltage is 12 V)
      Battery positive (+) → Terminal 1 (B)
      Battery negative (-) → Terminal 4 (E)
      2 (T) - 4 (E)
      0
      10.4 V to 11.2 V
      (0.5)
      9.8 V to 10.5 V
      1
      9.2 V to 9.9 V
      (1.5)
      8.5 V to 9.2 V
      2
      7.9 V to 8.6 V
      (2.5)
      7.2 V to 8.0 V
      3
      6.6 V to 7.3 V
      (3.5)
      6.0 V to 6.7 V
      4
      5.3 V to 6.0 V
      (4.5)
      4.7 V to 5.4 V
      5
      4.0 V to 4.8 V

      If the result is not as specified, replace the headlight leveling switch.

  1. Inspect the illumination of the switch.

    1. Apply battery voltage to the headlight leveling switch connector.

    2. Check that the illumination comes on.

      OK:

      Measurement Condition
      Specified Condition
      Battery positive (+) → Terminal 3 (ILL+)
      Battery negative (-) → Terminal 4 (E)
      Illumination comes on

      If the result is not as specified, replace the headlight leveling switch.