PRE-CRASH SAFETY PRE-CRASH SAFETY SYSTEM C1A4B Stop Light Relay Circuit
DESCRIPTION
The skid control ECU (brake actuator assembly) sends a stop light operation signal to the stop light control relay (STOP relay). When the skid control ECU (brake actuator assembly) detects a malfunction in the stop light circuit, the driving support ECU assembly stores DTC C1A4B.
| DTC No. | Detection Item | DTC Detection Condition | Trouble Area |
|---|---|---|---|
| C1A4B | Stop Light Relay Circuit | Either of the following conditions is met:
·
When the engine switch is on (IG), the IG1 terminal voltage is between 11 and 14 V and the stop light illumination output signal (STPO) is output, the signal is not received at terminal STP2 for 2.272 seconds or more. ·
When the engine switch is on (IG), the IG1 terminal voltage is between 11 and 14 V and the stop light illumination output signal (STPO) is not output, the signals received at terminals STP and STP2 are different for 2.272 seconds or more. |
·
Lighting system ·
Vehicle stability control system ·
Harness or connector ·
STOP relay ·
Driving support ECU assembly |
WIRING DIAGRAM
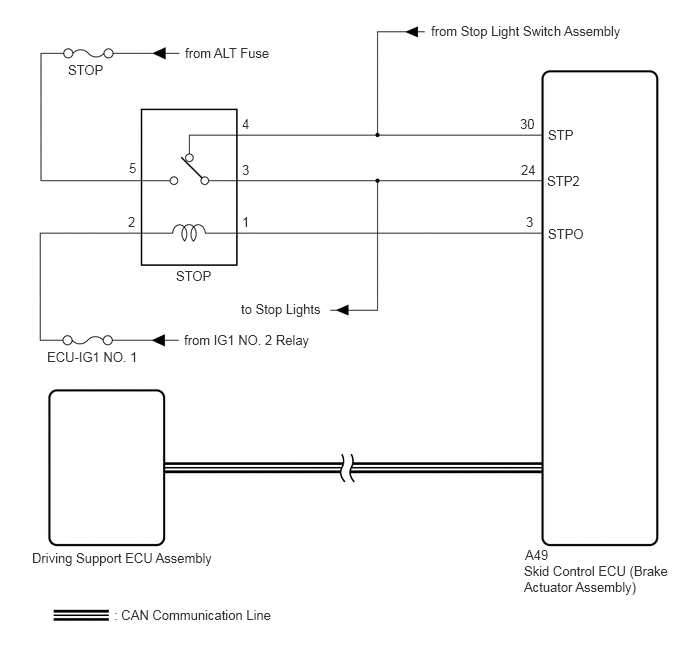
CAUTION / NOTICE / HINT
- NOTICE:
- ·
Inspect the fuses for circuits related to this system before performing the following procedure.
·When this DTC is output, a malfunction in the lighting system is suspected. Check if the lighting system is functioning normally.
Click hereVehicle Exterior>LIGHTING (EXT)>LIGHTING SYSTEM>HOW TO PROCEED WITH TROUBLESHOOTING
·When replacing the driving support ECU assembly, always replace it with a new one. If a driving support ECU assembly which was installed to another vehicle is used, the information stored in the driving support ECU assembly will not match the information from the vehicle. As a result, a DTC may be stored.
PROCEDURE
Check that the stop lights come on when the brake pedal is depressed and go off when the brake pedal is released.
- OK:
Condition Illumination Condition Brake pedal depressed On Brake pedal released Off
- Result:
Proceed to OK NG
OK
NG
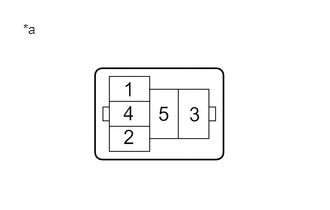
| *a | No. 2 Engine Room Relay Block (Relay Holder) |
Remove the STOP relay from the No. 2 engine room relay block.
Measure the voltage according to the value(s) in the table below.
- Standard Voltage:
Tester Connection Condition Specified Condition Relay holder terminal 5 - Body ground Always 11 to 14 V Relay holder terminal 2 - Body ground Engine switch on (IG) 11 to 14 V
Reinstall the STOP relay to the No. 2 engine room relay block.
- Result:
Proceed to OK NG
OK
NG
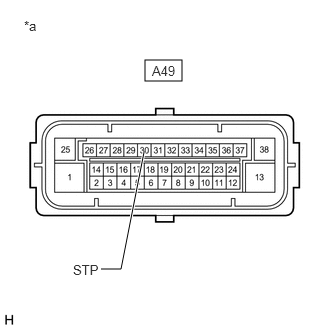
| *a | Front view of wire harness connector
(to Skid Control ECU (Brake Actuator Assembly)) |
Disconnect the A49 skid control ECU (brake actuator assembly) connector.
Measure the voltage according to the value(s) in the table below.
- Standard Voltage:
Tester Connection Condition Specified Condition A49-30 (STP) - Body ground Stop light switch assembly on
(Brake pedal depressed)11 to 14 V A49-30 (STP) - Body ground Stop light switch assembly off
(Brake pedal released)Below 1.5 V
- Result:
Proceed to OK NG
OK
NG
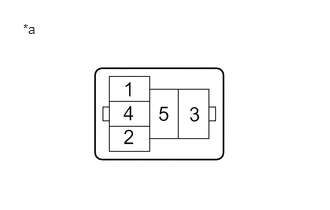
| *a | No. 2 Engine Room Relay Block (Relay Holder) |
Remove the STOP relay from the No. 2 engine room relay block.
Measure the voltage according to the value(s) in the table below.
- Standard Voltage:
Tester Connection Condition Specified Condition Relay holder terminal 4 - Body ground Stop light switch assembly on
(Brake pedal depressed)11 to 14 V Relay holder terminal 4 - Body ground Stop light switch assembly off
(Brake pedal released)Below 2 V
Reinstall the STOP relay to the No. 2 engine room relay block.
- Result:
Proceed to OK NG
OK
NG
Enter the following menus: Chassis / ABS/VSC/TRC / Active Test.
Perform the Active Test according to the display on the GTS.
- Chassis > ABS/VSC/TRC > Active Test
-
Tester Display Measurement Item Control Range Diagnostic Note Stop Light Relay Stop light switch assembly (stop light relay) ON or OFF Stop lights come on
- Chassis > ABS/VSC/TRC > Active Test
-
Active Test Display Stop Light Relay -
Data List Display Stop Light Relay Output - 50004 105 5 291
Enter the following menus: Chassis / ABS/VSC/TRC / Data List.
Check the stop light switch assembly (stop light control relay) operation using the Data List and stop light operation by performing an Active Test.
- Chassis > ABS/VSC/TRC > Data List
-
Tester Display Measurement Item Range Normal Condition Diagnostic Note Stop Light Relay Output Stop light switch assembly (stop light relay) ON or OFF ON: Relay output on (Stop light on)
OFF: Relay output off (Stop light off)-
- Result:
Result Proceed to Data List item changes between ON and OFF, but stop lights do not turn on A Data List item changes between ON and OFF and stop lights turn on and off B
A
B
Disconnect the A49 skid control ECU (brake actuator assembly) connector.
Remove the STOP relay from the No. 2 engine room relay block.
Measure the resistance according to the value(s) in the table below.
- Standard Resistance:
Tester Connection Condition Specified Condition Relay holder terminal 1 - A49-3 (STPO) Always Below 1 Ω Relay holder terminal 1 or A49-3 (STPO) - Body ground Always 10 kΩ or higher
Reinstall the STOP relay to the No. 2 engine room relay block.
Reconnect the A49 skid control ECU (brake actuator assembly) connector.
- Result:
Proceed to OK NG
OK
NG
Disconnect the A49 skid control ECU (brake actuator assembly) connector.
Remove the STOP relay from the No. 2 engine room relay block.
Measure the resistance according to the value(s) in the table below.
- Standard Resistance:
Tester Connection Condition Specified Condition Relay holder terminal 3 - A49-24 (STP2) Always Below 1 Ω Relay holder terminal 3 or A49-24 (STP2) - Body ground Always 10 kΩ or higher
- Result:
Proceed to OK NG
OK
NG
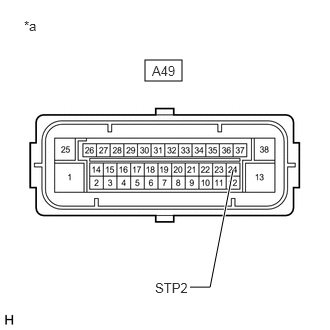
| *a | Front view of wire harness connector
(to Skid Control ECU (Brake Actuator Assembly)) |
Disconnect the A49 skid control ECU (brake actuator assembly) connector.
Measure the voltage according to the value(s) in the table below.
- Standard Voltage:
Tester Connection Condition Specified Condition A49-24 (STP2) - Body ground Stop light switch assembly on
(Brake pedal depressed)11 to 14 V A49-24 (STP2) - Body ground Stop light switch assembly off
(Brake pedal released)Below 1.5 V
- Result:
Proceed to OK NG
OK
NG
Turn the engine switch off and wait for at least 2 minutes.
Connect the GTS to the DLC3.
Turn the engine switch on (IG).
Turn the GTS on.
Clear the DTCs.
Click hereVehicle Interior>PRE-CRASH SAFETY>PRE-CRASH SAFETY SYSTEM>DTC CHECK / CLEAR
- Body Electrical > Pre-Crash 2 > Clear DTCs
- 50002 220
Make sure that the DTC detection conditions are met.
- HINT:
-
If the detection conditions are not met, the system cannot detect the malfunction.
Check for DTCs.
Click hereVehicle Interior>PRE-CRASH SAFETY>PRE-CRASH SAFETY SYSTEM>DTC CHECK / CLEAR
- Body Electrical > Pre-Crash 2 > Trouble Codes
- 50001 220
- Result:
Result Proceed to DTC C1A4B is not output A DTC C1A4B is output B
A
B