WINDOW / GLASS BACK WINDOW GLASS INSTALLATION
PROCEDURE

 56116D
1.INSTALL NO. 2 BACK WINDOW GLASS STOPPER (for 2-piece Type)
Using a brush or sponge, coat the application area of 2 new No. 2 back window glass stoppers with Primer G.
- NOTICE:
- ·
Do not apply too much primer G.
·Allow the primer G coating to dry for 3 minutes or more.
·Throw away any leftover primer G.
- HINT:
-
If an area other than specified is coated by accident, wipe off the primer G with a clean piece of cloth before it dries.
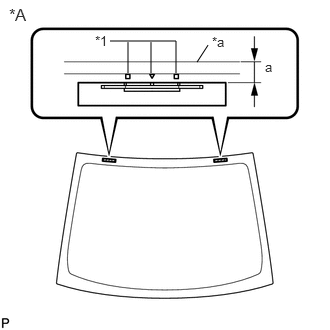
| *A | Back Side |
| *1 | Ceramic Notch |
| *a | Back Window Glass Edge Side |
Install the 2 new No. 2 back window glass stoppers onto the back window glass as shown in the illustration.
- Standard Dimension:
Area Dimension a 14.2 to 15.2 mm (0.559 to 0.598 in.)
- HINT:
-
Only 2-piece type No. 2 back window glass stoppers are supplied. Use the 2-piece type stoppers even if a 1-piece type was used.
56115B
2.INSTALL NO. 1 BACK WINDOW GLASS STOPPER (for 2-piece Type)
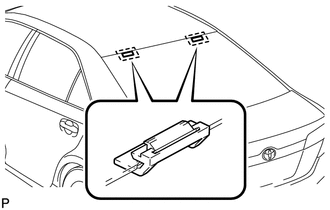
Install 2 new No. 1 back window glass stoppers to the vehicle body as shown in the illustration.
- HINT:
-
Only 2-piece type back window glass stoppers are provided as supply parts. Use 2-piece type stoppers as replacements even if a 1-piece type was originally installed.
75573F
3.INSTALL BACK WINDOW OUTSIDE MOULDING
Using a brush or sponge, coat the application area of a new back window outside moulding with Primer G.
- NOTICE:
- ·
Do not apply too much primer G.
·Allow the primer G coating to dry for 3 minutes or more.
·Throw away any leftover primer G.
- HINT:
-
If an area other than specified is coated by accident, wipe off the primer G with a clean piece of cloth before it dries.
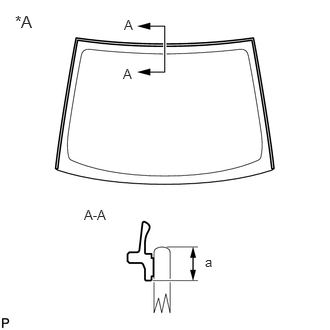
| *A | Back Side |
Install the new back window outside moulding onto the back window glass as shown in the illustration.
- Standard Dimension:
Area Dimension a 7.4 mm (0.291 in.)
56117A
4.INSTALL BACK WINDOW GLASS ADHESIVE DAM
Using a brush or sponge, coat the application area of a new back window glass adhesive dam with Primer G.
- NOTICE:
- ·
Allow the primer G coating to dry for 3 minutes or more.
·Do not apply too much primer G.
Install the new back window adhesive dam, applying double-sided tape all the way around the glass except where the dam is installed as shown in the illustration.
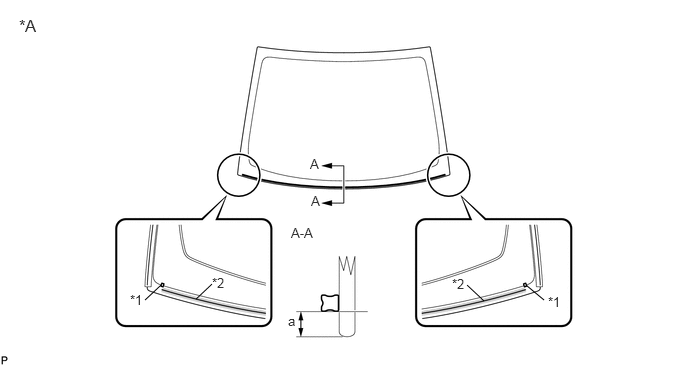
| *A | Back Side | - | - |
| *1 | Ceramic Notch | *2 | Back Window Glass Adhesive Dam |
- Standard Dimension:
Area Dimension a 7.4 mm (0.291 in.)
- NOTICE:
- ·
Do not apply too much primer G.
·Allow the primer G coating to dry for 3 minutes or more.
·Do not keep any of the opened Primer G for later use.
- HINT:
-
If an area other than specified is coated by accident, wipe off the primer G with a clean piece of cloth before it dries.
64811
5.INSTALL BACK WINDOW GLASS SUB-ASSEMBLY
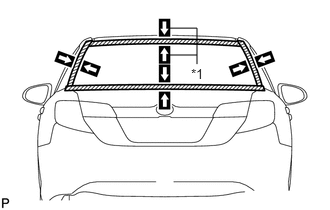
| *1 | Matchmark |
Position the back window glass.
Using suction cups, place the back window glass in the correct position.
Check that the whole contact surface of the back window glass rim is perfectly even.
Align the matchmarks on the back window glass and vehicle body.
- NOTICE:
-
Check that the back window glass stoppers are attached to the vehicle body correctly.
Remove the back window glass.
Using a brush, coat the installation surface on the vehicle body with Primer M.
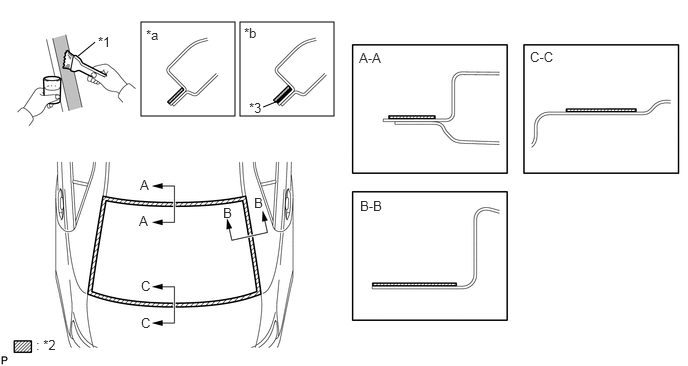
| *1 | Brush | *2 | Primer M |
| *3 | Adhesive | - | - |
| *a | CORRECT | *b | INCORRECT |
- NOTICE:
- ·
Do not coat the adhesive with Primer M.
·Do not apply too much primer M.
·Allow the primer M coating to dry for 3 minutes or more.
·Do not keep any of the opened Primer M for later use.
- HINT:
-
If an area other than specified is coated by accident, wipe off the primer M with a clean piece of cloth before it dries.
Using a brush or sponge, coat the adhesive application area with Primer G.
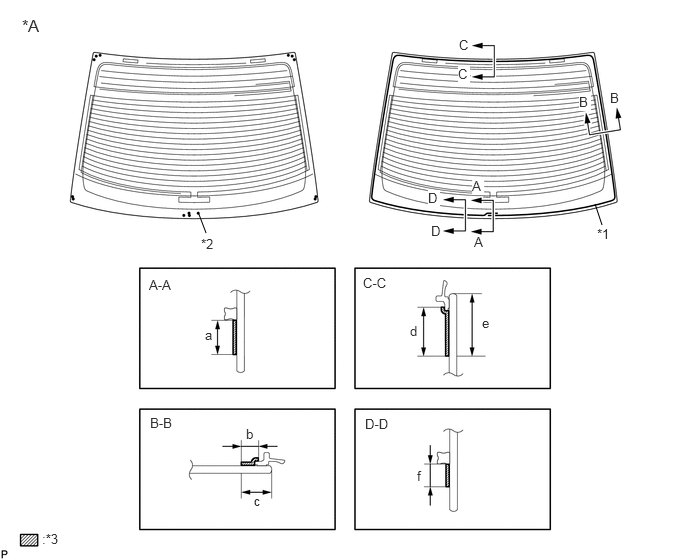
| *A | Back Side | - | - |
| *1 | Adhesive Center Line | *2 | Ceramic Notch |
| *3 | Primer G | - | - |
- Standard Dimension:
Area Dimension a 16.0 mm (0.630 in.) or more b 8.3 mm (0.327 in.) or more c 14.2 mm (0.559 in.) or more d 8.0 mm (0.315 in.) or more e 14.0 mm (0.551 in.) or more f 8.0 mm (0.315 in.) or more
- NOTICE:
- ·
Do not apply too much primer G.
·Allow the primer G coating to dry for 3 minutes or more.
·Do not keep any of the opened Primer G for later use.
- HINT:
-
If an area other than specified is coated by accident, wipe off the primer G with a clean piece of cloth before it dries.
Apply adhesive to the glass.
- Adhesive:
Toyota Genuine Windshield Glass Adhesive or equivalent
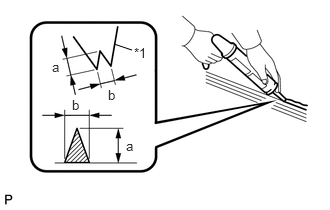
| *1 | Nozzle |
Cut off the tip of the cartridge nozzle as shown in the illustration.
- Standard Dimension:
Area Dimension a 12.0 mm (0.472 in.) b 8.0 mm (0.315 in.)
- HINT:
-
After cutting off the tip, use all adhesive within the time described in the table below.
- Usage Time Frame:
Temperature Usage Time Frame 35°C (95°F) 15 minutes 20°C (68°F) 1 hour and 40 minutes 5°C (41°F) 8 hours
Load the sealer gun with the cartridge.
Apply adhesive to the back window glass as shown in the illustration.
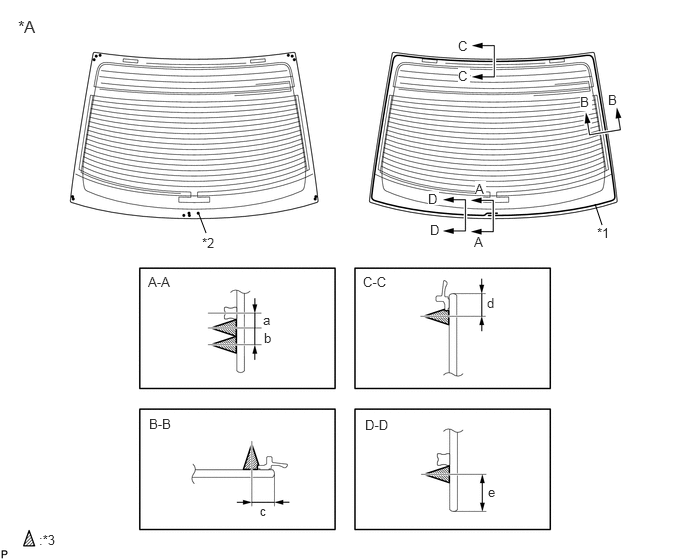
| *A | Back Side | - | - |
| *1 | Adhesive Center Line | *2 | Ceramic Notch |
| *3 | Adhesive | - | - |
- Standard Dimension:
Area Dimension a 6.5 mm (0.256 in.) b 8.0 mm (0.315 in.) c 10.0 mm (0.394 in.) d 10.0 mm (0.394 in.) e 16.5 mm (0.650 in.)
Install the back window glass sub-assembly.
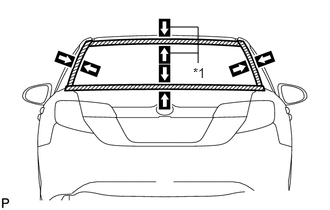
| *1 | Matchmark |
Using suction cups, position the back window glass so that the matchmarks are aligned, and press it in gently along the rim.
- NOTICE:
- ·
Check that the back window glass stoppers are attached to the vehicle body correctly.
·Check the clearance between the vehicle body and back window glass.
Lightly press the front surface of the back window glass to ensure a close fit.
- HINT:
-
Press the glass with force of 98 N (10 kgf, 22.0 lbf) or more.
Using a scraper, remove any excess or protruding adhesive.
Hold the back window glass using protective tape until the applied adhesive becomes hard.
- NOTICE:
-
Do not drive the vehicle for the time described in the table below.
- Minimum Time:
Temperature Minimum Time Prior to Driving Vehicle 35°C (95°F) 1 hour and 30 minutes 20°C (68°F) 5 hours 5°C (41°F) 24 hours
Connect each connector.
6. INSPECT FOR LEAKS AND REPAIR
After the adhesive has hardened, apply water from the outside of the vehicle. Check that no water leaks into the cabin.
If water leaks into the cabin, allow the water to dry and add adhesive.
Remove the protective tape.
64330
7.INSTALL PACKAGE TRAY TRIM PANEL ASSEMBLY (w/o Rear Sunshade)
64340B
8.INSTALL NO. 2 PACKAGE TRAY TRIM PANEL ASSEMBLY (w/ Rear Sunshade)
9.INSTALL CENTER STOP LIGHT SET (w/ Rear Sunshade)
64330
10.INSTALL PACKAGE TRAY TRIM PANEL ASSEMBLY (w/ Rear Sunshade)
73373
11.INSTALL REAR SEAT SHOULDER BELT COVER
73370C
12.CONNECT REAR NO. 1 SEAT OUTER BELT ASSEMBLY LH
73360C
13.CONNECT REAR NO. 1 SEAT OUTER BELT ASSEMBLY RH
73480
14.CONNECT REAR SEAT INNER WITH CENTER BELT ASSEMBLY LH (for LHD)
73480
15.CONNECT REAR SEAT INNER WITH CENTER BELT ASSEMBLY LH (for RHD)
16.INSTALL CHILD RESTRAINT SEAT ANCHOR BRACKET SUB-ASSEMBLY LH (for LHD)
17.INSTALL CHILD RESTRAINT SEAT ANCHOR BRACKET SUB-ASSEMBLY LH (for RHD)
18.INSTALL ROOF HEADLINING ASSEMBLY