Home › Power Source / Network · NETWORKING › CAN COMMUNICATION SYSTEM

CAN COMMUNICATION SYSTEM > TERMINALS OF ECU

for Preparation Click here


NOTICE:
  1. After turning the ignition switch off, waiting time may be required before disconnecting the cable from the negative (-) battery terminal. Therefore, make sure to read the disconnecting the cable from the negative (-) battery terminal notices before proceeding with work (Click here).
  2. Turn the ignition switch off before measuring the resistances between CAN main bus lines and between CAN branch lines.
  3. Turn the ignition switch off before inspecting CAN bus lines for a ground short.
  4. Before measuring the resistance of the CAN bus, turn the ignition switch off and leave the vehicle for 1 minute or more without operating the key, switches or opening or closing the doors. After that, disconnect the cable from the negative (-) battery terminal and leave the vehicle for 1 minute or more before measuring the resistance.
  5. This section describes the standard values for all CAN related components.

HINT:
  1. Operating the ignition switch, any other switches or a door triggers related ECU and sensor communication on the CAN. This communication will cause the resistance value to change.
  2. Even after DTCs are cleared, if a DTC is stored again after driving the vehicle for a while, the malfunction may be occurring due to vibration of the vehicle. In such a case, wiggling the ECUs or wire harness while performing the inspection below may help determine the cause of the malfunction.


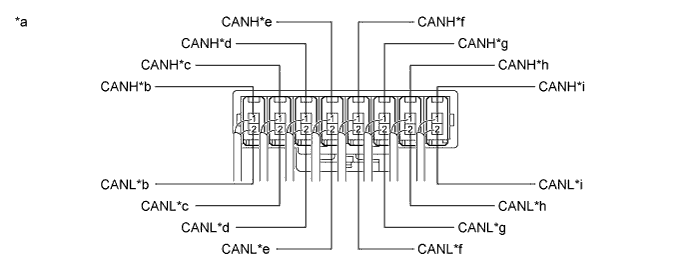
CAN NO. 1 JUNCTION CONNECTOR (for LHD)


  1. Check the CAN No. 1 junction connector.

    HINT:
    Connectors that connect to the CAN junction connector can be distinguished by the color of their CAN bus lines. When the connectors have been disconnected from the CAN junction connector, reconnecting the connectors to non-original positions on the CAN junction connector does not affect system performance. However, it is preferred to reconnect the connectors to their original positions to avoid negative effects on the wiring such as tension on the wiring harnesses, and to make future maintenance easier.


    1. Connection diagram


      C239444E01


      Text in Illustration 
      *a
      Component with harness connected
      (CAN No. 1 Junction Connector)
      *b
      to AFS ECU*1
      (for V Bus)
      *c
      to Main Body ECU (Multiplex Network Body ECU)
      (for V Bus)
      *d
      to Steering Sensor
      (for V Bus)
      *e
      to Airbag Sensor Assembly
      (for V Bus)
      *f
      to DLC3
      *g
      to Power Steering ECU with Motor Assembly
      (for V Bus)
      *h
      to Combination Meter Assembly
      (for V Bus)
      *i
      to CAN No. 2 Junction Connector
      (for V Bus)
      -
      -
      *1: w/ AFS

    2. Check the connection diagram of the components which are connected to the CAN No. 1 junction connector.

      Terminal No. (Symbol)
      Wiring Color
      Connected to
      I112-1 (CANH)
      BE
      AFS ECU*1
      (for V bus)
      I112-2 (CANL)
      W
      I95-1 (CANH)
      P
      Main body ECU (Multiplex network body ECU)
      (for V bus)
      I95-2 (CANL)
      W
      I97-1 (CANH)
      V
      Steering sensor
      (for V bus)
      I97-2 (CANL)
      W
      I103-1 (CANH)
      Y
      Airbag sensor assembly
      (for V bus)
      I103-2 (CANL)
      W
      I96-1 (CANH)
      L
      DLC3
      I96-2 (CANL)
      W
      I100-1 (CANH)
      G
      Power steering ECU with motor assembly
      (for V bus)
      I100-2 (CANL)
      W
      I94-1 (CANH)
      R
      Combination meter assembly
      (for V bus)
      I94-2 (CANL)
      W
      I93-1 (CANH)
      B
      CAN No. 2 junction connector
      (for V bus)
      I93-2 (CANL)
      W
      *1: w/ AFS


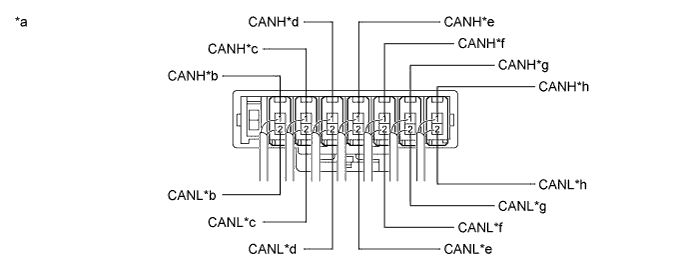
CAN NO. 1 JUNCTION CONNECTOR (for RHD)


  1. Check the CAN No. 1 junction connector.

    HINT:
    Connectors that connect to the CAN junction connector can be distinguished by the color of their CAN bus lines. When the connectors have been disconnected from the CAN junction connector, reconnecting the connectors to non-original positions on the CAN junction connector does not affect system performance. However, it is preferred to reconnect the connectors to their original positions to avoid negative effects on the wiring such as tension on the wiring harnesses, and to make future maintenance easier.


    1. Connection diagram


      C250922E01


      Text in Illustration 
      *a
      Component with harness connected
      (CAN No. 1 Junction Connector)
      *b
      to Main Body ECU (Multiplex Network Body ECU)
      (for V Bus)
      *c
      to Air Conditioning Amplifier Assembly
      (for V Bus)
      *d
      to Airbag Sensor Assembly
      (for V Bus)
      *e
      to Power Steering ECU with Motor Assembly
      (for V Bus)
      *f
      to ECM
      (for V Bus)
      *g
      to Radio and Display Receiver Assembly*1
      (for V Bus)
      *h
      to CAN No. 2 Junction Connector
      (for V Bus)
      *1: for Radio and display type

    2. Check the connection diagram of the components which are connected to the CAN No. 1 junction connector.

      Terminal No. (Symbol)
      Wiring Color
      Connected to
      I95-1 (CANH)
      P
      Main body ECU (Multiplex network body ECU)
      (for V bus)
      I95-2 (CANL)
      W
      I102-1 (CANH)
      V
      Air conditioning amplifier assembly
      (for V bus)
      I102-2 (CANL)
      W
      I103-1 (CANH)
      Y
      Airbag sensor assembly
      (for V bus)
      I103-2 (CANL)
      W
      I100-1 (CANH)
      L
      Power steering ECU with motor assembly
      (for V bus)
      I100-2 (CANL)
      W
      I104-1 (CANH)
      G
      ECM
      (for V bus)
      I104-2 (CANL)
      W
      I107-1 (CANH)
      R
      Radio and display receiver assembly*1
      (for V bus)
      I107-2 (CANL)
      W
      I93-1 (CANH)
      B
      CAN No. 2 junction connector
      (for V bus)
      I93-2 (CANL)
      W
      *1: for Radio and display type


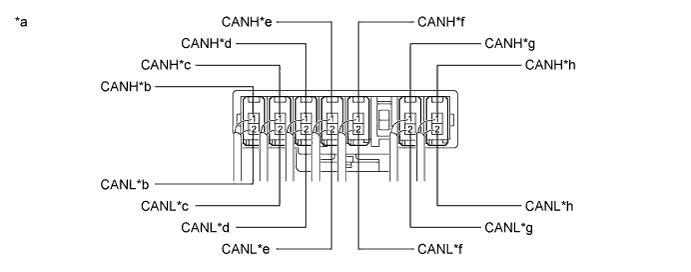
CAN NO. 2 JUNCTION CONNECTOR (for LHD)


  1. Check the CAN No. 2 junction connector.

    HINT:
    Connectors that connect to the CAN junction connector can be distinguished by the color of their CAN bus lines. When the connectors have been disconnected from the CAN junction connector, reconnecting the connectors to non-original positions on the CAN junction connector does not affect system performance. However, it is preferred to reconnect the connectors to their original positions to avoid negative effects on the wiring such as tension on the wiring harnesses, and to make future maintenance easier.


    1. Connection diagram


      C269149E01


      Text in Illustration 
      *a
      Component with harness connected
      (CAN No. 2 Junction Connector)
      *b
      to Clearance Warning ECU Assembly*1
      (for V Bus)
      *c
      to ECM
      (for V Bus)
      *d
      to Air Conditioning Amplifier Assembly
      (for V Bus)
      *e
      to Brake Actuator Assembly
      (for V Bus)
      *f
      to Smart Key ECU Assembly (Certification ECU)*2
      (for V Bus)
      *g
      1. to Navigation ECU Sub-assembly*3
      2. to Radio and Display Receiver Assembly*4
      (for V Bus)
      *h
      to CAN No. 1 Junction Connector
      (for V Bus)
      *1: w/ Toyota parking assist-sensor system
      *2: w/ Smart entry and start system
      *3: for Navigation receiver type
      *4: for Radio and display type

    2. Check the connection diagram of the components which are connected to the CAN No. 2 junction connector.

      Terminal No. (Symbol)
      Wiring Color
      Connected to
      I111-1 (CANH)
      BE
      Clearance warning ECU assembly*1
      (for V bus)
      I111-2 (CANL)
      W
      I104-1 (CANH)
      P
      ECM
      (for V bus)
      I104-2 (CANL)
      W
      I102-1 (CANH)
      V
      Air conditioning amplifier assembly
      (for V bus)
      I102-2 (CANL)
      W
      I105-1 (CANH)
      Y
      Brake actuator assembly
      (for V bus)
      I105-2 (CANL)
      W
      I106-1 (CANH)
      L
      Smart key ECU assembly (Certification ECU)*2
      (for V bus)
      I106-2 (CANL)
      W
      I107-1 (CANH)
      R
      1. Navigation ECU sub-assembly*3
      2. Radio and display receiver assembly*4
      (for V bus)
      I107-2 (CANL)
      W
      I101-1 (CANH)
      B
      CAN No. 1 junction connector
      (for V bus)
      I101-2 (CANL)
      W
      *1: w/ Toyota parking assist-sensor system
      *2: w/ Smart entry and start system
      *3: for Navigation receiver type
      *4: for Radio and display type


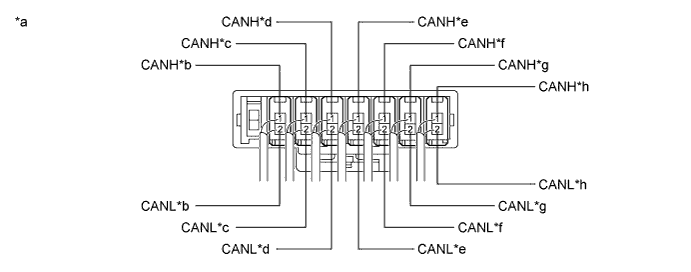
CAN NO. 2 JUNCTION CONNECTOR (for RHD)


  1. Check the CAN No. 2 junction connector.

    HINT:
    Connectors that connect to the CAN junction connector can be distinguished by the color of their CAN bus lines. When the connectors have been disconnected from the CAN junction connector, reconnecting the connectors to non-original positions on the CAN junction connector does not affect system performance. However, it is preferred to reconnect the connectors to their original positions to avoid negative effects on the wiring such as tension on the wiring harnesses, and to make future maintenance easier.


    1. Connection diagram


      C269150E01


      Text in Illustration 
      *a
      Component with harness connected
      (CAN No. 2 Junction Connector)
      *b
      to Clearance Warning ECU Assembly
      (for V Bus)
      *c
      to Steering Sensor
      (for V Bus)
      *d
      to Brake Actuator Assembly
      (for V Bus)
      *e
      to Smart Key ECU Assembly (Certification ECU)*1
      (for V Bus)
      *f
      DLC3
      *g
      to Combination Meter Assembly
      (for V Bus)
      *h
      to CAN No. 1 Junction Connector
      (for V Bus)
      *1: w/ Smart entry and start system

    2. Check the connection diagram of the components which are connected to the CAN No. 2 junction connector.

      Terminal No. (Symbol)
      Wiring Color
      Connected to
      I111-1 (CANH)
      P
      Clearance warning ECU assembly
      (for V bus)
      I111-2 (CANL)
      W
      I97-1 (CANH)
      V
      Steering sensor
      (for V bus)
      I97-2 (CANL)
      W
      I105-1 (CANH)
      Y
      Brake actuator assembly
      (for V bus)
      I105-2 (CANL)
      W
      I106-1 (CANH)
      L
      Smart key ECU assembly (Certification ECU)*1
      (for V bus)
      I106-2 (CANL)
      W
      I96-1 (CANH)
      G
      DLC3
      I96-2 (CANL)
      W
      I94-1 (CANH)
      R
      Combination meter assembly
      (for V bus)
      I94-2 (CANL)
      W
      I101-1 (CANH)
      B
      CAN No. 1 junction connector
      (for V bus)
      I101-2 (CANL)
      W
      *1: w/ Smart entry and start system


CAN NO. 3 JUNCTION CONNECTOR (w/ Power Tilt and Power Telescopic Steering Column System)


  1. Check the CAN No. 3 junction connector.

    HINT:
    Connectors that connect to the CAN junction connector can be distinguished by the color of their CAN bus lines. When the connectors have been disconnected from the CAN junction connector, reconnecting the connectors to non-original positions on the CAN junction connector does not affect system performance. However, it is preferred to reconnect the connectors to their original positions to avoid negative effects on the wiring such as tension on the wiring harnesses, and to make future maintenance easier.


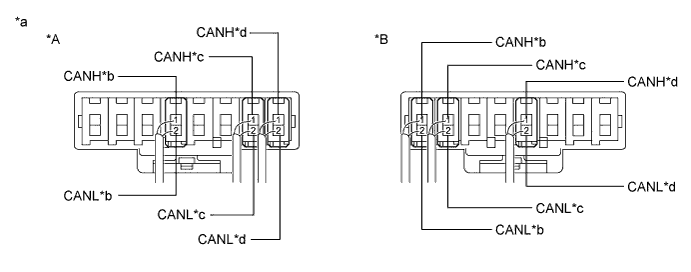
    1. Connection diagram


      C250837E01


      Text in Illustration 
      *A
      for TMC Made
      *B
      for TMMR Made
      *a
      Component with harness connected
      (CAN No. 3 Junction Connector)
      *b
      to Multiplex Tilt and Telescopic ECU
      (for Sub Bus 1)
      *c
      to Main Body ECU (Multiplex Network Body ECU)
      (for Sub Bus 1)
      *d
      to CAN No. 4 Junction Connector
      (for Sub Bus 1)

    2. Check the connection diagram of the components which are connected to the CAN No. 3 junction connector.

      Terminal No. (Symbol)
      Wiring Color
      Connected to
      I115-1 (CANH)
      B
      Multiplex tilt and telescopic ECU
      (for Sub bus 1)
      I115-2 (CANL)
      GR
      I114-1 (CANH)
      R
      Main body ECU (Multiplex network body ECU)
      (for Sub bus 1)
      I114-2 (CANL)
      GR
      I117-1 (CANH)
      Y
      CAN No. 4 junction connector
      (for Sub bus 1)
      I117-2 (CANL)
      GR


CAN NO. 4 JUNCTION CONNECTOR (w/ Power Tilt and Power Telescopic Steering Column System)


  1. Check the CAN No. 4 junction connector.

    HINT:
    Connectors that connect to the CAN junction connector can be distinguished by the color of their CAN bus lines. When the connectors have been disconnected from the CAN junction connector, reconnecting the connectors to non-original positions on the CAN junction connector does not affect system performance. However, it is preferred to reconnect the connectors to their original positions to avoid negative effects on the wiring such as tension on the wiring harnesses, and to make future maintenance easier.


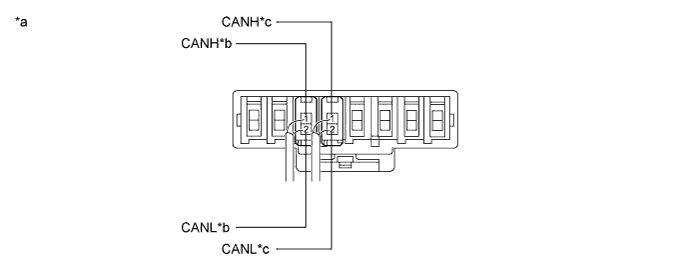
    1. Connection diagram


      C241479E01


      Text in Illustration 
      *a
      Component with harness connected
      (CAN No. 4 Junction Connector)
      *b
      to CAN No. 5 Junction Connector
      (for Sub Bus 1)
      *c
      to CAN No. 3 Junction Connector
      (for Sub Bus 1)
      -
      -

    2. Check the connection diagram of the components which are connected to the CAN No. 4 junction connector.

      Terminal No. (Symbol)
      Wiring Color
      Connected to
      I121-1 (CANH)
      V
      CAN No. 5 junction connector
      (for Sub bus 1)
      I121-2 (CANL)
      GR
      I120-1 (CANH)
      Y
      CAN No. 3 junction connector
      (for Sub bus 1)
      I120-2 (CANL)
      GR


CAN NO. 5 JUNCTION CONNECTOR (w/ Power Tilt and Power Telescopic Steering Column System)


  1. Check the CAN No. 5 junction connector.


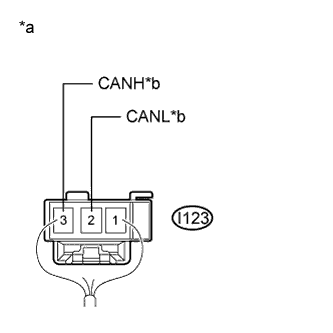
      C183982E18
    1. Connection diagram
      Text in Illustration 
      *a
      Rear view of wire harness connector
      (to CAN No. 5 Junction Connector)
      *b
      to CAN No. 4 Junction Connector
      (for Sub Bus 1)

    2. Check the connection diagram of the components which are connected to the CAN No. 5 junction connector.

      Terminal No. (Symbol)
      Wiring Color
      Connected to
      I123-3 (CANH)
      V
      CAN No. 4 junction connector
      (for Sub bus 1)
      I123-2 (CANL)
      GR


DLC3
  1. Disconnect the cable from the negative (-) battery terminal.


  2. Measure the resistance according to the value(s) in the table below.


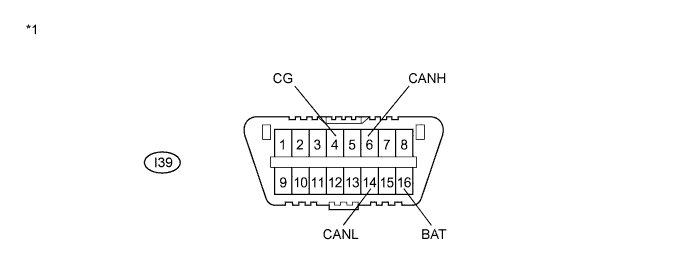
    C188081E16


    Text in Illustration 
    *1
    DLC3
    -
    -

    Standard Resistance:

    Terminal No. (Symbol)
    Wiring Color
    Terminal Description
    Condition
    Specified Condition
    I39-6 (CANH) - I39-14 (CANL)
    L - W*1
    G - W*2
    HIGH-level CAN bus line - LOW-level CAN bus line
    Cable disconnected from negative (-) battery terminal
    54 to 69 Ω
    I39-6 (CANH) - I39-4 (CG)
    L - W-B*1
    G - W-B*2
    HIGH-level CAN bus line - Ground
    Cable disconnected from negative (-) battery terminal
    200 Ω or higher
    I39-14 (CANL) - I39-4 (CG)
    W - W-B
    LOW-level CAN bus line - Ground
    Cable disconnected from negative (-) battery terminal
    200 Ω or higher
    I39-6 (CANH) - I39-16 (BAT)
    L - R*1
    G - R*2
    HIGH-level CAN bus line - Battery positive (+)
    Cable disconnected from negative (-) battery terminal
    6 kΩ or higher
    I39-14 (CANL) - I39-16 (BAT)
    W - R
    LOW-level CAN bus line - Battery positive (+)
    Cable disconnected from negative (-) battery terminal
    6 kΩ or higher

    *1: for LHD
    *2: for RHD


ECM (for 2GR-FE)

A247842E25


Text in Illustration 
*a
Component without harness connected
(ECM)
-
-
  1. Disconnect the cable from the negative (-) battery terminal.


  2. Disconnect the ECM connectors.


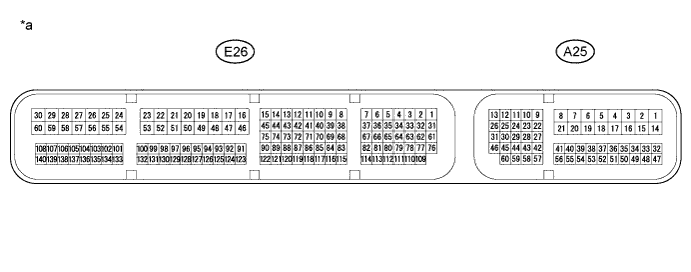
    C239445E05


    Text in Illustration 
    *a
    Front view of wire harness connector
    (to ECM)
    -
    -

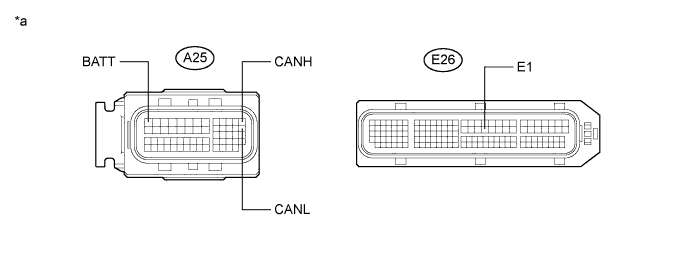
  3. Measure the resistance according to the value(s) in the table below.

    Standard Resistance:

    Terminal No. (Symbol)
    Wiring Color
    Terminal Description
    Condition
    Specified Condition
    A25-13 (CANH) - A25-26 (CANL)
    B - W
    HIGH-level CAN bus line - LOW-level CAN bus line
    Cable disconnected from negative (-) battery terminal
    108 to 132 Ω
    A25-13 (CANH) - E26-49 (E1)
    B - BR
    HIGH-level CAN bus line - Ground
    Cable disconnected from negative (-) battery terminal
    200 Ω or higher
    A25-26 (CANL) - E26-49 (E1)
    W - BR
    LOW-level CAN bus line - Ground
    Cable disconnected from negative (-) battery terminal
    200 Ω or higher
    A25-13 (CANH) - A25-1 (BATT)
    B - GR
    HIGH-level CAN bus line - Battery positive (+)
    Cable disconnected from negative (-) battery terminal
    6 kΩ or higher
    A25-26 (CANL) - A25-1 (BATT)
    W - GR
    LOW-level CAN bus line - Battery positive (+)
    Cable disconnected from negative (-) battery terminal
    6 kΩ or higher


ECM (for 2AR-FE)

A247842E25


Text in Illustration 
*a
Component without harness connected
(ECM)
-
-
  1. Disconnect the cable from the negative (-) battery terminal.


  2. Disconnect the ECM connectors.


    C239445E06


    Text in Illustration 
    *a
    Front view of wire harness connector
    (to ECM)
    -
    -

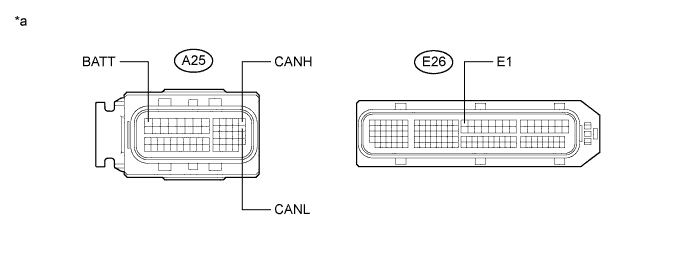
  3. Measure the resistance according to the value(s) in the table below.

    Standard Resistance:

    Terminal No. (Symbol)
    Wiring Color
    Terminal Description
    Condition
    Specified Condition
    A25-13 (CANH) - A25-26 (CANL)
    B - W
    HIGH-level CAN bus line - LOW-level CAN bus line
    Cable disconnected from negative (-) battery terminal
    108 to 132 Ω
    A25-13 (CANH) - E26-16 (E1)
    B - BR
    HIGH-level CAN bus line - Ground
    Cable disconnected from negative (-) battery terminal
    200 Ω or higher
    A25-26 (CANL) - E26-16 (E1)
    W - BR
    LOW-level CAN bus line - Ground
    Cable disconnected from negative (-) battery terminal
    200 Ω or higher
    A25-13 (CANH) - A25-1 (BATT)
    B - GR
    HIGH-level CAN bus line - Battery positive (+)
    Cable disconnected from negative (-) battery terminal
    6 kΩ or higher
    A25-26 (CANL) - A25-1 (BATT)
    W - GR
    LOW-level CAN bus line - Battery positive (+)
    Cable disconnected from negative (-) battery terminal
    6 kΩ or higher


ECM (for 1AZ-FE)

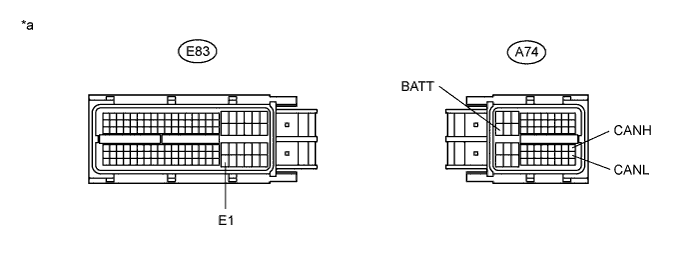
C233237E07


Text in Illustration 
*a
Component without harness connected
(ECM)
-
-
  1. Disconnect the cable from the negative (-) battery terminal.


  2. Disconnect the ECM connectors.


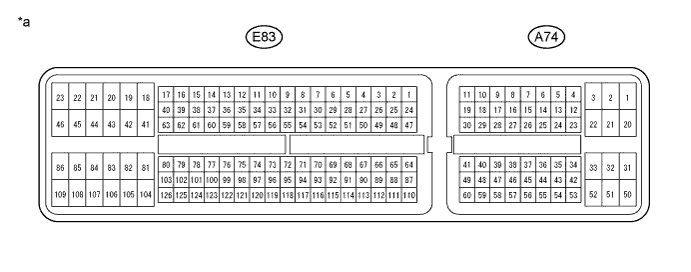
    C248873E05


    Text in Illustration 
    *a
    Front view of wire harness connector
    (to ECM)
    -
    -

  3. Measure the resistance according to the value(s) in the table below.

    Standard Resistance:

    Terminal No. (Symbol)
    Wiring Color
    Terminal Description
    Condition
    Specified Condition
    A74-41 (CANH) - A74-49 (CANL)
    B - W
    HIGH-level CAN bus line - LOW-level CAN bus line
    Cable disconnected from negative (-) battery terminal
    108 to 132 Ω
    A74-41 (CANH) - E83-104 (E1)
    B - BR
    HIGH-level CAN bus line - Ground
    Cable disconnected from negative (-) battery terminal
    200 Ω or higher
    A74-49 (CANL) - E83-104 (E1)
    W - BR
    LOW-level CAN bus line - Ground
    Cable disconnected from negative (-) battery terminal
    200 Ω or higher
    A74-41 (CANH) - A74-20 (BATT)
    B - GR
    HIGH-level CAN bus line - Battery positive (+)
    Cable disconnected from negative (-) battery terminal
    6 kΩ or higher
    A74-49 (CANL) - A74-20 (BATT)
    W - GR
    LOW-level CAN bus line - Battery positive (+)
    Cable disconnected from negative (-) battery terminal
    6 kΩ or higher


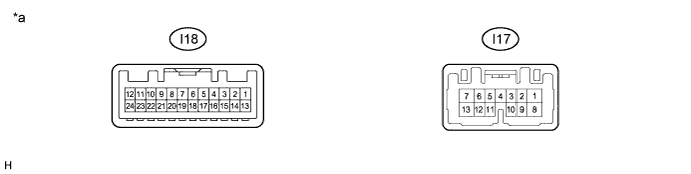
COMBINATION METER ASSEMBLY

E224288E05


Text in Illustration 
*a
Component without harness connected
(Combination Meter Assembly)
-
-
  1. Disconnect the cable from the negative (-) battery terminal.


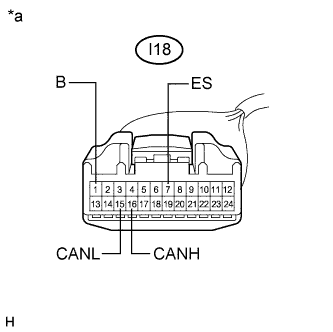
  2. E224284E18
  3. Disconnect the combination meter assembly connector.
    Text in Illustration 
    *a
    Front view of wire harness connector
    (to Combination Meter Assembly)

  4. Measure the resistance according to the value(s) in the table below.

    Standard Resistance:

    Terminal No. (Symbol)
    Wiring Color
    Terminal Description
    Condition
    Specified Condition
    I18-16 (CANH) - I18-15 (CANL)
    R - W
    HIGH-level CAN bus line - LOW-level CAN bus line
    Cable disconnected from negative (-) battery terminal
    108 to 132 Ω
    I18-16 (CANH) - I18-7 (ES)
    R - BR
    HIGH-level CAN bus line - Ground
    Cable disconnected from negative (-) battery terminal
    200 Ω or higher
    I18-15 (CANL) - I18-7 (ES)
    W - BR
    LOW-level CAN bus line - Ground
    Cable disconnected from negative (-) battery terminal
    200 Ω or higher
    I18-16 (CANH) - I18-1 (B)
    R - W
    HIGH-level CAN bus line - Battery positive (+)
    Cable disconnected from negative (-) battery terminal
    6 kΩ or higher
    I18-15 (CANL) - I18-1 (B)
    W - W
    LOW-level CAN bus line - Battery positive (+)
    Cable disconnected from negative (-) battery terminal
    6 kΩ or higher


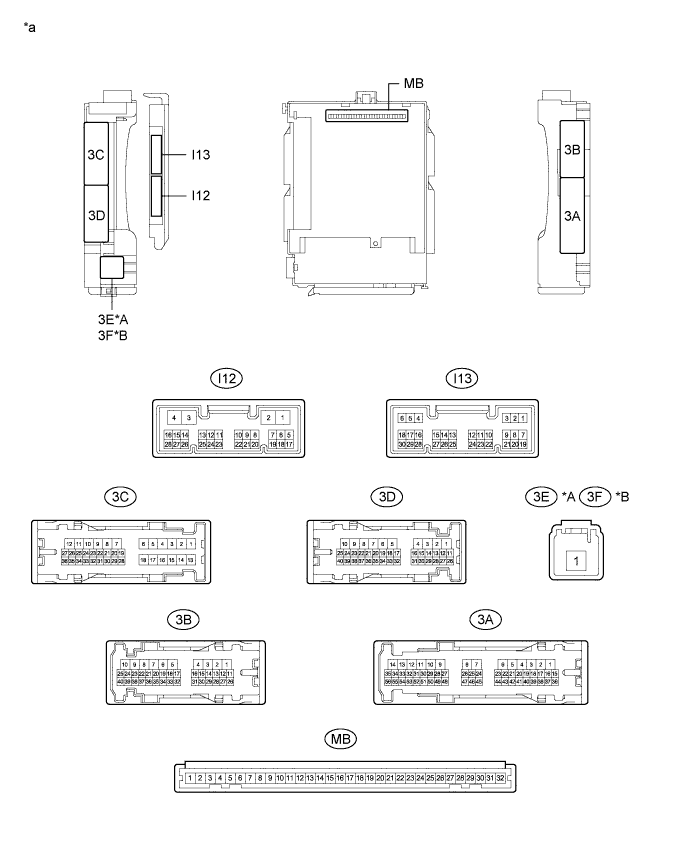
INSTRUMENT PANEL JUNCTION BLOCK ASSEMBLY AND MAIN BODY ECU (MULTIPLEX NETWORK BODY ECU)

B278841E09


Text in Illustration 
*A
for LHD
*B
for RHD
*a
Component without harness connected
(Instrument Panel Junction Block Assembly and Main Body ECU (Multiplex Network Body ECU))
-
-
  1. Disconnect the cable from the negative (-) battery terminal.


  2. Disconnect the main body ECU (multiplex network body ECU) connectors.


    C204058E10


    Text in Illustration 
    *1
    DLC3
    -
    -
    *a
    Front view of wire harness connector
    (to Main Body ECU (Multiplex Network Body ECU))
    -
    -

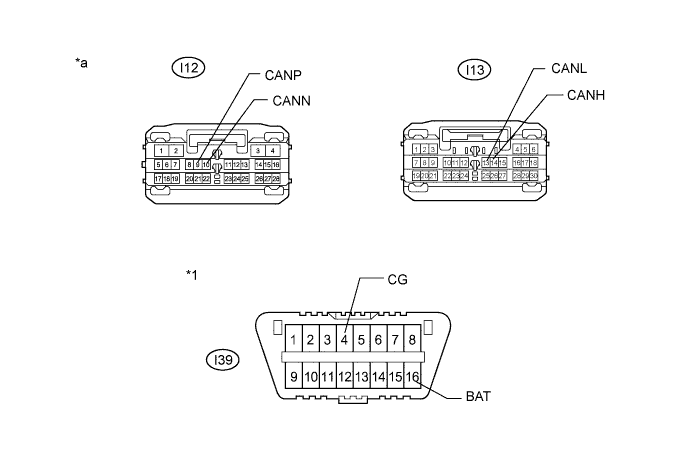
  3. Measure the resistance according to the value(s) in the table below.

    Standard Resistance:

    V Bus Branch Lines 
    Terminal No. (Symbol)
    Wiring Color
    Terminal Description
    Condition
    Specified Condition
    I13-14 (CANH) - I13-13 (CANL)
    P - W
    HIGH-level CAN bus line - LOW-level CAN bus line
    Cable disconnected from negative (-) battery terminal
    54 to 69 Ω
    I13-14 (CANH) - I39-4 (CG)
    P - W-B
    HIGH-level CAN bus line - Ground
    Cable disconnected from negative (-) battery terminal
    200 Ω or higher
    I13-13 (CANL) - I39-4 (CG)
    W - W-B
    LOW-level CAN bus line - Ground
    Cable disconnected from negative (-) battery terminal
    200 Ω or higher
    I13-14 (CANH) - I39-16 (BAT)
    P - R
    HIGH-level CAN bus line - Battery positive (+)
    Cable disconnected from negative (-) battery terminal
    6 kΩ or higher
    I13-13 (CANL) - I39-16 (BAT)
    W - R
    LOW-level CAN bus line - Battery positive (+)
    Cable disconnected from negative (-) battery terminal
    6 kΩ or higher

    Sub Bus 1 Main Lines 
    Terminal No. (Symbol)
    Wiring Color
    Terminal Description
    Condition
    Specified Condition
    I12-9 (CANP) - I12-10 (CANN)
    R - GR
    HIGH-level CAN bus line - LOW-level CAN bus line
    Cable disconnected from negative (-) battery terminal
    108 to 132 Ω
    I12-9 (CANP) - I39-4 (CG)
    R - W-B
    HIGH-level CAN bus line - Ground
    Cable disconnected from negative (-) battery terminal
    200 Ω or higher
    I12-10 (CANN) - I39-4 (CG)
    GR - W-B
    LOW-level CAN bus line - Ground
    Cable disconnected from negative (-) battery terminal
    200 Ω or higher
    I12-9 (CANP) - I39-16 (BAT)
    R - R
    HIGH-level CAN bus line - Battery positive (+)
    Cable disconnected from negative (-) battery terminal
    6 kΩ or higher
    I12-10 (CANN) - I39-16 (BAT)
    GR - R
    LOW-level CAN bus line - Battery positive (+)
    Cable disconnected from negative (-) battery terminal
    6 kΩ or higher


BRAKE ACTUATOR ASSEMBLY

C238830E01


Text in Illustration 
*a
Component without harness connected
(Brake Actuator Assembly)
-
-
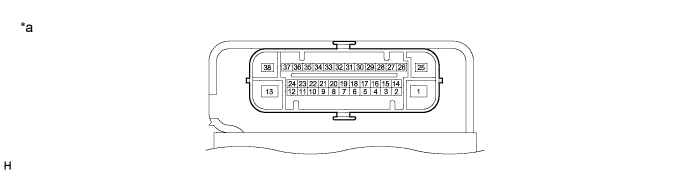
  1. Disconnect the cable from the negative (-) battery terminal.


  2. C238832E18
  3. Disconnect the brake actuator assembly connector.
    Text in Illustration 
    *a
    Front view of wire harness connector
    (to Brake Actuator Assembly)

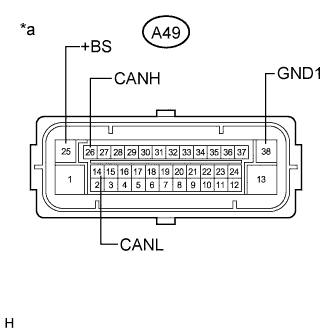
  4. Measure the resistance according to the value(s) in the table below.

    Standard Resistance:

    Terminal No. (Symbol)
    Wiring Color
    Terminal Description
    Condition
    Specified Condition
    A49-26 (CANH) - A49-14 (CANL)
    GR - W
    HIGH-level CAN bus line - LOW-level CAN bus line
    Cable disconnected from negative (-) battery terminal
    54 to 69 Ω
    A49-26 (CANH) - A49-38 (GND1)
    GR - W-B
    HIGH-level CAN bus line - Ground
    Cable disconnected from negative (-) battery terminal
    200 Ω or higher
    A49-14 (CANL) - A49-38 (GND1)
    W - W-B
    LOW-level CAN bus line - Ground
    Cable disconnected from negative (-) battery terminal
    200 Ω or higher
    A49-26 (CANH) - A49-25 (+BS)
    GR - L
    HIGH-level CAN bus line - Battery positive (+)
    Cable disconnected from negative (-) battery terminal
    6 kΩ or higher
    A49-14 (CANL) - A49-25 (+BS)
    W - L
    LOW-level CAN bus line - Battery positive (+)
    Cable disconnected from negative (-) battery terminal
    6 kΩ or higher


STEERING SENSOR
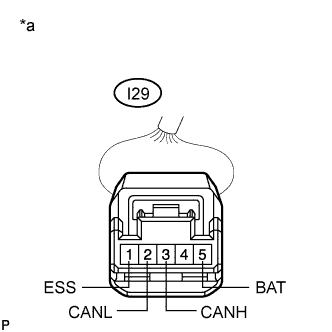
  1. Disconnect the cable from the negative (-) battery terminal.


  2. C156493E53
  3. Disconnect the steering sensor connector.
    Text in Illustration 
    *a
    Front view of wire harness connector
    (to Steering Sensor)

  4. Measure the resistance according to the value(s) in the table below.

    Standard Resistance:

    Terminal No. (Symbol)
    Wiring Color
    Terminal Description
    Condition
    Specified Condition
    I29-3 (CANH) - I29-2 (CANL)
    V - W
    HIGH-level CAN bus line - LOW-level CAN bus line
    Cable disconnected from negative (-) battery terminal
    54 to 69 Ω
    I29-3 (CANH) - I29-1 (ESS)
    V - W-B
    HIGH-level CAN bus line - Ground
    Cable disconnected from negative (-) battery terminal
    200 Ω or higher
    I29-2 (CANL) - I29-1 (ESS)
    W - W-B
    LOW-level CAN bus line - Ground
    Cable disconnected from negative (-) battery terminal
    200 Ω or higher
    I29-3 (CANH) - I29-5 (BAT)
    V - W
    HIGH-level CAN bus line - Battery positive (+)
    Cable disconnected from negative (-) battery terminal
    6 kΩ or higher
    I29-2 (CANL) - I29-5 (BAT)
    W - W
    LOW-level CAN bus line - Battery positive (+)
    Cable disconnected from negative (-) battery terminal
    6 kΩ or higher


POWER STEERING ECU WITH MOTOR ASSEMBLY
  1. Disconnect the cable from the negative (-) battery terminal.


  2. Disconnect the power steering ECU with motor assembly connectors.


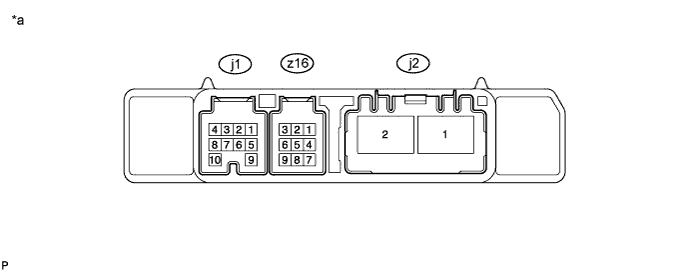
    C238935E08


    Text in Illustration 
    *a
    Component without harness connected
    (Power Steering ECU with Motor Assembly)
    -
    -

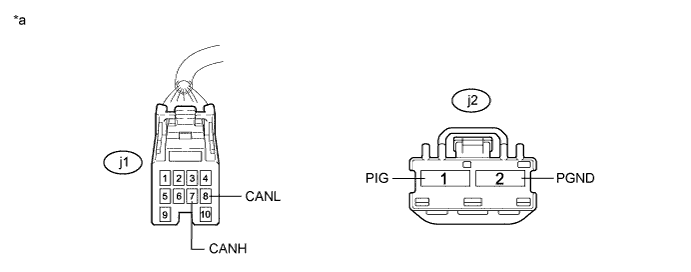
    C240488E04


    Text in Illustration 
    *a
    Front view of wire harness connector
    (to Power Steering ECU with Motor Assembly)
    -
    -

  3. Measure the resistance according to the value(s) in the table below.

    Standard Resistance:

    Terminal No. (Symbol)
    Wiring Color
    Terminal Description
    Condition
    Specified Condition
    j1-7 (CANH) - j1-8 (CANL)
    Y - SB
    HIGH-level CAN bus line - LOW-level CAN bus line
    Cable disconnected from negative (-) battery terminal
    54 to 69 Ω
    j1-7 (CANH) - j2-2 (PGND)
    Y - B
    HIGH-level CAN bus line - Ground
    Cable disconnected from negative (-) battery terminal
    200 Ω or higher
    j1-8 (CANL) - j2-2 (PGND)
    SB - B
    LOW-level CAN bus line - Ground
    Cable disconnected from negative (-) battery terminal
    200 Ω or higher
    j1-7 (CANH) - j2-1 (PIG)
    Y - R
    HIGH-level CAN bus line - Battery positive (+)
    Cable disconnected from negative (-) battery terminal
    6 kΩ or higher
    j1-8 (CANL) - j2-1 (PIG)
    SB - R
    LOW-level CAN bus line - Battery positive (+)
    Cable disconnected from negative (-) battery terminal
    6 kΩ or higher


AIRBAG SENSOR ASSEMBLY
  1. Disconnect the cable from the negative (-) battery terminal.


  2. Disconnect the airbag sensor assembly connector.


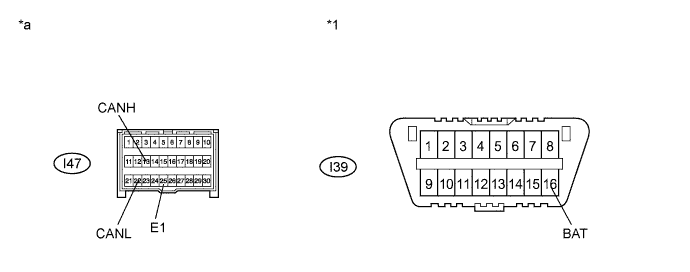
    C188802E20


    Text in Illustration 
    *1
    DLC3
    -
    -
    *a
    Front view of wire harness connector
    (to Airbag Sensor Assembly)
    -
    -

  3. Measure the resistance according to the value(s) in the table below.

    Standard Resistance:

    Terminal No. (Symbol)
    Wiring Color
    Terminal Description
    Condition
    Specified Condition
    I47-13 (CANH) - I47-22 (CANL)
    Y - W
    HIGH-level CAN bus line - LOW-level CAN bus line
    Cable disconnected from negative (-) battery terminal
    54 to 69 Ω
    I47-13 (CANH) - I47-25 (E1)
    Y - W-B
    HIGH-level CAN bus line - Ground
    Cable disconnected from negative (-) battery terminal
    200 Ω or higher
    I47-22 (CANL) - I47-25 (E1)
    W - W-B
    LOW-level CAN bus line - Ground
    Cable disconnected from negative (-) battery terminal
    200 Ω or higher
    I47-13 (CANH) - I39-16 (BAT)
    Y - R
    HIGH-level CAN bus line - Battery positive (+)
    Cable disconnected from negative (-) battery terminal
    6 kΩ or higher
    I47-22 (CANL) - I39-16 (BAT)
    W - R
    LOW-level CAN bus line - Battery positive (+)
    Cable disconnected from negative (-) battery terminal
    6 kΩ or higher


SMART KEY ECU ASSEMBLY (CERTIFICATION ECU) (w/ Smart Entry and Start System)

B264892E22


Text in Illustration 
*a
Component without harness connected
(Smart Key ECU Assembly (Certification ECU))
-
-
  1. Disconnect the cable from the negative (-) battery terminal.


  2. Disconnect the smart key ECU assembly (certification ECU) connectors.


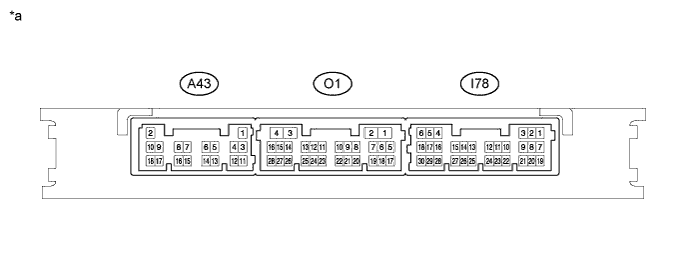
    C240482E04


    Text in Illustration 
    *a
    Rear view of wire harness connector
    (to Smart Key ECU Assembly (Certification ECU))
    -
    -

  3. Measure the resistance according to the value(s) in the table below.

    Standard Resistance:

    Terminal No. (Symbol)
    Wiring Color
    Terminal Description
    Condition
    Specified Condition
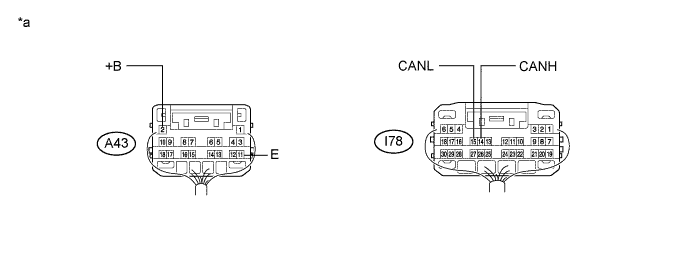
    I78-14 (CANH) - I78-15 (CANL)
    L - W
    HIGH-level CAN bus line - LOW-level CAN bus line
    Cable disconnected from negative (-) battery terminal
    54 to 69 Ω
    I78-14 (CANH) - A43-11 (E)
    L - W
    HIGH-level CAN bus line - Ground
    Cable disconnected from negative (-) battery terminal
    200 Ω or higher
    I78-15 (CANL) - A43-11 (E)
    W - W
    LOW-level CAN bus line - Ground
    Cable disconnected from negative (-) battery terminal
    200 Ω or higher
    I78-14 (CANH) - A43-2 (+B)
    L - W
    HIGH-level CAN bus line - Battery positive (+)
    Cable disconnected from negative (-) battery terminal
    6 kΩ or higher
    I78-15 (CANL) - A43-2 (+B)
    W - W
    LOW-level CAN bus line - Battery positive (+)
    Cable disconnected from negative (-) battery terminal
    6 kΩ or higher


RADIO AND DISPLAY RECEIVER ASSEMBLY (for Radio and Display Type)

E225865E11


Text in Illustration 
*a
Component without harness connected
(Radio and Display Receiver Assembly)
-
-
  1. Disconnect the cable from the negative (-) battery terminal.


  2. Disconnect the radio and display receiver assembly connectors.


    C240506E10


    Text in Illustration 
    *a
    Front view of wire harness connector
    (to Radio and Display Receiver Assembly)
    -
    -

  3. Measure the resistance according to the value(s) in the table below.

    Standard Resistance:

    Terminal No. (Symbol)
    Wiring Color
    Terminal Description
    Condition
    Specified Condition
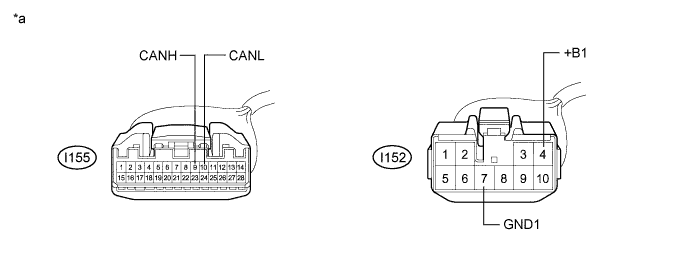
    I155-9 (CANH) - I155-10 (CANL)
    R - W
    HIGH-level CAN bus line - LOW-level CAN bus line
    Cable disconnected from negative (-) battery terminal
    54 to 69 Ω
    I155-9 (CANH) - I152-7 (GND1)
    R - BR
    HIGH-level CAN bus line - Ground
    Cable disconnected from negative (-) battery terminal
    200 Ω or higher
    I155-10 (CANL) - I152-7 (GND1)
    W - BR
    LOW-level CAN bus line - Ground
    Cable disconnected from negative (-) battery terminal
    200 Ω or higher
    I155-9 (CANH) - I152-4 (+B1)
    R - L-Y
    HIGH-level CAN bus line - Battery positive (+)
    Cable disconnected from negative (-) battery terminal
    6 kΩ or higher
    I155-10 (CANL) - I152-4 (+B1)
    W - L-Y
    LOW-level CAN bus line - Battery positive (+)
    Cable disconnected from negative (-) battery terminal
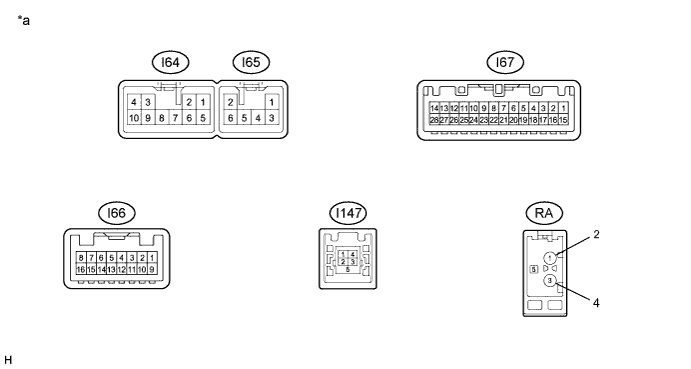
    6 kΩ or higher


NAVIGATION ECU SUB-ASSEMBLY (for Navigation Receiver Type)

E225806E07


Text in Illustration 
*a
Component without harness connected
(Navigation ECU Sub-assembly)
-
-
  1. Disconnect the cable from the negative (-) battery terminal.


  2. Disconnect the navigation ECU sub-assembly connectors.


    C240506E08


    Text in Illustration 
    *a
    Front view of wire harness connector
    (to Navigation ECU Sub-assembly)
    -
    -

  3. Measure the resistance according to the value(s) in the table below.

    Standard Resistance:

    Terminal No. (Symbol)
    Wiring Color
    Terminal Description
    Condition
    Specified Condition
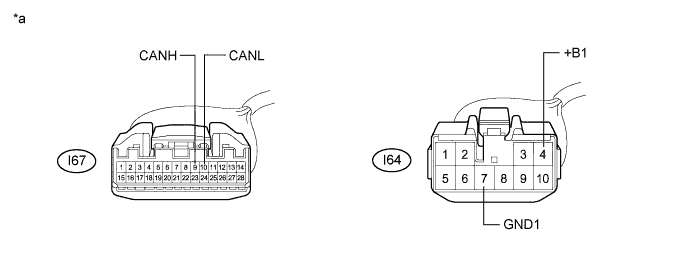
    I67-9 (CANH) - I67-10 (CANL)
    R - W
    HIGH-level CAN bus line - LOW-level CAN bus line
    Cable disconnected from negative (-) battery terminal
    54 to 69 Ω
    I67-9 (CANH) - I64-7 (GND1)
    R - BR
    HIGH-level CAN bus line - Ground
    Cable disconnected from negative (-) battery terminal
    200 Ω or higher
    I67-10 (CANL) - I64-7 (GND1)
    W - BR
    LOW-level CAN bus line - Ground
    Cable disconnected from negative (-) battery terminal
    200 Ω or higher
    I67-9 (CANH) - I64-4 (+B1)
    R - L-Y
    HIGH-level CAN bus line - Battery positive (+)
    Cable disconnected from negative (-) battery terminal
    6 kΩ or higher
    I67-10 (CANL) - I64-4 (+B1)
    W - L-Y
    LOW-level CAN bus line - Battery positive (+)
    Cable disconnected from negative (-) battery terminal
    6 kΩ or higher


AIR CONDITIONING AMPLIFIER ASSEMBLY
  1. Disconnect the cable from the negative (-) battery terminal.


  2. Disconnect the air conditioning amplifier assembly connector.


    E226604E07


    Text in Illustration 
    *a
    Component without harness connected
    (Air Conditioning Amplifier Assembly)
    -
    -

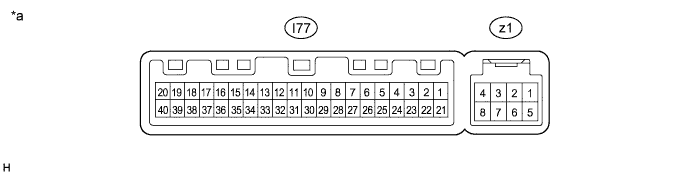
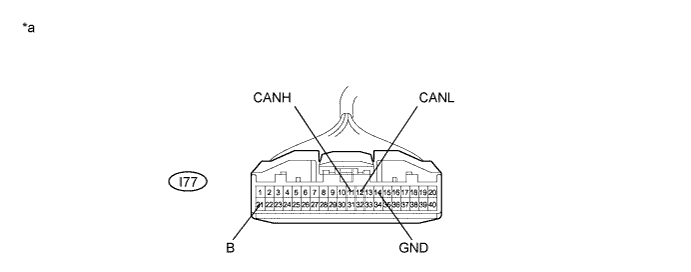
    C188799E31


    Text in Illustration 
    *a
    Front view of wire harness connector
    (to Air Conditioning Amplifier Assembly)
    -
    -

  3. Measure the resistance according to the value(s) in the table below.

    Standard Resistance:

    Terminal No. (Symbol)
    Wiring Color
    Terminal Description
    Condition
    Specified Condition
    I77-11 (CANH) - I77-12 (CANL)
    V - W
    HIGH-level CAN bus line - LOW-level CAN bus line
    Cable disconnected from negative (-) battery terminal
    54 to 69 Ω
    I77-11 (CANH) - I77-14 (GND)
    V - W-B
    HIGH-level CAN bus line - Ground
    Cable disconnected from negative (-) battery terminal
    200 Ω or higher
    I77-12 (CANL) - I77-14 (GND)
    W - W-B
    LOW-level CAN bus line - Ground
    Cable disconnected from negative (-) battery terminal
    200 Ω or higher
    I77-11 (CANH) - I77-21 (B)
    V - Y
    HIGH-level CAN bus line - Battery positive (+)
    Cable disconnected from negative (-) battery terminal
    6 kΩ or higher
    I77-12 (CANL) - I77-21 (B)
    W - Y
    LOW-level CAN bus line - Battery positive (+)
    Cable disconnected from negative (-) battery terminal
    6 kΩ or higher


CLEARANCE WARNING ECU ASSEMBLY (w/ Toyota Parking Assist-sensor System)
  1. Disconnect the cable from the negative (-) battery terminal.


  2. Disconnect the clearance warning ECU assembly connector.


    C240483E03


    Text in Illustration 
    *1
    DLC3
    -
    -
    *a
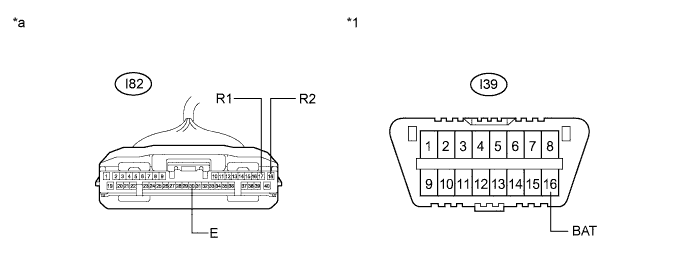
    Front view of wire harness connector
    (to Clearance Warning ECU Assembly)
    -
    -

  3. Measure the resistance according to the value(s) in the table below.

    Standard Resistance:

    Terminal No. (Symbol)
    Wiring Color
    Terminal Description
    Condition
    Specified Condition
    I82-17 (R1) - I82-18 (R2)
    BE - W*1
    P - W*2
    HIGH-level CAN bus line - LOW-level CAN bus line
    Cable disconnected from negative (-) battery terminal
    54 to 69 Ω
    I82-17 (R1) - I82-30 (E)
    BE - BR*1
    P - BR*2
    HIGH-level CAN bus line - Ground
    Cable disconnected from negative (-) battery terminal
    200 Ω or higher
    I82-18 (R2) - I82-30 (E)
    W - BR
    LOW-level CAN bus line - Ground
    Cable disconnected from negative (-) battery terminal
    200 Ω or higher
    I82-17 (R1) - I39-16 (BAT)
    BE - R*1
    P - R*2
    HIGH-level CAN bus line - Battery positive (+)
    Cable disconnected from negative (-) battery terminal
    6 kΩ or higher
    I82-18 (R2) - I39-16 (BAT)
    W - R
    LOW-level CAN bus line - Battery positive (+)
    Cable disconnected from negative (-) battery terminal
    6 kΩ or higher

    *1: for LHD
    *2: for RHD


AFS ECU (w/ AFS)

C188112E03


Text in Illustration 
*a
Component without harness connected
(AFS ECU)
-
-
  1. Disconnect the cable from the negative (-) battery terminal.


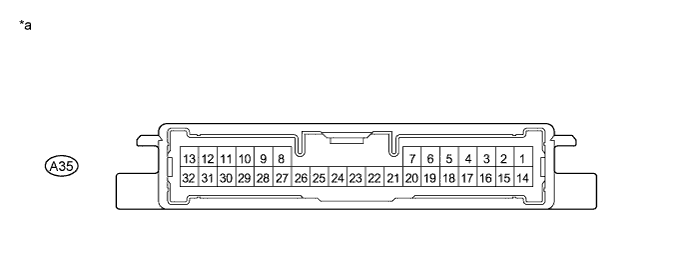
  2. Disconnect the AFS ECU connector.


    C188932E14


    Text in Illustration 
    *1
    DLC3
    -
    -
    *a
    Front view of wire harness connector
    (to AFS ECU)
    -
    -

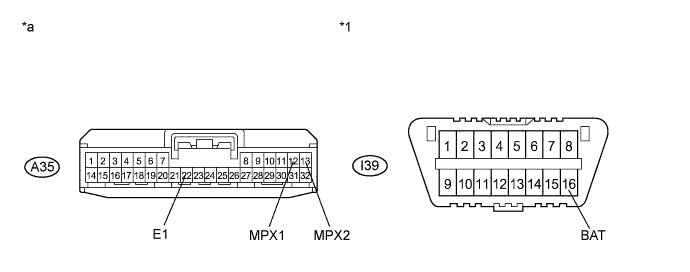
  3. Measure the resistance according to the value(s) in the table below.

    Standard Resistance:

    Terminal No. (Symbol)
    Wiring Color
    Terminal Description
    Condition
    Specified Condition
    A35-12 (MPX1) - A35-13 (MPX2)
    B - W
    HIGH-level CAN bus line - LOW-level CAN bus line
    Cable disconnected from negative (-) battery terminal
    54 to 69 Ω
    A35-12 (MPX1) - A35-22 (E1)
    B - W-B
    HIGH-level CAN bus line - Ground
    Cable disconnected from negative (-) battery terminal
    200 Ω or higher
    A35-13 (MPX2) - A35-22 (E1)
    W - W-B
    LOW-level CAN bus line - Ground
    Cable disconnected from negative (-) battery terminal
    200 Ω or higher
    A35-12 (MPX1) - I39-16 (BAT)
    B - R
    HIGH-level CAN bus line - Battery positive (+)
    Cable disconnected from negative (-) battery terminal
    6 kΩ or higher
    A35-13 (MPX2) - I39-16 (BAT)
    W - R
    LOW-level CAN bus line - Battery positive (+)
    Cable disconnected from negative (-) battery terminal
    6 kΩ or higher


MULTIPLEX TILT AND TELESCOPIC ECU (w/ Power Tilt and Power Telescopic Steering Column System)

C240520E03


Text in Illustration 
*a
Component without harness connected
(Multiplex Tilt and Telescopic ECU)
-
-
  1. Disconnect the cable from the negative (-) battery terminal.


  2. Disconnect the multiplex tilt and telescopic ECU connector.


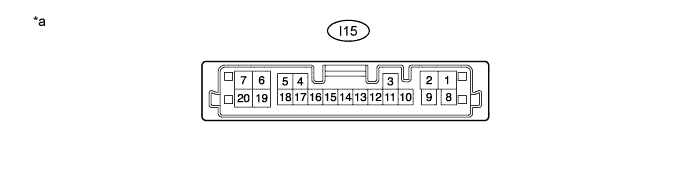
    C241674E02


    Text in Illustration 
    *a
    Front view of wire harness connector
    (to Multiplex Tilt and Telescopic ECU)
    -
    -

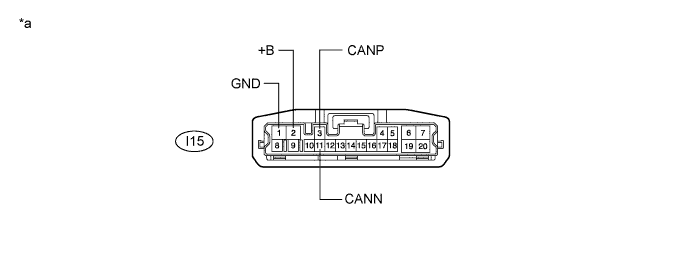
  3. Measure the resistance according to the value(s) in the table below.

    Standard Resistance:

    Terminal No. (Symbol)
    Wiring Color
    Terminal Description
    Condition
    Specified Condition
    I15-3 (CANP) -I15-11 (CANN)
    B - GR
    HIGH-level CAN bus line - LOW-level CAN bus line
    Cable disconnected from negative (-) battery terminal
    54 to 69 Ω
    I15-3 (CANP) - I15-1 (GND)
    B - W-B
    HIGH-level CAN bus line - Ground
    Cable disconnected from negative (-) battery terminal
    200 Ω or higher
    I15-11 (CANN) - I15-1 (GND)
    GR - W-B
    LOW-level CAN bus line - Ground
    Cable disconnected from negative (-) battery terminal
    200 Ω or higher
    I15-3 (CANP) - I15-2 (+B)
    B - Y
    HIGH-level CAN bus line - Battery positive (+)
    Cable disconnected from negative (-) battery terminal
    6 kΩ or higher
    I15-11 (CANN) - I15-2 (+B)
    GR - Y
    LOW-level CAN bus line - Battery positive (+)
    Cable disconnected from negative (-) battery terminal
    6 kΩ or higher