Home › Suspension › FRONT SUSPENSION › FRONT SHOCK ABSORBER

FRONT SHOCK ABSORBER > INSTALLATION

for Preparation Click here


HINT:
  1. Use the same procedure for the RH side and LH side.
  2. The procedure listed below is for the LH side.


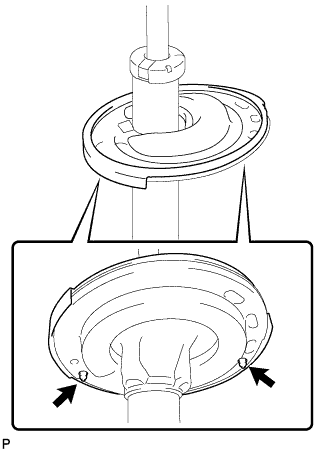
1. INSTALL FRONT LOWER COIL SPRING INSULATOR


    C165910
  1. Install the front lower coil spring insulator to the front shock absorber assembly.
    Text in Illustration 
    V100135
    Positioning Pin

    NOTICE:
    Make sure that the positioning pins on the front lower coil spring insulator are inserted into the holes in the front shock absorber assembly.
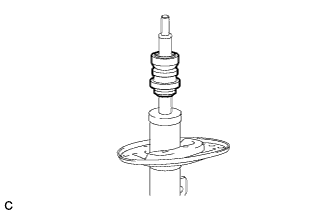
2. INSTALL FRONT SPRING BUMPER


    C238981
  1. Install the front spring bumper to the front shock absorber assembly.
    NOTICE:
    Face the smaller diameter end of the front spring bumper downward.


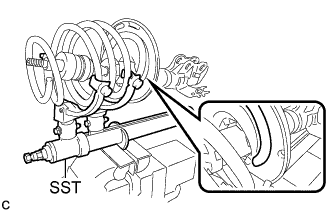
3. INSTALL FRONT COIL SPRING


    C265549E01
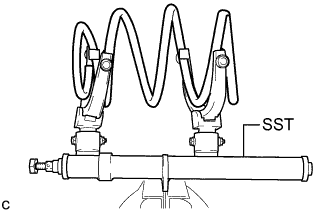
  1. Attach SST to the front coil spring and secure it in a vise.

    SST
    09727-30021   (09727-00010, 09727-00021, 09727-00031)


    C263591
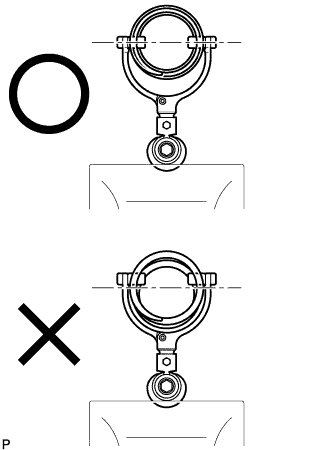
  1. Attach the arm of SST to the diameter of the front coil spring.

    CAUTION:
    1. Make sure that the front coil spring is installed so that the distance between the upper and lower hooks of SST is at the maximum.
    2. Make sure that the claws of the hooks are securely attached.

  1. Using SST, compress the front coil spring.

    CAUTION:
    1. If the front coil spring bends during the compression, immediately stop the compression and reinstall SST.
    2. Do not compress the spring until the coil springs contact each other.
    3. Do not use an impact wrench. It will damage SST.


    C267416E01
  1. Install the front coil spring to the front shock absorber assembly.

    NOTICE:
    Make sure that the end of the front coil spring is positioned in the depression of the front lower coil spring insulator.


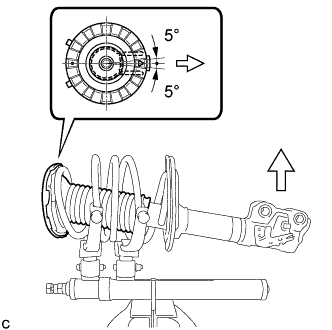
4. INSTALL FRONT UPPER COIL SPRING INSULATOR


    C263333E01
  1. Install the front upper coil spring insulator as shown in the illustration.
    Text in Illustration 
    V100136
    Outside of the Vehicle

    NOTICE:
    Any misalignment between the front shock absorber lower bracket and the alignment mark must be +/- 5°.


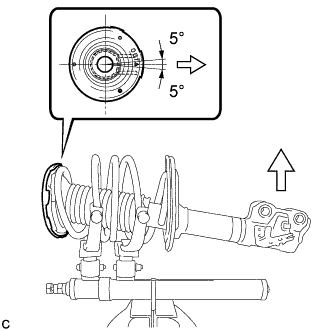
5. INSTALL FRONT UPPER COIL SPRING SEAT


    C263332E01
  1. Install the front upper coil spring seat with the mark facing the outside of the vehicle.
    Text in Illustration 
    V100136
    Outside of the Vehicle

    NOTICE:
    Any misalignment between the front shock absorber lower bracket and the alignment mark must be +/- 5°.


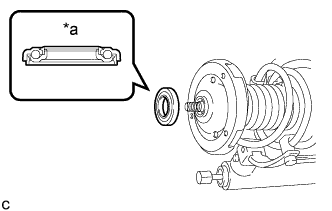
6. INSTALL FRONT SUSPENSION SUPPORT BEARING


    C263336E01
  1. Install the front suspension support bearing as shown in the illustration.
    Text in Illustration 
    *a
    Upper Side

    NOTICE:
    Do not install the bearing upside down.


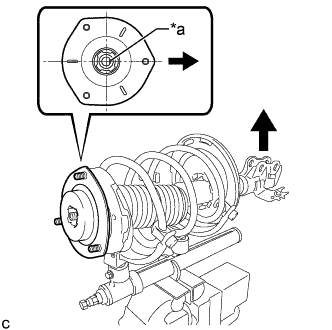
7. INSTALL FRONT SUSPENSION SUPPORT SUB-ASSEMBLY


    C267417E01
  1. Install the front suspension support sub-assembly as shown in the illustration.
    Text in Illustration 
    *a
    Slot
    V100135
    Outside of the Vehicle

    HINT:
    Check that the slot on the piston rod and the slot on the front suspension support sub-assembly are aligned.

  1. Temporarily tighten a new front support to front shock absorber nut.


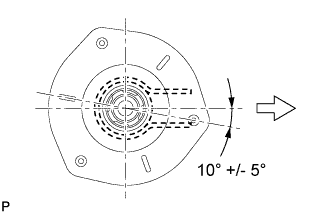
    C132423E06
  1. While aligning the stud bolt of the front suspension support sub-assembly and the front shock absorber lower bracket, remove SST from the front coil spring.
    Text in Illustration 
    V100136
    Outside of the Vehicle

    NOTICE:
    1. When reassembling the front suspension support sub-assembly, ensure that any misalignment between the absorber lower bracket and the stud bolt is within +/- 5°. Use the stud bolt that is closest to the outside of the vehicle.
    2. Do not use an impact wrench. It will damage SST.


8. INSTALL FRONT SHOCK ABSORBER WITH COIL SPRING
  1. Install the front shock absorber with coil spring (upper side) with the 3 nuts.

    Torque:
    85 N*m{ 867 kgf*cm , 63 ft.*lbf }

  1. Install the front shock absorber with coil spring (lower side) to the steering knuckle and insert the 2 bolts and 2 nuts.

    Torque:
    210 N*m{ 2141 kgf*cm , 155 ft.*lbf }

    NOTICE:
    While keeping the bolts from rotating, tighten the nuts.


9. INSTALL FRONT STABILIZER LINK ASSEMBLY
  1. Install the front stabilizer link assembly to the front shock absorber assembly with the nut.

    Torque:
    74 N*m{ 755 kgf*cm , 55 ft.*lbf }

    If the ball joint turns together with the nut, use a hexagon wrench to hold the stud bolt.


10. INSTALL FRONT SPEED SENSOR
  1. Install the front speed sensor and front flexible hose to the front shock absorber assembly with the bolt and clamp.

    Torque:
    19 N*m{ 192 kgf*cm , 14 ft.*lbf }

    NOTICE:
    Do not twist the front speed sensor when installing it.

    HINT:
    Install the speed sensor harness bracket first and then the front flexible hose.


11. FULLY TIGHTEN FRONT SUPPORT TO FRONT SHOCK ABSORBER NUT
  1. Fully tighten the front support to front shock absorber nut.

    Torque:
    for TMC Made:
    47 N*m{ 479 kgf*cm , 35 ft.*lbf }
    except TMC Made:
    70 N*m{ 714 kgf*cm , 52 ft.*lbf }

    NOTICE:
    Perform this step only when the front shock absorber with coil spring has been disassembled.


12. INSTALL FRONT WHEEL

Torque:
103 N*m{ 1049 kgf*cm , 76 ft.*lbf }


13. STABILIZE SUSPENSION
  1. Lower the vehicle and bounce it up and down several times to stabilize the front suspension.


14. INSPECT AND ADJUST FRONT WHEEL ALIGNMENT
(Click here)