| B |  |
| REPLACE NAVIGATION ECU SUB-ASSEMBLY (Click here) |
NAVIGATION SYSTEM > Radio Broadcast cannot be Received or Poor Reception |
| 1.CHECK NAVIGATION ECU SUB-ASSEMBLY |
Check the radio automatic station search function.
Check the radio automatic station search function by activating it.
| Result | Proceed to |
| Automatic station search function does not stop | A |
| Automatic station search function stops on a station | B |
|
| ||||
| A | |
 |
| 2.CHECK OPTIONAL COMPONENTS |
Check if any optional components that may decrease reception capacity, such as sunshade film or a telephone antenna, are installed.
| Result | Proceed to |
| Optional components are not installed | A |
| Optional components are installed | B |
|
| ||||
| A | |
|
| 3.CHECK NAVIGATION ECU SUB-ASSEMBLY |
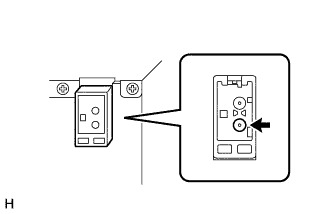 |
Preparation for check
Remove the antenna connector from the navigation ECU sub-assembly.
Check for noise
Turn the ignition switch to ACC with the navigation ECU sub-assembly connector connected.
Turn the radio on and tune into AM mode.
Place a screwdriver, thin wire or other metal object on the navigation ECU sub-assembly antenna jack and check that noise can be heard from the speakers.
|
| ||||
| OK | |
|
| 4.CHECK WINDOW GLASS ANTENNA WIRE |
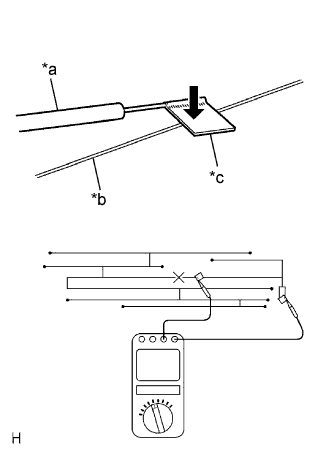 |
Check for continuity in the window glass antenna wire.
| *a | Tester Probe |
| *b | Antenna Wire |
| *c | Tin Foil |
|
| ||||
| OK | |
|
| 5.INSPECT NAVIGATION ECU SUB-ASSEMBLY |
Disconnect the navigation ECU sub-assembly connector.
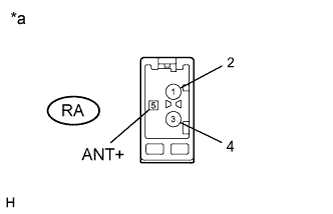 |
Measure the voltage according to the value(s) in the table below.
| Tester Connection | Condition | Specified Condition |
| RA-5 (ANT) - Body ground | Ignition switch ACC Radio switch on and AM or FM selected | 11 to 14 V |
| *a | Component without harness connected (Navigation ECU Sub-assembly) |
|
| ||||
| OK | |
|
| 6.REPLACE ANTENNA CORD SUB-ASSEMBLY |
Replace the antenna cord sub-assembly and check if radio broadcasts can be received normally (Click here).
|
| ||||
| OK | ||
 | ||
| ||
| 7.INSPECT NO. 2 ANTENNA CORD SUB-ASSEMBLY |
Disconnect the No. 2 antenna cord sub-assembly.
Measure the resistance of the No. 2 antenna cord sub-assembly to check for an open circuit in the No. 2 antenna cord sub-assembly.
Measure the resistance between the No. 2 antenna cord sub-assembly and body ground to check for a short circuit in the No. 2 antenna cord sub-assembly.
|
| ||||
| OK | |
|
| 8.REPLACE AMPLIFIER ANTENNA ASSEMBLY |
Replace the amplifier antenna assembly and check if radio broadcasts can be received normally (Click here).
|
| ||||
| OK | ||
| ||
| ||
