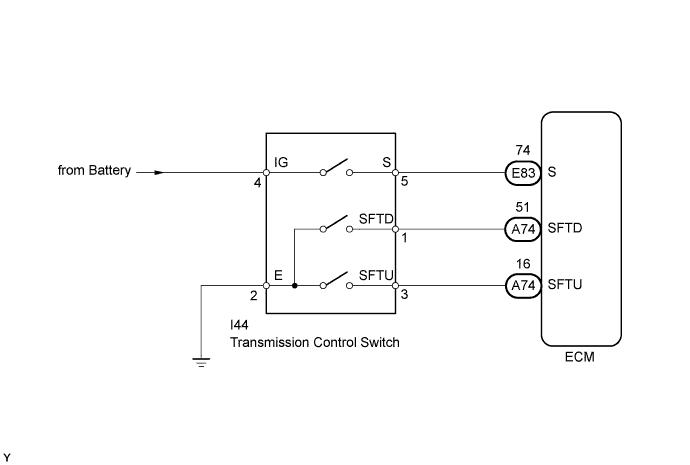
AUTOMATIC TRANSAXLE SYSTEM > Transmission Control Switch Circuit |
| 1.CHECK HARNESS AND CONNECTOR (BATTERY - TRANSMISSION CONTROL SWITCH) |
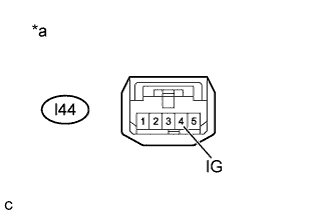 |
Disconnect the transmission control switch connector.
Measure the voltage according to the value(s) in the table below.
| Tester Connection | Switch Condition | Specified Condition |
| I44-4 (IG) - Body ground | IG switch ON | 11 to 14 V |
| IG switch OFF | Below 1 V |
| *a | Front view of wire harness connector (to Transmission Control Switch) |
|
| ||||
| OK | |
 |
| 2.CHECK HARNESS AND CONNECTOR (TRANSMISSION CONTROL SWITCH - BODY GROUND) |
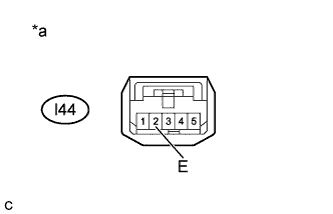 |
Measure the resistance according to the value(s) in the table below.
| Tester Connection | Condition | Specified Condition |
| I44-2 (E) - Body ground | Always | Below 1 Ω |
| *a | Front view of wire harness connector (to Transmission Control Switch) |
|
| ||||
| OK | |
|
| 3.INSPECT LOWER SHIFT LEVER ASSEMBLY (TRANSMISSION CONTROL SWITCH) |
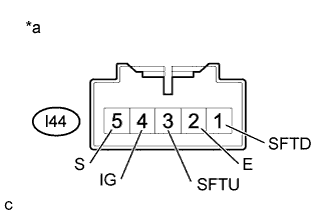 |
Measure resistance between each terminal.
| Tester Connection | Condition | Specified Condition |
| I44-4 (IG) - I44-5 (S) | Shift lever in S, "+" and "-" | Below 1 Ω |
| Shift lever not in S, "+" and "-" | 10 kΩ or higher | |
| I44-3 (SFTU) - I44-2 (E) | Shift lever held in "+" (Up shift) | Below 1 Ω |
| Shift lever held in S | 10 kΩ or higher | |
| I44-1 (SFTD) - I44-2 (E) | Shift lever held in "-" (Down shift) | Below 1 Ω |
| Shift lever held in S | 10 kΩ or higher |
| *a | Component without harness connected (Transmission Control Switch) |
|
| ||||
| OK | |
|
| 4.CHECK HARNESS AND CONNECTOR (TRANSMISSION CONTROL SWITCH - ECM) |
Connect the transmission control switch connector of shift lock control unit assembly.
Disconnect the ECM connector.
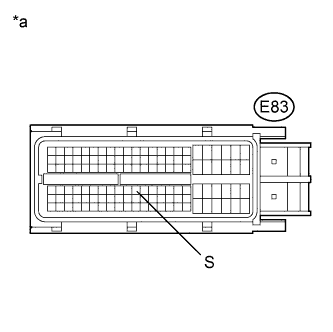 |
Turn the ignition switch to ON, and measure the voltage according to the value(s) in the table below when the shift lever is moved to each position.
| Tester Connection | Condition | Specified Condition |
| E83-74 (S) - Body ground | Shift lever in S, "+" and "-" | 11 to 14 V |
| Shift lever not in S, "+" and "-" | Below 1 V |
| *a | Front view of wire harness connector (to ECM) |
Turn the ignition switch off.
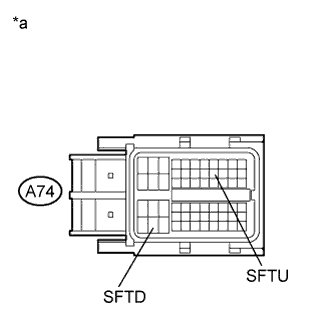 |
Disconnect the ECM connector.
Measure the resistance according to the value(s) in the table below when the shift lever is moved to each position.
| Tester Connection | Condition | Specified Condition |
| A74-16 (SFTU) - Body ground | Press continuously "+" (Up shift) | Below 1 Ω |
| S | 10 kΩ or higher | |
| A74-51 (SFTD) - Body ground | Press continuously "-" (Down shift) | Below 1 Ω |
| S | 10 kΩ or higher |
| *a | Front view of wire harness connector (to ECM) |
|
| ||||
| OK | ||
 | ||
| ||
