 |
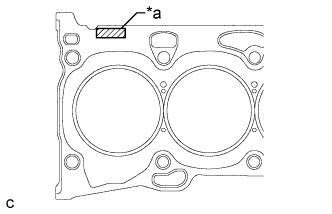
Place a new cylinder head gasket on the cylinder block surface with the lot No. stamp facing upward.
- NOTICE:
- Remove any oil from the contact surfaces.
- Be careful of the installation direction.
| *a | Lot No. |
CYLINDER HEAD GASKET > INSTALLATION |
| 1. INSTALL CYLINDER HEAD GASKET |
|
Place a new cylinder head gasket on the cylinder block surface with the lot No. stamp facing upward.
| *a | Lot No. |
| 2. INSTALL CYLINDER HEAD SUB-ASSEMBLY |
Place the cylinder head sub-assembly on the cylinder head gasket.
Apply a light coat of engine oil to the threads and under the heads of the 10 cylinder head set bolts.
Set the 10 plate washers and 10 cylinder head set bolts.
Step 1:
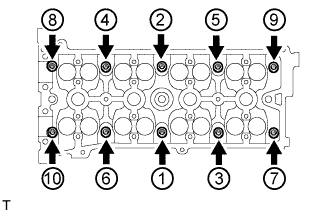 |
Using a 10 mm bi-hexagon wrench, uniformly tighten the 10 cylinder head set bolts in several steps, in the order shown in the illustration.
Step 2:
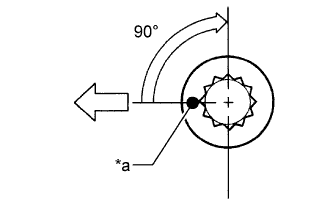 |
Mark the front of the cylinder head set bolts with paint.
| *a | Paint Mark |
 | Engine Front |
Tighten the cylinder head set bolts 90° in the sequence shown in step 1.
Check that the paint mark is now at a 90° angle to the front.
| 3. INSTALL EXHAUST MANIFOLD CONVERTER SUB-ASSEMBLY |
Set a new gasket to the cylinder head sub-assembly.
Temporarily install the exhaust manifold converter sub-assembly with the 5 nuts.
Temporarily install the No. 2 manifold stay and manifold stay with the 2 bolts and 2 nuts.
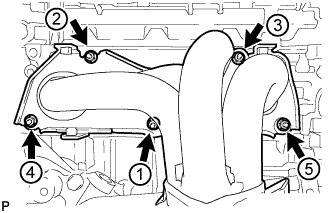 |
Using a 12 mm deep socket wrench, install the exhaust manifold converter sub-assembly and 5 nuts in the order shown in the illustration.
Connect the air fuel ratio sensor connector.
| 4. INSTALL NO. 2 MANIFOLD STAY |
Install the No. 2 manifold stay with the bolt and nut.
| 5. INSTALL MANIFOLD STAY |
Install the manifold stay with the bolt and nut.
| 6. INSTALL NO. 1 EXHAUST MANIFOLD HEAT INSULATOR |
Install the No. 1 exhaust manifold heat insulator with the 4 bolts.
| 7. INSTALL NO. 1 INTAKE MANIFOLD INSULATOR |
Install the No. 1 intake manifold insulator to the cylinder block.
| 8. INSTALL INTAKE MANIFOLD |
Install the vacuum hose clamp with the bolt.
Install a new No. 1 intake manifold to head gasket to the intake manifold.
Set the intake manifold on the engine assembly.
Using an E7 "TORX" wrench, install the 2 stud bolts.
Temporarily install the intake manifold with the 5 bolts and 2 nuts.
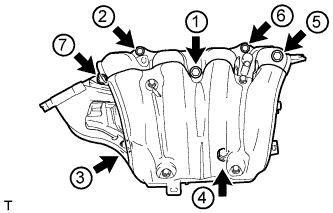 |
Tighten the 5 bolts and 2 nuts in the order shown in the illustration.
Connect the oxygen sensor connector and 2 wire harness clamps.
| 9. INSTALL THROTTLE WITH MOTOR BODY ASSEMBLY |
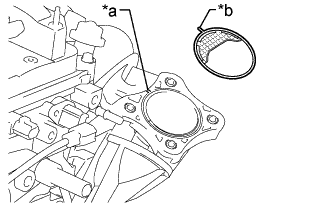 |
Install a new gasket to the intake manifold.
| *a | Groove |
| *b | Protrusion |
Temporarily install the throttle with motor body assembly and fuel tube bracket with the 4 bolts.
Connect the 2 water by-pass hoses.
Connect the purge line hose.
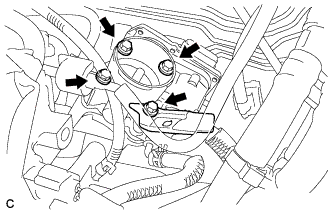 |
Install the fuel tube bracket and the throttle with motor body assembly with the 4 bolts.
Connect the throttle with motor body assembly connector to the throttle with motor body assembly.
Connect the wire harness clamp to the fuel tube bracket.
Install the fuel tube to the fuel tube bracket.
| 10. CONNECT ENGINE WIRE |
Connect the 4 connectors.
Connect the earth wire with the bolt.
| 11. INSTALL CAMSHAFT |
Apply a light coat of engine oil to the camshaft journals, camshaft housings and bearing caps.
Install the No. 1 camshaft bearing and No. 2 camshaft bearing.
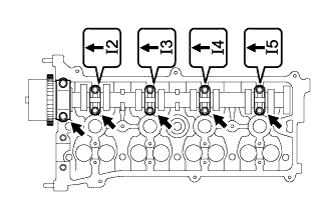 |
Examine the front marks and numbers, and check that the order is as shown in the illustration. Then temporarily install the camshaft and 5 camshaft bearing caps with the 10 bolts.
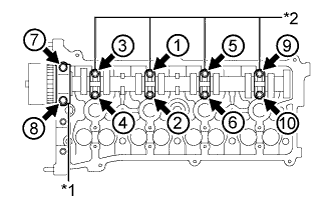 |
Using several steps, uniformly tighten the 10 bolts in the order shown in the illustration.
| *1 | No. 1 Camshaft Bearing Cap |
| *2 | No. 3 Camshaft Bearing Cap |
| 12. INSTALL NO. 2 CAMSHAFT |
Apply a light coat of engine oil to the camshaft journals, camshaft housings and bearing caps.
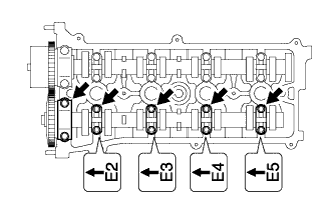 |
Examine the front marks and numbers, and check that the order is as shown in the illustration. Then temporarily install the No. 2 camshaft and 5 camshaft bearing caps with the 10 bolts.
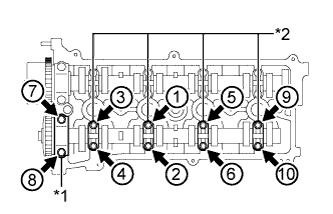 |
Using several steps, uniformly tighten the 10 bolts in the order shown in the illustration.
| *1 | No. 2 Camshaft Bearing Cap |
| *2 | No. 3 Camshaft Bearing Cap |
| 13. INSTALL NO. 1 CHAIN VIBRATION DAMPER |
Install the No. 1 chain vibration damper with the 2 bolts.
| 14. INSTALL CHAIN SUB-ASSEMBLY |
Set the No. 1 cylinder to TDC/compression.
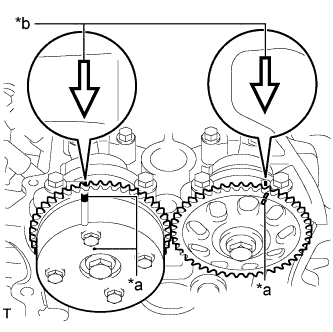 |
Using the hexagonal portion of the camshafts, rotate the camshafts with a wrench, align the timing marks on the camshaft timing gear assembly and camshaft timing sprocket with the front marks located on the No. 1 camshaft bearing cap and No. 2 camshaft bearing cap as shown in the illustration.
| *a | Timing Mark |
| *b | Front Mark |
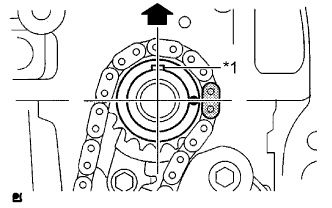 |
Check that the crankshaft is positioned with the crankshaft key facing up as shown in the illustration.
| *1 | Crankshaft Key |
 | Up |
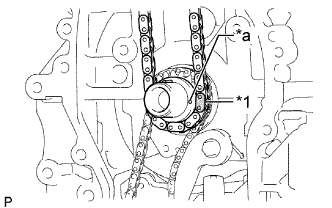 |
Install the chain onto the crankshaft timing sprocket with the gold or pink mark link aligned with the timing mark on the crankshaft.
| *1 | Mark Link |
| *a | Timing Mark |
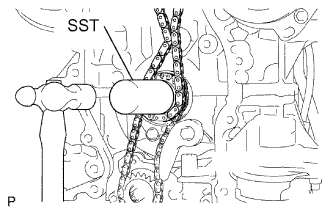 |
Using SST and a hammer, tap in the crankshaft timing sprocket.
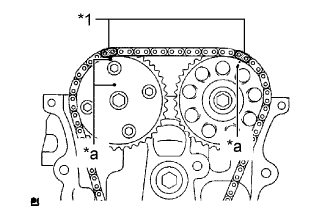 |
Align the gold or yellow links with the timing marks located on the camshaft timing gear assembly and camshaft timing sprocket, then install the chain sub-assembly.
| *1 | Mark Link |
| *a | Timing Mark |
| 15. INSTALL CHAIN TENSIONER SLIPPER |
Install the chain tensioner slipper with the bolt.
| 16. INSTALL TIMING CHAIN GUIDE |
Install the timing chain guide with the bolt.
| 17. INSTALL NO. 1 CRANKSHAFT POSITION SENSOR PLATE |
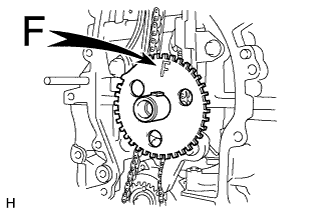 |
Install the No. 1 crankshaft position sensor plate with the "F" mark facing forward.
| 18. INSTALL TIMING CHAIN COVER SUB-ASSEMBLY |