Home › Vehicle Interior › HEATING / AIR CONDITIONING › AIR CONDITIONING UNIT

AIR CONDITIONING UNIT > REASSEMBLY

for Preparation Click here


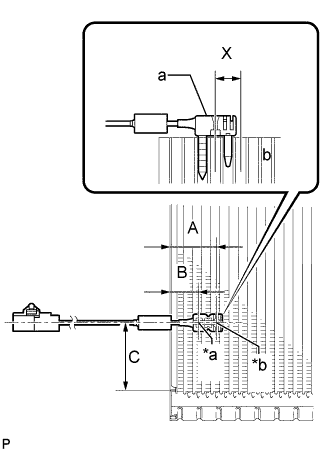
1. INSTALL NO. 1 COOLER THERMISTOR


    E168014E05
  1. Install the No. 1 cooler thermistor as shown in the illustration.
    Text in Illustration 
    *a
    Fixed Part
    *b
    Sensor Part
    Part
    Length
    A
    34.3 mm
    1.35 in.
    B
    20.9 mm
    0.822 in.
    C
    50 mm
    1.96 in.

    NOTICE:
    1. Be sure to insert the thermistor only once because reinserting it into the same position will not allow it to be firmly secured.
    2. When reusing the evaporator, insert the thermistor one row next to the one that has been used previously (X in the illustration).
    3. After inserting the thermistor, do not apply excessive force to the wire.
    4. Directly insert the thermistor until the edge of plastic case "a" comes into contact with evaporator "b".
2. INSTALL NO. 1 COOLER EVAPORATOR SUB-ASSEMBLY


    E167988
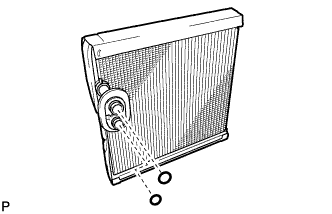
  1. Sufficiently apply compressor oil to 2 new O-rings and the fitting surfaces. Install the 2 O-rings to the No. 1 cooler evaporator sub-assembly.

    Compressor oil:
    ND-OIL 8 or equivalent

  1. Install the No. 1 cooler evaporator sub-assembly to the blower assembly.

    NOTICE:
    Keep the O-rings and O-ring fitting surfaces free from dirt or any foreign objects.


    E179587
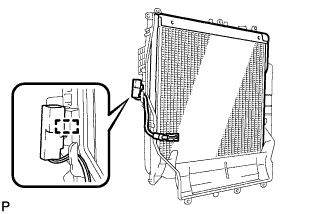
  1. Engage the clamp to install the No. 1 cooler evaporator sub-assembly with the No. 1 cooler thermistor.

    HINT:
    Completely cover the tube with the grommet.


    E179586
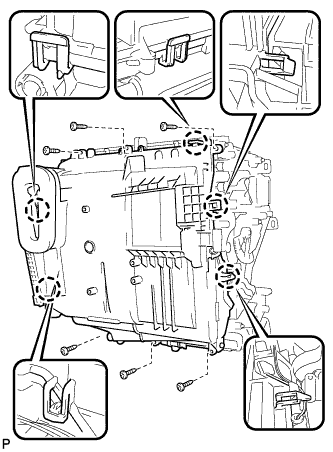
  1. Engage the 5 claws.

  1. Install the plate cover with the 6 screws.


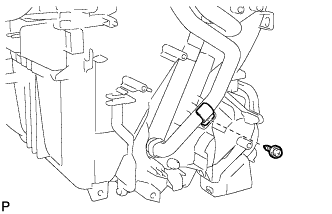
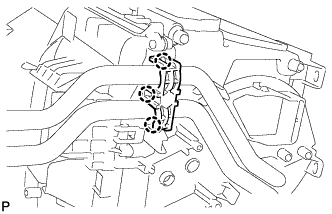
3. INSTALL HEATER RADIATOR UNIT SUB-ASSEMBLY


    E228079
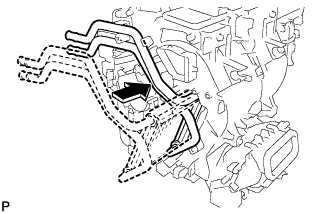
  1. Install the heater radiator unit sub-assembly to the air conditioner radiator assembly.


    E228077
  1. Install the clamp with the screw.


    E228076
  1. Engage the 3 claws and install the heater clamp.


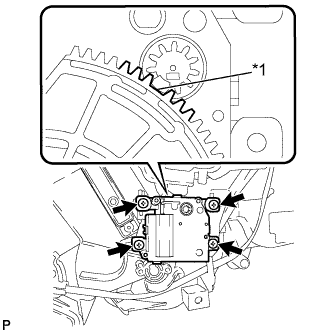
4. INSTALL NO. 3 AIR CONDITIONING RADIATOR DAMPER SERVO SUB-ASSEMBLY (for 3 Zone Type)


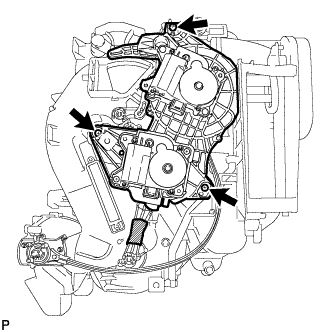
    E228081E01
  1. Using the reference point, install the No. 3 air conditioning radiator damper servo sub-assembly with the 4 screws.
    Text in Illustration 
    *1
    Reference Point


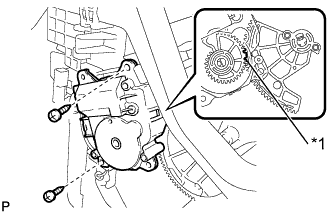
5. INSTALL NO. 2 AIR CONDITIONING RADIATOR DAMPER SERVO SUB-ASSEMBLY


    E179569E01
  1. Using the reference point, install the No. 2 air conditioning radiator damper servo sub-assembly sub-assembly with the 2 screws.
    Text in Illustration 
    *1
    Reference Point


6. INSTALL NO. 1 AIR CONDITIONING RADIATOR DAMPER SERVO SUB-ASSEMBLY


    E220371
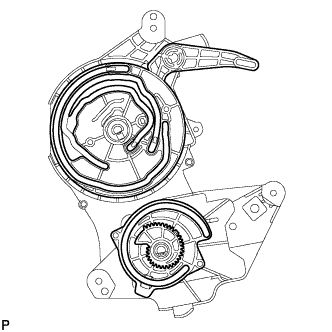
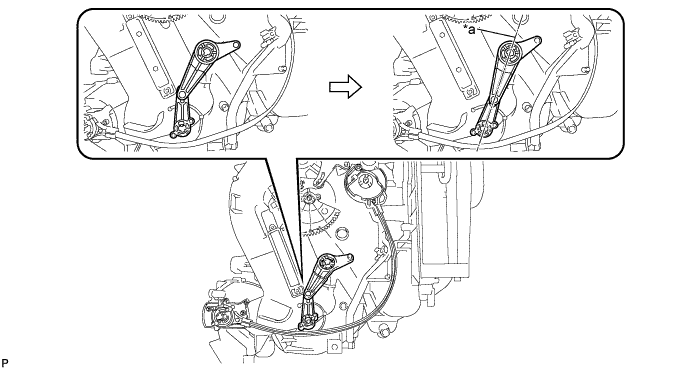
  1. Check that the slots, links and gears of the No. 1 air conditioning radiator damper servo sub-assembly are positioned in the correct orientation as shown in the illustration.

  1. Face the contact surfaces of the No. 1 air conditioning radiator damper servo sub-assembly and air conditioning radiator assembly for the No. 1 air conditioning radiator damper servo sub-assembly upward.


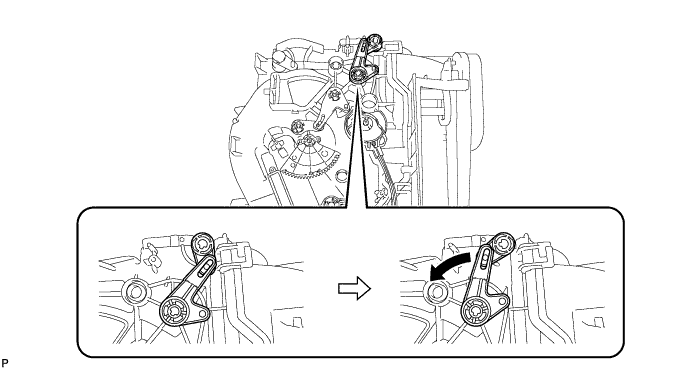
  1. Rotate the link of the air conditioning radiator assembly all the way to the left as shown in the illustration.


    E219270


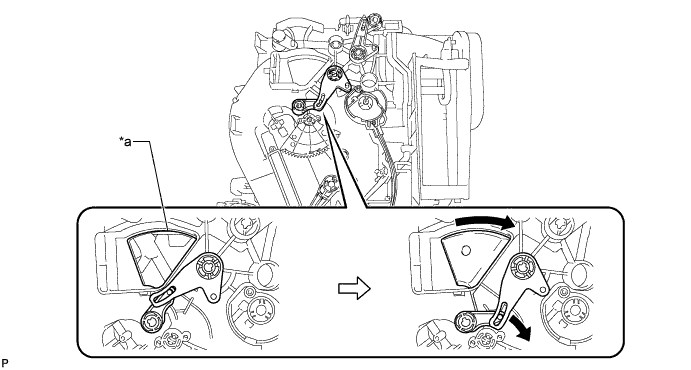
  1. Rotate the link of the air conditioning radiator assembly to the bottom as shown in the illustration and confirm that the mode switching duct hole is fully closed.


    E219271E03


    Text in Illustration 
    *a
    Mode Switching Duct Hole
    -
    -


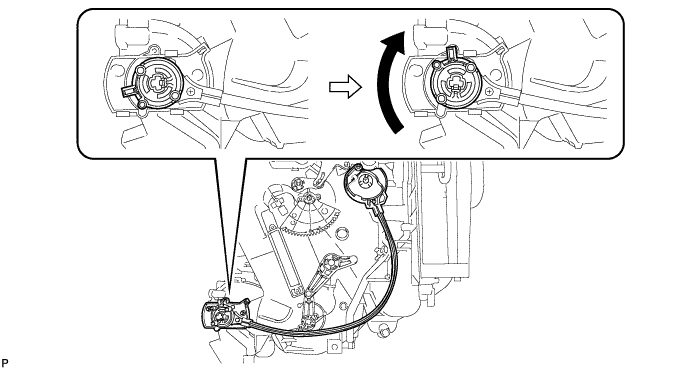
  1. Rotate the lever of the air conditioning radiator assembly to the top as shown in the illustration.


    E220372


  1. Rotate the link of the air conditioning radiator assembly to the in-line position as shown in the illustration.


    E220373E03


    Text in Illustration 
    *a
    In-line Position
    -
    -


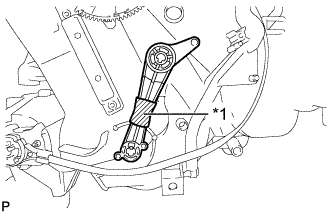
    E219274E02
  1. Wrap the upper and lower links with vinyl tape to hold them in the in-line position.
    Text in Illustration 
    *1
    Vinyl Tape


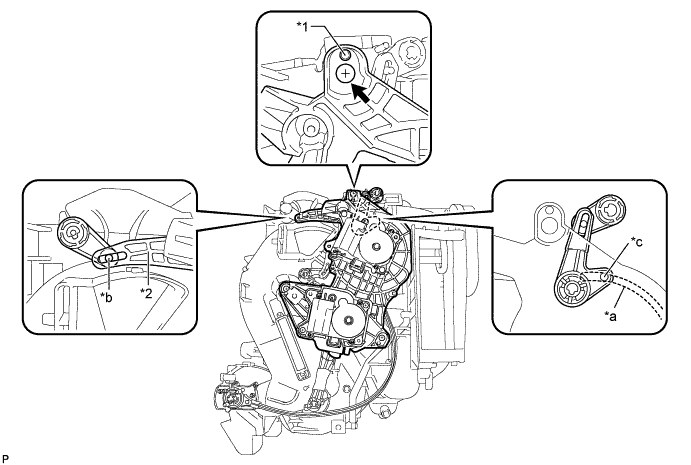
  1. Install the link of the No. 1 air conditioning radiator damper servo sub-assembly to the link guide pin (A) of the air conditioning radiator assembly as shown in the illustration.


    E220374E05


    Text in Illustration 
    *1
    Guide
    *2
    No. 1 Air Conditioning Radiator Damper Servo Sub-assembly
    *a
    No. 1 Air Conditioning Radiator Damper Servo Sub-assembly Slot
    *b
    Link Guide Pin (A)
    *c
    Link Guide Pin (B)
    -
    -

  1. Install the guide hole of the No. 1 air conditioning radiator damper servo sub-assembly to the guide pin of the air conditioning radiator assembly as shown in the illustration.

  1. Temporarily install the screw (up to 4 or 5 threads).

    NOTICE:
    1. Make sure that the link guide pin (B) is inserted in the No. 1 air conditioning radiator damper servo sub-assembly slot.
    2. Avoid tilting the air conditioning radiator assembly during installation. This helps to prevent the guide pins from coming out of position.


    E219276
  1. Lift the No. 1 air conditioning radiator damper servo sub-assembly slightly to create clearance.


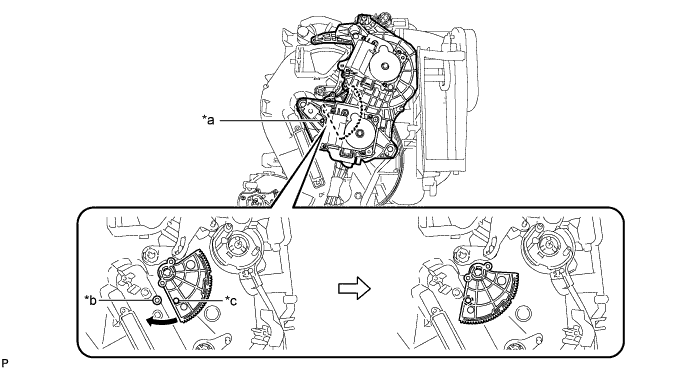
  1. Move the air conditioning radiator assembly gear so that alignment holes of the No. 1 air conditioning radiator damper servo sub-assembly and air conditioning radiator assembly are aligned.


    E219277E05


    Text in Illustration 
    *a
    No. 1 Air Conditioning Radiator Damper Servo Sub-assembly Alignment Hole
    *b
    Air Conditioning Radiator Assembly Alignment Hole
    *c
    Air Conditioning Radiator Assembly Alignment Gear Alignment Hole
    -
    -


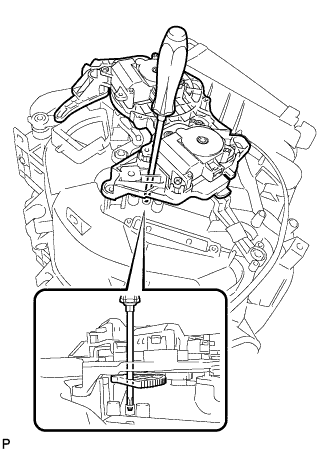
    E219278
  1. Insert a screwdriver into the aligned holes as shown in the illustration.


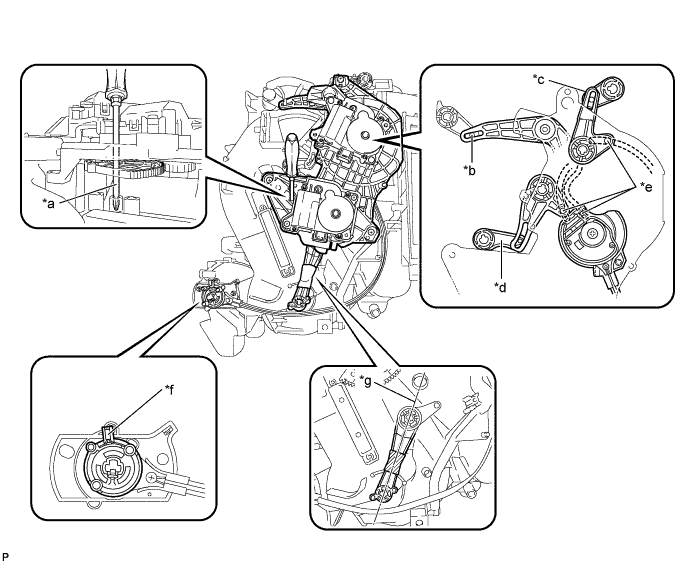
  1. Make sure that all the links and gears are in the positions shown in the illustration.


    E220477E05


    Text in Illustration 
    *a
    Screwdriver is inserted into alignment holes.
    *b
    Link guide pin is inserted.
    *c
    Link is positioned to left side.
    *d
    Link is positioned at bottom.
    *e
    Each link guide pin is inserted in its No. 1 air conditioning radiator damper servo sub-assembly slot.
    *f
    Lever is positioned at top.
    *g
    Links are in-line.
    -
    -


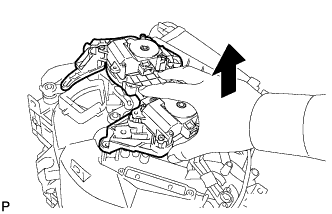
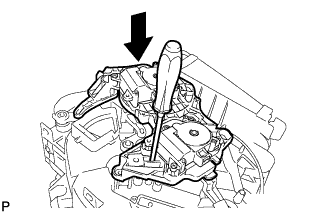
    E219280
  1. Push the loose fitting No. 1 air conditioning radiator damper servo sub-assembly into position.

    NOTICE:
    1. Make sure that the No. 1 air conditioning radiator damper servo sub-assembly are fully pushed into position.
    2. After pushing the servos into position, keep them in place by holding them until the screws are installed.

    HINT:
    Push the No. 1 air conditioning radiator damper servo sub-assembly until a click sound is heard.

  1. Remove the screwdriver.


    E220478
  1. Fully install the top screw, and then install the No. 1 air conditioning radiator damper servo sub-assembly with the 2 remaining screws.

  1. Remove the vinyl tape.


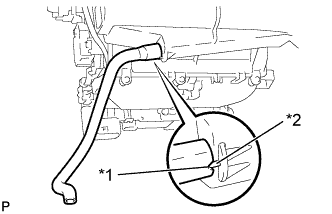
7. INSTALL DRAIN COOLER HOSE


    E234897E01
  1. Install the drain cooler hose to the air conditioning radiator assembly as shown in the illustration.
    Text in Illustration 
    *1
    Hose Notch
    *2
    Air Conditioning Radiator Assembly Rib


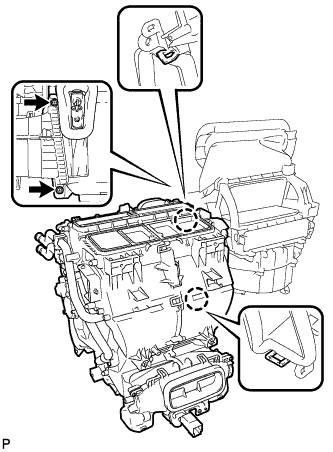
8. INSTALL AIR CONDITIONING RADIATOR ASSEMBLY


    E228069
  1. Engage the 2 claws.

  1. Install the air conditioning radiator assembly with the 2 screws.


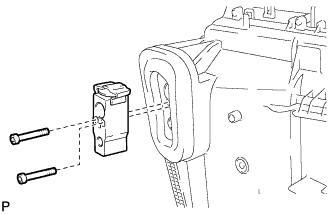
9. INSTALL COOLER EXPANSION VALVE


    E228074
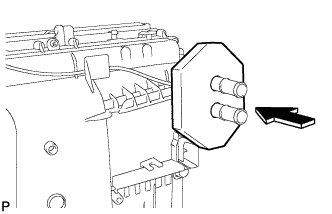
  1. Using a 4 mm hexagon wrench, install the cooler expansion valve with the 2 hexagon bolts.

    Torque:
    3.5 N*m{ 36 kgf*cm , 31 in.*lbf }


10. INSTALL AIR CONDITIONING HARNESS ASSEMBLY (for Dual Type)


    E228651
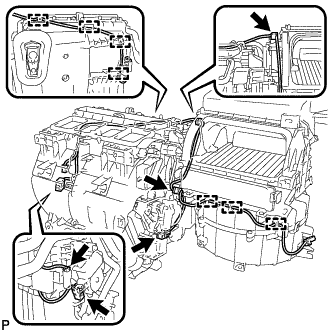
  1. Engage the 7 clamps to install the air conditioning harness assembly.

  1. Connect the 5 connectors.


    E228073
  1. Install the heater packing as shown in the illustration.


11. INSTALL AIR CONDITIONING HARNESS ASSEMBLY (for 3 Zone Type)


    E228068
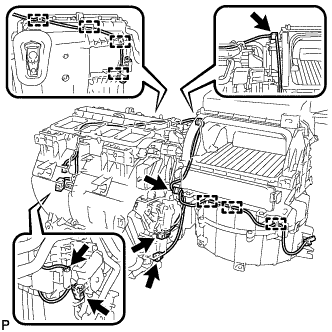
  1. Engage the 7 clamps to install the air conditioning harness assembly.

  1. Connect the 6 connectors.


    E228073
  1. Install the heater packing as shown in the illustration.


12. INSTALL ASPIRATOR


    E228071
  1. Engage the 2 claws to install the aspirator.


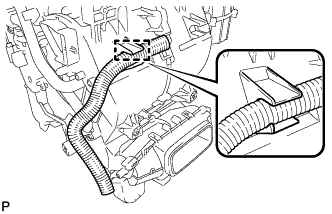
13. INSTALL COOLER THERMISTOR HOSE


    E234890
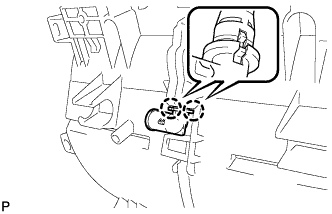
  1. Engage the clamp to install the cooler thermistor hose.


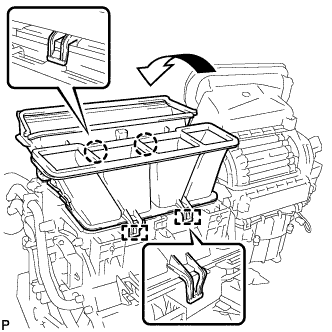
14. INSTALL NO. 6 HEATER TO REGISTER DUCT ASSEMBLY


    E227194
  1. Engage the 2 claws and 2 guides to install the No. 6 heater to register duct assembly as shown in the illustration.


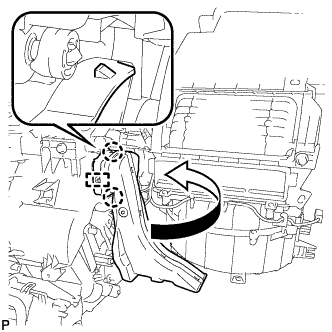
15. INSTALL NO. 1 AIR DUCT SUB-ASSEMBLY


    E227192
  1. Engage the guide and 2 claws to install the No. 1 air duct sub-assembly as shown in the illustration.