 |
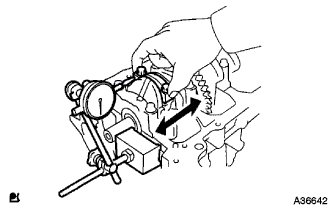
Using a dial indicator, measure the thrust clearance while moving the connecting rod back and forth.
- Standard thrust clearance:
- 0.160 to 0.362 mm (0.00630 to 0.0143 in.)
- Maximum thrust clearance:
- 0.362 mm (0.0143 in.)
CYLINDER BLOCK > INSPECTION |
| 1. INSPECT CONNECTING ROD THRUST CLEARANCE |
Install the connecting rod cap .
|
Using a dial indicator, measure the thrust clearance while moving the connecting rod back and forth.
| 2. INSPECT CONNECTING ROD OIL CLEARANCE |
Clean the crank pin and bearing.
Check the crank pin and bearing for pitting and scratches.
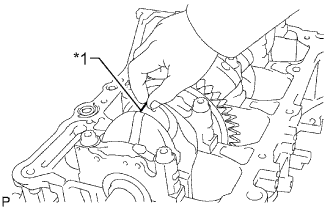 |
Lay a strip of Plastigage on the crank pin.
| *1 | Plastigage |
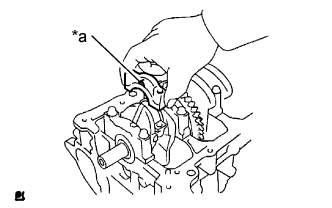 |
Check that the front mark of the connecting rod cap is facing forward.
| *a | Front Mark |
Install the connecting rod cap .
Remove the 2 bolts and connecting rod cap .
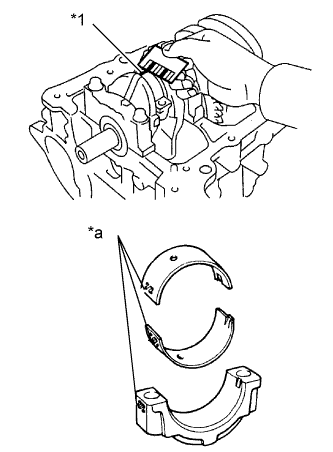 |
Measure the Plastigage at its widest point.
| *1 | Plastigage |
| *a | 1, 2, or 3 Mark |
| Mark | Specified Condition |
| Mark 1 | 51.000 to 51.007 mm (2.0079 to 2.0082 in.) |
| Mark 2 | 51.008 to 51.013 mm (2.0082 to 2.0084 in.) |
| Mark 3 | 51.014 to 51.020 mm (2.0084 to 2.0087 in.) |
| Mark | Specified Condition |
| Mark 1 | 1.485 to 1.488 mm (0.0585 to 0.0586 in.) |
| Mark 2 | 1.489 to 1.491 mm (0.0586 to 0.0587 in.) |
| Mark 3 | 1.492 to 1.494 mm (0.0587 to 0.0588 in.) |
| 3. INSPECT CYLINDER BLOCK FOR WARPAGE |
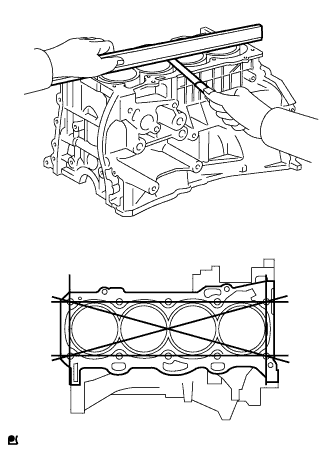 |
Using a precision straightedge and feeler gauge, measure the warpage of the surface that contacts the cylinder head gasket.
| 4. INSPECT CYLINDER BORE |
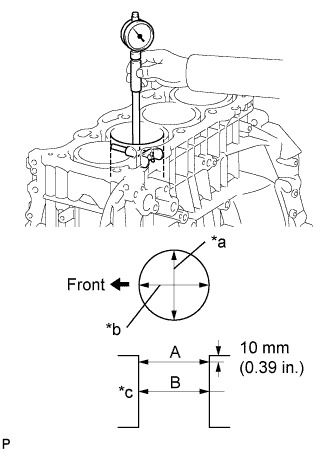 |
Using a cylinder gauge, measure the cylinder bore diameter at positions A and B in the thrust and axial directions.
| *a | Thrust Direction |
| *b | Axial Direction |
| *c | Center |
 | Engine Front |
| 5. INSPECT PISTON |
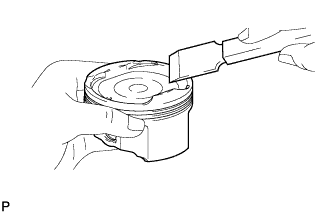 |
Using a gasket scraper, remove the carbon from the top of the piston.
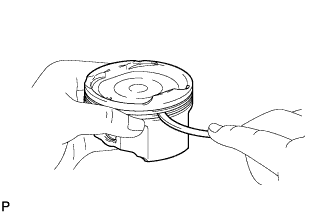 |
Using a groove cleaning tool or a broken ring, clean the piston ring grooves.
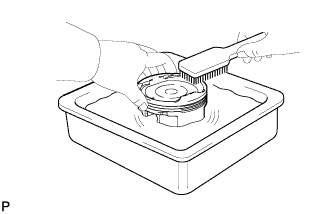 |
Using a brush and solvent, thoroughly clean the piston.
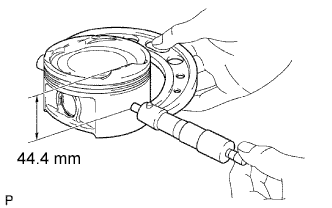 |
Using a micrometer, measure the piston diameter at right angles to the piston pin hole, and at the piston 44.4 mm (1.748 in.) from the piston head.
| 6. INSPECT PISTON OIL CLEARANCE |
Subtract the piston diameter measurement from the cylinder bore diameter measurement.
| 7. INSPECT RING GROOVE CLEARANCE |
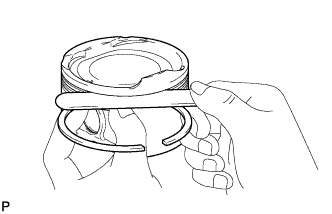 |
Using a feeler gauge, measure the clearance between a new piston ring and the wall of the ring groove.
| Item | Specified Condition |
| No. 1 Ring | 0.020 to 0.070 mm (0.000787 to 0.00276 in.) |
| No. 2 Ring | 0.020 to 0.060 mm (0.000787 to 0.00236 in.) |
| Oil Ring | 0.070 to 0.150 mm (0.00276 to 0.00591 in.) |
| 8. INSPECT PISTON RING END GAP |
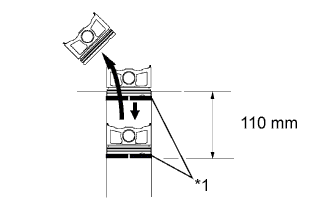 |
Using a piston, push the piston ring a little beyond the bottom of the ring travel, 110 mm (4.33 in.) from the top of the cylinder block.
| *1 | Piston Ring |
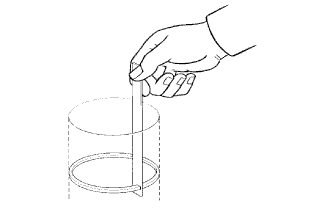 |
Using a feeler gauge, measure the end gap.
| Item | Specified Condition |
| No. 1 Ring | 0.24 to 0.32 mm (0.00945 to 0.0126 in.) |
| No. 2 Ring | 0.47 to 0.62 mm (0.0185 to 0.0244 in.) |
| Oil Ring | 0.10 to 0.35 mm (0.00394 to 0.0138 in.) |
| Item | Specified Condition |
| No. 1 Ring | 0.89 mm (0.0350 in.) |
| No. 2 Ring | 1.37 mm (0.0539 in.) |
| Oil Ring | 0.73 mm (0.0287 in.) |
| 9. INSPECT PISTON PIN OIL CLEARANCE |
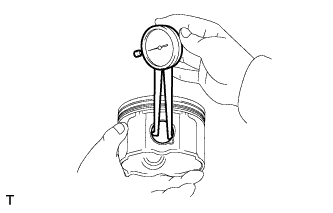 |
Using a caliper gauge, measure the piston pin bore diameter.
| Item | Specified Condition |
| A | 22.001 to 22.004 mm (0.8662 to 0.8663 in.) |
| B | 22.005 to 22.007 mm (0.8663 to 0.8664 in.) |
| C | 22.008 to 22.010 mm (0.8665 to 0.8665 in.) |
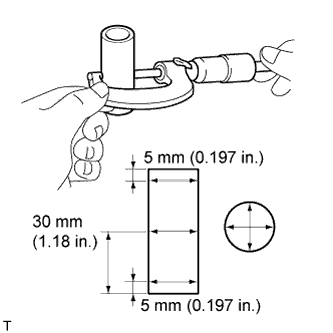 |
Using a micrometer, measure the piston pin diameter.
| Item | Specified Condition |
| A | 21.997 to 22.000 mm (0.8660 to 0.8661 in.) |
| B | 22.001 to 22.003 mm (0.8662 to 0.8663 in.) |
| C | 22.004 to 22.006 mm (0.8663 to 0.8664 in.) |
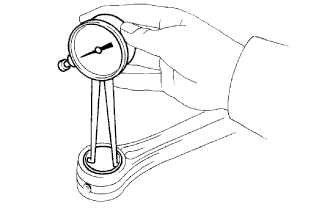 |
Using a caliper gauge, measure the connecting rod small end bore diameter.
| Item | Specified Condition |
| A | 22.005 to 22.008 mm (0.8663 to 0.8665 in.) |
| B | 22.009 to 22.011 mm (0.8665 to 0.8666 in.) |
| C | 22.012 to 22.014 mm (0.8666 to 0.8667 in.) |
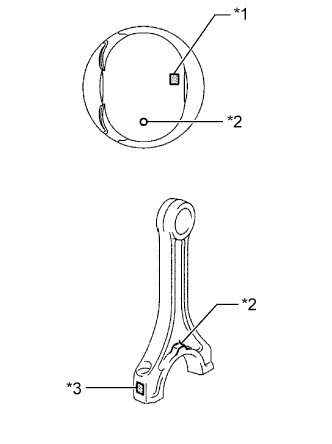 |
Subtract the piston pin diameter measurement from the piston pin bore diameter measurement.
| *1 | Piston Pin Bore Diameter Mark |
| *2 | Front Mark |
| *3 | Connecting Rod Small End Bore Diameter Mark |
Subtract the piston pin diameter measurement from the connecting rod small end bore diameter measurement.
| 10. INSPECT CONNECTING ROD BOLT |
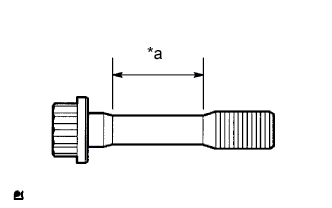 |
Using a vernier caliper, measure the diameter of the bolt in the area shown in the illustration.
| *a | Measurement Area |
| 11. INSPECT CONNECTING ROD SUB-ASSEMBLY |
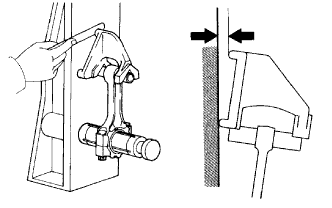 |
Using a connecting rod aligner and feeler gauge, check the connecting rod alignment.
Check for misalignment.
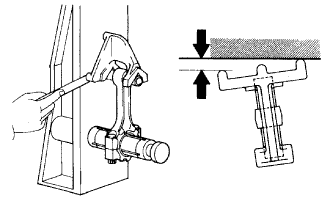 |
Check for twist.
| 12. INSPECT CRANKSHAFT |
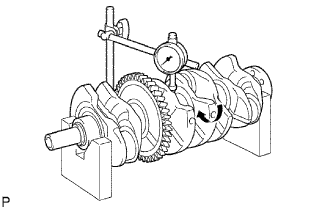 |
Using a dial indicator and V-blocks, measure the circle runout as shown in the illustration.
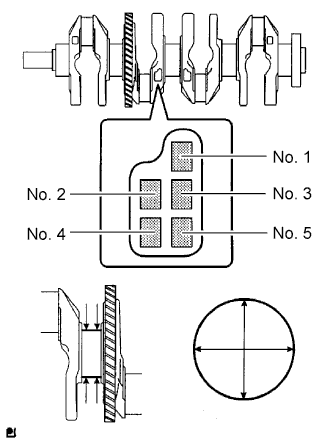 |
Using a micrometer, measure the diameter of each main journal.
Check each main journal for taper and distortion as shown in the illustration.
| Mark | Specified Condition |
| 0 | 54.999 to 55.000 mm (2.16531 to 2.16535 in.) |
| 1 | 54.997 to 54.998 mm (2.16523 to 2.16527 in.) |
| 2 | 54.995 to 54.996 mm (2.16515 to 2.16519 in.) |
| 3 | 54.993 to 54.994 mm (2.16507 to 2.16511 in.) |
| 4 | 54.991 to 54.992 mm (2.16500 to 2.16503 in.) |
| 5 | 54.988 to 54.990 mm (2.1649 to 2.1650 in.) |
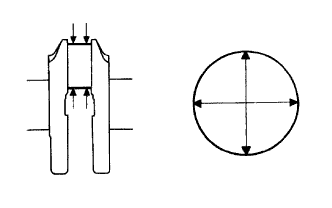 |
Using a micrometer, measure the diameter of each crank pin.
Inspect each crank pin for taper and distortion as shown in the illustration.
| 13. INSPECT CRANKSHAFT THRUST CLEARANCE |
Install the crankshaft bearing cap .
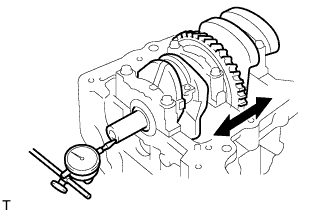 |
Using a dial indicator, measure the thrust clearance while prying the crankshaft back and forth with a screwdriver.
| 14. INSPECT CRANKSHAFT OIL CLEARANCE |
Check the crank journal and bearing for pitting and scratches.
Install the crankshaft bearing .
Place the crankshaft on the cylinder block.
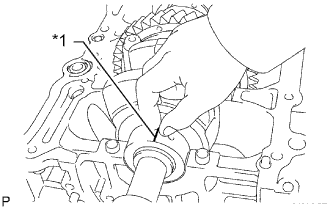 |
Lay a strip of plastigage across each journal.
| *1 | Plastigage |
Examine the front marks and numbers and install the crankshaft bearing caps on the cylinder block.
Install the crankshaft bearing caps .
Remove the bearing caps .
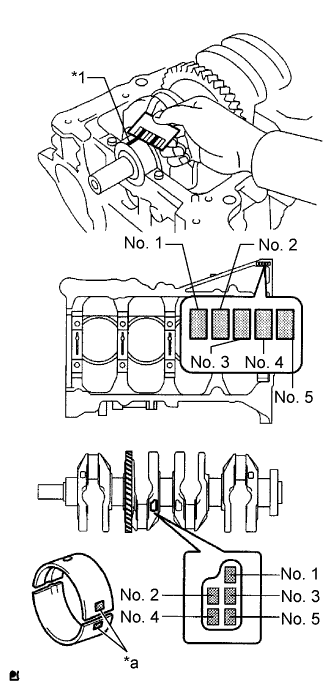 |
Measure the Plastigage at its widest point.
| *1 | Plastigage |
| *a | Number Mark |
| Cylinder block + Crankshaft | 0 to 2 | 3 to 5 | 6 to 8 | 9 to 11 |
| Bearing to be used | "1" | "2" | "3" | "4" |
| Mark | Specified Condition |
| 0 | 59.000 to 59.002 mm (2.32283 to 2.32291 in.) |
| 1 | 59.003 to 59.004 mm (2.32295 to 2.32299 in.) |
| 2 | 59.005 to 59.006 mm (2.32303 to 2.32307 in.) |
| 3 | 59.007 to 59.009 mm (2.32311 to 2.32318 in.) |
| 4 | 59.010 to 59.011 mm (2.32322 to 2.32326 in.) |
| 5 | 59.012 to 59.013 mm (2.32330 to 2.32334 in.) |
| 6 | 59.014 to 59.016 mm (2.32338 to 2.32346 in.) |
| Mark | Specified Condition |
| 0 | 54.999 to 55.000 mm (2.16531 to 2.16535 in.) |
| 1 | 54.997 to 54.998 mm (2.16523 to 2.16527 in.) |
| 2 | 54.995 to 54.996 mm (2.16515 to 2.16519 in.) |
| 3 | 54.993 to 54.994 mm (2.16507 to 2.16511 in.) |
| 4 | 54.991 to 54.992 mm (2.16500 to 2.16504 in.) |
| 5 | 54.988 to 54.990 mm (2.16488 to 2.16496 in.) |
| Mark | Specified Condition |
| 1 | 1.993 to 1.996 mm (0.078464 to 0.078583 in.) |
| 2 | 1.997 to 1.999 mm (0.078622 to 0.078701 in.) |
| 3 | 2.000 to 2.002 mm (0.078740 to 0.078819 in.) |
| 4 | 2.003 to 2.005 mm (0.078858 to 0.078937 in.) |
| 15. INSPECT CRANKSHAFT BEARING CAP SET BOLT |
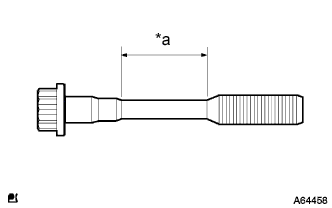 |
Using a vernier caliper, measure the diameter of the bolt in the area shown in the illustration.
| *a | Measurement Area |