Home › Vehicle Interior › SUPPLEMENTAL RESTRAINT SYSTEMS › CENTER AIRBAG SENSOR ASSEMBLY

CENTER AIRBAG SENSOR ASSEMBLY > INSTALLATION

for Preparation Click here


1. INSTALL AIRBAG SENSOR ASSEMBLY
  1. Check that the ignition switch is off.

  1. Check that the cable is disconnected from the negative (-) battery terminal.

    CAUTION:
    Wait at least 90 seconds after disconnecting the cable from the negative (-) battery terminal to disable the SRS system.


  1. Using SST, install the airbag sensor assembly with the 3 bolts.
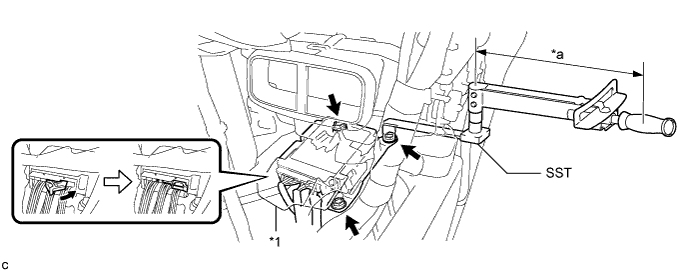

    B278815E01

    SST
    09961-00950  

    Text in Illustration 
    *1
    Waterproof Sheet
    -
    -
    *a
    Fulcrum Length
    -
    -

    Torque:
    without SST:
    18 N*m{ 178 kgf*cm , 13 ft.*lbf }
    with SST:
    11 N*m{ 112 kgf*cm , 8 ft.*lbf }

    NOTICE:
    1. Use a torque wrench with a fulcrum length of 250 mm (9.84 in.).
    2. This torque value is effective when SST is parallel to a torque wrench.
    3. If the airbag sensor assembly has been dropped, or there are any cracks, dents or other defects in the case or connector, replace it with a new one.
    4. When installing the airbag sensor assembly, be careful that the SRS wiring does not interfere with or is not pinched between other parts.
    5. When the ignition switch is first turned to ON after the airbag sensor assembly has been replaced, make sure that no one is in the vehicle.
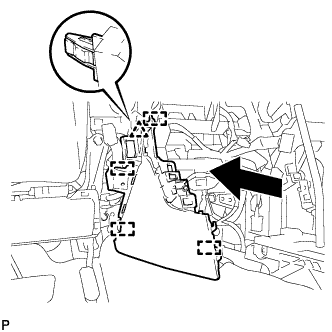
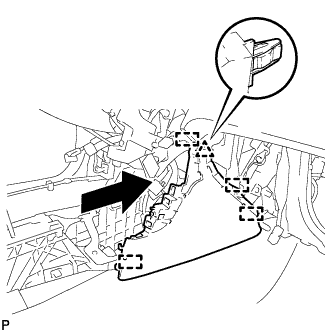
  1. Connect the connectors to the airbag sensor assembly as shown in the illustration.

    NOTICE:
    When connecting any airbag connector, take care not to damage the airbag wire harness.

  1. Check that the waterproof sheet is properly set.

  1. Check that there is no looseness in the installation parts of the airbag sensor assembly.


2. INSTALL NO. 1 CONSOLE BOX DUCT
  1. Install the No. 1 console box duct with the clip.


3. INSTALL FLOOR CARPET BRACKET LH
  1. Engage the 2 guides.

  1. Install the floor carpet bracket LH with the 2 clips.


4. INSTALL FLOOR CARPET BRACKET RH
  1. Engage the 2 guides.

  1. Install the floor carpet bracket RH with the 2 clips.


5. INSTALL FRONT NO. 2 CONSOLE BOX INSERT


    B281776
  1. Engage the clip and 4 guides as shown in the illustration.

  1. Install the front No. 2 console box insert with the 2 screws <C>.

  1. for LHD:

    1. Engage the 2 claws to connect the room temperature sensor.


6. INSTALL CONSOLE BOX INSERT


    B281779
  1. Engage the clip and 4 guides as shown in the illustration.

  1. Install the console box insert with the 2 screws <C>.

  1. for RHD:

    1. Engage the 2 claws to connect the room temperature sensor.


7. INSTALL LOWER INSTRUMENT PANEL SUB-ASSEMBLY


    B281770
  1. Engage the 2 clips and 4 guides.

  1. Install the 3 screws <C>.

  1. Close the lower instrument panel door.

  1. Install the lower instrument panel sub-assembly with the bolt <B> and screws <C>.


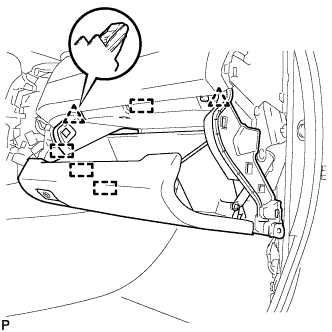
8. INSTALL NO. 2 INSTRUMENT PANEL UNDER COVER SUB-ASSEMBLY
  1. Connect the connector.

  1. Engage the 2 guides and 4 claws to install the No. 2 instrument panel under cover sub-assembly.


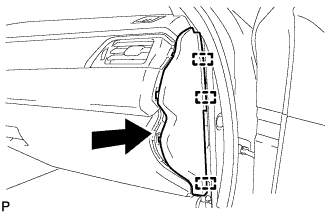
9. INSTALL INSTRUMENT SIDE PANEL RH


    B281766
  1. Engage the 3 guides as shown in the illustration.


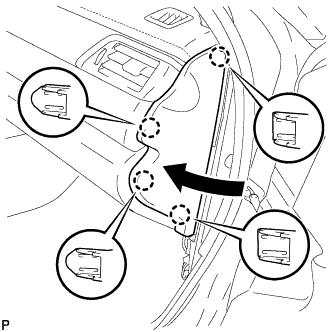
    B281764
  1. Engage the 4 claws to install the instrument side panel RH as shown in the illustration.


10. INSTALL FRONT DOOR OPENING TRIM WEATHERSTRIP RH


11. INSTALL COWL SIDE TRIM SUB-ASSEMBLY RH

HINT:
Use the same procedure for the RH side and LH side .


12. INSTALL FRONT DOOR SCUFF PLATE RH

HINT:
Use the same procedure for the RH side and LH side .


13. INSTALL FRONT ASH RECEPTACLE ASSEMBLY
  1. Connect each connector.


    B281756
  1. Engage the 2 clips.

  1. Install the front ash receptacle assembly with the 2 screws <C>.


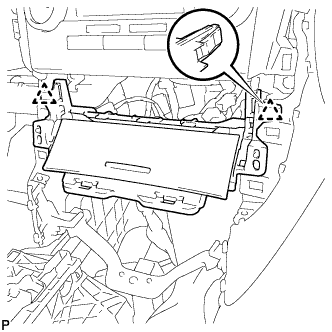
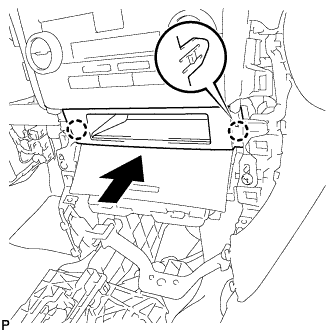
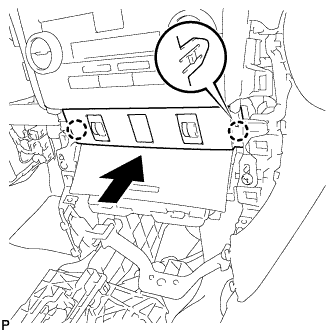
14. INSTALL FRONT CONSOLE UPPER PANEL GARNISH


  1. for Blank Type:


      B284923
    1. Engage the 2 claws to install the front console upper panel garnish as shown in the illustration.


  1. for 3 Switch Hole Type:

    1. Connect each connector.


    2. B281753
    3. Engage the 2 claws to install the front console upper panel garnish as shown in the illustration.


15. INSTALL INSTRUMENT PANEL SUB-ASSEMBLY
  1. w/o Driver Side Knee Airbag:

    1. Engage the 5 clips and 3 guides.

  1. w/ Driver Side Knee Airbag:

    1. Engage the 4 claws, 7 clips and 3 guides.

  1. Install the instrument panel sub-assembly with the 2 bolts <B>.


16. CONNECT HOOD LOCK CONTROL LEVER SUB-ASSEMBLY
  1. Engage the claw and 2 guides to connect the hood lock control lever sub-assembly.


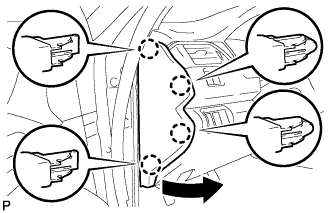
17. INSTALL INSTRUMENT SIDE PANEL LH
  1. Engage the 3 guides.


    B280321
  1. Engage the 4 claws to install the instrument side panel LH as shown in the illustration.


18. INSTALL FRONT DOOR OPENING TRIM WEATHERSTRIP LH


19. INSTALL COWL SIDE TRIM SUB-ASSEMBLY LH
  1. Engage the 2 clips.

  1. Install the cowl side trim sub-assembly LH with the clip.


20. INSTALL FRONT DOOR SCUFF PLATE LH
  1. Engage the 10 claws to install the front door scuff plate LH.


21. INSTALL CONSOLE BOX ASSEMBLY
(Click here)


22. CONNECT CABLE TO NEGATIVE BATTERY TERMINAL

NOTICE:
When disconnecting the cable, some systems need to be initialized after the cable is reconnected (Click here).


23. PERFORM DIAGNOSTIC SYSTEM CHECK
for Separate Type Yaw Rate Sensor: (Click here)
for Built-in Type Yaw Rate Sensor: (Click here)


24. INSPECT SRS WARNING LIGHT
for Separate Type Yaw Rate Sensor: (Click here)
for Built-in Type Yaw Rate Sensor: (Click here)