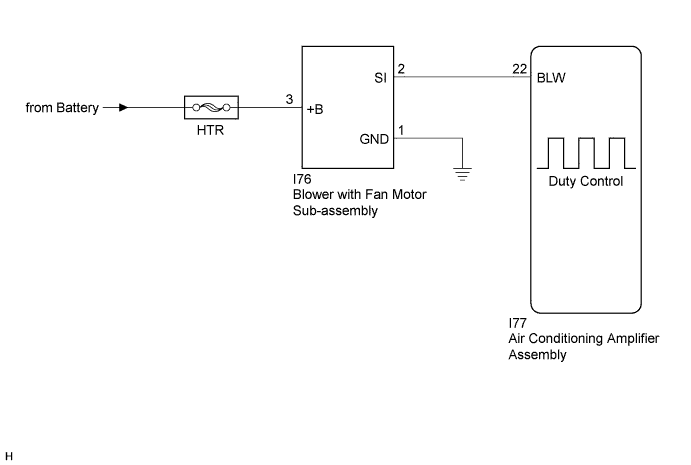
AIR CONDITIONING SYSTEM (for Automatic Air Conditioning System) > Blower Motor Circuit |
| 1.PERFORM ACTIVE TEST USING TECHSTREAM |
Connect the Techstream to the DLC3.
Turn the ignition switch to ON.
Turn the Techstream on.
Enter the following menus: Body Electrical / Air Conditioner / Active Test.
Check the operation by referring to the table below.
| Tester Display | Test Part | Control Range | Diagnostic Note |
| Blower Motor | Blower with fan motor sub-assembly | Min.: 0, Max.: 31 | - |
| Result | Proceed to |
| OK | A |
| NG (Blower with fan motor sub-assembly does not operate) | B |
| NG (Blower with fan motor sub-assembly operates but does not change speed) | C |
|
| ||||
|
| ||||
| A | ||
 | ||
| ||
| 2.CHECK HARNESS AND CONNECTOR (BLOWER WITH FAN MOTOR SUB-ASSEMBLY - BODY GROUND) |
Disconnect the I76 blower with fan motor sub-assembly connector.
Measure the resistance according to the value(s) in the table below.
| Tester Connection | Condition | Specified Condition |
| I76-1 (GND) - Body ground | Always | Below 1 Ω |
|
| ||||
| OK | |
 |
| 3.CHECK HARNESS AND CONNECTOR (BLOWER WITH FAN MOTOR SUB-ASSEMBLY - BATTERY) |
Measure the voltage according to the value(s) in the table below.
| Tester Connection | Condition | Specified Condition |
| I76-3 (+B) - Body ground | Always | 11 to 14 V |
|
| ||||
| OK | |
|
| 4.CHECK HARNESS AND CONNECTOR (AIR CONDITIONING AMPLIFIER ASSEMBLY - BLOWER WITH FAN MOTOR SUB-ASSEMBLY) |
Disconnect the I77 air conditioning amplifier assembly connector.
Measure the resistance according to the value(s) in the table below.
| Tester Connection | Condition | Specified Condition |
| I77-22 (BLW) - I76-2 (SI) | Always | Below 1 Ω |
| I77-22 (BLW) - Body ground | Always | 10 kΩ or higher |
|
| ||||
| OK | |
|
| 5.INSPECT BLOWER WITH FAN MOTOR SUB-ASSEMBLY |
Reconnect the I76 blower with fan motor sub-assembly connector.
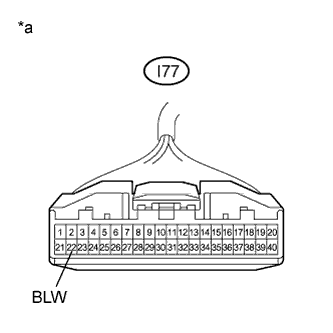 |
Measure the voltage according to the value(s) in the table below.
| Tester Connection | Condition | Specified Condition |
| I77-22 (BLW) - Body ground | Always | 4.5 to 5.5 V |
| *a | Front view of wire harness connector (to Air Conditioning Amplifier Assembly) |
|
| ||||
| OK | |
|
| 6.INSPECT AIR CONDITIONING AMPLIFIER ASSEMBLY |
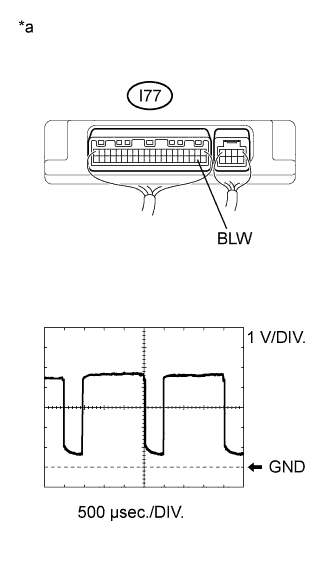 |
Remove the air conditioning amplifier assembly (Click here).
Reconnect the air conditioning amplifier assembly connector.
Turn the ignition switch to ON.
Turn the blower switch on (LO).
Measure the waveform between terminal I77-22 (BLW) of the air conditioning amplifier assembly and body ground.
| Item | Content |
| Tool setting | 1 V/DIV., 500 μs/DIV. |
| Vehicle condition | Ignition switch ON Blower switch on (LO) |
| *a | Component with harness connected (Air Conditioning Amplifier Assembly) |
|
| ||||
| OK | ||
| ||
| ||

