Home › Suspension › REAR SUSPENSION › REAR STABILIZER BAR

REAR STABILIZER BAR > INSTALLATION

for Preparation Click here


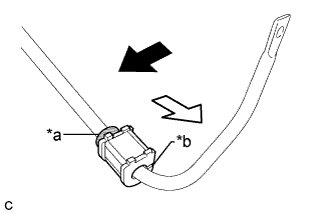
1. INSTALL REAR STABILIZER BUSHING (for LH Side)


    C239082E01
  1. Install the rear stabilizer bushing to the outside of the stopper ring on the rear stabilizer bar as shown in the illustration.
    Text in Illustration 
    *a
    Stopper Ring
    *b
    Cutout
    V100135
    Front of the Vehicle
    V100136
    Outside of the Vehicle

    NOTICE:
    Install the rear stabilizer bushing so that the cutout face rearward.


2. INSTALL REAR STABILIZER BUSHING (for RH Side)

HINT:
Perform the same procedure as for the LH side.


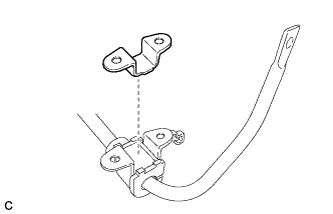
3. INSTALL REAR NO. 1 STABILIZER BAR BRACKET (for LH Side)


    C239605
  1. Install the rear No. 1 stabilizer bar bracket to the rear stabilizer bar.
    Text in Illustration 
    V100135
    Front of the Vehicle

    NOTICE:
    Be sure to install the rear No. 1 stabilizer bar bracket in the correct direction.


4. INSTALL REAR NO. 1 STABILIZER BAR BRACKET (for RH Side)

HINT:
Perform the same procedure as for the LH side.


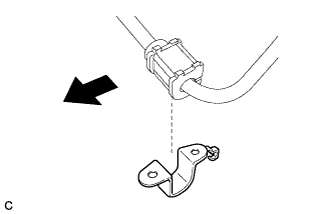
5. INSTALL REAR NO. 2 STABILIZER BAR BRACKET (for LH Side)


    C239083
  1. Install the rear No. 2 stabilizer bar bracket to the rear stabilizer bar.


6. INSTALL REAR NO. 2 STABILIZER BAR BRACKET (for RH Side)

HINT:
Perform the same procedure as for the LH side.


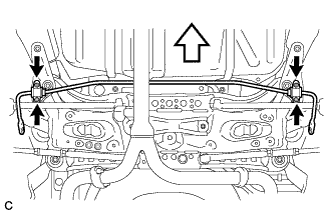
7. INSTALL REAR STABILIZER BAR


    C239620
  1. Install the rear stabilizer bar with the 4 bolts.
    Text in Illustration 
    V100135
    Bolt
    V100136
    Front of the Vehicle

    Torque:
    31 N*m{ 316 kgf*cm , 23 ft.*lbf }


8. INSTALL REAR STABILIZER LINK ASSEMBLY LH
  1. Install the rear stabilizer link assembly LH to the rear shock absorber with coil spring with the nut.

    Torque:
    39 N*m{ 400 kgf*cm , 29 ft.*lbf }

    If the ball joint turns together with the nut, use a hexagon wrench to hold the stud.

  1. Install the rear stabilizer link assembly LH to the rear stabilizer bar with the nut.

    Torque:
    39 N*m{ 400 kgf*cm , 29 ft.*lbf }

    If the ball joint turns together with the nut, use a hexagon wrench to hold the stud.


9. INSTALL REAR STABILIZER LINK ASSEMBLY RH

HINT:
Perform the same procedure as for the LH side.


10. INSTALL NO. 2 FLOOR UNDER COVER (w/ Floor Under Cover)
  1. Install the No. 2 floor under cover with the 2 bolts, 3 nuts and 2 clips.

    Torque:
    Bolt:
    12 N*m{ 122 kgf*cm , 9 ft.*lbf }
    Nut:
    4.0 N*m{ 41 kgf*cm , 35 in.*lbf }


11. INSTALL NO. 1 FLOOR UNDER COVER
  1. Install the No. 1 floor under cover with the 2 bolts, 3 nuts and 2 clips.

    Torque:
    Bolt:
    12 N*m{ 122 kgf*cm , 9 ft.*lbf }
    Nut:
    4.0 N*m{ 41 kgf*cm , 35 in.*lbf }


12. INSTALL REAR WHEELS

Torque:
103 N*m{ 1049 kgf*cm , 76 ft.*lbf }