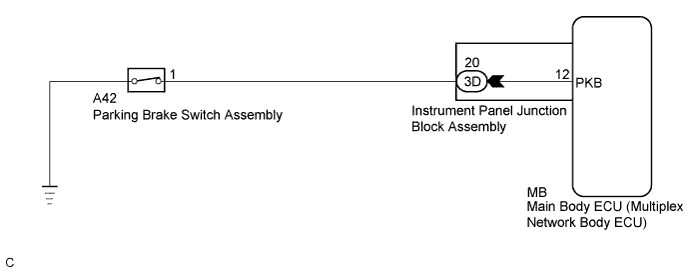
LIGHTING SYSTEM > Parking Brake Switch Circuit |
| 1.READ VALUE USING TECHSTREAM |
Connect the Techstream to the DLC3.
Turn the ignition switch to ON.
Turn the Techstream on.
Enter the following menus: Body Electrical / Main Body / Data List.
Read the display on the Techstream.
| Tester Display | Measurement Item/Range | Normal Condition | Diagnostic Note |
| Parking Brake SW | Parking brake switch signal/ON or OFF | ON: Parking brake switch on OFF: Parking brake switch off | - |
|
| ||||
| OK | ||
 | ||
| ||
| 2.INSPECT PARKING BRAKE SWITCH ASSEMBLY |
Remove the parking brake switch assembly (Click here).
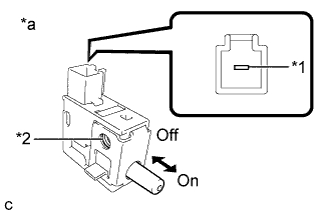 |
Measure the resistance according to the value(s) in the table below.
| Tester Connection | Switch Condition | Specified Condition |
| Terminal - Nut | On (Shaft not pressed) | Below 1 Ω |
| Terminal - Nut | Off (Shaft pressed) | 10 kΩ or higher |
| *1 | Terminal |
| *2 | Nut |
| *a | Component without harness connected (Parking Brake Switch Assembly) |
|
| ||||
| OK | |
 |
| 3.CHECK HARNESS AND CONNECTOR (PARKING BRAKE SWITCH ASSEMBLY - INSTRUMENT PANEL JUNCTION BLOCK ASSEMBLY) |
Disconnect the 3D instrument panel junction block assembly connector.
Measure the resistance according to the value(s) in the table below.
| Tester Connection | Condition | Specified Condition |
| A42-1 - 3D-20 | Always | Below 1 Ω |
| A42-1 - Body ground | Always | 10 kΩ or higher |
|
| ||||
| OK | |
|
| 4.INSPECT INSTRUMENT PANEL JUNCTION BLOCK ASSEMBLY |
Remove the instrument panel junction block assembly (Click here).
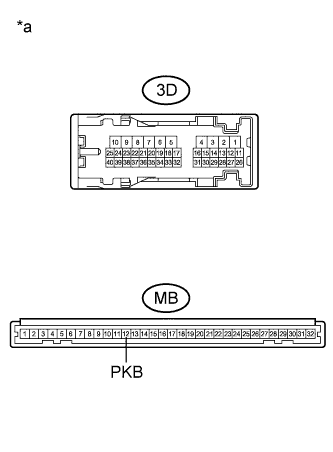 |
Remove the main body ECU (multiplex network body ECU) from the instrument panel junction block assembly.
Measure the resistance according to the value(s) in the table below.
| Tester Connection | Condition | Specified Condition |
| 3D-20 - MB-12 (PKB) | Always | Below 1 Ω |
| 3D-20 - Body ground | Always | 10 kΩ or higher |
| *a | Component without harness connected (Instrument Panel Junction Block Assembly) |
|
| ||||
| OK | ||
| ||
| ||

