
POWER WINDOW CONTROL SYSTEM > TERMINALS OF ECU |
| POWER WINDOW REGULATOR MASTER SWITCH ASSEMBLY |
Disconnect the K11 power window regulator master switch assembly connector.
Measure the voltage and resistance according to the value(s) in the table below.
| Tester Connection | Wiring Color | Terminal Description | Condition | Specified Condition |
| K11-1 (E) - Body ground | W-B - Body ground | Ground | Always | Below 1 Ω |
| K11-6 (B) - K11-1 (E) | LG - W-B | Power supply | Ignition switch ON | 11 to 14 V |
Reconnect the K11 power window regulator master switch assembly.
Measure the voltage according to the value(s) in the table below.
| Tester Connection | Wiring Color | Terminal Description | Condition | Specified Condition |
| K11-8 (U) - K11-1 (E) | L - W-B | Power window motor UP output | Ignition switch ON, driver door power window switch OFF → UP (Manual operation) | 11 to 14 V → Below 1 V |
| K11-4 (A) - K11-1 (E) | B - W-B | Power window motor AUTO UP output | Ignition switch ON, driver door power window fully open → driver door power window switch UP (AUTO UP position) → driver door power window fully closed | 11 to 14 V → Below 1 V → 11 to 14 V |
| Power window motor AUTO DOWN output | Ignition switch ON, driver door power window fully closed → driver door power window switch DOWN (AUTO DOWN position) → driver door power window fully open | 11 to 14 V → Below 1 V → 11 to 14 V | ||
| K11-5 (D) - K11-1 (E) | V - W-B | Power window motor DOWN output | Ignition switch ON, driver door power window switch OFF → DOWN (Manual operation) | 11 to 14 V → Below 1 V |
| K11-16 (U) - K11-1 (E) | W - W-B | Power window motor UP output | Ignition switch ON, front passenger door power window switch OFF → UP (Manual operation) | Below 1 V → 11 to 14 V |
| K11-15 (D) - K11-1 (E) | R - W-B | Power window motor DOWN output | Ignition switch ON, front passenger door power window switch OFF → DOWN (Manual operation) | Below 1 V → 11 to 14 V |
| K11-12 (U) - K11-1 (E) | L - W-B | Power window motor UP output | Ignition switch ON, rear LH door power window switch OFF → UP (Manual operation) | Below 1 V → 11 to 14 V |
| K11-13 (D) - K11-1 (E) | B - W-B | Power window motor DOWN output | Ignition switch ON, rear LH door power window switch OFF → DOWN (Manual operation) | Below 1 V → 11 to 14 V |
| K11-10 (U) - K11-1 (E) | Y - W-B | Power window motor UP output | Ignition switch ON, rear RH door power window switch OFF → UP (Manual operation) | Below 1 V → 11 to 14 V |
| K11-18 (D) - K11-1 (E) | LG - W-B | Power window motor DOWN output | Ignition switch ON, rear RH door power window switch OFF → DOWN (Manual operation) | Below 1 V → 11 to 14 V |
| CHECK POWER WINDOW REGULATOR SWITCH ASSEMBLY (for Front Passenger Door) |

Disconnect the J11 power window regulator switch assembly (for front passenger door) connector.
Measure the voltage according to the value(s) in the table below.
| Tester Connection | Wiring Color | Terminal Description | Condition | Specified Condition |
| J11-3 (B) - Body ground | GR - Body ground | Power supply | Ignition switch ON | 11 to 14 V |
Reconnect the J11 power window regulator switch assembly (for front passenger door).
Measure the voltage according to the value(s) in the table below.
| Tester Connection | Wiring Color | Terminal Description | Condition | Specified Condition |
| J11-4 (U) - Body ground | G - Body ground | Power window motor UP output | Ignition switch ON, front passenger door power window switch OFF → UP (Manual operation) | Below 1 V → 11 to 14 V |
| J11-1 (D) - Body ground | Y - Body ground | Power window motor DOWN output | Ignition switch ON, front passenger door power window switch OFF → DOWN (Manual operation) | Below 1 V → 11 to 14 V |
| CHECK POWER WINDOW REGULATOR SWITCH ASSEMBLY (for Rear LH Door) |

Disconnect the M6 power window regulator switch assembly (for rear LH door) connector.
Measure the voltage according to the value(s) in the table below.
| Tester Connection | Wiring Color | Terminal Description | Condition | Specified Condition |
| M6-3 (B) - Body ground | G - Body ground | Power supply | Ignition switch ON | 11 to 14 V |
Reconnect the M6 power window regulator switch assembly (for rear LH door).
Measure the voltage according to the value(s) in the table below.
| Tester Connection | Wiring Color | Terminal Description | Condition | Specified Condition |
| M6-4 (U) - Body ground | B - Body ground | Power window motor UP output | Ignition switch ON, rear LH door power window switch OFF → UP (Manual operation) | Below 1 V → 11 to 14 V |
| M6-1 (D) - Body ground | R - Body ground | Power window motor DOWN output | Ignition switch ON, rear LH door power window switch OFF → DOWN (Manual operation) | Below 1 V → 11 to 14 V |
| CHECK POWER WINDOW REGULATOR SWITCH ASSEMBLY (for Rear RH Door) |

Disconnect the L6 power window regulator switch assembly (for rear RH door) connector.
Measure the voltage according to the value(s) in the table below.
| Tester Connection | Wiring Color | Terminal Description | Condition | Specified Condition |
| L6-3 (B) - Body ground | G - Body ground | Power supply | Ignition switch ON | 11 to 14 V |
Reconnect the L6 power window regulator switch assembly (for rear RH door) connector.
Measure the voltage according to the value(s) in the table below.
| Tester Connection | Wiring Color | Terminal Description | Condition | Specified Condition |
| L6-4 (U) - Body ground | B - Body ground | Power window motor UP output | Ignition switch ON, rear RH door power window switch OFF → UP (Manual operation) | Below 1 V → 11 to 14 V |
| L6-1 (D) - Body ground | R - Body ground | Power window motor DOWN output | Ignition switch ON, rear RH door power window switch OFF → DOWN (Manual operation) | Below 1 V → 11 to 14 V |
| CHECK POWER WINDOW REGULATOR MOTOR ASSEMBLY LH (for Driver Door) |

Disconnect the K9 power window regulator motor assembly LH (for driver door) connector.
Measure the voltage and resistance according to the value(s) in the table below.
| Tester Connection | Wiring Color | Terminal Description | Condition | Specified Condition |
| K9-1 (E) - Body ground | W-B - Body ground | Ground | Always | Below 1 Ω |
| K9-2 (B) - Body ground | W - Body ground | Power supply | Always | 11 to 14 V |
Reconnect the K9 power window regulator motor assembly LH (for driver door) connector.
Measure the voltage according to the value(s) in the table below.
| Tester Connection | Wiring Color | Terminal Description | Condition | Specified Condition |
| K9-4 (AUTO) - K9-1 (E) | B - W-B | Power window motor AUTO UP input | Ignition switch ON, driver door power window fully open | 11 to 14 V |
| K9-4 (AUTO) - K9-1 (E) | B - W-B | Power window motor AUTO UP input | Ignition switch ON, driver door power window moving, power window regulator switch assembly fully pulled up (Automatic operation) | Below 1 V |
| K9-4 (AUTO) - K9-1 (E) | B - W-B | Power window motor AUTO UP input | Ignition switch ON, driver door power window fully closed | 11 to 14 V |
| K9-4 (AUTO) - K9-1 (E) | B - W-B | Power window motor AUTO DOWN input | Ignition switch ON, driver door power window fully closed | 11 to 14 V |
| K9-4 (AUTO) - K9-1 (E) | B - W-B | Power window motor AUTO DOWN input | Ignition switch ON, driver door power window moving, power window regulator switch assembly fully pushed down (Automatic operation) | Below 1 V |
| K9-4 (AUTO) - K9-1 (E) | B - W-B | Power window motor AUTO DOWN input | Ignition switch ON, driver door power window fully open | 11 to 14 V |
| K9-5 (LED) - K9-1 (E) | Y - W-B | LED illumination signal | Ignition switch ON | 11 to 14 V |
| K9-5 (LED) - K9-1 (E) | Y - W-B | LED illumination signal | Approximately 43 seconds after ignition switch turned off | Below 1 V |
| K9-7 (DWN1) - K9-1 (E) | V - W-B | Power window motor DOWN input | Ignition switch ON, driver door power window regulator switch not pushed or pulled | 11 to 14 V |
| K9-7 (DWN1) - K9-1 (E) | V - W-B | Power window motor DOWN input | Ignition switch ON, driver door power window regulator switch pushed halfway down (Manual operation) | Below 1 V |
| K9-7 (DWN1) - K9-1 (E) | V - W-B | Power window motor DOWN input | Ignition switch ON, driver door power window fully closed | 11 to 14 V |
| K9-7 (DWN1) - K9-1 (E) | V - W-B | Power window motor DOWN input | Ignition switch ON, driver door power window regulator switch fully pushed down (Automatic position) | Below 1 V |
| K9-7 (DWN1) - K9-1 (E) | V - W-B | Power window motor DOWN input | Ignition switch ON, driver door power window fully open | 11 to 14 V |
| K9-10 (UP1) - K9-1 (E) | L - W-B | Power window motor UP input | Ignition switch ON, driver door power window regulator switch not pushed or pulled | 11 to 14 V |
| K9-10 (UP1) - K9-1 (E) | L - W-B | Power window motor UP input | Ignition switch ON, driver door power window regulator switch pulled halfway up (Manual operation) | Below 1 V |
| K9-10 (UP1) - K9-1 (E) | L - W-B | Power window motor UP input | Ignition switch ON, driver door power window fully open | 11 to 14 V |
| K9-10 (UP1) - K9-1 (E) | L - W-B | Power window motor UP input | Ignition switch ON, driver door power window regulator switch fully pulled up (Automatic operation) | Below 1 V |
| K9-10 (UP1) - K9-1 (E) | L - W-B | Power window motor UP input | Ignition switch ON, driver door power window fully closed | 11 to 14 V |
| CHECK INSTRUMENT PANEL JUNCTION BLOCK ASSEMBLY AND MAIN BODY ECU (MULTIPLEX NETWORK BODY ECU) |
Disconnect the MB and I12 main body ECU (multiplex network body ECU) connector.
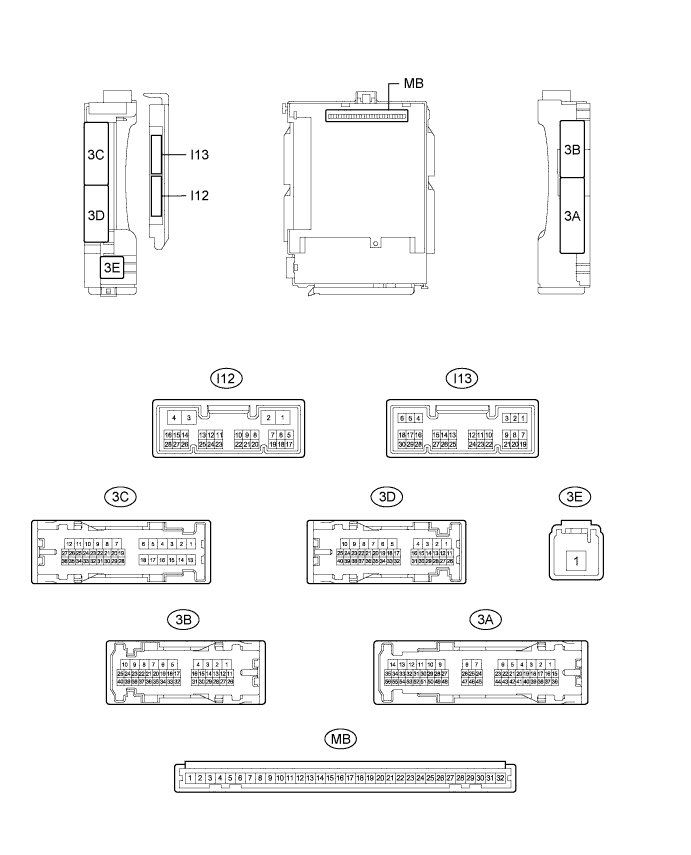
Measure the voltage and resistance according to the value(s) in the table below.
| Tester Connection | Wiring Color | Terminal Description | Condition | Specified Condition |
| MB-11 (GND1) - Body ground | - | Ground | Always | Below 1 Ω |
| MB-30 (BECU) - Body ground | - | Battery power supply | Always | 11 to 14 V |
| I12-3 (GND2) - Body ground | W-B - Body ground | Ground | Always | Below 1 Ω |
| MB-29 (ACC) - Body ground | - | ACC power supply | Ignition switch ACC | 11 to 14 V |
| MB-29 (ACC) - Body ground | - | ACC power supply | Ignition switch off | Below 1 V |
| MB-31 (ALTB) - Body ground | - | Battery power supply | Always | 11 to 14 V |
| MB-32 (IG) - Body ground | - | Ignition switch power supply | Ignition switch ON | 11 to 14 V |
| MB-32 (IG) - Body ground | - | Ignition switch power supply | Ignition switch off | Below 1 V |
Reconnect the MB and I12 main body ECU (multiplex network body ECU) connector.
Measure the voltage according to the value(s) in the table below.
| Tester Connection | Wiring Color | Terminal Description | Condition | Specified Condition |
| 3C-15 (FLCY) - Body ground | L - Body ground | Front door courtesy switch LH input | Front door LH open | Below 1 V |
| 3C-15 (FLCY) - Body ground | L - Body ground | Front door courtesy switch LH input | Front door LH closed | 11 to 14 V |
| I13-19 (FRCY) - Body ground | Y - Body ground | Front door courtesy switch RH input | Front door RH open | Below 1 V |
| I13-19 (FRCY) - Body ground | Y - Body ground | Front door courtesy switch RH input | Front door RH closed | 11 to 14 V |
| I13-11 (L2) - Body ground | R - Body ground | Driver door key-linked lock input | Driver door key cylinder turned to lock | Below 1 V |
| I13-11 (L2) - Body ground | R - Body ground | Driver door key-linked lock input | Driver door key cylinder off | Pulse generation |
| I13-24 (UL3) - Body ground | GR - Body ground | Driver door key-linked unlock input | Driver door key cylinder turned to unlock | Below 1 V |
| I13-24 (UL3) - Body ground | GR - Body ground | Driver door key-linked unlock input | Driver door key cylinder off | Pulse generation |
| I13-4 (PRG) - Body ground* | P - Body ground | Signal output to door control receiver | Key inserted in ignition key cylinder → Key pulled out of ignition key cylinder | 11 to 14 V → Pulse generation → 11 to 14 V |
| I13-16 (RDA) - Body ground* | L - Body ground | Signal input from door control receiver | Ignition switch off, all doors closed and transmitter switch not pressed | 11 to 14 V |
| Ignition switch off, all doors closed and transmitter switch pressed | Pulse generation |
| CHECK CERTIFICATION ECU (SMART KEY ECU ASSEMBLY) (w/ Smart Key System) |
Disconnect the A43 certification ECU (smart key ECU assembly) connector.
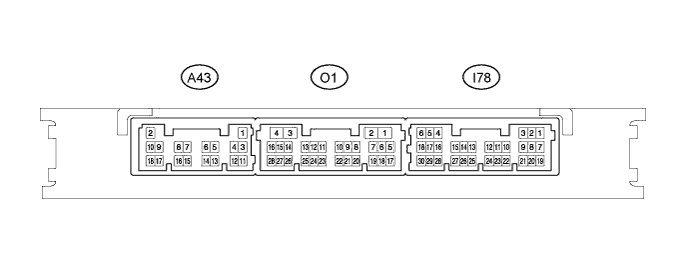
Measure the voltage and resistance according to the value(s) in the table below.
| Tester Connection | Wiring Color | Terminal Description | Condition | Specified Condition |
| A43-2 (+B) - Body ground | W - Body ground | +B power supply | Always | 11 to 14 V |
| A43-11 (E) - Body ground | W - Body ground | Ground | Always | Below 1 Ω |
Reconnect the A43 certification ECU (smart key ECU assembly) connector.
Measure the voltage and check for pulses according to the value(s) in the table below.
| Tester Connection | Wiring Color | Terminal Description | Condition | Specified Condition |
| I78-5 (IG) - Body ground | LG - Body ground | IG power supply | Ignition switch off | Below 1 V |
| I78-5 (IG) - Body ground | LG - Body ground | IG power supply | Ignition switch ON | 11 to 14 V |
| O1-5 (RCO) - A43-11 (E) | G - W | Door control receiver power source |
| Below 1 V |
| O1-5 (RCO) - A43-11 (E) | G - W | Door control receiver power source |
| 4.5 to 5.5 V |
| O1-17 (RDAM) - A43-11 (E) | Y - W | Door control receiver data input signal | Ignition switch off | Pulse between 11 to 14 V occurs regularly |