 |
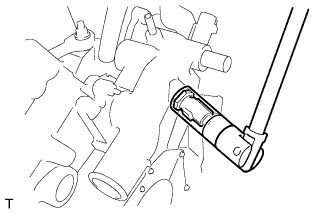
Using a 19 mm deep socket wrench, install the engine coolant temperature sensor and a new gasket.
- Torque:
- 20 N*m{ 204 kgf*cm , 15 ft.*lbf }
ENGINE UNIT > INSTALLATION |
| 1. INSTALL ENGINE COOLANT TEMPERATURE SENSOR |
|
Using a 19 mm deep socket wrench, install the engine coolant temperature sensor and a new gasket.
| 2. INSTALL KNOCK SENSOR WIRE |
Connect the 2 clamps, 2 knock sensor connectors and knock sensor wire connector.
| 3. INSTALL KNOCK CONTROL SENSOR |
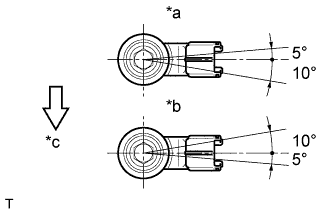 |
Install the 2 knock control sensors with the 2 bolts as shown in the illustration.
| *a | for Bank 1 |
| *b | for Bank 2 |
| *c | Front of Vehicle |
Connect the 2 knock control sensor connectors.
| 4. INSTALL ENGINE OIL PRESSURE SWITCH ASSEMBLY |
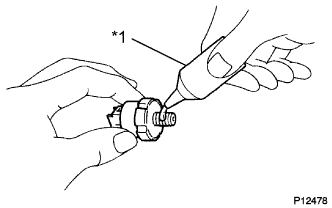 |
Clean the threads of the oil pressure switch. Apply adhesive to 2 or 3 threads of the oil pressure switch assembly.
| *1 | Adhesive |
Using a deep socket wrench, install the oil pressure switch.
| 5. INSTALL NO. 1 VACUUM SWITCHING VALVE |
Install the No. 1 vacuum switching valve with the bolt.
| 6. INSTALL WATER PUMP PULLEY |
Temporarily install the water pump pulley with the 4 bolts.
Using SST, hold the water pump pulley.
Tighten the 4 bolts.
| 7. INSTALL NO. 2 IDLER PULLEY SUB-ASSEMBLY |
Install the idler pulley cover plate, No. 2 idler pulley sub-assembly and No. 2 idler pulley cover plate with the bolt.
| 8. INSTALL NO. 2 TIMING GEAR COVER |
Install the No. 2 timing gear cover with the 2 bolts.
| 9. INSTALL V-RIBBED BELT TENSIONER ASSEMBLY |
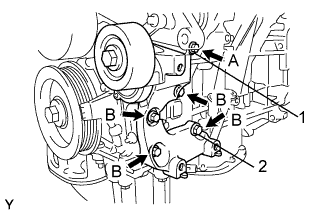 |
Temporarily install the V-ribbed belt tensioner assembly with the 5 bolts.
Install the V-ribbed belt tensioner assembly by tightening the bolt 1 and bolt 2 in the order shown in the illustration.
Tighten the other bolts.
| 10. INSTALL EXHAUST MANIFOLD SUB-ASSEMBLY LH |
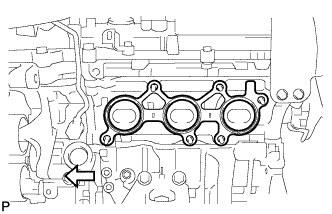 |
Install a new gasket as shown in the illustration.
 | Engine Front |
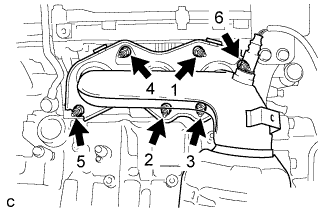 |
Install the exhaust manifold sub-assembly LH with the 6 nuts in the order shown in the illustration.
| 11. INSTALL NO. 2 EXHAUST MANIFOLD HEAT INSULATOR |
Install the No. 2 exhaust manifold heat insulator with the 3 bolts.
| 12. INSTALL NO. 2 MANIFOLD STAY |
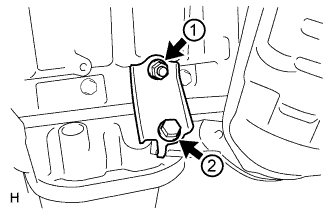 |
Tighten the bolt and nut in the order shown in the illustration.
| 13. INSTALL NO. 2 ENGINE OIL LEVEL DIPSTICK GUIDE |
Install a new O-ring to the No. 2 engine oil level dipstick guide.
Apply a light coat of engine oil to the O-ring.
Push in the No. 2 engine oil level dipstick guide end into the engine oil level dipstick guide.
Install the No. 2 engine oil level dipstick guide with the bolt.
Install the engine oil level dipstick.
| 14. INSTALL EXHAUST MANIFOLD SUB-ASSEMBLY RH |
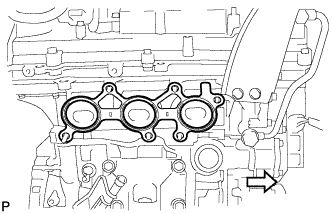 |
Install a new gasket as shown in the illustration.
| Engine Front |
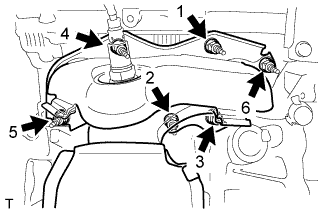 |
Install the exhaust manifold sub-assembly RH with the 6 nuts in the order shown in the illustration.
| 15. INSTALL INTAKE MANIFOLD |
Set a new gasket on each cylinder head.
Set the intake manifold on the cylinder heads.
Install and tighten the 6 bolts and 4 nuts uniformly in several steps.
| 16. INSTALL NO. 2 ENGINE MOUNTING STAY RH |
Install the No. 2 engine mounting stay RH with the bolt.
| 17. INSTALL IGNITION COIL ASSEMBLY |
Install the 6 ignition coils with the 6 bolts.
Connect the 6 ignition coil connectors.
Connect the 2 wire harness clamps.
Install the nut.
| 18. INSTALL NO. 1 SURGE TANK STAY |
| Oil Application Prohibited Bolt |
| Bolt for No. 1 surge tank stay and cylinder head cover |
Install the No. 1 surge tank stay with the bolt.
| 19. INSTALL THROTTLE BODY BRACKET |
| Oil Application Prohibited Bolt |
| Bolt for throttle body bracket and cylinder head cover |
Install the throttle body bracket with the bolt.
| 20. INSTALL INTAKE AIR SURGE TANK ASSEMBLY |
| Oil Application Prohibited Bolt |
| Intake Air Surge Tank Assembly and Intake Manifold |
| No. 1 Surge Tank Stay and Intake Air Surge Tank Assembly |
| Throttle Body Bracket and Intake Air Surge Tank Assembly |
Install 3 new gaskets to the intake air surge tank assembly.
Temporarily install the intake air surge tank assembly with the 4 bolts and 2 nuts.
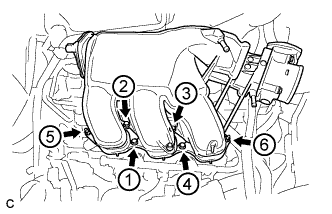 |
Using a 5 mm hexagon socket wrench, in several steps, uniformly tighten the 4 bolts and 2 nuts in the order shown in the illustration.
Install the throttle body bracket and No. 1 surge tank stay with the 2 bolts.
Install the vacuum hose clamp with the bolt.
Connect the connector to the intake air control valve assembly.
Connect the 2 water by-pass hoses and fuel vapor feed hose.
Connect the connector and wire harness clamp to the throttle body assembly.
Connect the hose clamp and union to check valve hose.
Connect the ventilation hose.
| 21. INSTALL ENGINE HANGERS |
Install the 2 engine hangers with the 4 bolts as shown in the illustration.
| Item | Part No. |
| No. 1 engine hanger | 12281-31120 |
| No. 2 engine hanger | 12282-31100 |
| Bolt | 90119-A0117 |
Attach an engine sling device and hang the engine with a chain block.