Home › Brake › BRAKE SYSTEM (OTHER) › BRAKE PEDAL

BRAKE PEDAL > INSTALLATION

for Preparation Click here


1. INSTALL BRAKE PEDAL SUPPORT ASSEMBLY
  1. Install the brake pedal support assembly with the 4 nuts.

    Torque:
    13 N*m{ 131 kgf*cm , 9 ft.*lbf }

  1. Engage the 3 clamps to install the wire harness to the brake pedal support assembly.

  1. Connect the brake pedal load sensing switch connector and engage the clamp.


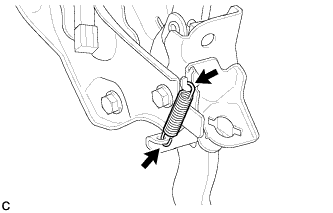
2. INSTALL BRAKE PEDAL RETURN SPRING


    C239881
  1. Install the brake pedal return spring to the brake pedal support assembly.

    NOTICE:
    Attach the bottom part of the brake pedal return spring first, making sure that the open part of the hook is facing the rear of the vehicle. Attach the top part of the brake pedal return spring second, making sure that the open part of the hook is facing the front of the vehicle.

3. INSTALL PUSH ROD PIN


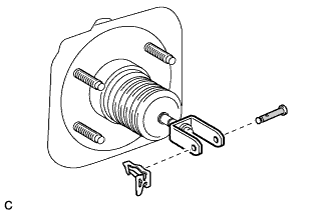
    C238443
  1. Apply lithium soap base glycol grease to the push rod pin.
    Text in Illustration 
    V100145
    Lithium Soap Base Glycol Grease

  1. Connect the brake master cylinder push rod clevis to the brake pedal support assembly with the push rod pin, and install a new clip as shown in the illustration.

    NOTICE:
    1. Be sure to insert the pin with its clip end facing the outside of the vehicle.
    2. Make sure that the brake master cylinder push rod clevis moves sideway.


4. INSTALL STOP LIGHT SWITCH MOUNTING ADJUSTER


5. INSTALL STOP LIGHT SWITCH ASSEMBLY


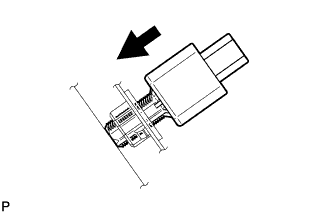
    E167768
  1. Insert the stop light switch assembly until the threaded sleeve hits the pedal.

    NOTICE:
    When inserting the stop light switch assembly, support the pedal from behind so that the pedal is not pushed in.


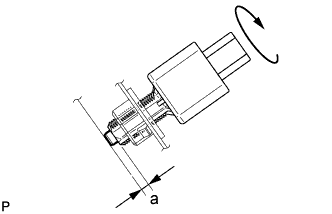
    E167769E01
  1. Make a quarter turn clockwise to install the stop light switch assembly.

    Torque:
    1.5 N*m{ 15 kgf*cm , 13 in.*lbf } or less

    NOTICE:
    When inserting the stop light switch assembly, support the pedal from behind so that the pedal is not pushed in.

  1. Connect the connector.

  1. Check the protrusion of the plunger.
    Protrusion of the plunger 
    Area
    Measurement
    a
    1.5 to 2.5 mm (0.0591 to 0.0984 in.)
    If the protrusion is not as specified, recheck switch installation and inspect brake pedal adjustment if necessary (Click here).

    NOTICE:
    Do not depress or support the brake pedal.


6. INSTALL HEADLIGHT LEVELING ECU ASSEMBLY (w/ Automatic Headlight Beam Level Control System)
  1. Engage the 2 guides.

  1. Install the headlight leveling ECU assembly with the bolt.

    Torque:
    8.0 N*m{ 82 kgf*cm , 71 in.*lbf }

  1. Engage the clamp.

  1. Connect the connector.


7. INSTALL INSTRUMENT PANEL REINFORCEMENT ASSEMBLY WITH AIR CONDITIONING UNIT


8. INSPECT AND ADJUST BRAKE PEDAL
(Click here)