 |
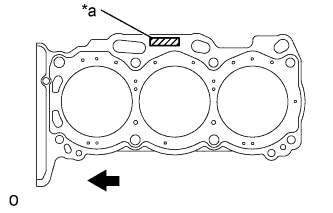
Place a new cylinder head gasket RH on the cylinder block surface with the Lot No. stamp facing upward.
| *a | Lot No. |
 | Engine Front |
- NOTICE:
- Be careful of the installation direction.
CYLINDER HEAD GASKET > INSTALLATION |
| 1. INSTALL CYLINDER HEAD GASKET RH |
|
Place a new cylinder head gasket RH on the cylinder block surface with the Lot No. stamp facing upward.
| *a | Lot No. |
| Engine Front |
| 2. INSTALL CYLINDER HEAD SUB-ASSEMBLY RH |
Place the cylinder head on the cylinder block.
Apply a light coat of engine oil to the threads and under the heads of the cylinder head bolts.
Step 1
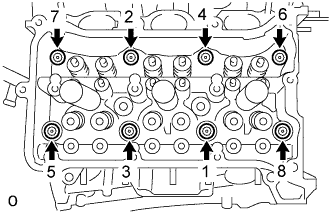 |
Using a 10 mm bi-hexagon wrench, install and uniformly tighten the 8 cylinder head bolts with the plate washers in several steps and in the sequence shown in the illustration.
 |
Step 2
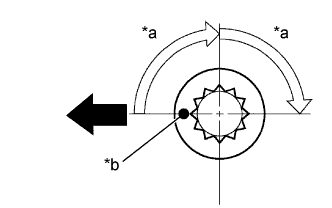
| *a | Turn 90° |
| *b | Painted Mark |
| Engine Front |
Mark each cylinder head bolt head with paint as shown in the illustration.
Tighten the cylinder head bolts 90° in the sequence shown in step 1.
Step 3
Tighten the cylinder head bolts an additional 90° in the sequence shown in step 1.
Check that the painted mark is now facing rearward.
| 3. INSTALL CYLINDER HEAD GASKET LH |
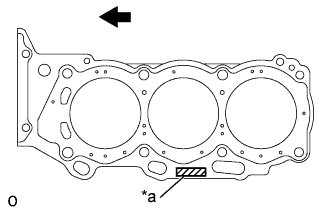 |
Place a new cylinder head gasket LH on the cylinder block surface with the Lot No. stamp facing upward.
| *a | Lot No. |
| Engine Front |
| 4. INSTALL CYLINDER HEAD SUB-ASSEMBLY LH |
Place the cylinder head on the cylinder block.
Apply a light coat of engine oil to the threads and under the heads of the cylinder head bolts.
Step 1
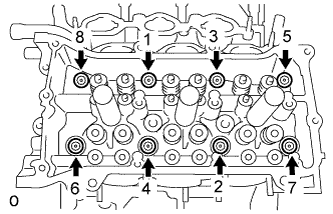 |
Using a 10 mm bi-hexagon wrench, install and uniformly tighten the 8 cylinder head bolts with the plate washers in several steps in the sequence shown in the illustration.
|
Step 2
| *a | Turn 90° |
| *b | Painted Mark |
| Engine Front |
Mark each cylinder head bolt head with paint as shown in the illustration.
Tighten the cylinder head bolts 90° in the sequence shown in step 1.
Step 3
Tighten the cylinder head bolts an additional 90° in the sequence shown in step 1.
Check that the painted mark is now facing rearward.
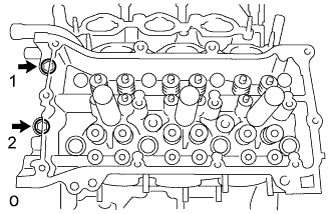 |
Tighten the 2 bolts in the order shown in the illustration.
| 5. INSTALL WATER OUTLET |
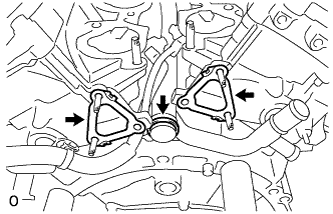 |
Install 2 new gaskets and a new O-ring.
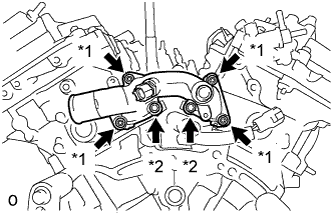 |
Install the water outlet with the 2 bolts and 4 nuts.
| *1 | Nut |
| *2 | Bolt |
| 6. INSTALL VALVE STEM CAP |
Install the 24 valve stem caps.
| 7. INSTALL VALVE LASH ADJUSTER ASSEMBLY |
Place the lash adjuster into a container filled with engine oil.
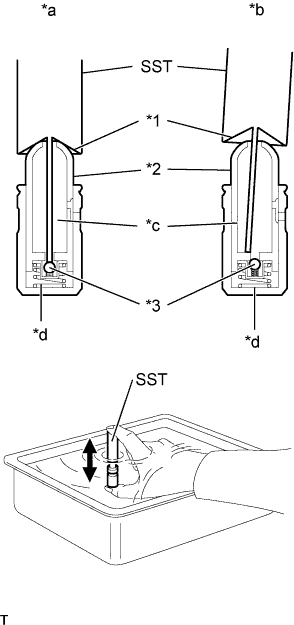 |
Insert the tip of SST into the lash adjuster plunger and use the tip to press down on the check ball inside the plunger.
| *1 | Tapered Part |
| *2 | Plunger |
| *3 | Check Ball |
| *a | CORRECT |
| *b | INCORRECT |
| *c | Low Pressure Chamber |
| *d | High Pressure Chamber |
Squeeze SST and lash adjuster together to move the plunger up and down 5 to 6 times.
Check the movement of the plunger and bleed the air.
After bleeding the air, remove SST. Then, try to press the plunger quickly and firmly by hand.
Install the valve lash adjusters.
| 8. INSTALL NO. 1 VALVE ROCKER ARM SUB-ASSEMBLY |
Apply engine oil to the lash adjuster tip and valve stem cap end.
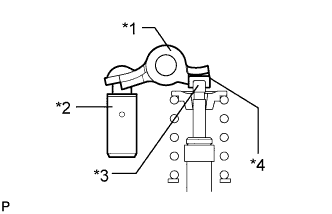 |
Install the valve rocker arms as shown in the illustration.
| *1 | Valve Rocker Arm |
| *2 | Lash Adjuster |
| *3 | Valve Stem |
| *4 | Valve Stem Cap |
| 9. INSTALL NO. 3 CAMSHAFT |
Apply a light coat of engine oil to the No. 3 camshaft journals and camshaft housing sub-assembly LH.
Install the No. 3 camshaft to the camshaft housing sub-assembly LH.
| 10. INSTALL NO. 4 CAMSHAFT |
Apply a light coat of engine oil to the No. 4 camshaft journals and camshaft housing sub-assembly LH.
Install the No. 4 camshaft to the camshaft housing sub-assembly LH.
| 11. INSTALL CAMSHAFT BEARING CAP (for Bank 2) |
Apply engine oil to the camshaft bearing caps.
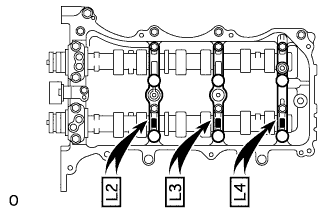 |
Make sure of the marks and numbers on the camshaft bearing caps and place them in each proper position and direction.
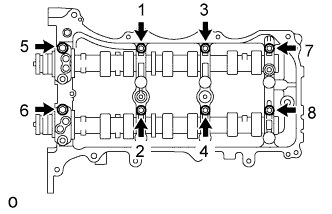 |
Temporarily tighten the 8 bolts in the order shown in the illustration.
| 12. INSTALL CAMSHAFT HOUSING SUB-ASSEMBLY LH |
|
Make sure that the valve rocker arm is installed as shown in the illustration.
| *1 | Valve Rocker Arm |
| *2 | Lash Adjuster |
| *3 | Valve Stem |
| *4 | Valve Stem Cap |
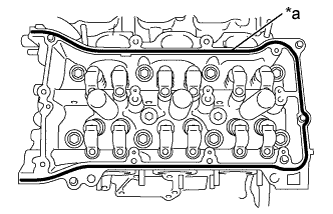 |
Apply seal packing in a continuous line as shown in the illustration.
| *a | Seal packing diameter (3.5 to 4.5 mm) |
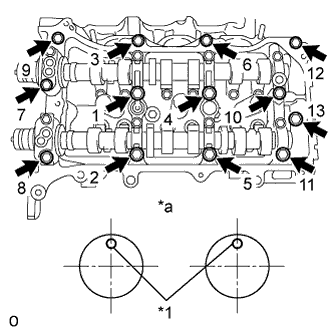 |
Install the camshaft housing sub-assembly LH and tighten the 13 bolts in the order shown in the illustration.
| *1 | Knock Pin |
| *a | Front View |
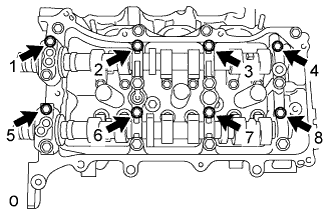 |
Tighten the 8 bolts in the order shown in the illustration.
| 13. INSTALL CAMSHAFT |
Apply a light coat of engine oil to the camshaft journals and camshaft housing sub-assembly RH.
Install the camshaft to the camshaft housing sub-assembly RH.
| 14. INSTALL NO. 2 CAMSHAFT |
Apply a light coat of engine oil to the No. 2 camshaft journals and camshaft housing sub-assembly RH.
Install the No. 2 camshaft to the camshaft housing sub-assembly RH.
| 15. INSTALL CAMSHAFT BEARING CAP (for Bank 1) |
Apply engine oil to the camshaft bearing caps.
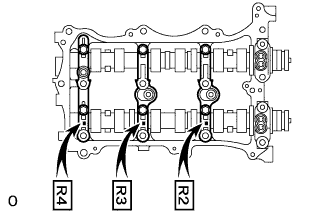 |
Make sure of the marks and numbers on the camshaft bearing caps and place them in each proper position and direction.
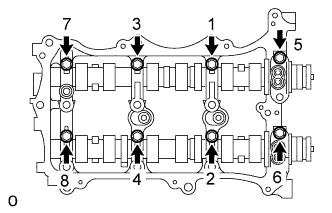 |
Temporarily tighten the 8 bearing cap bolts in the order shown in the illustration.
| 16. INSTALL CAMSHAFT HOUSING SUB-ASSEMBLY RH |