CYLINDER HEAD GASKET > INSTALLATION |
| 1. INSPECT CYLINDER HEAD BOLT |
![]() |
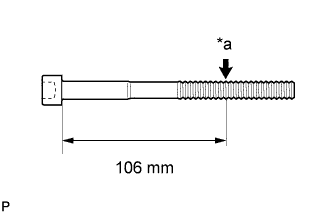
Using a vernier caliper, measure the diameter of the threads at the measurement point.
| *a | Measurement Point |
| 2. INSPECT CYLINDER HEAD SUB-ASSEMBLY |
![]() |
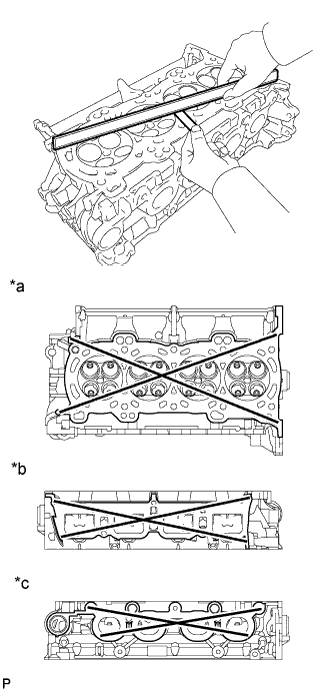
Using a precision straightedge and feeler gauge, measure the warpage of the contact surfaces where the cylinder head contacts the cylinder block and manifold.
| Item | Specified Condition |
| Cylinder head lower side | 0.05 mm (0.00197 in.) |
| Intake manifold side | 0.10 mm (0.00394 in.) |
| Exhaust manifold side | 0.10 mm (0.00394 in.) |
| *a | Cylinder Head Lower Side |
| *b | Intake Manifold Side |
| *c | Exhaust Manifold Side |
![]() |
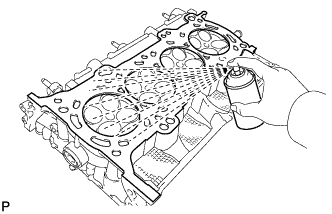
Using a dye penetrant, check the intake ports, exhaust ports and cylinder surface for cracks.
If cracked, replace the cylinder head.
| 3. INSTALL CYLINDER HEAD GASKET |
![]() |
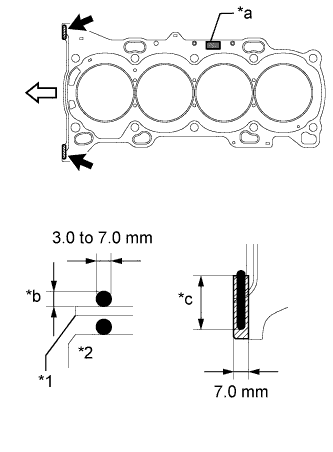
Clean the cylinder block and cylinder head with solvent.
| *1 | Cylinder Head Gasket |
| *2 | Cylinder Block |
| *a | Lot No. |
| *b | 3.0 mm or more |
| *c | 20 mm or more |
![]() | Seal Packing |
![]() | Front |
Apply a continuous line of seal packing to a new cylinder head gasket as shown in the illustration.
Place a new cylinder head gasket on the cylinder block surface with the front face of the Lot No. stamp facing upward.
| 4. INSTALL CYLINDER HEAD SUB-ASSEMBLY |
Place the cylinder head on the cylinder block.
Install the plate washers to the cylinder head bolts.
Apply a light coat of engine oil to the threads and under the heads of the cylinder head bolts.
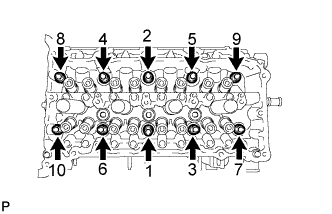
Step 1:
![]() |
Using a 10 mm bi-hexagon wrench, install and uniformly tighten the 10 cylinder head bolts in several steps, in the sequence shown in the illustration.
Step 2:
Tighten the cylinder head bolts again in the sequence shown in the illustration to make sure that they are tightened to the specified torque.
Step 3:
![]() |
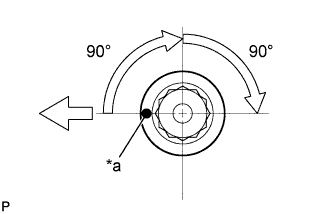
Mark each cylinder head bolt head with paint as shown in the illustration.
![]() | Front |
| *a | Painted Mark |
Tighten the cylinder head bolts 90° in the sequence shown in step 1.
Step 4:
Tighten the cylinder head bolts another 90° in the sequence shown in step 1.
Check that the paint marks are now facing rearward.
| 5. INSTALL VALVE STEM CAP |
Apply a light coat of engine oil to the valve stem ends.
Install the 16 valve stem caps to the cylinder head.
| 6. SET CAMSHAFT TIMING GEAR ASSEMBLY |
![]() |
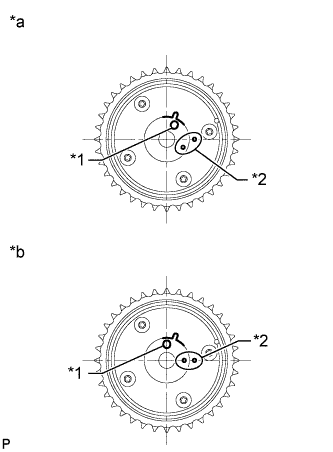
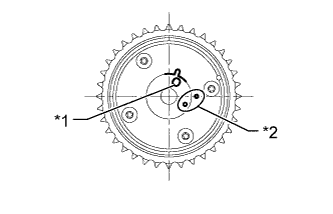
Check the camshaft timing gear position.
| *1 | Knock Pin Hole |
| *2 | Alignment Mark |
| *a | Advanced Position: |
| *b | Retarded Position: |
![]() |
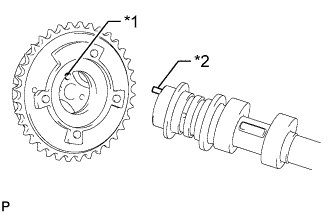
Align and attach the knock pin of the camshaft with the pin hole of the camshaft timing gear assembly.
| *1 | Pin Hole |
| *2 | Knock Pin |
![]() |
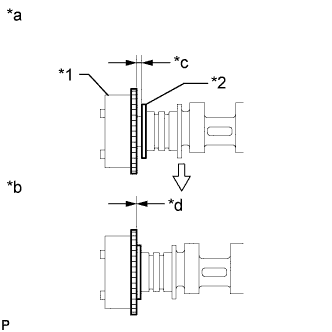
Check that there is no clearance between the camshaft timing gear assembly and camshaft flange.
| *1 | Camshaft Timing Gear Assembly |
| *2 | Flange |
| *a | INCORRECT |
| *b | CORRECT |
| *c | Clearance |
| *d | No Clearance |
Secure the camshaft in place by hand, and then install the installation bolt of the camshaft timing gear by hand.
![]() |
Release the lock pin.
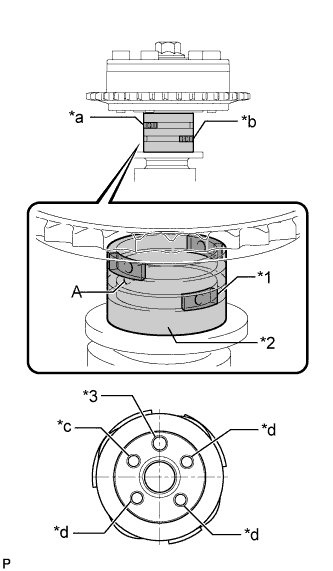
| *1 | Rubber |
| *2 | Vinyl Tape |
| *3 | Knock Pin |
| *a | Retard Side Path |
| *b | Advance Side Path |
| *c | Open |
| *d | Close |
Clean the camshaft journal with non-residue solvent.
Cover the 4 oil paths of the cam journal with vinyl tape as shown in the illustration.
Open a hole at port A shown in the illustration.
![]() |
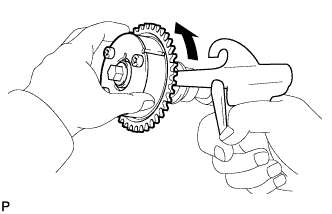
While applying approximately 200 kPa (2.0 kgf/ cm2, 29 psi) of air pressure to the oil path, forcibly turn the camshaft timing gear assembly in the advance direction (counterclockwise).
Remove the vinyl tape and rubber pieces from the camshaft.
Remove the bolt and camshaft timing gear.
| 7. INSTALL VALVE LASH ADJUSTER ASSEMBLY |
Inspect the valve lash adjuster before installing it .
Install the 16 lash adjusters to the cylinder head.
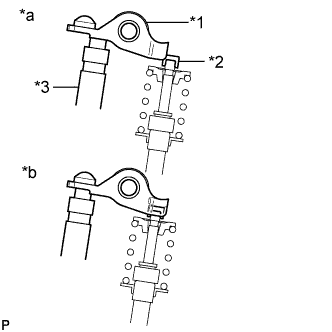
| 8. INSTALL NO. 1 VALVE ROCKER ARM SUB-ASSEMBLY |
![]() |
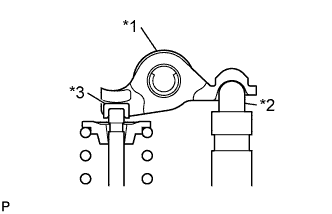
Apply engine oil to the lash adjuster tips and valve stem caps.
| *1 | Valve Rocker Arm |
| *2 | Valve Lash Adjuster |
| *3 | Valve Stem Cap |
Install the 16 valve rocker arms as shown in the illustration.
| 9. INSTALL NO. 2 CAMSHAFT BEARING |
Clean the No. 2 camshaft bearing.
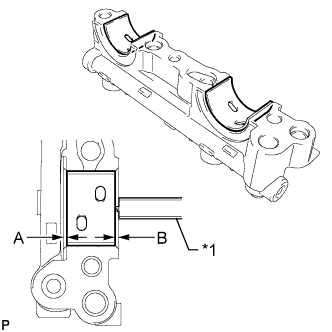
Install the camshaft bearing to the camshaft housing.
![]() |
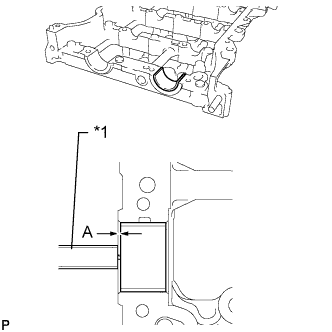
Using a vernier caliper, measure the distance between the camshaft housing edge and the camshaft bearing edge.
| *1 | Vernier Caliper |
| 10. INSTALL NO. 1 CAMSHAFT BEARING |
![]() |
Clean the No. 1 camshaft bearing.
| *1 | Vernier Caliper |
Install the camshaft bearing to the No. 1 camshaft bearing cap.
Using a vernier caliper, measure the distance between the camshaft bearing cap edge and the camshaft bearing edge.
| 11. INSTALL OIL CONTROL VALVE FILTER |
![]() |
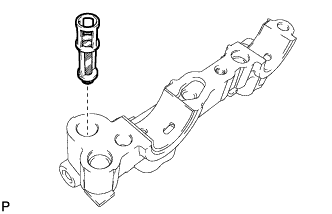
Install the oil control valve filter to the No. 1 camshaft bearing cap.
| 12. INSTALL CAMSHAFT |
Clean the camshaft journals, camshaft housing and bearing caps.
Apply a light coat of engine oil to the camshaft journal, camshaft housing and bearing caps.
Install the camshaft and No. 2 camshaft to the camshaft housing.
| 13. INSTALL CAMSHAFT BEARING CAP |
![]() |
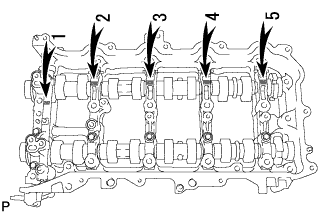
Confirm the marks and numbers on the camshaft bearing caps and place them in their proper positions and directions.
![]() |
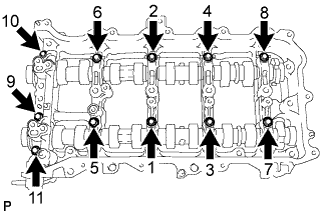
Install the 11 bolts in the order shown in the illustration.
| 14. INSTALL CAMSHAFT HOUSING SUB-ASSEMBLY |
![]() |
Check that the valve rocker arms are installed as shown in the illustration.
| *1 | Valve Rocker Arm |
| *2 | Valve Stem Cap |
| *3 | Valve Lash Adjuster |
| *a | INCORRECT |
| *b | CORRECT |
![]() |
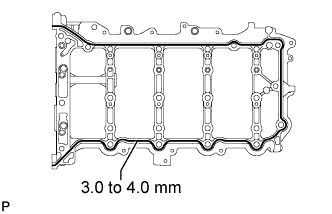
Apply seal packing in a continuous line as shown in the illustration.
![]() |
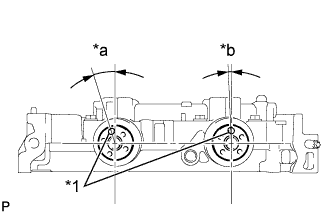
Position the knock pin of the camshaft and No. 2 camshaft as shown in the illustration.
| *1 | Knock Pin |
| *a | Approximately 17° |
| *b | Approximately 2° |
![]() |
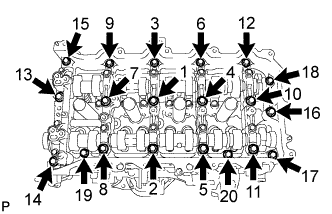
Install the camshaft housing, and then install the 20 bolts in the order shown in the illustration.
| 15. INSTALL CAMSHAFT TIMING GEAR ASSEMBLY |
![]() |
Check the camshaft timing gear position.
| *1 | Knock Pin Hole |
| *2 | Alignment Mark |
![]() |
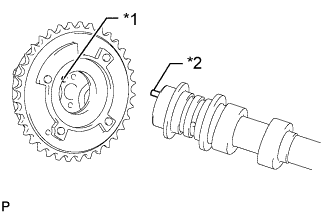
Align and attach the knock pin of the camshaft with the pin hole of the camshaft timing gear assembly.
| *1 | Pin Hole |
| *2 | Knock Pin |
![]() |
Check that there is no clearance between the camshaft timing gear and camshaft flange.
| *1 | Camshaft Timing Gear |
| *2 | Flange |
| *a | INCORRECT |
| *b | CORRECT |
| *c | Clearance |
| *d | No Clearance |
![]() |
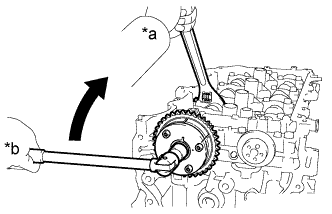
Using a wrench to hold the hexagonal portion of the camshaft, install the bolt.
| *a | Hold |
| *b | Turn |
| 16. INSTALL CAMSHAFT TIMING EXHAUST GEAR ASSEMBLY |
![]() |
Align and attach the knock pin of the No. 2 camshaft with the pin hole of the camshaft timing exhaust gear assembly.
| *1 | Pin Hole |
| *2 | Knock Pin |
![]() |
Check that there is no clearance between the camshaft timing exhaust gear and camshaft flange.
| *1 | Camshaft Timing Exhaust Gear |
| *2 | Flange |
| *a | INCORRECT |
| *b | CORRECT |
| *c | Clearance |
| *d | No Clearance |
![]() |
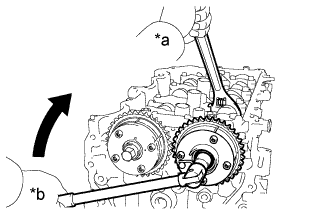
Using a wrench to hold the hexagonal portion of the No. 2 camshaft, install the bolt.
| *a | Hold |
| *b | Turn |
| 17. ADD ENGINE OIL |
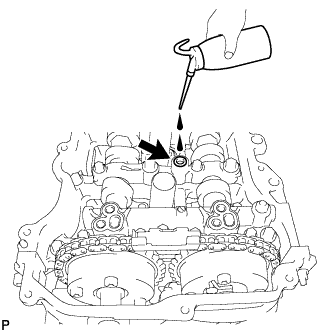
![]() |
Add 50 cc (3.1 cu. in) of engine oil into the oil hole shown in the illustration.
| 18. SET NO. 1 CYLINDER TO TDC/COMPRESSION |
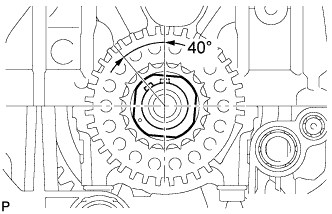
![]() |
Temporarily install the crankshaft pulley bolt.
Rotate the crankshaft 40° counterclockwise to position the crankshaft pulley key as shown in the illustration.
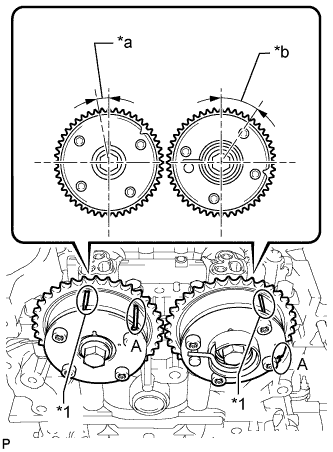
![]() |
Check that the timing marks of the camshaft timing gears are as shown in the illustration.
| *1 | Timing Mark |
| *a | Approximately 7° |
| *b | Approximately 32° |
| 19. INSTALL NO. 1 CHAIN VIBRATION DAMPER |
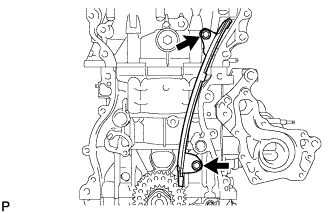
![]() |
Install the chain vibration damper with the 2 bolts.
| 20. INSTALL CHAIN SUB-ASSEMBLY |
Place the chain onto the camshaft timing gears and crankshaft timing sprocket.
![]() |
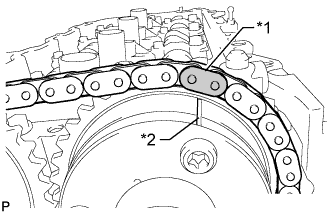
Align the mark plate (yellow or gold) of the chain with the timing mark of the camshaft timing exhaust gear and install the chain to the camshaft timing exhaust gear.
| *1 | Mark Plate |
| *2 | Timing Mark |
![]() |
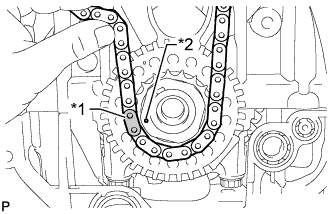
Align the mark plate (pink or gold) of the chain with the timing mark of the crankshaft timing sprocket and install the chain to the crankshaft timing sprocket.
| *1 | Mark Plate |
| *2 | Timing Mark |
![]() |
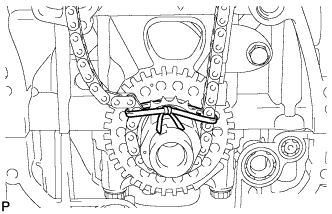
Tie a string above the crankshaft timing sprocket so that the chain is secure.
![]() |
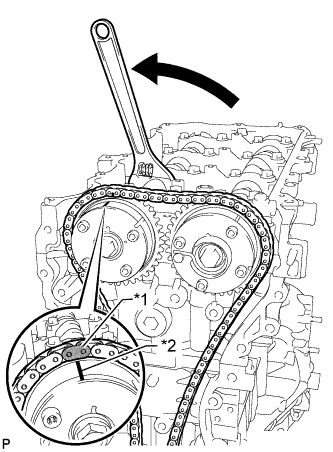
Using the hexagonal portion of the intake camshaft, rotate the intake camshaft counterclockwise with a wrench, align the timing mark of the camshaft timing gear with the mark plate (yellow or gold) of the chain and install the chain to the camshaft timing gear.
| *1 | Mark Plate |
| *2 | Timing Mark |
![]() |
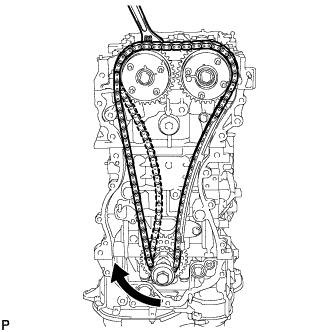
Remove the string above the crankshaft timing sprocket, rotate the crankshaft clockwise, and loosen the chain so that the chain tensioner slipper can be installed.
| 21. INSTALL CHAIN TENSIONER SLIPPER |
![]() |
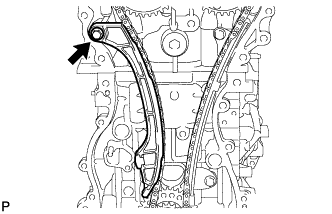
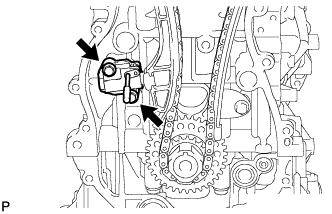
Install the chain tensioner slipper with the bolt.
| 22. INSTALL NO. 1 CHAIN TENSIONER ASSEMBLY |
![]() |
Install a new gasket and the chain tensioner with the 2 bolts.
Remove the pin from the stopper plate.
| 23. INSTALL TIMING CHAIN GUIDE |
![]() |
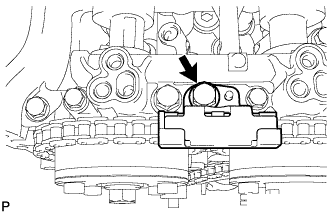
Install the timing chain guide with the bolt.
| 24. CHECK NO. 1 CYLINDER AT TDC/COMPRESSION |
Temporarily install the crankshaft pulley bolt.

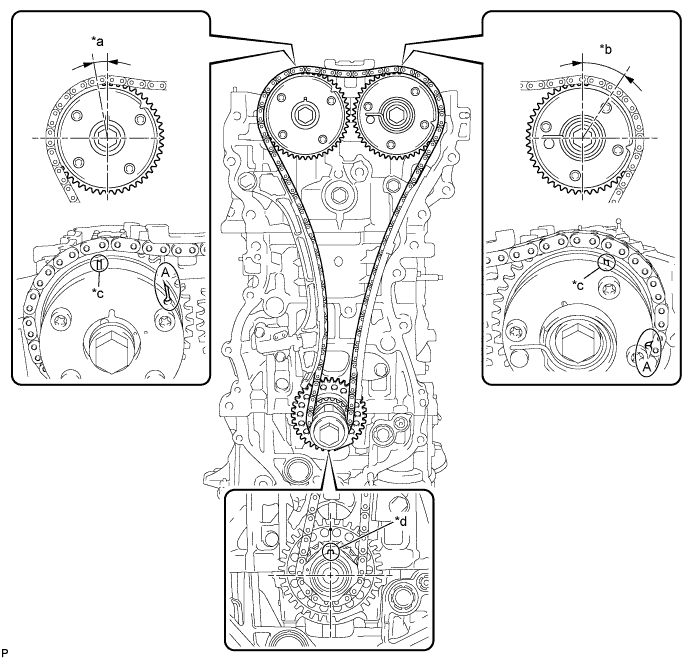
| *a | Approximately 7° | *b | Approximately 32° |
| *c | Timing Mark | *d | Key |
Rotate the crankshaft clockwise, and check that the timing marks on the crankshaft timing sprocket and camshaft timing gears are as shown in the illustration.
Remove the crankshaft pulley bolt.
| 25. INSTALL INTAKE MANIFOLD |
![]() |
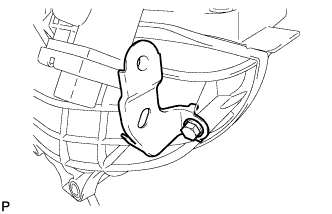
Install the wire harness clamp bracket with the bolt.
![]() |
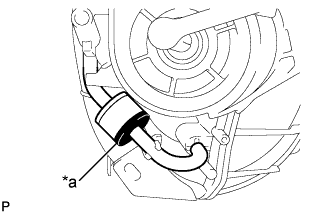
Connect the 2 vacuum hoses and check that the No. 1 check valve is installed as shown in the illustration.
| *a | Black |
Check the tumble control valves.
Install a new intake manifold gasket to the intake manifold.
![]() |
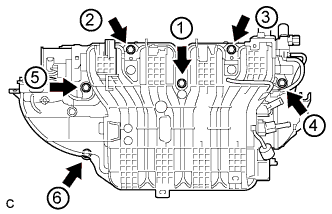
Install the intake manifold by tightening the 6 bolts in the sequence shown in the illustration.
![]() |
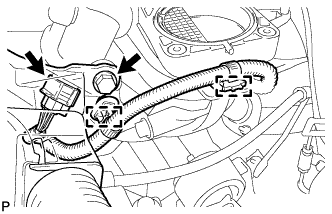
Connect the intake air control actuator connector and 2 wire harness clamps.
Install the wire harness clamp with the bolt.
![]() |
Install the wire harness clamp bracket with the bolt.
Connect the 3 wire harness clamps and connector.
Connect the fuel vapor feed hose.
![]() |
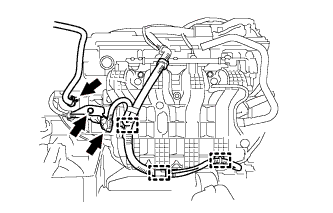
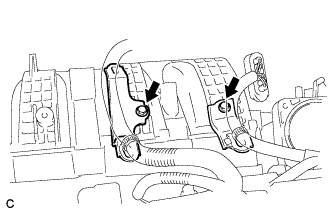
Install the 2 wire harness clamp brackets with the 2 bolts.
| 26. CONNECT NO. 2 VENTILATION HOSE |
Connect the No. 2 ventilation hose to the intake manifold.
| 27. INSTALL FUEL DELIVERY PIPE SUB-ASSEMBLY |
![]() |
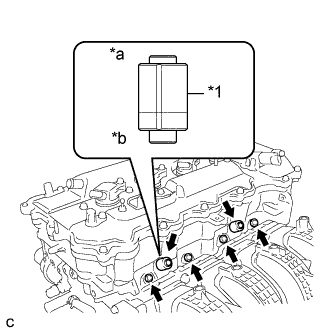
Install 4 new injector vibration insulators to the cylinder head.
| *1 | Fuel Delivery Spacer |
| *a | Fuel Delivery Pipe Side |
| *b | Cylinder Head Side |
Install the 2 fuel delivery spacers onto the cylinder head.
Install the fuel delivery pipe sub-assembly with the 4 fuel injector assemblies and install the 2 bolts.
| 28. INSTALL VACUUM SWITCHING VALVE ASSEMBLY (for ACIS) |
Install the vacuum switching valve assembly with the bolt.
Connect the 2 vacuum hoses and connector.
Connect the union to connector tube hose and wire harness clamp.
| 29. INSTALL THROTTLE WITH MOTOR BODY ASSEMBLY |
| 30. INSTALL EXHAUST MANIFOLD CONVERTER SUB-ASSEMBLY |
Install a new exhaust manifold to head gasket onto the cylinder head.
Temporarily install the exhaust manifold converter sub-assembly with the 5 nuts.
![]() |
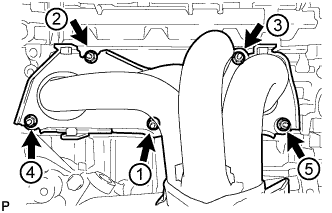
Tighten the 5 nuts in the sequence shown in the illustration (except PZEV).
![]() |
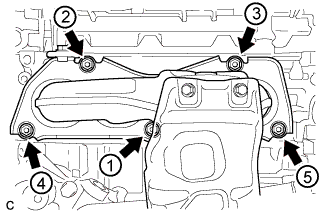
Tighten the 5 nuts in the sequence shown in the illustration (for PZEV).
| 31. INSTALL EGR INLET EXHAUST MANIFOLD PLATE (for PZEV) |
Install the EGR inlet exhaust manifold plate with the bolt.
| 32. INSTALL NO. 1 EXHAUST MANIFOLD HEAT INSULATOR (except PZEV) |
Install the No. 1 exhaust manifold heat insulator with the 4 bolts.
| 33. INSTALL NO. 2 MANIFOLD STAY |
Install the No. 2 manifold stay with the bolt and nut.
| 34. INSTALL MANIFOLD STAY |
Install the manifold stay with the bolt and nut.
| 35. INSTALL TIMING CHAIN COVER SUB-ASSEMBLY |