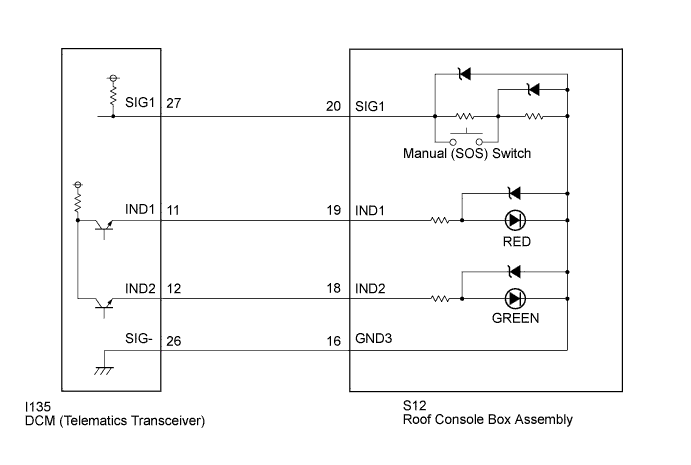
DTC B15C5 Manual Button Malfunction |
| DTC No. | DTC Detection Condition | Trouble Area |
| B15C5 | Open or short circuit in manual (SOS) switch is detected. |
|
| 1.CHECK DTC |
Turn the engine switch off.
Connect the Techstream to the DLC3.
Turn the engine switch on (IG) and wait for 10 seconds.
Turn the Techstream on.
Perform "Health Check" and check for current DTCs (Click here).
| Result | Proceed to |
| DTC B1570, B1571 and B15C5 are output | A |
| DTC B15C5 is output (DTC B1570 and B1571 are not output) | B |
|
| ||||
| A | |
 |
| 2.INSPECT ROOF CONSOLE BOX ASSEMBLY (MANUAL (SOS) SWITCH) |
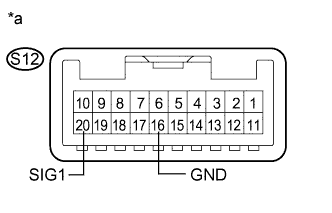 |
Disconnect the S12 roof console box assembly connector.
Measure the resistance according to the value(s) in the table below.
| Tester Connection | Switch Condition | Specified Condition |
| S12-20 (SIG1) - S12-16 (GND3) | Manual (SOS) switch not pressed | 410 to 414 Ω |
| S12-20 (SIG1) - S12-16 (GND3) | Manual (SOS) switch pressed | 81 to 83 Ω |
| *a | Component without harness connected (Roof Console Box Assembly) |
|
| ||||
| OK | |
|
| 3.CHECK HARNESS AND CONNECTOR (DCM (TELEMATICS TRANSCEIVER) - ROOF CONSOLE BOX ASSEMBLY) |
Disconnect the I135 DCM (Telematics Transceiver) connector.
Disconnect the S12 roof console box assembly connector.
Measure the resistance according to the value(s) in the table below.
| Tester Connection | Condition | Specified Condition |
| I135-26 (SIG-) - S12-16 (GND3) | Always | Below 1 Ω |
| I135-26 (SIG-) - Body ground | Always | 10 kΩ or higher |
|
| ||||
| OK | |
|
| 4.REPLACE DCM (TELEMATICS TRANSCEIVER) |
Replace the DCM (Telematics Transceiver) (Click here).
| NEXT | ||
 | ||
| ||
| 5.READ VALUE USING TECHSTREAM (MANUAL (SOS) SWITCH OPERATION) |
Turn the engine switch off.
Connect the Techstream to the DLC3.
Turn the engine switch on (IG) and wait for 10 seconds.
Turn the Techstream on.
Enter the following menus: Body Electrical / Telematics / Data List.
Check that the manual (SOS) switch condition observed on the Techstream changes according to manual (SOS) switch operation.
| Tester Display | Measurement Item/Range | Normal Condition | Diagnostic Note |
| Emergency Switch | Manual (SOS) switch / OFF or ON | OFF: Manual (SOS) switch not pressed | - |
| ON: Manual (SOS) switch pressed* | - |
| Result | Proceed to |
| Techstream display changes when turning the manual (SOS) switch ON/OFF. | A |
| Techstream display does not change when turning the manual (SOS) switch ON/OFF. | B |
|
| ||||
| A | |
|
| 6.REPLACE DCM (TELEMATICS TRANSCEIVER) |
Replace the DCM (Telematics Transceiver) (Click here).
| NEXT | ||
| ||
| ||
| 7.INSPECT DCM (TELEMATICS TRANSCEIVER) (SIG1 VOLTAGE) |
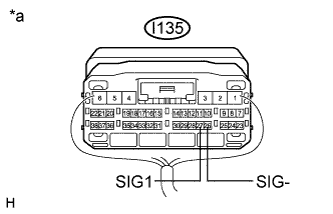 |
Remove the DCM (Telematics Transceiver) but do not disconnect the connectors (Click here).
Measure the voltage according to the value(s) in the table below.
| Tester Connection | Condition | Specified Condition |
| I135-27 (SIG1) - I135-26 (SIG-) | Engine switch on (IG), manual (SOS) switch not pressed | 1.5 to 2.0 V |
| *a | Component with harness connected (DCM (Telematics Transceiver)) |
|
| ||||
| OK | |
|
| 8.REPLACE DCM (TELEMATICS TRANSCEIVER) |
Replace the DCM (Telematics Transceiver) (Click here).
| NEXT | ||
| ||
| ||
| 9.INSPECT ROOF CONSOLE BOX ASSEMBLY (MANUAL (SOS) SWITCH) |
|
Disconnect the S12 roof console box assembly connector.
Measure the resistance according to the value(s) in the table below.
| Tester Connection | Switch Condition | Specified Condition |
| S12-20 (SIG1) - S12-16 (GND3) | Manual (SOS) switch not pressed | 410 to 414 Ω |
| S12-20 (SIG1) - S12-16 (GND3) | Manual (SOS) switch pressed | 81 to 83 Ω |
| *a | Component without harness connected (Roof Console Box Assembly) |
|
| ||||
| OK | |
|
| 10.CHECK HARNESS AND CONNECTOR (DCM (TELEMATICS TRANSCEIVER) - ROOF CONSOLE BOX ASSEMBLY) |
Disconnect the I135 DCM (Telematics Transceiver) connector.
Disconnect the S12 roof console box assembly connector.
Measure the resistance according to the value(s) in the table below.
| Tester Connection | Condition | Specified Condition |
| I135-27 (SIG1) - S12-20 (SIG1) | Always | Below 1 Ω |
| I135-27 (SIG1) - Body ground | Always | 10 kΩ or higher |
|
| ||||
| OK | |
|
| 11.REPLACE DCM (TELEMATICS TRANSCEIVER) |
Replace the DCM (Telematics Transceiver) (Click here).
| NEXT | ||
| ||
| ||

