Home › Vehicle Interior › THEFT DETERRENT / KEYLESS ENTRY › THEFT DETERRENT SYSTEM › 2012.02–2015.04
RM2030EQ _58 Vehicle Interior _014665 THEFT DETERRENT / KEYLESS ENTRY _0074593 THEFT DETERRENT SYSTEM J

THEFT DETERRENT / KEYLESS ENTRY  THEFT DETERRENT SYSTEM  Ignition Switch Circuit  


DESCRIPTION

The main body ECU (multiplex network body ECU) determines the ignition position (LOCK, ACC, ON) based on signals from the IG or ACC circuit.

WIRING DIAGRAM
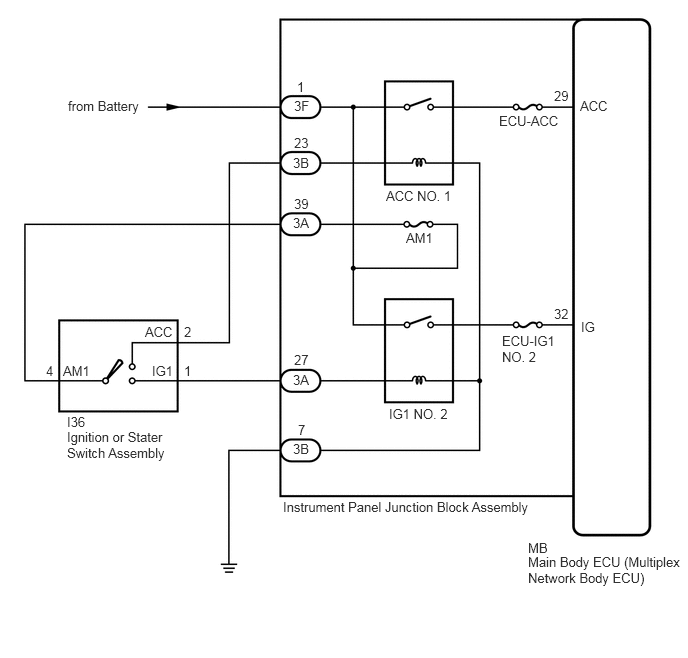
B289671E12
6.042,1.021 6.427,1.25 0.385,0.229 10 false ACC 1.51,3.375 1.927,3.615 0.417,0.24 10 false ACC 5.198,1.177 6.031,1.573 0.833,0.396 10 false ECU-ACC 4.021,1.958 4.917,2.24 0.896,0.281 10 false ACC NO. 1 4.229,2.396 4.667,2.646 0.438,0.25 10 false AM1 0.656,3.781 1.104,4 0.448,0.219 10 false AM1 4.052,4.229 4.823,4.438 0.771,0.208 10 false IG1 NO. 2 0.698,4.313 1.052,4.552 0.354,0.24 10 false I36 0.698,4.469 1.833,4.875 1.135,0.406 10 false Ignition or Stater Switch Assembly 0.708,1.021 1.552,1.344 0.844,0.323 10 false from Battery 5.229,3.469 5.813,3.875 0.583,0.406 10 false ECU-IG1 NO. 2 2.948,5.198 5.802,5.479 2.854,0.281 10 false Instrument Panel Junction Block Assembly 5.5,5.771 7.156,6.146 1.656,0.375 10 false Main Body ECU (Multiplex Network Body ECU) 6.052,3.323 6.375,3.646 0.323,0.323 10 false IG 5.5,5.625 5.938,6 0.438,0.375 10 false MB 1.583,3.781 1.948,4.021 0.365,0.24 10 false IG1 3.063,1.021 3.354,1.26 0.292,0.24 10 false 3F 5.771,0.917 6.021,1.177 0.25,0.26 10 false 29 5.771,3.188 6.063,3.448 0.292,0.26 10 false 32 3.094,0.823 3.292,1.021 0.198,0.198 10 false 1 3.052,1.615 3.385,1.865 0.333,0.25 10 false 3B 3.063,1.406 3.375,1.677 0.313,0.271 10 false 23 3.052,4.594 3.375,4.813 0.323,0.219 10 false 3B 3.104,4.396 3.292,4.604 0.188,0.208 10 false 7 3.052,2.24 3.427,2.573 0.375,0.333 10 false 3A 3.052,3.875 3.313,4.146 0.26,0.271 10 false 3A 3.063,2.042 3.323,2.271 0.26,0.229 10 false 39 3.063,3.667 3.302,3.865 0.24,0.198 10 false 27 1.917,3.781 2.115,3.979 0.198,0.198 10 false 1 1.917,3.375 2.146,3.615 0.229,0.24 10 false 2 0.479,3.781 0.688,3.99 0.208,0.208 10 false 4

CAUTION / NOTICE / HINT

NOTICE:

Inspect the fuses for circuits related to this system before performing the following inspection procedure.


PROCEDURE

1.READ VALUE USING INTELLIGENT TESTER
a.

Connect the intelligent tester to the DLC3.


b.

Turn the ignition switch to ON.


c.

Turn intelligent tester on.


d.

Enter the following menus: Body / Main Body / Data List.


e.

According to the display on the intelligent tester, read the Data List.

Body Electrical > Main Body > Data List
Tester Display Measurement Item Range Normal Condition Diagnostic Note
ACC SW Ignition switch ON or OFF ON: Ignition switch ACC
OFF: Ignition switch LOCK
-
IG SW Ignition switch ON or OFF ON: Ignition switch ON
OFF: Ignition switch LOCK or ACC
-
Body Electrical > Main Body > Data List
Tester Display
ACC SW
IG SW
50003 123 31,30
OK:

ON or OFF appears on the screen according to whether the ignition switch is in ON or is in LOCK or ACC.


Result:
Proceed to
OK
NG


OK

PROCEED TO NEXT SUSPECTED AREA SHOWN IN PROBLEM SYMPTOMS TABLE

NG

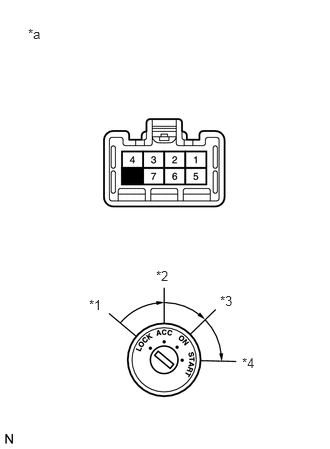
2.INSPECT IGNITION OR STARTER SWITCH ASSEMBLY
a.
B125076C02
0.927,3.094 1.344,3.417 0.417,0.323 10 false *1 0.292,0.271 0.438,0.406 0.146,0.135 10 false *a 1.625,2.792 1.958,3.052 0.333,0.26 10 false *2 2.292,3.052 2.708,3.427 0.417,0.375 10 false *3 2.521,3.698 3.104,4.135 0.583,0.438 10 false *4
*1 LOCK
*2 ACC
*3 ON
*4 START
*a Component without harness connected
(Ignition or Starter Switch Assembly)


Remove the ignition or starter switch assembly.

Click hereEngine / Hybrid System>2GR-FE STARTING>IGNITION SWITCH>REMOVAL


b.

Measure the resistance according to the value(s) in the table below.

Standard Resistance:
Tester Connection Condition Specified Condition
1 - 4 Ignition switch ON Below 1 Ω
2 - 4 Ignition switch ACC Below 1 Ω


Result:
Proceed to
OK
NG


OK

3.CHECK HARNESS AND CONNECTOR (BATTERY - INSTRUMENT PANEL JUNCTION BLOCK ASSEMBLY)

NG

REPLACE IGNITION OR STARTER SWITCH ASSEMBLY

3.CHECK HARNESS AND CONNECTOR (BATTERY - INSTRUMENT PANEL JUNCTION BLOCK ASSEMBLY)
a.

Disconnect the 3F instrument panel junction blockassembly connector.


b.

Measure the voltage according to the value(s) in the table below.

Standard Voltage:
Tester Connection Condition Specified Condition
3F-1 - Body ground Always 11 to 14 V


Result:
Proceed to
OK
NG


OK

4.CHECK HARNESS AND CONNECTOR (INSTRUMENT PANEL JUNCTION BLOCK ASSEMBLY - BODY GROUND)

NG

REPAIR OR REPLACE HARNESS OR CONNECTOR

4.CHECK HARNESS AND CONNECTOR (INSTRUMENT PANEL JUNCTION BLOCK ASSEMBLY - BODY GROUND)
a.

Disconnect the 3B instrument panel junction block assembly connector.


b.

Measure the resistance according to the value(s) in the table below.

Standard Resistance:
Tester Connection Condition Specified Condition
3B-7 - Body ground Always Below 1 Ω


Result:
Proceed to
OK
NG


OK

5.CHECK HARNESS AND CONNECTOR (IGNITION SWITCH ASSEMBLY - INSTRUMENT PANEL JUNCTION BLOCK ASSEMBLY)

NG

REPAIR OR REPLACE HARNESS OR CONNECTOR

5.CHECK HARNESS AND CONNECTOR (IGNITION SWITCH ASSEMBLY - INSTRUMENT PANEL JUNCTION BLOCK ASSEMBLY)
a.

Disconnect the 3A instrument panel junction block assembly connector.


b.

Measure the resistance according to the value(s) in the table below.

Standard Resistance:
Tester Connection Condition Specified Condition
I36-1 (IG1) - 3A-27 Always Below 1 Ω
I36-1 (IG1) - Body ground Always 10 kΩ or higher
I36-2 (ACC) - 3B-23 Always Below 1 Ω
I36-2 (ACC) - Body ground Always 10 kΩ or higher
I36-4 (AM1) - 3A-39 Always Below 1 Ω
I36-4 (AM1) - Body ground Always 10 kΩ or higher


Result:
Proceed to
OK
NG


OK

REPLACE INSTRUMENT PANEL JUNCTION BLOCK ASSEMBLY

NG

REPAIR OR REPLACE HARNESS OR CONNECTOR