LIGHTING (EXT) HIGH INTENSITY DISCHARGE HEADLIGHT BULB INSTALLATION
CAUTION / NOTICE / HINT
- HINT:
- ·
Use the same procedure for the RH and LH sides.
·The procedure described below is for the LH side.
PROCEDURE

 81110L
1.INSTALL DISCHARGE HEADLIGHT BULB
Set the discharge headlight bulb to the headlight unit.
- NOTICE:
-
Do not touch the bulb glass.
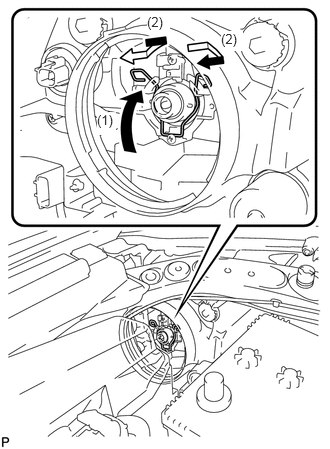
Lock the set spring to install the discharge headlight bulb as shown in the illustration.
81108
2.INSTALL HEADLIGHT LIGHT CONTROL ECU SUB-ASSEMBLY
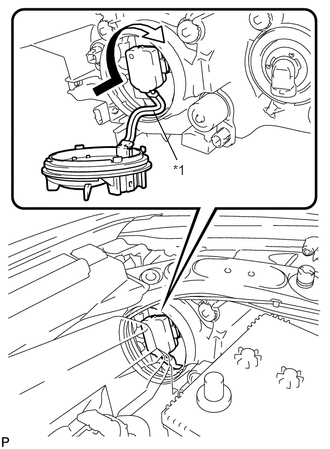
| *1 | Red Line |
Turn the socket of the headlight light control ECU sub-assembly in the direction indicated by the arrow shown in the illustration to connect it.
- NOTICE:
- ·
Check that the O-ring is installed on the headlight light control ECU sub-assembly.
·Check that the O-ring is not damaged or contaminated with foreign matter. If there is any damage, replace the O-ring with a new one.
·Do not pull the headlight light control ECU sub-assembly with the socket connected.
Check that the red line on the output harness is not twisted and store the harness in the headlight assembly securely so that the output harness is not pinched.
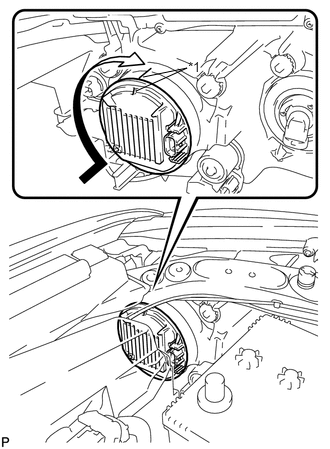
| *1 | Lock Mark |
Turn the headlight light control ECU sub-assembly in the direction indicated by the arrow shown in the illustration until the lock marks are aligned to install it.
- NOTICE:
- ·
To prevent incomplete installation, make sure to fully push in and turn the headlight light control ECU sub-assembly until the lock marks are aligned.
·Do not apply excessive force using a tool.
Connect the connector.
3.CONNECT CABLE TO NEGATIVE BATTERY TERMINAL
- NOTICE:
-
When disconnecting the cable, some systems need to be initialized after the cable is reconnected.
-
Click hereGeneral>INTRODUCTION>REPAIR INSTRUCTION>INITIALIZATION