2AR-FXE ENGINE MECHANICAL CYLINDER BLOCK DISASSEMBLY
PROCEDURE

 1.INSPECT CONNECTING ROD THRUST CLEARANCE
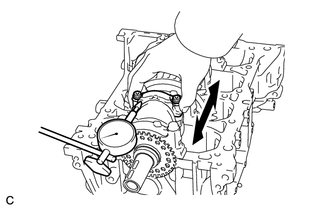
Using a dial indicator, measure the thrust clearance while moving the connecting rod back and forth.
- Standard thrust clearance:
0.160 to 0.512 mm (0.00630 to 0.0202 in.)
- Maximum thrust clearance:
0.512 mm (0.0202 in.)
If the thrust clearance is more than the maximum, replace the connecting rod. If necessary, replace the crankshaft.
2.INSPECT CONNECTING ROD OIL CLEARANCE
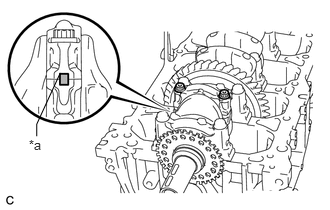
| *a | Alignment Mark |
Check the alignment marks on the connecting rod and cap to ensure correct reassembly.
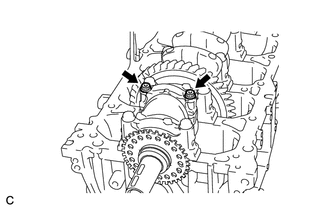
Remove the 2 bolts and connecting rod cap.
- HINT:
-
Keep the lower bearing and connecting rod cap together.
Clean the crank pin and bearing.
Check the crank pin and bearing for pitting and scratches.
If the crank pin or bearing is damaged, replace the bearings. If necessary, replace the crankshaft.
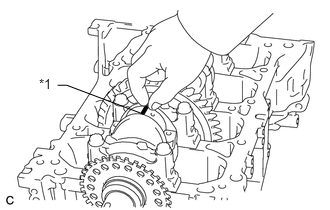
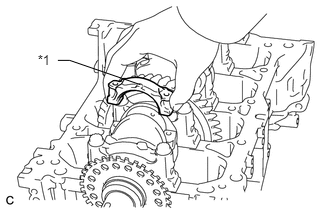
| *1 | Plastigage |
Lay a strip of Plastigage on the crank pin.
| *1 | Front Mark |
Check that the front mark of the connecting rod cap is facing in the correct direction.
Apply a light coat of engine oil to the threads and under the heads of the connecting rod bolts.
Install and alternately tighten the bolts of the connecting rod cap in several steps.
- Torque:
- 40 N*m (408 kgf*cm, 30 ft.*lbf)
- NOTICE:
-
Do not turn the crankshaft during the measurement.
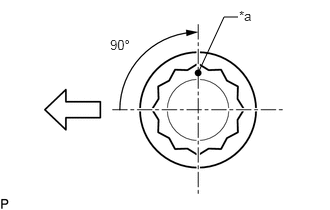
| *a | Paint Mark |

|
Engine Front |
Mark the front of each connecting rod bolt with paint.
Tighten the bolts 90° as shown in the illustration.
- NOTICE:
-
Do not turn the crankshaft during the measurement.
Remove the 2 bolts and connecting rod cap.
- HINT:
-
Keep the lower bearing and connecting rod cap together.
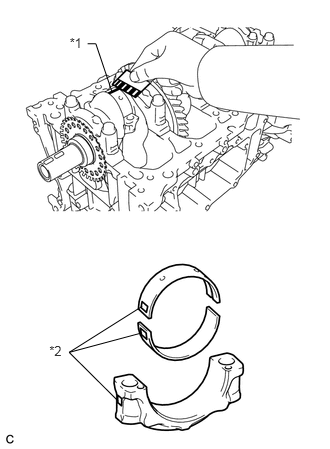
| *1 | Plastigage |
| *2 | Number Mark |
Measure the Plastigage at its widest point.
- Standard oil clearance:
0.030 to 0.063 mm (0.00118 to 0.00248 in.)
- Maximum oil clearance:
0.07 mm (0.00276 in.)
- NOTICE:
-
Remove the Plastigage completely after the measurement.
If the oil clearance is more than the maximum, replace the connecting rod bearing. If necessary, grind or replace the crankshaft.
- HINT:
-
If replacing a bearing, select a new one with the same number as marked on the connecting rod. There are 3 sizes of standard bearings, marked "1", "2" and "3" accordingly.
- Standard crank pin diameter:
51.492 to 51.500 mm (2.0272 to 2.0276 in.)
- Standard Connecting Rod Big End Inside Diameter:
Item Specified Condition Mark 1 54.500 to 54.508 mm (2.1457 to 2.1460 in.) Mark 2 54.509 to 54.516 mm (2.1460 to 2.1463 in.) Mark 3 54.517 to 54.524 mm (2.1463 to 2.1466 in.)
- Standard Size Connecting Rod Bearing Center Wall Thickness:
Item Specified Condition Mark 1 1.486 to 1.490 mm (0.0585 to 0.0587 in.) Mark 2 1.491 to 1.494 mm (0.0587 to 0.0588 in.) Mark 3 1.495 to 1.498 mm (0.0589 to 0.0590 in.)
Perform the inspection above for each cylinder.
3.REMOVE PISTON WITH CONNECTING ROD
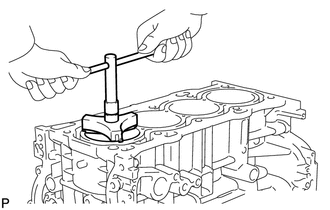
Using a ridge reamer, remove all the carbon from the top of the cylinder.
Remove the 8 bolts, 4 connecting rod caps and 4 lower bearings.
Push the piston, connecting rod assembly and upper bearing through the top of the cylinder block.
- HINT:
- ·
Keep the bearings, connecting rod and cap together.
·Arrange the piston and connecting rod assemblies in the correct order.
·Be sure to arrange the removed piston and connecting rod assemblies in such a way that they can be reinstalled exactly as before.
13041
4.REMOVE CONNECTING ROD BEARING
Remove the connecting rod bearings from the connecting rods and connecting rod caps.
- HINT:
-
Arrange the removed parts in the correct order.
5.INSPECT CRANKSHAFT THRUST CLEARANCE
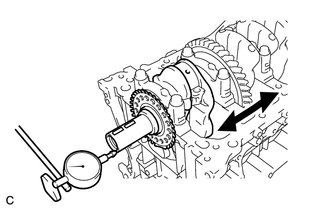
Using a dial indicator, measure the thrust clearance while prying the crankshaft back and forth with a screwdriver.
- Standard thrust clearance:
0.04 to 0.24 mm (0.00157 to 0.00945 in.)
- Maximum thrust clearance:
0.30 mm (0.0118 in.)
If the thrust clearance is more than the maximum, replace the thrust washers as a set. If necessary, replace the crankshaft.
- Standard thrust washer thickness:
1.93 to 1.98 mm (0.0760 to 0.0780 in.)
13411
6.REMOVE CRANKSHAFT
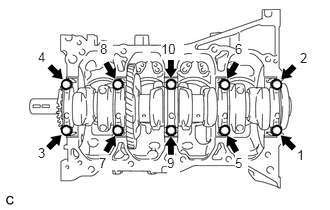
Using several steps, uniformly loosen and remove the 10 bearing cap bolts in the sequence shown in the illustration.
Remove the 5 bearing caps from the cylinder block.
- HINT:
- ·
Keep the No. 2 crankshaft bearings and crankshaft bearing caps together.
·Arrange the bearing caps in the correct order.
Remove the crankshaft from the cylinder block.
- HINT:
-
Keep the crankshaft bearings and crankshaft thrust washers together with the cylinder block.
Check each crankshaft journal and bearing for pitting and scratches.
If the journal or bearing is damaged, replace the bearings. If necessary, replace the crankshaft.
11791
7.REMOVE CRANKSHAFT THRUST WASHER
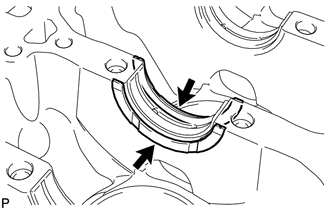
Remove the thrust washers from the cylinder block.
11711
8.REMOVE CRANKSHAFT BEARING
Remove the crankshaft bearings from the cylinder block and bearing caps.
- HINT:
-
Arrange the bearings in the correct order.
13471A
9.REMOVE CRANKSHAFT PULLEY KEY
Using a screwdriver, remove the 2 pulley keys from the crankshaft.
13011
10.REMOVE PISTON RING SET
- HINT:
-
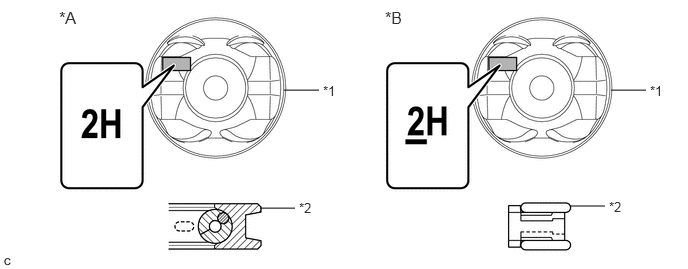
Type A and type B can be distinguished by the mark on the piston and the shape of the oil ring.
 2.958,0.938 3.323,0.938 false 2.708,2.167 3.073,2.167 false 6.365,0.938 6.729,0.938 false 5.938,2.146 6.302,2.146 false 0.615,0.083 1.021,0.354 0.406,0.271 12 false *A 4.01,0.083 4.396,0.344 0.385,0.26 12 false *B 3.365,0.865 3.677,1.021 0.313,0.156 10 false *1 3.115,2.083 3.427,2.24 0.313,0.156 10 false *2 6.771,0.865 7.083,1.021 0.313,0.156 10 false *1 6.344,2.073 6.656,2.229 0.313,0.156 10 false *2
*A Type A *B Type B *1 Piston *2 Oil Ring
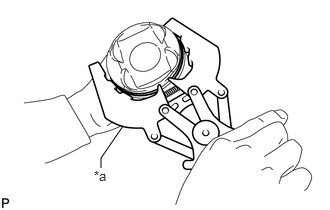
| *a | Piston Ring Expander |
Using a piston ring expander, remove the No. 1 compression ring and No. 2 compression ring.
Type A:
Remove the oil ring and oil ring expander by hand.
- HINT:
-
Arrange the removed parts in the correct order.
Type B:
Remove the oil ring expander, upper oil ring side rail and lower oil ring side rail by hand.
- HINT:
-
Arrange the removed parts in the correct order.
13101A
11.REMOVE PISTON PIN HOLE SNAP RING
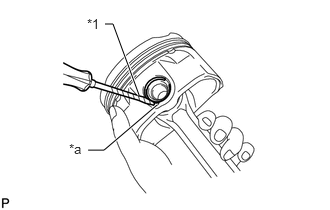
| *1 | Protective Tape |
| *a | Front Mark |
Using a screwdriver, pry out the snap ring (front side).
- NOTICE:
-
Do not remove the snap ring (rear side) unless necessary.
- HINT:
-
Tape the screwdriver tip before use.
13211
12.REMOVE PISTON
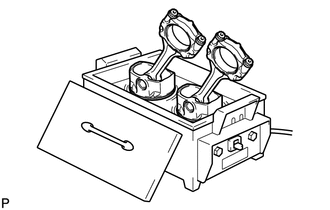
Gradually heat each piston up to 80 to 90°C (176 to 194°F).
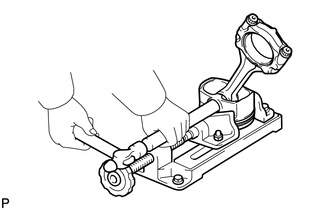
Using a plastic-faced hammer and brass bar, lightly tap out the piston pin. Then remove the connecting rod.
- HINT:
- ·
The piston and pin are a matched set.
·Be sure to arrange the removed pistons, pins, rings, connecting rods and bearings in such a way that the parts can be reinstalled exactly as before.
·Arrange the pistons, pins, rings, connecting rods and bearings in the correct order.
15708
13.REMOVE NO. 1 OIL NOZZLE SUB-ASSEMBLY
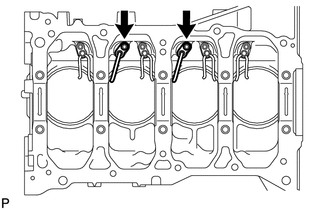
Using a 5 mm hexagon wrench, remove the 2 bolts and 2 No.1 oil nozzles sub-assembly.
15709
14.REMOVE NO. 2 OIL NOZZLE SUB-ASSEMBLY
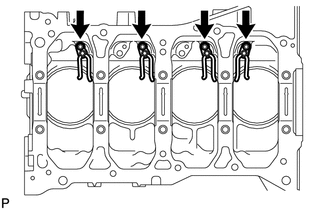
Using a 5 mm hexagon wrench, remove the 4 bolts and 4 No. 2 oil nozzles sub-assembly.
15.REMOVE STUD BOLT
- NOTICE:
-
If a stud bolt is deformed or its threads are damaged, replace it.
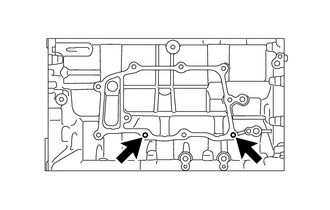
Using an E8 "TORX" socket wrench, remove the 2 stud bolts.