2AR-FXE ENGINE MECHANICAL CYLINDER BLOCK REASSEMBLY
CAUTION / NOTICE / HINT
- HINT:
-
Perform "Inspection After Repair" after replacing the piston or piston ring.
-
Click hereEngine / Hybrid System>2AR-FXE ENGINE CONTROL>SFI SYSTEM>INITIALIZATION
PROCEDURE

 1.INSTALL STUD BOLT
- NOTICE:
-
If a stud bolt is deformed or the threads are damaged, replace it.
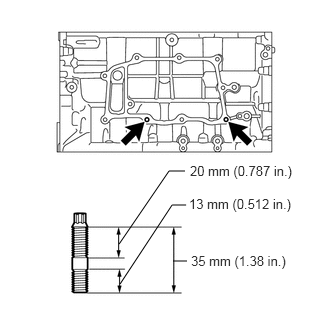
Using an E8 "TORX" socket wrench, install the 2 stud bolts.
- Torque:
- 6.5 N*m (66 kgf*cm, 58 in.*lbf)
15709
2.INSTALL NO. 2 OIL NOZZLE SUB-ASSEMBLY
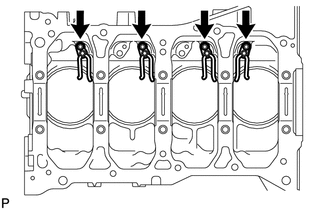
Using a 5 mm hexagon wrench, install the 4 No. 2 oil nozzles sub-assembly with the 4 bolts.
- Torque:
- 10 N*m (102 kgf*cm, 7 ft.*lbf)
15708
3.INSTALL NO. 1 OIL NOZZLE SUB-ASSEMBLY
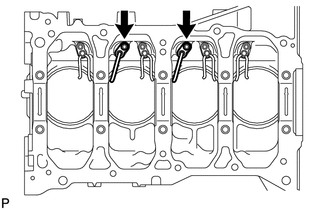
Using a 5 mm hexagon wrench, install the 2 No. 1 oil nozzles sub-assembly with the 2 bolts.
- Torque:
- 10 N*m (102 kgf*cm, 7 ft.*lbf)
13211
4.INSTALL PISTON
Using a small screwdriver, install a new snap ring (rear side) at one end of the piston pin hole.
Gradually heat the piston up to 80 to 90°C (176 to 194°F).
Coat the piston, piston pin and connecting rod with engine oil.
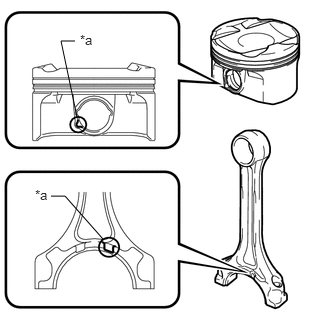
| *a | Front Mark |
Align the front marks of the piston and connecting rod, insert the connecting rod into the piston, and then push in the piston pin with your thumb until the pin comes into contact with the snap ring.
- HINT:
-
The piston and pin are a matched set.
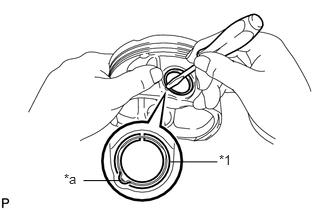
| *1 | Snap Ring |
| *a | Front Mark Cutout Portion |
Using a small screwdriver, install a new snap ring (front side) on the other side of the piston pin hole.
- HINT:
-
Be sure that the end gap of the snap ring is not aligned with the front mark cutout portion of the piston.
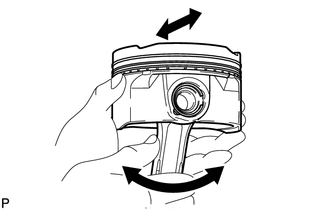
Check the fitting condition between the piston and piston pin.
Move the connecting rod back and forth on the piston pin. Check the fitting condition.
If abnormal movement is felt, replace the piston and pin as a set.
Rotate the piston back and forth on the piston pin. Check the fitting condition.
If abnormal movement is felt, replace the piston and pin as a set.
- HINT:
-
Perform "Inspection After Repair" after replacing the piston.
-
Click hereEngine / Hybrid System>2AR-FXE ENGINE CONTROL>SFI SYSTEM>INITIALIZATION
13011
5.INSTALL PISTON RING SET
- NOTICE:
-
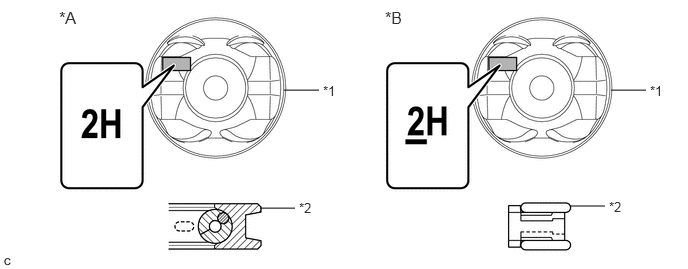
During installation, use a type A piston ring set for the type A piston, and a type B piston ring set for the type B piston.
 2.958,0.938 3.323,0.938 false 2.708,2.167 3.073,2.167 false 6.365,0.938 6.729,0.938 false 5.938,2.146 6.302,2.146 false 0.615,0.083 1.021,0.354 0.406,0.271 12 false *A 4.01,0.083 4.396,0.344 0.385,0.26 12 false *B 3.365,0.865 3.677,1.021 0.313,0.156 10 false *1 3.115,2.083 3.427,2.24 0.313,0.156 10 false *2 6.771,0.865 7.083,1.021 0.313,0.156 10 false *1 6.344,2.073 6.656,2.229 0.313,0.156 10 false *2
*A Type A *B Type B *1 Piston *2 Oil Ring
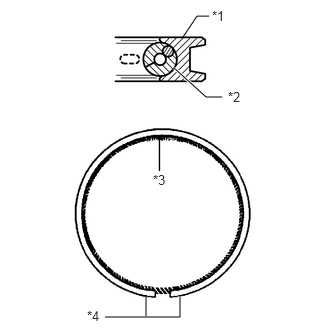
| *1 | Oil Ring |
| *2 | Oil Ring Expander |
| *3 | Coil Joint |
| *4 | Oil Ring End |
Type A:
Install the oil ring expander and oil ring by hand.
- HINT:
-
Arrange the oil ring ends and coil joint as shown in the illustration.
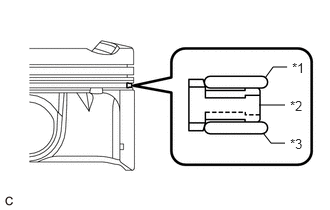
| *1 | Upper Oil Ring Side Rail |
| *2 | Oil Ring Expander |
| *3 | Lower Oil Ring Side Rail |
Type B:
Install the oil ring expander, upper oil ring side rail and lower oil ring side rail by hand.
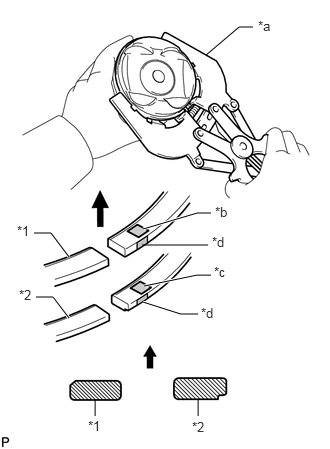
| *1 | No. 1 Compression Ring |
| *2 | No. 2 Compression Ring |
| *a | Piston Ring Expander |
| *b | Code Mark (1N or 1NA) |
| *c | Code Mark (2N) |
| *d | Paint Mark |

|
Upward |
Using a piston ring expander, install the No. 1 compression ring and No. 2 compression ring with the code mark positioned as shown in the illustration.
- Piston Ring Mark:
Item Code Mark No. 1 Compression Ring 1N or 1NA No. 2 Compression Ring 2N
- NOTICE:
-
Install the compression ring with the code mark facing upward.
- HINT:
-
Perform "Inspection After Repair" after replacing the piston, piston ring.
-
Click hereEngine / Hybrid System>2AR-FXE ENGINE CONTROL>SFI SYSTEM>INITIALIZATION
13471A
6.INSTALL CRANKSHAFT PULLEY KEY
Install the 2 crankshaft pulley keys to the crankshaft.
11711
7.INSTALL CRANKSHAFT BEARING
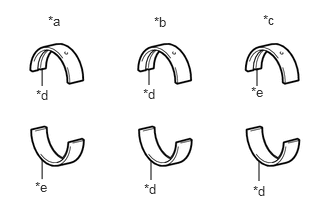
| *a | No. 1, No. 5 Journal Bearing |
| *b | No. 2, No. 4 Journal Bearing |
| *c | No. 3 Journal Bearing |
| *d | Silver |
| *e | Black |
Clean the main journal and both surfaces of the bearing.
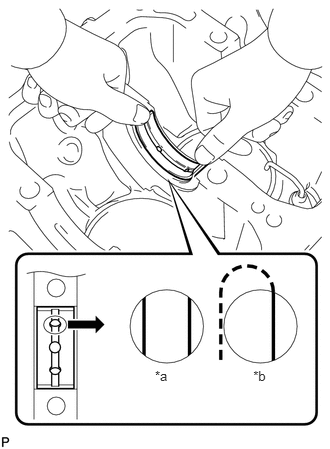
| *a | CORRECT |
| *b | INCORRECT |
Install the upper bearing to the cylinder block as shown in the illustration.
- NOTICE:
- ·
The color of the No. 3 journal bearing is different from that of the No. 1, No. 2, No. 4 and No. 5 journal bearings. Be sure to check the color before installation.
·Do not apply engine oil to the bearings or their contact surfaces.
·Both sides of the oil groove in the cylinder block should be visible through the oil feed holes in the bearing. The amount visible on each side of the holes should be equal.
·Do not allow coolant to come into contact with the bearing inner surface.
·If any coolant comes into contact with the bearing inner surface, replace the bearing with a new one.
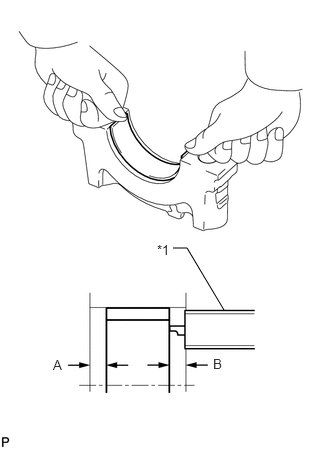
| *1 | Vernier Caliper |
Install the lower bearing onto the bearing cap.
Using a vernier caliper, measure the distance between the crankshaft bearing cap edge and the lower bearing edge.
- Standard dimension A - B or B - A:
0 to 0.7 mm (0 to 0.0276 in.)
- NOTICE:
- ·
The color of the No. 1 and No. 5 journal bearing is different from that of the No. 2, No. 3 and No. 4 journal bearings. Be sure to check the color before installation.
·Do not apply engine oil to the bearings and the contact surfaces.
·Do not allow coolant to come into contact with the bearing inner surface.
·If any coolant comes into contact with the bearing inner surface, replace the bearing with a new one.
11791
8.INSTALL CRANKSHAFT THRUST WASHER
Apply engine oil to the thrust washers.
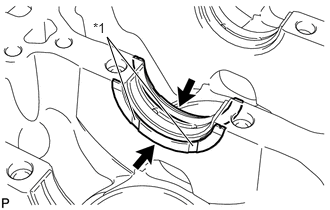
| *1 | Oil Groove |
Install the 2 thrust washers onto the No. 3 journal position of the cylinder block with the oil grooves facing outward.
13411
9.INSTALL CRANKSHAFT
Apply engine oil to the upper bearing, and install the crankshaft onto the cylinder block.
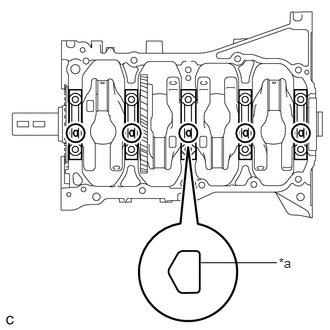
| *a | Front Mark |
Examine the front marks and numbers, and install the bearing caps onto the cylinder block with the front marks as shown in the illustration.
- HINT:
-
The crankshaft bearing cap bolts are tightened in 3 progressive steps.
Apply a light coat of engine oil to the threads and under the heads of the bearing cap bolts.
Step 1:
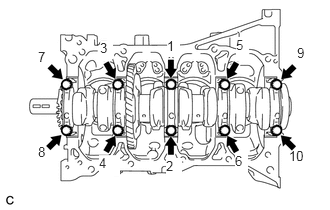
Using several steps, uniformly install and tighten the 10 bearing cap bolts in the sequence shown in the illustration.
- Torque:
- 20 N*m (204 kgf*cm, 15 ft.*lbf)
Step 2:
Tighten the 10 bearing cap bolts again in the sequence shown in the illustration.
- Torque:
- 40 N*m (408 kgf*cm, 30 ft.*lbf)
Step 3:
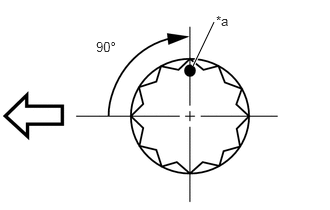
| *a | Paint Mark |

|
Engine Front |
Mark the front of the bearing cap bolts with paint.
Tighten the 10 bearing cap bolts 90° in the same sequence.
Check that the paint marks are now at a 90° angle to the front.
Check that the crankshaft turns smoothly.
13041
10.INSTALL CONNECTING ROD BEARING
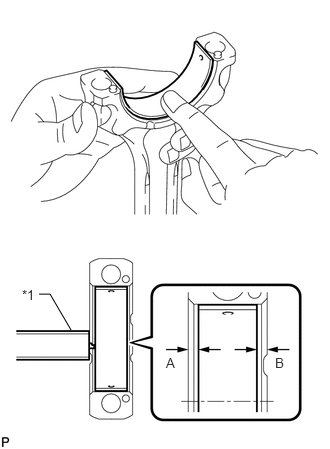
| *1 | Vernier Caliper |
Clean the bearing contact surface of the connecting rod and cap, and both surfaces of both bearings.
Install the connecting rod bearings to the connecting rods and connecting rod caps.
Using a vernier caliper, measure the distance between the edges of the connecting rod and connecting rod bearing, and the edges of the bearing cap and connecting rod bearing.
- Standard dimension A - B or B - A:
0 to 0.7 mm (0 to 0.0276 in.)
- NOTICE:
- ·
Do not apply engine oil to the bearings and the contact surfaces.
·Do not allow coolant to come into contact with the bearing inner surface.
·If any coolant comes into contact with the bearing inner surface, replace the bearing with a new one.
11.INSTALL PISTON WITH CONNECTING ROD
- HINT:
-
Type A and type B can be distinguished by the mark on the piston and the shape of the oil ring.
-
2.958,0.938 3.323,0.938 false 2.708,2.167 3.073,2.167 false 6.365,0.938 6.729,0.938 false 5.938,2.146 6.302,2.146 false 0.615,0.083 1.021,0.354 0.406,0.271 12 false *A 4.01,0.083 4.396,0.344 0.385,0.26 12 false *B 3.365,0.865 3.677,1.021 0.313,0.156 10 false *1 3.115,2.083 3.427,2.24 0.313,0.156 10 false *2 6.771,0.865 7.083,1.021 0.313,0.156 10 false *1 6.344,2.073 6.656,2.229 0.313,0.156 10 false *2
*A Type A *B Type B *1 Piston *2 Oil Ring
Apply engine oil to the cylinder walls, pistons, and surfaces of the connecting rod bearings.
Position the piston rings so that the ring ends are as shown in the illustration.
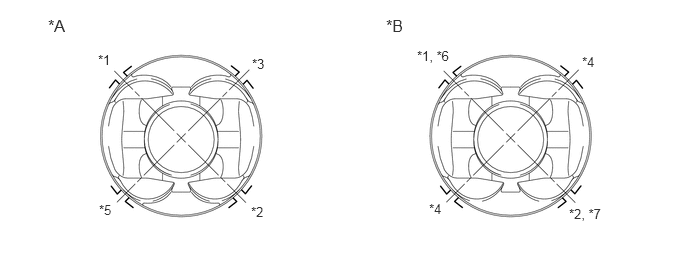
| *A | for Type A | *B | for Type B |
| *1 | No. 1 Compression Ring | *2 | No. 2 Compression Ring |
| *3 | Oil Ring | *4 | Oil Ring Expander |
| *5 | Oil Ring Expander (Coil Joint) | *6 | Upper Oil Ring Side Rail |
| *7 | Lower Oil Ring Side Rail | - | - |
- HINT:
-
The type B oil ring expander can be installed with the ring ends in either of the directions shown in the illustration.
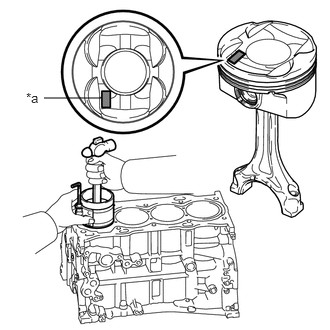
| *a | Front Mark |
Using a hammer handle and piston ring compressor, press a piston with connecting rod into each cylinder with the front mark of the piston facing forward.
- NOTICE:
-
When inserting the piston with connecting rod into the cylinder block, make sure the oil nozzle does not interfere with the connecting rod.
- HINT:
-
The front mark is "2H" printed in raised letters.
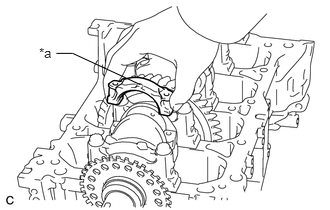
| *a | Front Mark |
Check that the front mark of the connecting rod cap is facing in the correct direction.
- NOTICE:
-
Match the numbered connecting rod cap with the connecting rod.
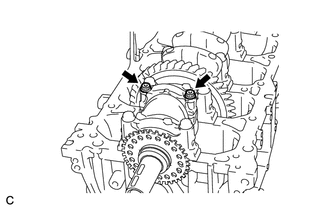
Apply a light coat of engine oil to the threads and under the heads of the connecting rod bolts.
Temporarily install the connecting rod bolts.
- HINT:
-
The connecting rod bolts are tightened in 2 progressive steps.
Step 1:
Alternately tighten the connecting rod bolts in several steps.
- Torque:
- 40 N*m (408 kgf*cm, 30 ft.*lbf)
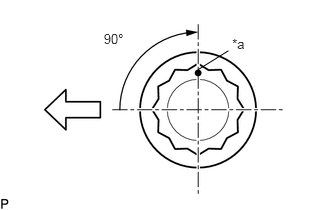
| *a | Paint Mark |
|
|
Engine Front |
Step 2:
Mark the front of the connecting rod bolts with paint.
Tighten the bolts 90° as shown in the illustration.
Check that the paint marks are now at a 90° angle to the front.
Check that the crankshaft turns smoothly.