Home › Audio / Visual / Telematics › NAVIGATION / MULTI INFO DISPLAY › NAVIGATION SYSTEM(for SD) › from 2014.05
RM2040EQ _56 Audio / Visual / Telematics _014717 NAVIGATION / MULTI INFO DISPLAY _0169499 NAVIGATION SYSTEM(for SD) J

NAVIGATION / MULTI INFO DISPLAY  NAVIGATION SYSTEM(for SD)  Vehicle Speed Signal Circuit between Stereo Component Amplifier and Combination Meter  


DESCRIPTION

The stereo component amplifier assembly receives a vehicle speed signal from the combination meter assembly to control the ASL function.

HINT:
·

A voltage of 12 V or 5 V is output from each ECU and then input to the combination meter assembly. The signal is changed to a pulse signal at the transistor in the combination meter assembly. Each ECU controls its respective systems based on this pulse signal.

·

If a short occurs in any of the ECUs or in the wire harness connected to an ECU, all systems in the following diagram will not operate normally.


WIRING DIAGRAM
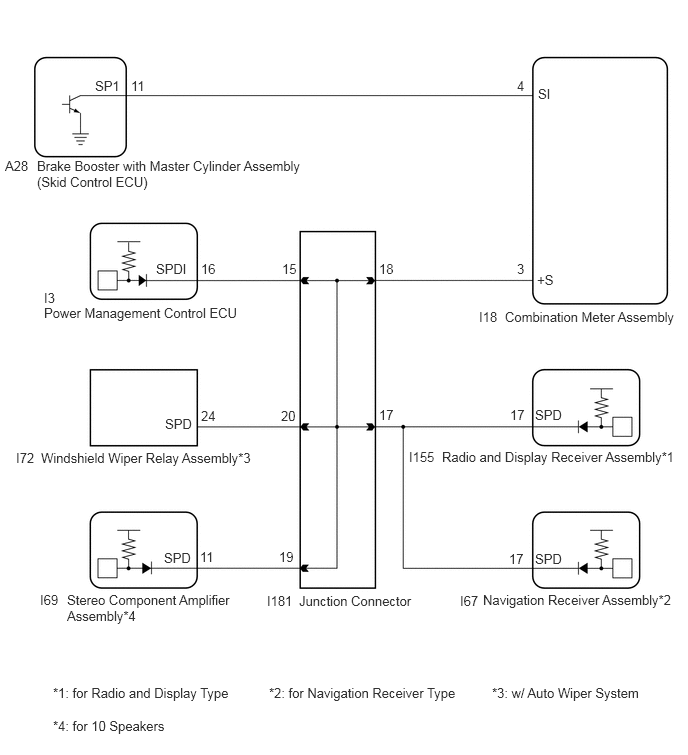
E237358E06
0.385,1.646 3.219,2.042 2.833,0.396 10 false Brake Booster with Master Cylinder Assembly (Skid Control ECU) 0.99,0.813 1.281,0.958 0.292,0.146 10 false SP1 0.052,1.646 0.375,1.823 0.323,0.177 10 false A28 0.698,6.167 2.427,6.573 1.729,0.406 10 false Stereo Component Amplifier Assembly*4 0.417,6.167 0.74,6.344 0.323,0.177 10 false I69 1.365,0.813 1.552,0.958 0.188,0.146 10 false 11 0.458,3.177 2.594,3.458 2.135,0.281 10 false Power Management Control ECU 0.458,3.021 0.75,3.188 0.292,0.167 10 false I3 1.625,2.719 2.021,2.875 0.396,0.156 10 false SPDI 2.094,2.719 2.427,2.948 0.333,0.229 10 false 16 2.938,2.719 3.115,2.875 0.177,0.156 10 false 15 3.948,2.719 4.125,2.875 0.177,0.156 10 false 18 3.948,4.24 4.125,4.396 0.177,0.156 10 false 17 2.927,4.25 3.104,4.406 0.177,0.156 10 false 20 5.385,0.813 5.688,0.958 0.302,0.146 10 false 4 5.385,2.719 5.656,2.865 0.271,0.146 10 false 3 5.604,0.896 5.802,1.042 0.198,0.146 10 false SI 5.594,2.833 5.792,2.979 0.198,0.146 10 false +S 4.99,3.219 5.281,3.479 0.292,0.26 10 false I18 5.26,3.219 7.125,3.479 1.865,0.26 10 false Combination Meter Assembly 5.573,4.24 5.896,4.385 0.323,0.146 10 false SPD 5.313,4.24 5.625,4.406 0.313,0.167 10 false 17 5.573,5.74 5.896,5.885 0.323,0.146 10 false SPD 5.302,5.74 5.49,5.906 0.188,0.167 10 false 17 4.792,6.177 5.26,6.344 0.469,0.167 10 false I67 5.031,6.167 7.115,6.354 2.083,0.188 10 false Navigation Receiver Assembly*2 2.906,5.719 3.083,5.875 0.177,0.156 10 false 19 1.708,5.729 2.031,5.875 0.323,0.146 10 false SPD 2.083,5.719 2.26,5.885 0.177,0.167 10 false 11 4.26,4.677 4.563,4.833 0.302,0.156 10 false I155 4.604,4.677 7.115,4.865 2.51,0.188 10 false Radio and Display Receiver Assembly*1 3.115,6.177 4.365,6.396 1.25,0.219 10 false Junction Connector 2.781,6.177 3.177,6.344 0.396,0.167 10 false I181 2.094,4.25 2.406,4.417 0.313,0.167 10 false 24 0.427,4.688 2.76,4.927 2.333,0.24 10 false Windshield Wiper Relay Assembly*3 0.552,7.135 2.656,7.5 2.104,0.365 10 false *1: for Radio and Display Type 2.802,7.135 4.844,7.438 2.042,0.302 10 false *2: for Navigation Receiver Type 1.719,4.333 2.042,4.479 0.323,0.146 10 false SPD 0.167,4.688 0.448,4.844 0.281,0.156 10 false I72 5.125,7.135 6.792,7.438 1.667,0.302 10 false *3: w/ Auto Wiper System 0.552,7.479 3.458,7.677 2.906,0.198 10 false *4: for 10 Speakers

PROCEDURE

1.INSPECT COMBINATION METER ASSEMBLY (OUTPUT WAVEFORM)
a.

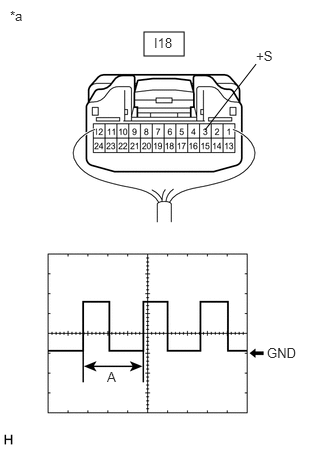
Check the output waveform.

i.

Remove the combination meter assembly with the connector(s) still connected.

ii.
E286967C23
1.5,0.333 1.917,0.583 0.417,0.25 2.135,1.354 2.667,0.667 false 0.104,0.083 0.417,0.281 0.313,0.198 10 false *a 1.604,0.365 2.063,0.563 0.458,0.198 10 false I18 2.667,0.5 3.125,0.698 0.458,0.198 10 false +S 1.115,3.844 1.427,4.042 0.313,0.198 10 false A 2.781,3.594 3.24,3.792 0.458,0.198 10 false GND
*a Component with harness connected
(Combination Meter Assembly)


Connect an oscilloscope to terminal I18-3 (+S) and body ground.


iii.

Turn the power switch on (IG).


iv.

Turn a wheel slowly.


v.

Check the signal waveform according to the condition(s) in the table below.

Item Condition
Measurement terminal I18-3 (+S) - Body ground
Tool setting 5 V/DIV., 20 ms./DIV.
Vehicle condition Wheel being rotated

OK:

The waveform is similar to that shown in the illustration.


HINT:

When the system is functioning normally, one wheel revolution generates 4 pulses. As the vehicle speed increases, the width indicated by (A) in the illustration narrows.


Result:
Proceed to
OK
NG


OK

2.INSPECT STEREO COMPONENT AMPLIFIER ASSEMBLY (INPUT WAVEFORM)

NG

2.INSPECT STEREO COMPONENT AMPLIFIER ASSEMBLY (INPUT WAVEFORM)
a.

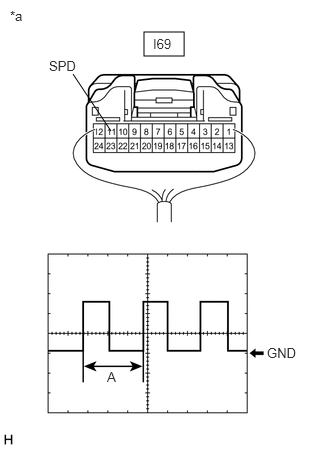
Check the input waveform.

i.

Remove the stereo component amplifier assembly with the connector(s) still connected.

ii.
E286967C25
1.5,0.333 1.917,0.583 0.417,0.25 1.156,1.365 0.76,0.771 false 0.104,0.083 0.417,0.281 0.313,0.198 10 false *a 1.594,0.375 2.052,0.573 0.458,0.198 10 false I69 0.51,0.604 0.969,0.802 0.458,0.198 10 false SPD 1.115,3.844 1.427,4.042 0.313,0.198 10 false A 2.781,3.594 3.24,3.792 0.458,0.198 10 false GND
*a Component with harness connected
(Stereo Component Amplifier Assembly)


Connect an oscilloscope to terminal I69-11 (SPD) and body ground.


iii.

Turn the power switch on (IG).


iv.

Turn a wheel slowly.


v.

Check the signal waveform according to the condition(s) in the table below.

Item Condition
Measurement terminal I69-11 (SPD) - Body ground
Tool setting 5 V/DIV., 20 ms./DIV.
Vehicle condition Wheel being rotated

OK:

The waveform is similar to that shown in the illustration.


HINT:

When the system is functioning normally, one wheel revolution generates 4 pulses. As the vehicle speed increases, the width indicated by (A) in the illustration narrows.


Result:
Proceed to
OK
NG


OK

PROCEED TO NEXT SUSPECTED AREA SHOWN IN PROBLEM SYMPTOMS TABLE

NG

3.CHECK HARNESS AND CONNECTOR (STEREO COMPONENT AMPLIFIER ASSEMBLY - JUNCTION CONNECTOR)
a.

Disconnect the I69 stereo component amplifier assembly connector.


b.

Disconnect the I181 junction connector.


c.

Measure the resistance according to the value(s) in the table below.

Standard Resistance:
Tester Connection Condition Specified Condition
I69-11 (SPD) - I181-19 Always Below 1 Ω


Result:
Proceed to
OK
NG


OK

4.CHECK HARNESS AND CONNECTOR (COMBINATION METER ASSEMBLY - JUNCTION CONNECTOR)

NG

REPAIR OR REPLACE HARNESS OR CONNECTOR

4.CHECK HARNESS AND CONNECTOR (COMBINATION METER ASSEMBLY - JUNCTION CONNECTOR)
a.

Disconnect the I18 combination meter assembly connector.


b.

Disconnect the I181 junction connector.


c.

Measure the resistance according to the value(s) in the table below.

Standard Resistance:
Tester Connection Condition Specified Condition
I18-3 (+S) - I181-18 Always Below 1 Ω


Result:
Proceed to
OK
NG


OK

REPLACE JUNCTION CONNECTOR

NG

REPAIR OR REPLACE HARNESS OR CONNECTOR