HYBRID / BATTERY CONTROL HYBRID CONTROL SYSTEM Pattern Select Switch EV Mode Circuit
DESCRIPTION
The EV mode signal is sent to the power management control ECU. This signal is then transmitted from the power management control ECU via CAN to the combination meter assembly to illuminate the EV mode indicator light.
WIRING DIAGRAM
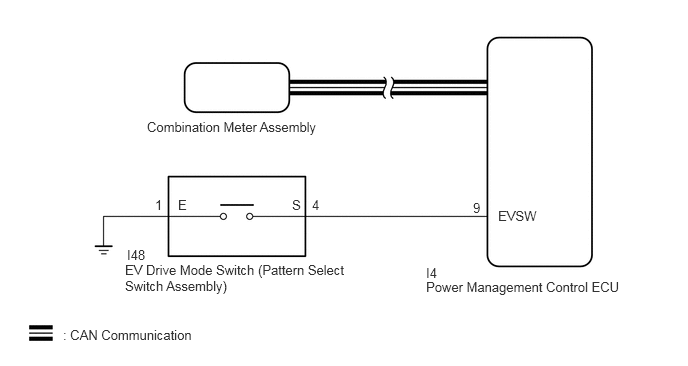
INSPECTION PROCEDURE
If any of the following conditions are not met, EV mode may not be turned on or the mode may be cancelled. (A buzzer sounds to indicate that the transition to EV mode is cancelled.)
| EV Mode Entry Condition | Tester Display | Specified Condition |
|---|---|---|
| HV battery charge level | State of Charge (All Bat) | Approximately 50% or higher |
| Accelerator pedal position | Accelerator Degree | Below approximately 30% |
| Engine coolant temperature | Engine Coolant Temp | 20°C (68°F) or higher |
| HV battery temperature | Temp of Batt TB1 to TB3 | Between 10 to 40°C (50 to 104°F) |
| Vehicle speed
(Varies depending on engine warm-up condition) |
Vehicle Spd | Cold: 30 km/h (19 mph) or less
Warmed-up: 40 km/h (25 mph) |
| Win | Charge Control Value | Below -5000 kW |
| Wout | Discharge Control Value | 11500 kW or higher |
| Defroster | - | OFF |
| Cruise control | - | OFF |
PROCEDURE
Check if a buzzer sounded and a message was displayed on the multi-information display when attempting to enter EV mode.
- Result:
Result Proceed to No buzzer sounded and no message was displayed on multi-information display. A A buzzer sounded and a message was displayed on multi-information display. B
- HINT:
-
If a buzzer sounds and a message is displayed on multi-information display, one or more of the EV mode entry conditions have not been met. Check that all of the EV mode entry conditions have been met before pressing the EV drive mode switch (pattern select switch assembly).
A
B
Connect the intelligent tester to the DLC3.
Turn the power switch on (IG).
Enter the following menus: System Select / CAN Bus Check.
- CAN Bus Check
- 50007
- Result:
Result Proceed to All of the ECUs and sensors that are currently connected to the CAN communication system are displayed. A None of the ECUs and sensors that are currently connected to the CAN communication system are displayed, or some of them are not displayed. B
Turn the power switch off.
A
B
Click herePower Source / Network>NETWORKING>CAN COMMUNICATION SYSTEM>HOW TO PROCEED WITH TROUBLESHOOTING
Connect the intelligent tester to the DLC3.
Turn the power switch on (IG).
Enter the following menus: System Select / Utility / All Codes.
Check DTCs.
- Result:
Result Proceed to No DTCs are output. A DTCs are output. B
Turn the power switch off.
A
B
Connect the intelligent tester to the DLC3.
Turn the power switch on (IG).
Enter the following menus: Powertrain / Hybrid Control / Data List / EV request, EV Switch.
Read the value displayed on the intelligent tester.
- Powertrain > Hybrid Control > Data List
-
Tester Display Measurement Item Range Normal Condition Diagnostic Note EV Request EV mode transition availability ON or OFF In EV mode: ON - EV Switch EV drive mode switch (pattern select switch assembly) condition ON or OFF EV drive mode switch (pattern select switch assembly) being pushed and held: ON -
- Powertrain > Hybrid Control > Data List
-
Tester Display EV Request EV Switch - 50003 236 544,88
- Result:
Result Proceed to The intelligent tester display changes according to the EV drive mode switch (pattern select switch assembly) operation. A The intelligent tester display does not change according to the EV drive mode switch (pattern select switch assembly) operation. B
Turn the power switch off.
A
B
Remove the EV drive mode switch (pattern select switch assembly)
Click hereEngine / Hybrid System>HYBRID / BATTERY CONTROL>COMBINATION SWITCH>COMPONENTS
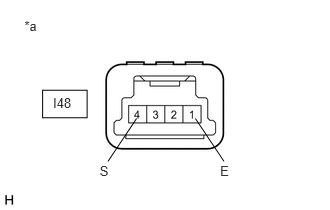
| *a | Component without harness connected
(EV Drive Mode Switch (Pattern Select Switch Assembly)) |
Measure the resistance according to the value(s) in the table below.
- Standard Resistance:
Tester Connection Switch Condition Specified Condition I48-4 (S) - I48-1 (E) EV drive mode switch (pattern select switch assembly) being pushed and held Below 1 Ω EV drive mode switch (pattern select switch assembly) not pushed 10 kΩ or higher
Install the EV drive mode switch (pattern select switch assembly).
- Result:
Proceed to OK NG
OK
NG
Disconnect connector I48 from the EV drive mode switch (pattern select switch assembly).
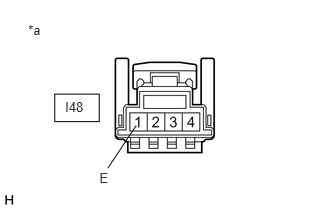
| *a | Front view of wire harness connector
(to EV Drive Mode Switch (Pattern Select Switch Assembly)) |
Measure the resistance according to the value(s) in the table below.
- Standard Resistance:
Tester Connection Condition Specified Condition I48-1 (E) - Body ground Always Below 1 Ω
Connect the EV drive mode switch (pattern select switch assembly) connector.
- Result:
Proceed to OK NG
OK
NG
Disconnect connector I4 from the power management control ECU.
Disconnect connector I48 from the EV drive mode switch (pattern select switch assembly).
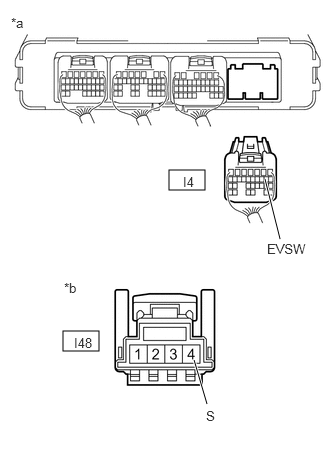
| *a | Rear view of wire harness connector
(to Power Management Control ECU) |
| *b | Front view of wire harness connector
(to EV Drive Mode Switch (Pattern Select Switch Assembly)) |
Measure the resistance according to the value(s) in the table below.
- Standard Resistance:
Tester Connection Condition Specified Condition I4-9 (EVSW) - I48-4 (S) Always Below 1 Ω I4-9 (EVSW) or I48-4 (S) - Body ground Always 10 kΩ or higher
Connect the EV drive mode switch (pattern select switch assembly) connector.
Connect the power management control ECU connector.
- Result:
Proceed to OK NG
OK
NG