Home › Engine / Hybrid System › HYBRID / BATTERY CONTROL › HYBRID CONTROL SYSTEM

DTC    P0AA6-526    Hybrid Battery Voltage System Isolation Fault

DTC    P0AA6-611    Hybrid Battery Voltage System Isolation Fault

DTC    P0AA6-612    Hybrid Battery Voltage System Isolation Fault

DTC    P0AA6-613    Hybrid Battery Voltage System Isolation Fault

DTC    P0AA6-614    Hybrid Battery Voltage System Isolation Fault

for Preparation Click here


DESCRIPTION

The power management control ECU monitors the battery smart unit and detects insulation malfunctions in the high-voltage system.

DTC No.
INF Code
DTC Detection Condition
Trouble Area
P0AA6
526(*1)
Insulation resistance between the high-voltage circuit and the body has decreased.*2
  1. Hybrid vehicle transaxle assembly
  2. Inverter with converter assembly
  3. No. 4 floor wire
  4. No. 4 engine wire
  5. Hybrid battery junction block assembly
  6. Air conditioning system
  7. HV battery
  8. Battery smart unit
611
Insulation resistance of the high voltage circuit in the air conditioning system has decreased.*3
Air conditioning system
612
Insulation resistance of the HV battery area has decreased.*3
  1. Hybrid battery junction block assembly
  2. Battery smart unit
  3. HV battery
613
Insulation resistance of the transaxle area has decreased.*3
  1. Hybrid vehicle transaxle assembly
  2. Inverter with converter assembly
614
Insulation resistance of the high-voltage DC area has decreased.*3
  1. Inverter with converter assembly
  2. No. 4 floor wire
  3. Air conditioning system
  4. No. 4 engine wire
  5. Hybrid battery junction block assembly

HINT:
  1. *1: INF code 526 is stored together with P0AA6.
  2. *2: The insulation malfunction detection circuit in the battery smart unit monitors the insulation resistance between the high voltage circuits and body. If the insulation resistance decreases, the power management control ECU stores DTC P0AA6-526 and illuminates the MIL first.
  3. *3: If the following operations are performed within the same trip after DTC P0AA6-526 is stored, just one of the related DTCs (P0AA6-611, 612, 613 or 614) will be stored.
    1. Apply the parking brake firmly.
    2. Wait for 1 minute or more with the vehicle stopped, the brake pedal firmly depressed, the power switch on (READY), the shift lever in D and the air conditioning system on (Lo/COOL MAX, blower speed HI), then turn the power switch off and wait for 1 minute or more.
  4. If DTC P0AA6 is stored, the vehicle cannot start.
  5. When measuring insulation resistance using a megohmmeter, measure the resistance while jiggling the high voltage wire harness.


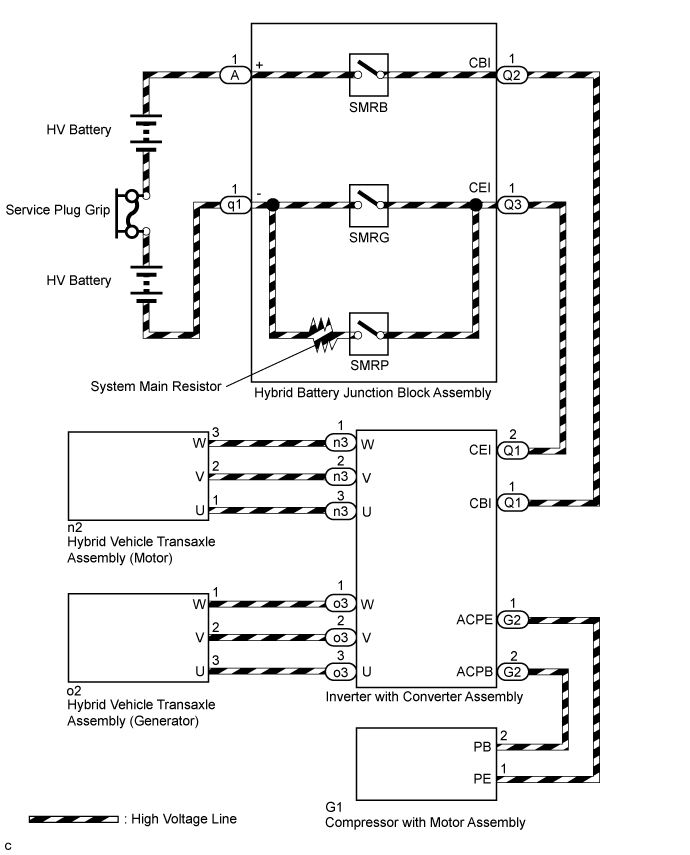
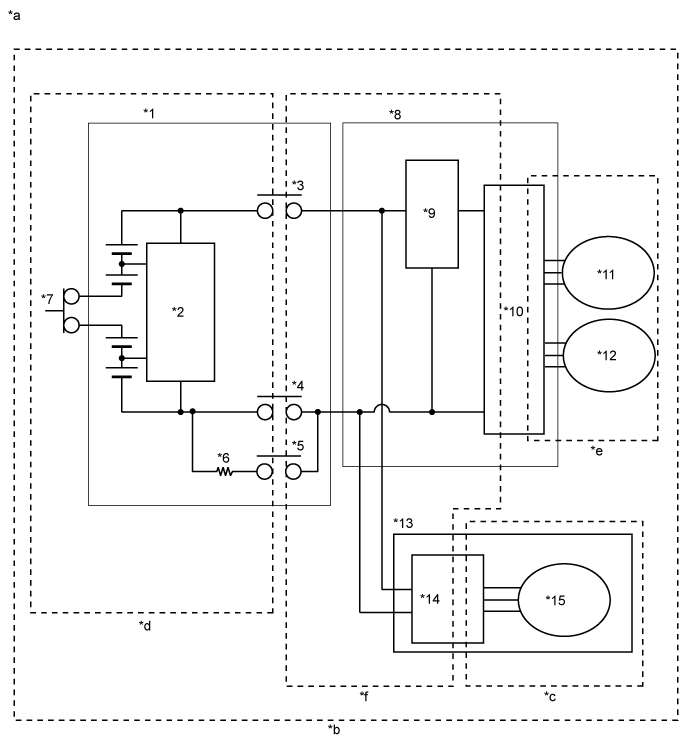
WIRING DIAGRAM


A260182E01


Text in Illustration 
*1
HV Battery
*2
Battery Smart Unit
*3
SMRB
*4
SMRG
*5
SMRP
*6
System Main Resistor
*7
Service Plug Grip
*8
Inverter with Converter Assembly
*9
Boost Converter
*10
Inverter
*11
MG1
*12
MG2
*13
Compressor with Motor Assembly
*14
A/C Inverter
*15
A/C Motor
-
-
*a
High-voltage Areas
*b
INF Code 526 Vehicle Insulation Resistance Reduction Area
*c
INF Code 611 Air Conditioning System Area
*d
INF Code 612 HV Battery Area
*e
INF Code 613 Transaxle Area
*f
INF Code 614 High Voltage Direct Current Area

A260420E10


SYSTEM DESCRIPTION

HINT:
If a decrease in insulation resistance cannot be confirmed using a megohmmeter, check the Short Wave Highest Val in the Data List.


Characteristics of Short Wave Highest Value
  1. The Data List item Short Wave Highest Val and insulation resistance have the relationship shown in the table below. Short Wave Highest Val decreases with a decrease in insulation resistance. However, in some cases, even though the insulation resistance of the vehicle is normal, Short Wave Highest Val may decrease. Therefore, check Short Wave Highest Val while considering the following.

    1. Do not check until approximately 1 minute has passed after the power switch is turned on (IG) (*1).
    2. Do not check when there is a difference between the system voltages (Power Resource VB, VL-Voltage before Boosting, and VH-Voltage after Boosting) (*2).

      Short Wave Highest Value
      Trouble Area
      Neither condition (*1) nor (*2) is met and Short Wave Highest Val is approximately 0 V
      Since the insulation resistance is close to 0 Ω, there is a strong possibility of interference with a metal object.
      Neither condition (*1) nor (*2) is met and Short Wave Highest Val is between 0 and 5 V
      Since the insulation resistance is several hundred kilo ohms, there is a strong possibility of the presence of fluid such as coolant.


How to Determine Part with Insulation Malfunction
  1. Jiggle the high-voltage wire harness to check if the resistance to body ground changes with the position of the wire harness or force applied.

  2. Repeat rotating and stopping of the MG1, MG2 and compressor with motor assembly. Check that the Short Wave Highest Val does not decrease (for example if the motor stops with foreign matter forming a leak path) when the motor stops, or that the Short Wave Highest Val does not return to normal (for example if foreign matter moves away from the leak path) when the motor rotates.

  3. Increase the temperature of MG1and MG2. Check if the Short Wave Highest Val decreases with the temperature increase.


INSPECTION PROCEDURE

CAUTION:
  1. When performing P0AA6 troubleshooting, use either a tool wrapped with vinyl insulation tape or a insulated tool. (It is extremely dangerous when a high-voltage charge passes through a non-insulated tool causing a short.)
  2. Before inspecting the high-voltage system or disconnecting the low voltage connector of the inverter with converter assembly, take safety precautions such as wearing insulated gloves and removing the service plug grip to prevent electrical shocks. After removing the service plug grip, put it in your pocket to prevent other technicians from accidentally reconnecting it while you are working on the high-voltage system.
  3. After removing the service plug grip, wait for at least 10 minutes before touching any of the high-voltage connectors or terminals. After waiting for 10 minutes, check the voltage at the terminals in the inspection point in the inverter with converter assembly. The voltage should be 0 V before beginning work (Click here).

    HINT:
    Waiting for at least 10 minutes is required to discharge the high-voltage capacitor inside the inverter with converter assembly.

  4. When disposing of an HV battery, make sure to return it through an authorized collection agent who is capable of handling it safely. If the HV battery is returned via the manufacturer specified route, it will be returned properly and in a safe manner by an authorized collection agent.

NOTICE:
After turning the power switch off, waiting time may be required before disconnecting the cable from the negative (-) auxiliary battery terminal. Therefore, make sure to read the disconnecting the cable from the negative (-) auxiliary battery terminal notices before proceeding with work (Click here).

HINT:
When measuring insulation resistance using a megohmmeter, set the megohmmeter to 500 V.

1.CHECK DTC OUTPUT (HYBRID CONTROL)
  1. Connect the intelligent tester to the DLC3.

  1. Turn the power switch on (IG).

  1. Enter the following menus: Powertrain / Hybrid Control / DTC.

  1. Check if DTCs are output.

    Result:
    Result
    Proceed to
    P0AA6 only is output.
    A
    P0AA6 and P0A1D (power management control ECU malfunction) are output.
    B
    P0AA6 and P0AA7 (malfunction in the battery smart unit) are output.
    C
    P0AA6 and P0AFC (Hybrid Battery Pack Sensor Module) are output.
    D

  1. Turn the power switch off.


B
GO TO DTC CHART (P0A1D) (Click here)

C
GO TO DTC CHART (P0AA7) (Click here)

D
GO TO DTC CHART (P0AFC) (Click here)
A


2.CHECK INFORMATION CODE
  1. Connect the intelligent tester to the DLC3.

  1. Turn the power switch on (IG).

  1. Enter the following menus: Powertrain / Hybrid Control / DTC.

  1. Access the freeze frame data of DTC P0AA6 and read the INF code.

    NOTICE:
    1. Information codes 611, 612, 613 and 614 are not stored with 526 simultaneously. If a drop in insulation resistance is detected and DTC P0AA6-526 is output, turn the power switch on (READY) and wait for 1 minute with the shift lever in D and the air conditioning system on, then turn the power switch off and wait for 1 minute to determine on of the information code (611, 612, 613 or 614).
    2. If only DTC P0AA6-526 is output, perform the diagnosis procedure for INF code 526 to inspect all the high voltage circuits.


    Result:

    Result
    Proceed to
    526 (decrease in the insulation resistance of the high-voltage circuit) only is output
    A
    526 and 611 (decrease in the insulation resistance of the air conditioning system area) are output
    Refer to the troubleshooting procedures for P0AA6-611 (Air conditioning system) (Click here)
    526 and 612 (decrease in the insulation resistance of the battery area) are output
    B
    526 and 613 (decrease in the insulation resistance of the transaxle area) are output
    C
    526 and 614 (decrease in the insulation resistance of the high-voltage DC area) are output
    D

  1. Turn the power switch off.


B
Go to step 8

C
Go to step 9

D
Go to step 10
A


3.CHECK HYBRID VEHICLE TRANSAXLE ASSEMBLY

CAUTION:
Be sure to wear insulated gloves.

  1. Check that the service plug grip is not installed.
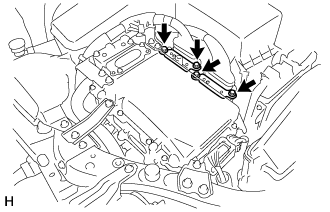
    NOTICE:
    After removing the service plug grip, do not turn the power switch on (READY), unless instructed by the repair manual because this may cause a malfunction.


    A258636
  1. Remove the upper inverter cover (generator cable side) and upper inverter cover (motor cable side) from the inverter with converter assembly.
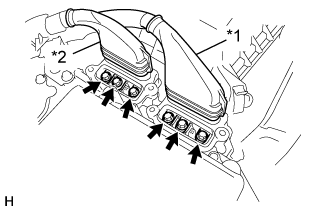
    HINT:
    Make sure that no foreign objects have entered or contaminated the inverter with converter assembly.


    A258637E03
  1. Disconnect the motor cable and generator cable from the inverter with converter assembly.
    Text in Illustration 
    *1
    Generator Cable
    *2
    Motor Cable


    A258955E17
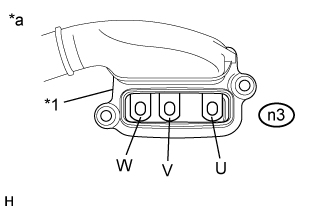
  1. Using a megohmmeter set to 500 V, measure the resistance according to the value(s) in the table below.

    NOTICE:
    Be sure to set the megohmmeter to 500 V when performing this test. Using a setting higher than 500 V can result in damage to the component being inspected.

    Standard Resistance:
    Tester Connection
    Switch Condition
    Specified Condition
    n3-3 (U) - Body ground and shielded wire ground
    Power switch off
    100 MΩ or higher
    n3-2 (V) - Body ground and shielded wire ground
    Power switch off
    100 MΩ or higher
    n3-1 (W) - Body ground and shielded wire ground
    Power switch off
    100 MΩ or higher

    Text in Illustration 
    *1
    Shielded Wire Ground
    *a
    Motor Cable (Inverter with Converter Assembly Side)


NG
REPLACE HYBRID VEHICLE TRANSAXLE ASSEMBLY (Click here)
OK


4.CHECK HYBRID VEHICLE TRANSAXLE ASSEMBLY

CAUTION:
Be sure to wear insulated gloves.

  1. Check that the service plug grip is not installed.
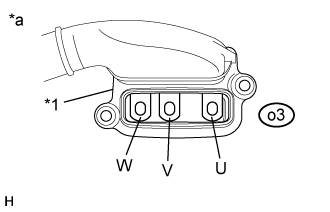
    NOTICE:
    After removing the service plug grip, do not turn the power switch on (READY), unless instructed by the repair manual because this may cause a malfunction.


    A258955E18
  1. Using a megohmmeter set to 500 V, measure the resistance according to the value(s) in the table below.

    NOTICE:
    Be sure to set the megohmmeter to 500 V when performing this test. Using a setting higher than 500 V can result in damage to the component being inspected.

    Standard Resistance:
    Tester Connection
    Switch Condition
    Specified Condition
    o3-3 (U) - Body ground and shielded wire ground
    Power switch off
    100 MΩ or higher
    o3-2 (V) - Body ground and shielded wire ground
    Power switch off
    100 MΩ or higher
    o3-1 (W) - Body ground and shielded wire ground
    Power switch off
    100 MΩ or higher

    Text in Illustration 
    *1
    Shielded Wire Ground
    *a
    Generator Cable (Inverter with Converter Assembly Side)


NG
REPLACE HYBRID VEHICLE TRANSAXLE ASSEMBLY (Click here)
OK


5.CHECK NO. 4 ENGINE WIRE

CAUTION:
Be sure to wear insulated gloves.

  1. Check that the service plug grip is not installed.
    NOTICE:
    After removing the service plug grip, do not turn the power switch on (READY), unless instructed by the repair manual because this may cause a malfunction.


    A259710
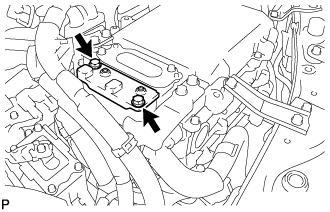
  1. Remove the connector cover assembly from the inverter with converter assembly.
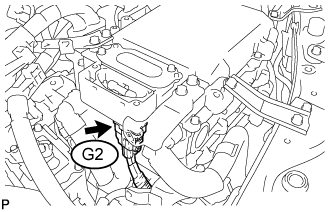
    HINT:
    Make sure that no foreign objects have entered or contaminated the inverter with converter assembly.


    A259717E01
  1. Disconnect connector G2 of the No. 4 engine wire (air conditioning harness) from the inverter with converter assembly.
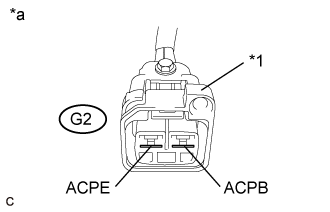
    HINT:
    Make sure that no foreign objects have entered or contaminated connector G2 of the No. 4 engine wire (air conditioning harness).


    A260188E01
  1. Using a megohmmeter set to 500 V, measure the resistance according to the value(s) in the table below.

    NOTICE:
    Be sure to set the megohmmeter to 500 V when performing this test. Using a setting higher than 500 V can result in damage to the component being inspected.

    Standard Resistance:
    Tester Connection
    Switch Condition
    Specified Condition
    G2-1 (ACPE) - Body ground and shielded wire ground
    Power switch off
    3 MΩ or higher
    G2-2 (ACPB) - Body ground and shielded wire ground
    Power switch off
    3 MΩ or higher

    Text in Illustration 
    *1
    Shielded Wire Ground
    *a
    Front view of No. 4 Engine Wire (Air Conditioning Harness) connector
    (to Inverter with Converter Assembly)


NG
Go to step 12
OK


6.CHECK INVERTER WITH CONVERTER ASSEMBLY

CAUTION:
Be sure to wear insulated gloves.

  1. Check that the service plug grip is not installed.
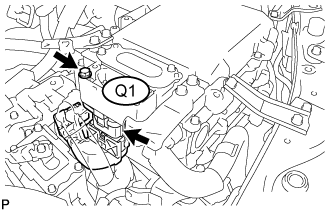
    NOTICE:
    After removing the service plug grip, do not turn the power switch on (READY), unless instructed by the repair manual because this may cause a malfunction.


    A259716E01
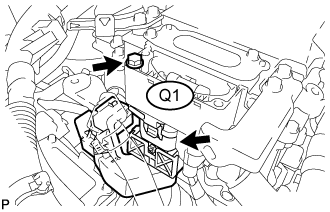
  1. Disconnect connector Q1 of the No. 4 floor wire from the inverter with converter assembly.
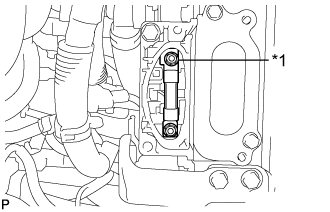
    HINT:
    Make sure that no foreign objects have entered or contaminated connector Q1 of the No. 4 floor wire.


    A259718E01
  1. Using a megohmmeter set to 500 V, measure the resistance according to the value(s) in the table below.

    NOTICE:
    Be sure to set the megohmmeter to 500 V when performing this test. Using a setting higher than 500 V can result in damage to the component being inspected.

    Standard Resistance:
    Tester Connection
    Switch Condition
    Specified Condition
    High voltage fuse terminal - Body ground
    Power switch off
    1 MΩ or higher

    Text in Illustration 
    *1
    High Voltage Fuse

    HINT:
    Perform this inspection with the motor cable, generator cable and No. 4 engine wire (air conditioning harness) disconnected from the inverter with converter assembly.


NG
REPLACE INVERTER WITH CONVERTER ASSEMBLY (Click here)
OK


7.CHECK NO. 4 FLOOR WIRE

CAUTION:
Be sure to wear insulated gloves.

  1. Check that the service plug grip is not installed.
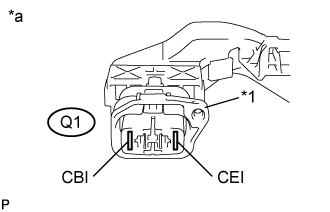
    NOTICE:
    After removing the service plug grip, do not turn the power switch on (READY), unless instructed by the repair manual because this may cause a malfunction.


    A259783E01
  1. Using a megohmmeter set to 500 V, measure the resistance according to the value(s) in the table below.

    NOTICE:
    Be sure to set the megohmmeter to 500 V when performing this test. Using a setting higher than 500 V can result in damage to the component being inspected.

    Standard Resistance:
    Tester Connection
    Switch Condition
    Specified Condition
    Q1-1 (CBI) - Body ground and shielded wire ground
    Power switch off
    10 MΩ or higher
    Q1-2 (CEI) - Body ground and shielded wire ground
    Power switch off
    10 MΩ or higher

    Text in Illustration 
    *1
    Shielded Wire Ground
    *a
    Front view of No. 4 Floor Wire connector
    (to Inverter with Converter Assembly)

    HINT:
    Visually inspect the No. 4 floor wire for damage. If there is any damage, then this is the likely cause of low insulation resistance.


NG
Go to step 13
OK


8.CHECK HV BATTERY AREA

CAUTION:
Be sure to wear insulated gloves.

  1. Check that the service plug grip is not installed.

    NOTICE:
    After removing the service plug grip, do not turn the power switch on (READY), unless instructed by the repair manual because this may cause a malfunction.

  1. Remove the No. 2 hybrid vehicle battery shield panel .


    A259732E01
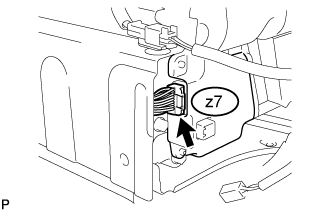
  1. Disconnect connector z7 from the battery smart unit.


    A259720E01
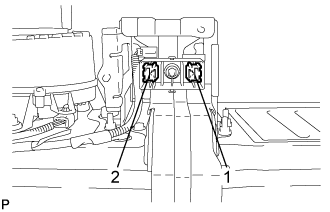
  1. Using a megohmmeter set to 500 V, measure the resistance according to the value(s) in the table below.

    NOTICE:
    Be sure to set the megohmmeter to 500 V when performing this test. Using a setting higher than 500 V can result in damage to the component being inspected.

    Standard Resistance:
    Tester Connection
    Switch Condition
    Specified Condition
    1 - Body ground
    Power switch off
    10 MΩ or higher
    2 - Body ground
    Power switch off
    10 MΩ or higher


NG
Go to step 14
OK

REPLACE BATTERY SMART UNIT (Click here)  

9.CHECK INVERTER WITH CONVERTER ASSEMBLY

CAUTION:
Be sure to wear insulated gloves.

  1. Check that the service plug grip is not installed.

    NOTICE:
    After removing the service plug grip, do not turn the power switch on (READY), unless instructed by the repair manual because this may cause a malfunction.


    A258636
  1. Remove the upper inverter cover (generator cable side) and upper inverter cover (motor cable side) from the inverter with converter assembly.
    HINT:
    Make sure that no foreign objects have entered or contaminated the inverter with converter assembly.


    A258637E03
  1. Disconnect the motor cable and generator cable from the inverter with converter assembly.
    Text in Illustration 
    *1
    Generator Cable
    *2
    Motor Cable


    A259710
  1. Remove the connector cover assembly from the inverter with converter assembly.

    HINT:
    Make sure that no foreign objects have entered or contaminated the inverter with converter assembly.


    A259718E01
  1. Using a megohmmeter set to 500 V, measure the resistance according to the value(s) in the table below.

    NOTICE:
    Be sure to set the megohmmeter to 500 V when performing this test. Using a setting higher than 500 V can result in damage to the component being inspected.

    Standard Resistance:
    Tester Connection
    Switch Condition
    Specified Condition
    High voltage fuse terminal - Body ground
    Power switch off
    1 MΩ or higher

    Text in Illustration 
    *1
    High Voltage Fuse

    Result:
    Result
    Proceed to
    NG
    A
    OK
    B


B
REPLACE HYBRID VEHICLE TRANSAXLE ASSEMBLY (Click here)
A

REPLACE INVERTER WITH CONVERTER ASSEMBLY (Click here)  

10.CHECK HIGH VOLTAGE DIRECT CURRENT AREA

CAUTION:
Be sure to wear insulated gloves.

  1. Check that the service plug grip is not installed.
    NOTICE:
    After removing the service plug grip, do not turn the power switch on (READY), unless instructed by the repair manual because this may cause a malfunction.


    A259710
  1. Remove the connector cover assembly from the inverter with converter assembly.

    HINT:
    Make sure that no foreign objects have entered or contaminated the inverter with converter assembly.


    A259712E04
  1. Disconnect connector Q1 of the No. 4 floor wire from the inverter with converter assembly.

    HINT:
    Make sure that no foreign objects have entered or contaminated connector Q1 of the No. 4 floor wire.


    A259783E01
  1. Using a megohmmeter set to 500 V, measure the resistance according to the value(s) in the table below.

    NOTICE:
    Be sure to set the megohmmeter to 500 V when performing this test. Using a setting higher than 500 V can result in damage to the component being inspected.

    Standard Resistance:
    Tester Connection
    Switch Condition
    Specified Condition
    Q1-1 (CBI) - Body ground and shielded wire ground
    Power switch off
    10 MΩ or higher
    Q1-2 (CEI) - Body ground and shielded wire ground
    Power switch off
    10 MΩ or higher

    Text in Illustration 
    *1
    Shielded Wire Ground
    *a
    Front view of No. 4 Floor Wire connector
    (to Inverter with Converter Assembly)

    HINT:
    Visually inspect the No. 4 floor wire for damage. If there is any damage, then this is the likely cause of low insulation resistance.


NG
Go to step 13
OK


11.CHECK NO. 4 ENGINE WIRE

CAUTION:
Be sure to wear insulated gloves.

  1. Check that the service plug grip is not installed.

    NOTICE:
    After removing the service plug grip, do not turn the power switch on (READY), unless instructed by the repair manual because this may cause a malfunction.


    A259717E01
  1. Disconnect connector G2 of the No. 4 engine wire (air conditioning harness) from the inverter with converter assembly.


    A260188E01
  1. Using a megohmmeter set to 500 V, measure the resistance according to the value(s) in the table below.

    NOTICE:
    Be sure to set the megohmmeter to 500 V when performing this test. Using a setting higher than 500 V can result in damage to the component being inspected.

    Standard Resistance:
    Tester Connection
    Switch Condition
    Specified Condition
    G2-1 (ACPE) - Body ground and shielded wire ground
    Power switch off
    3 MΩ or higher
    G2-2 (ACPB) - Body ground and shielded wire ground
    Power switch off
    3 MΩ or higher

    Text in Illustration 
    *1
    Shielded Wire Ground
    *a
    Front view of No. 4 Engine Wire (Air Conditioning Harness) connector
    (to Inverter with Converter Assembly)


NG
Go to step 12
OK

REPLACE INVERTER WITH CONVERTER ASSEMBLY (Click here)  

12.CHECK NO. 4 ENGINE WIRE

CAUTION:
Be sure to wear insulated gloves.

  1. Check that the service plug grip is not installed.

    NOTICE:
    After removing the service plug grip, do not turn the power switch on (READY), unless instructed by the repair manual because this may cause a malfunction.


    A259733E01
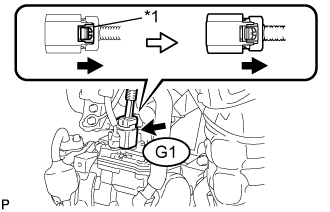
  1. Disconnect connector G1 of the No. 4 engine wire (air conditioning harness) from the compressor with motor assembly.
    Text in Illustration 
    *1
    Green Lock


    A260188E01
  1. Using a megohmmeter set to 500 V, measure the resistance according to the value(s) in the table below.

    NOTICE:
    Be sure to set the megohmmeter to 500 V when performing this test. Using a setting higher than 500 V can result in damage to the component being inspected.

    Standard Resistance:
    Tester Connection
    Switch Condition
    Specified Condition
    G2-1 (ACPE) - Body ground and shielded wire ground
    Power switch off
    10 MΩ or higher
    G2-2 (ACPB) - Body ground and shielded wire ground
    Power switch off
    10 MΩ or higher

    Text in Illustration 
    *1
    Shielded Wire Ground
    *a
    Front view of No. 4 Engine Wire (Air Conditioning Harness) connector
    (to Inverter with Converter Assembly)


NG
REPLACE NO. 4 ENGINE WIRE
OK

AIR CONDITIONING SYSTEM (P0AA6-611) (Click here)  

13.CHECK NO. 4 FLOOR WIRE

CAUTION:
Be sure to wear insulated gloves.

  1. Check that the service plug grip is not installed.

    NOTICE:
    After removing the service plug grip, do not turn the power switch on (READY), unless instructed by the repair manual because this may cause a malfunction.

  1. Remove the No. 4 hybrid battery shield panel .
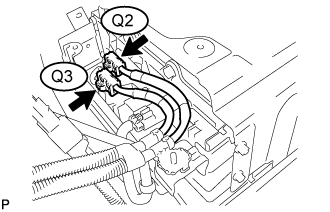


    A259723E04
  1. Disconnect connector Q2 and connector Q3 of the No. 4 floor wire from the hybrid battery junction block assembly.
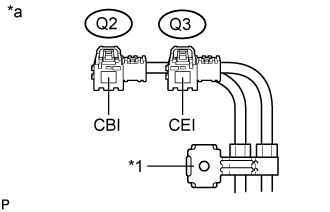
    HINT:
    Make sure that no foreign objects have entered or contaminated connector Q2 and Q3 of the No. 4 floor wire.


    A259725E01
  1. Using a megohmmeter set to 500 V, measure the resistance according to the value(s) in the table below.

    NOTICE:
    Be sure to set the megohmmeter to 500 V when performing this test. Using a setting higher than 500 V can result in damage to the component being inspected.

    Standard Resistance:
    Tester Connection
    Switch Condition
    Specified Condition
    Q3-1 (CEI) - Body ground and shielded wire ground
    Power switch off
    10 MΩ or higher
    Q2-1 (CBI) - Body ground and shielded wire ground
    Power switch off
    10 MΩ or higher

    Text in Illustration 
    *1
    Shielded Wire Ground
    *a
    Front view of No. 4 Floor Wire connector
    (to Hybrid Battery Junction Bock Assembly)

    HINT:
    Visually inspect the No. 4 floor wire for damage. If there is any damage, then this is the likely cause of low insulation resistance.


NG
REPLACE NO. 4 FLOOR WIRE (Click here)
OK

REPLACE HYBRID BATTERY JUNCTION BLOCK ASSEMBLY (Click here)  

14.CHECK HV BATTERY

CAUTION:
Be sure to wear insulated gloves.

  1. Check that the service plug grip is not installed.

    NOTICE:
    After removing the service plug grip, do not turn the power switch on (READY), unless instructed by the repair manual because this may cause a malfunction.

  1. Remove the hybrid battery junction block assembly (Click here).


    A259720E01
  1. Using a megohmmeter set to 500 V, measure the resistance according to the value(s) in the table below.

    NOTICE:
    Be sure to set the megohmmeter to 500 V when performing this test. Using a setting higher than 500 V can result in damage to the component being inspected.

    Standard Resistance:
    Tester Connection
    Switch Condition
    Specified Condition
    1 - Body ground
    Power switch off
    10 MΩ or higher
    2 - Body ground
    Power switch off
    10 MΩ or higher


NG
REPLACE HV BATTERY (Click here)
OK

REPLACE HYBRID BATTERY JUNCTION BLOCK ASSEMBLY (Click here)