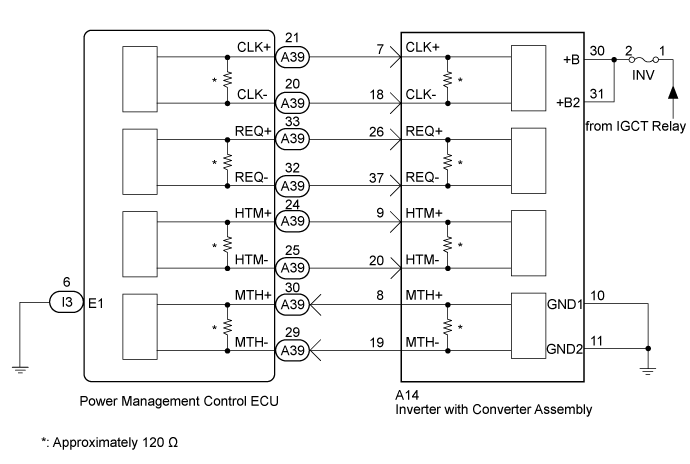
DTC U0110-159 Lost Communication with Drive Motor Control Module "A" |
DTC U0110-656 Lost Communication with Drive Motor Control Module "A" |
DTC U0110-657 Lost Communication with Drive Motor Control Module "A" |
| DTC No. | INF Code | DTC Detection Condition | Trouble Area |
| U0110 | 159 | Error in reception from inverter with converter assembly (MG ECU) via serial communication (out of communication standard) |
|
| 656 | Error in reception from inverter with converter assembly (MG ECU) via serial communication (out of communication standard) | ||
| 657 | Error in reception from inverter with converter assembly (MG ECU) via serial communication (no reception) |
| 1.CHECK FUSE (INV) |
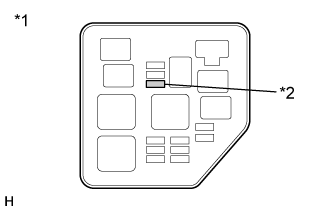
Remove the INV fuse from the No. 2 engine room relay block.
 |
Measure the resistance according to the value(s) in the table below.
| Tester Connection | Switch Condition | Specified Condition |
| INV fuse terminals | Always | Below 1 Ω |
| *1 | No. 2 Engine Room Relay Block |
| *2 | INV Fuse |
Install the INV fuse.
|
| ||||
| OK | |
 |
| 2.CLEAR DTC |
Connect the intelligent tester to the DLC3.
Turn the power switch on (IG).
Enter the following menus: Powertrain / Hybrid Control / DTC.
Clear DTCs and freeze frame data.
Turn the power switch off.
| NEXT | |
|
| 3.CHECK DTC OUTPUT (HYBRID CONTROL) |
Connect the intelligent tester to the DLC3.
Turn the power switch on (IG).
Enter the following menus: Powertrain / Hybrid Control / DTC.
Check if DTCs are output.
| Result | Proceed to |
| DTC U0110-159, 656 or 657 is output. | A |
| DTC U0110-159, 656 and 657 are not output. | B |
Turn the power switch off.
|
| ||||
| A | |
|
| 4.CHECK INVERTER WITH CONVERTER ASSEMBLY (GENERATOR CABLE CONNECTION CONDITION) |
Check that the service plug grip is not installed.
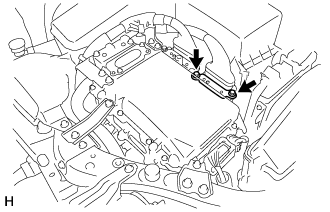 |
Remove the upper inverter cover (generator cable side) from the inverter with converter assembly.
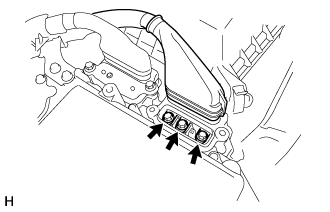 |
Check that the bolts for the generator cable are tightened to the specified torque, the generator cable is connected securely, and there are no contact problems.
Disconnect the generator cable from the inverter with converter assembly.
Check for arc marks at the terminals for the generator cable.
| Result | Proceed to | |
| The terminals are connected securely and there are no contact problems. | There are no arc marks. | A |
| The terminals are not connected securely and there is a contact problem. | There are arc marks. | B |
| The terminals are not connected securely and there is a contact problem. | There are no arc marks. | C |
| The terminals are connected securely and there are no contact problems. | There are arc marks. | B |
Connect the generator cable to the inverter with converter assembly.
Install the upper inverter cover.
|
| ||||
|
| ||||
| A | |
|
| 5.CHECK INVERTER WITH CONVERTER ASSEMBLY (MOTOR CABLE CONNECTION CONDITION) |
Check that the service plug grip is not installed.
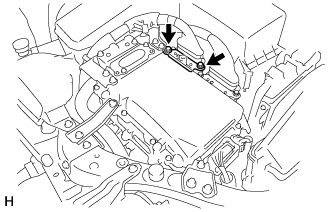 |
Remove the upper inverter cover (motor cable side) from the inverter with converter assembly.
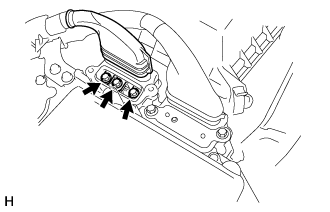 |
Check that the bolts for the motor cable are tightened to the specified torque, the motor cable is connected securely, and there are no contact problems.
Disconnect the motor cable from the inverter with converter assembly.
Check for arc marks at the terminals for the motor cable.
| Result | Proceed to | |
| The terminals are connected securely and there are no contact problems. | There are no arc marks. | A |
| The terminals are not connected securely and there is a contact problem. | There are arc marks. | B |
| The terminals are not connected securely and there is a contact problem. | There are no arc marks. | C |
| The terminals are connected securely and there are no contact problems. | There are arc marks. | B |
Connect the motor cable to the inverter with converter assembly.
Install the upper inverter cover.
|
| ||||
|
| ||||
| A | |
|
| 6.CHECK HYBRID VEHICLE TRANSAXLE ASSEMBLY (MG1) |
Check that the service plug grip is not installed.
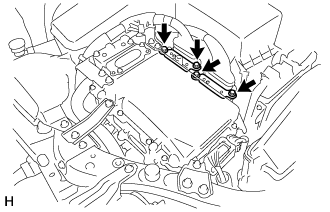 |
Remove the upper inverter cover (generator cable side) and upper inverter cover (motor cable side) from the inverter with converter assembly.
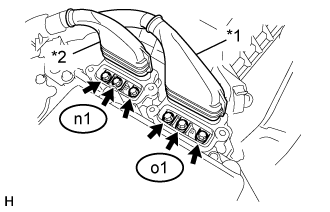 |
Disconnect the generator cable and motor cable from the inverter with converter assembly.
| *1 | Generator Cable |
| *2 | Motor Cable |
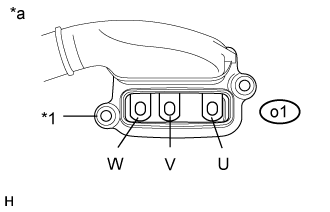 |
Check MG1 for an interphase short using a milliohmmeter.
Using a milliohmmeter, measure the resistance according to the value(s) in the table below.
| Tester Connection | Switch Condition | Specified Condition |
| o1-1 (W) - o1-3 (U) | Power switch off | 59.1 to 67.5 mΩ |
| o1-2 (V) - o1-1 (W) | Power switch off | 59.1 to 67.5 mΩ |
| o1-3 (U) - o1-2 (V) | Power switch off | 62.1 to 70.5 mΩ |
| *1 | Shield Ground |
| *a | Generator Cable (Inverter with Converter Assembly Side) |
Using a megohmmeter set to 500 V, measure the resistance according to the value(s) in the table below.
| Tester Connection | Switch Condition | Specified Condition |
| o1-1 (W) - Body ground and shield ground | Power switch off | 100 MΩ or higher |
| o1-2 (V) - Body ground and shield ground | Power switch off | 100 MΩ or higher |
| o1-3 (U) - Body ground and shield ground | Power switch off | 100 MΩ or higher |
Connect the generator cable and motor cable.
Install the upper inverter cover (generator cable side) and upper inverter cover (motor cable side).
|
| ||||
| OK | |
|
| 7.CHECK HYBRID VEHICLE TRANSAXLE ASSEMBLY (MG2) |
Check that the service plug grip is not installed.
|
Remove the upper inverter cover (generator cable side) and upper inverter cover (motor cable side) from the inverter with converter assembly.
|
Disconnect the generator cable and motor cable from the inverter with converter assembly.
| *1 | Generator Cable |
| *2 | Motor Cable |
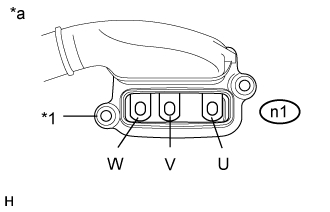 |
Check MG2 for an interphase short using a milliohmmeter.
Using a milliohmmeter, measure the resistance according to the value(s) in the table below.
| Tester Connection | Switch Condition | Specified Condition |
| n1-1 (W) - n1-3 (U) | Power switch off | 71.4 to 81.0 mΩ |
| n1-2 (V) - n1-1 (W) | Power switch off | 71.4 to 81.0 mΩ |
| n1-3 (U) - n1-2 (V) | Power switch off | 74.4 to 84.1 mΩ |
| *1 | Shield Ground |
| *a | Motor Cable (Inverter with Converter Assembly Side) |
Using a megohmmeter set to 500 V, measure the resistance according to the value(s) in the table below.
| Tester Connection | Switch Condition | Specified Condition |
| n1-1 (W) - Body ground and shield ground | Power switch off | 100 MΩ or higher |
| n1-2 (V) - Body ground and shield ground | Power switch off | 100 MΩ or higher |
| n1-3 (U) - Body ground and shield ground | Power switch off | 100 MΩ or higher |
Connect the generator cable and motor cable.
Install the upper inverter cover (generator cable side) and upper inverter cover (motor cable side).
|
| ||||
| OK | |
|
| 8.CHECK HARNESS AND CONNECTOR (INVERTER WITH CONVERTER ASSEMBLY POWER SOURCE CIRCUIT) |
Check that the service plug grip is not installed.
Disconnect connector A14 from the inverter with converter assembly.
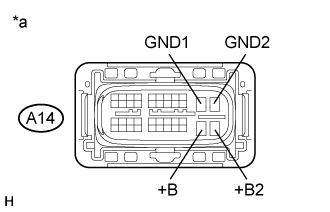 |
Measure the resistance according to the value(s) in the table below.
| Tester Connection | Switch Condition | Specified Condition |
| A14-10 (GND1) - Body ground | Power switch off | Below 1 Ω |
| A14-11 (GND2) - Body ground | Power switch off | Below 1 Ω |
| *a | Front view of wire harness connector (to Inverter with Converter Assembly) |
Connect the cable to the negative (-) auxiliary battery terminal.
Turn the power switch on (IG).
Measure the voltage according to the value(s) in the table below.
| Tester Connection | Switch Condition | Specified Condition |
| A14-30 (+B) - Body ground | Power switch on (IG) | 11 to 14 V |
| A14-31 (+B2) - Body ground | Power switch on (IG) | 11 to 14 V |
Turn the power switch off.
Connect the inverter with converter assembly connector.
|
| ||||
| OK | |
|
| 9.CHECK POWER MANAGEMENT CONTROL ECU (CHECK WAVEFORM) |
Connect an oscilloscope between the power management control ECU terminals specified in the following table.
Turn the power switch on (IG).
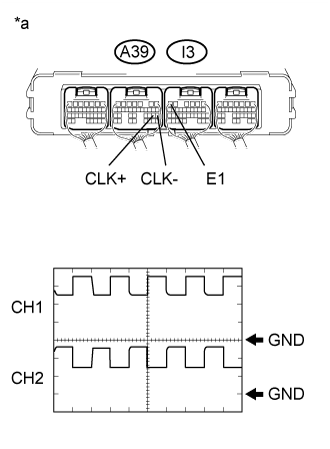 |
Measure the waveform.
| Item | Contents |
| Tester Connection | CH1: A39-21 (CLK+) - I3-6 (E1) CH2: A39-20 (CLK-) - I3-6 (E1) |
| Equipment Setting | 1V/DIV., 1μs/DIV. |
| Condition | Power switch on (IG) |
| Result | Proceed to |
| The waveform appears as shown in the illustration. | A |
| The waveform differs from the one shown in the illustration. | B |
| *a | Component with harness connected (Power Management Control ECU) |
Turn the power switch off.
|
| ||||
| A | |
|
| 10.CHECK POWER MANAGEMENT CONTROL ECU (CHECK WAVEFORM) |
Connect an oscilloscope between the power management control ECU terminals specified in the following table.
Turn the power switch on (IG).
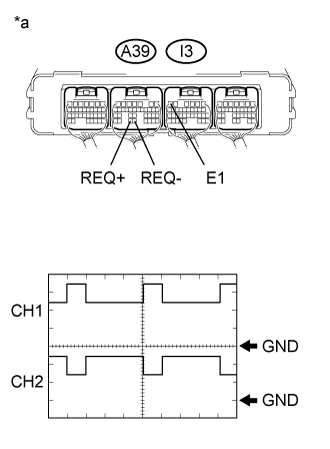 |
Measure the waveform.
| Item | Contents |
| Tester Connection | CH1: A39-33 (REQ+) - I3-6 (E1) CH2: A39-32 (REQ-) - I3-6 (E1) |
| Equipment Setting | 1V/DIV., 1ms/DIV. |
| Condition | Power switch on (IG) |
| Result | Proceed to |
| The waveform appears as shown in the illustration. | A |
| The waveform differs from the one shown in the illustration. | B |
| *a | Component with harness connected (Power Management Control ECU) |
Turn the power switch off.
|
| ||||
| A | |
|
| 11.CHECK POWER MANAGEMENT CONTROL ECU (CHECK WAVEFORM) |
Connect an oscilloscope between the power management control ECU terminals specified in the following table.
Turn the power switch on (IG).
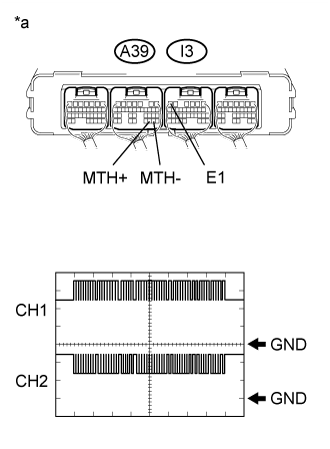 |
Measure the waveform.
| Item | Contents |
| Tester Connection | CH1: A39-30 (MTH+) - I3-6 (E1) CH2: A39-29 (MTH-) - I3-6 (E1) |
| Equipment Setting | 1V/DIV., 200μs/DIV. |
| Condition | Power switch on (IG) |
| Result | Proceed to |
| The waveform appears as shown in the illustration. | A |
| The waveform differs from the one shown in the illustration. | B |
| *a | Component with harness connected (Power Management Control ECU) |
Turn the power switch off.
|
| ||||
| A | ||
 | ||
| ||
| 12.CHECK HARNESS AND CONNECTOR (POWER MANAGEMENT CONTROL ECU - INVERTER WITH CONVERTER ASSEMBLY) |
Check that the service plug grip is not installed.
Disconnect connector A39 from the power management control ECU.
Disconnect connector A14 from the inverter with converter assembly.
Connect the cable to the negative (-) auxiliary battery terminal.
Turn the power switch on (IG).
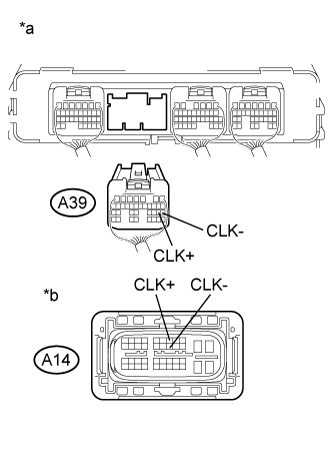 |
Measure the voltage according to the value(s) in the table below.
| Tester Connection | Switch Condition | Specified Condition |
| A39-21 (CLK+) - Body ground | Power switch on (IG) | Below 1 V |
| A39-20 (CLK-) - Body ground | Power switch on (IG) | Below 1 V |
| *a | Rear view of wire harness connector (to Power Management Control ECU) |
| *b | Front view of wire harness connector (to Inverter with Converter Assembly) |
Turn the power switch off.
Measure the resistance according to the value(s) in the table below.
| Tester Connection | Switch Condition | Specified Condition |
| A39-21 (CLK+) - A14-7 (CLK+) | Power switch off | Below 1 Ω |
| A39-20 (CLK-) - A14-18 (CLK-) | Power switch off | Below 1 Ω |
| Tester Connection | Switch Condition | Specified Condition |
| A39-21 (CLK+) or A14-7 (CLK+) - Body ground and other terminals | Power switch off | 10 kΩ or higher |
| A39-20 (CLK-) or A14-18 (CLK-) - Body ground and other terminals | Power switch off | 10 kΩ or higher |
Disconnect the cable from the negative (-) auxiliary battery terminal.
Connect the inverter with converter assembly connector.
Connect the power management control ECU connector.
|
| ||||
| OK | |
|
| 13.CHECK INVERTER WITH CONVERTER ASSEMBLY |
Disconnect connector A39 from the power management control ECU.
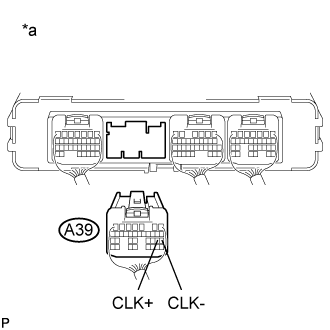 |
Measure the resistance according to the value(s) in the table below.
| Tester Connection | Switch Condition | Specified Condition |
| A39-21 (CLK+) - A39-20 (CLK-) | Power switch off | 80 to 170 Ω |
| *a | Rear view of wire harness connector (to Power Management Control ECU) |
Connect the power management control ECU connector.
|
| ||||
| OK | ||
| ||
| ||
| 14.CHECK HARNESS AND CONNECTOR (POWER MANAGEMENT CONTROL ECU - INVERTER WITH CONVERTER ASSEMBLY) |
Check that the service plug grip is not installed.
Disconnect connector A39 from the power management control ECU.
Disconnect connector A14 from the inverter with converter assembly.
Connect the cable to the negative (-) auxiliary battery terminal.
Turn the power switch on (IG).
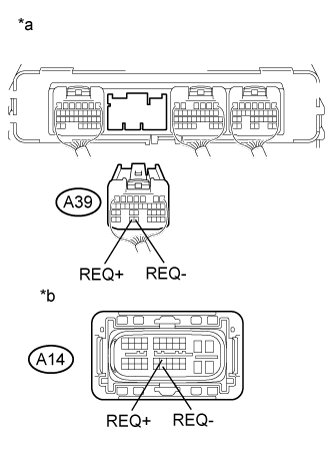 |
Measure the voltage according to the value(s) in the table below.
| Tester Connection | Switch Condition | Specified Condition |
| A39-33 (REQ+) - Body ground | Power switch on (IG) | Below 1 V |
| A39-32 (REQ-) - Body ground | Power switch on (IG) | Below 1 V |
| *a | Rear view of wire harness connector (to Power Management Control ECU) |
| *b | Front view of wire harness connector (to Inverter with Converter Assembly) |
Turn the power switch off.
Measure the resistance according to the value(s) in the table below.
| Tester Connection | Switch Condition | Specified Condition |
| A39-33 (REQ+) - A14-26 (REQ+) | Power switch off | Below 1 Ω |
| A39-32 (REQ-) - A14-37 (REQ-) | Power switch off | Below 1 Ω |
| Tester Connection | Switch Condition | Specified Condition |
| A39-33 (REQ+) or A14-26 (REQ+) - Body ground and other terminals | Power switch off | 10 kΩ or higher |
| A39-32 (REQ-) or A14-37 (REQ-) - Body ground and other terminals | Power switch off | 10 kΩ or higher |
Disconnect the cable from the negative (-) auxiliary battery terminal.
Connect the inverter with converter assembly connector.
Connect the power management control ECU connector.
|
| ||||
| OK | |
|
| 15.CHECK INVERTER WITH CONVERTER ASSEMBLY |
Disconnect connector A39 from the power management control ECU.
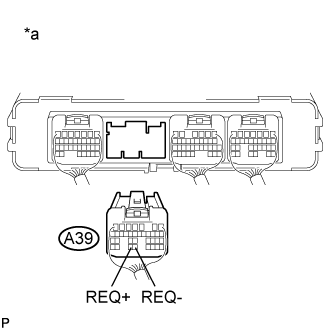 |
Measure the resistance according to the value(s) in the table below.
| Tester Connection | Switch Condition | Specified Condition |
| A39-33 (REQ+) - A39-32 (REQ-) | Power switch off | 80 to 170 Ω |
| *a | Rear view of wire harness connector (to Power Management Control ECU) |
Connect the power management control ECU connector.
|
| ||||
| OK | ||
| ||
| ||
| 16.CHECK HARNESS AND CONNECTOR (POWER MANAGEMENT CONTROL ECU - INVERTER WITH CONVERTER ASSEMBLY) |
Check that the service plug grip is not installed.
Disconnect connector A39 from the power management control ECU.
Disconnect connector A14 from the inverter with converter assembly.
Connect the cable to the negative (-) auxiliary battery terminal.
Turn the power switch on (IG).
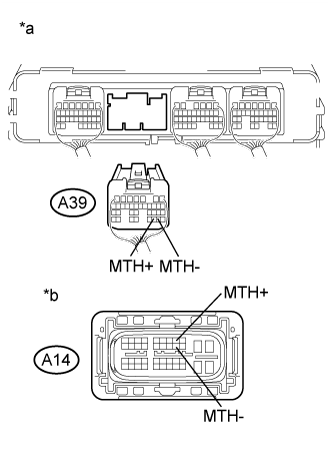 |
Measure the voltage according to the value(s) in the table below.
| Tester Connection | Switch Condition | Specified Condition |
| A39-30 (MTH+) - Body ground | Power switch on (IG) | Below 1 V |
| A39-29 (MTH-) - Body ground | Power switch on (IG) | Below 1 V |
| *a | Rear view of wire harness connector (to Power Management Control ECU) |
| *b | Front view of wire harness connector (to Inverter with Converter Assembly) |
Turn the power switch off.
Measure the resistance according to the value(s) in the table below.
| Tester Connection | Switch Condition | Specified Condition |
| A39-30 (MTH+) - A14-8 (MTH+) | Power switch off | Below 1 Ω |
| A39-29 (MTH-) - A14-19 (MTH-) | Power switch off | Below 1 Ω |
| Tester Connection | Switch Condition | Specified Condition |
| A39-30 (MTH+) or A14-8 (MTH+) - Body ground and other terminals | Power switch off | 10 kΩ or higher |
| A39-29 (MTH-) or A14-19 (MTH-) - Body ground and other terminals | Power switch off | 10 kΩ or higher |
Disconnect the cable from the negative (-) auxiliary battery terminal.
Connect the inverter with converter assembly connector.
Connect the power management control ECU connector.
|
| ||||
| OK | |
|
| 17.CHECK POWER MANAGEMENT CONTROL ECU |
Check that the service plug grip is not installed.
Disconnect connector A14 from the inverter with converter assembly.
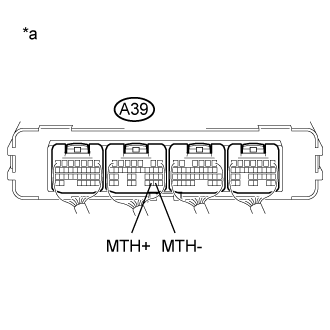 |
Measure the resistance according to the value(s) in the table below.
| Tester Connection | Switch Condition | Specified Condition |
| A39-30 (MTH+) - A39-29 (MTH-) | Power switch off | 80 to 170 Ω |
| *a | Component with harness connected (Power Management Control ECU) |
Connect the inverter with converter assembly connector.
|
| ||||
| OK | ||
| ||
| ||
| 18.REPLACE FUSE (INV) |
|
Replace the INV fuse.
| *1 | No. 2 Engine Room Relay Block |
| *2 | INV Fuse |
Turn the power switch on (READY).
Check if there is an open circuit in the INV fuse in the No. 2 engine room relay block.
Turn the power switch off.
|
| ||||
| OK | ||
| ||
| ||
| 19.CHECK HARNESS AND CONNECTOR (INVERTER WITH CONVERTER ASSEMBLY - INV FUSE) |
Check that the service plug grip is not installed.
|
Remove the INV fuse from the No. 2 engine room relay block.
| *1 | No. 2 Engine Room Relay Block |
| *2 | INV Fuse |
Disconnect connector A14 from the inverter with converter assembly.
Measure the resistance according to the value(s) in the table below.
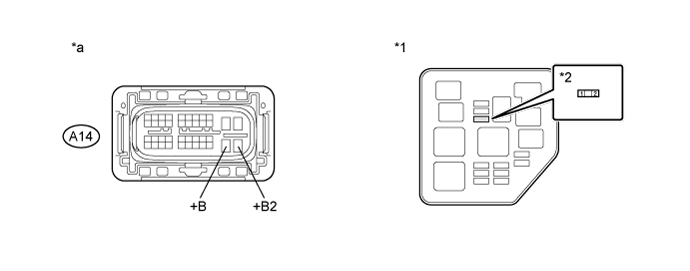
| *1 | No. 2 Engine Room Relay Block | *2 | INV Fuse |
| *a | Front view of wire harness connector (to Inverter with Converter Assembly) | - | - |
| Tester Connection | Switch Condition | Specified Condition |
| A14-30 (+B), A14-31 (+B2) or 2 (INV fuse terminal) - Body ground and other terminals | Power switch off | 10 kΩ or higher |
Connect the inverter with converter assembly connector.
Install the INV fuse.
|
| ||||
| OK | |
|
| 20.REPLACE INVERTER WITH CONVERTER ASSEMBLY |
| NEXT | ||
| ||
| ||
| 21.REPAIR OR REPLACE HARNESS OR CONNECTOR |
| NEXT | ||
| ||
| ||

