 |
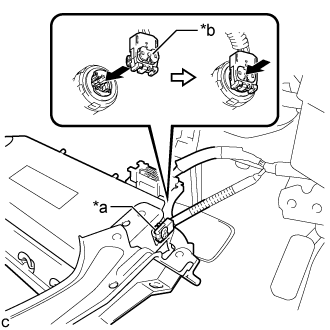
Connect the airbag connector to the lower No. 1 instrument panel airbag assembly.
| *a | Airbag Connector |
| *b | Airbag Connector Lock |
- NOTICE:
- When connecting any airbag connector, take care not to damage the airbag wire harness.
KNEE AIRBAG ASSEMBLY > INSTALLATION |
| 1. INSTALL LOWER NO. 1 INSTRUMENT PANEL AIRBAG ASSEMBLY |
Check that the power switch is off.
Check that the cable is disconnected from the negative (-) auxiliary battery terminal.
|
Connect the airbag connector to the lower No. 1 instrument panel airbag assembly.
| *a | Airbag Connector |
| *b | Airbag Connector Lock |
Push in the airbag connector lock to install the airbag connector.
Temporarily install the lower No. 1 instrument panel airbag assembly with the 2 hooks.
Engage the 2 claws to connect the DLC3.
Install the 4 bolts.
| 2. INSTALL INSTRUMENT PANEL SUB-ASSEMBLY |
Connect each connector.
Engage the 5 clips and 3 guides.
Install the instrument panel sub-assembly with the 2 bolts <B>.
| 3. CONNECT HOOD LOCK CONTROL LEVER SUB-ASSEMBLY |
Engage the claw and 2 guides to connect the hood lock control lever sub-assembly.
| 4. INSTALL INSTRUMENT SIDE PANEL LH |
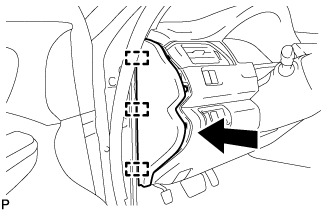 |
Engage the 3 guides.
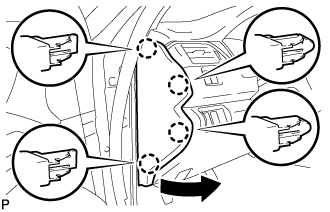 |
Engage the 4 claws to install the instrument side panel LH as shown in the illustration.
| 5. CONNECT FRONT DOOR OPENING TRIM WEATHERSTRIP LH |
| 6. INSTALL COWL SIDE TRIM SUB-ASSEMBLY LH |
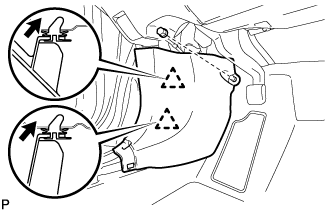 |
Insert the 2 clips in the direction indicated by the arrows shown in the illustration to engage them.
Install the cowl side trim sub-assembly LH with the clip.
| 7. INSTALL FRONT DOOR SCUFF PLATE LH |
Engage the 10 claws to install the front door scuff plate LH.
| 8. CONNECT CABLE TO NEGATIVE AUXILIARY BATTERY TERMINAL |
| 9. INSTALL LUGGAGE TRIM SERVICE HOLE COVER |
Engage the claw to connect the luggage trim service hole cover.
| 10. PERFORM DIAGNOSTIC SYSTEM CHECK |
| 11. INSPECT SRS WARNING LIGHT |