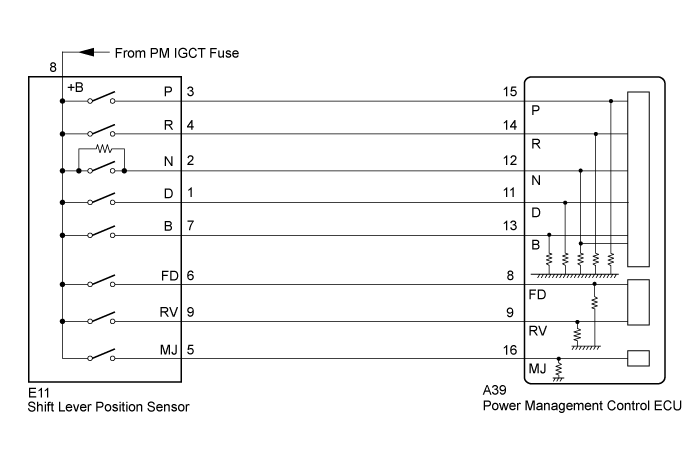
DTC P0705-757 Transmission Range Sensor Circuit |
| DTC No. | INF Code | DTC Detection Condition | Trouble Area |
| P0705 | 757 | Logical inconsistency in shift sensor output values |
|
| 1.READ VALUE USING INTELLIGENT TESTER (SHIFT POSITION) |
Connect the intelligent tester to the DLC3.
Turn the power switch on (IG).
Enter the following menus: Powertrain / Hybrid Control / Data List / Shift Sensor SW - P, Shift Sensor SW - R, Shift Sensor SW - N, Shift Sensor SW - D, Shift Sensor SW - B, Shift Sensor SW - FD, Shift Sensor SW - RV, Shift Sensor SW - MJ, .
While slowly moving the shift lever from P to B, then back to P, read the Data List (shift position) displayed on the intelligent tester.
| ECU Data List | Shift Position | ||||
| P | R | N | D | B | |
| Shift Sensor SW-P | ON | OFF | OFF | OFF | OFF |
| Shift Sensor SW-R | OFF | ON | OFF | OFF | OFF |
| Shift Sensor SW-N | OFF | OFF | ON | OFF | OFF |
| Shift Sensor SW-D | OFF | OFF | OFF | ON | OFF |
| Shift Sensor SW-B | OFF | OFF | OFF | OFF | ON |
| Shift Sensor SW-FD | OFF | OFF | OFF | ON | ON |
| Shift Sensor SW-RV | OFF | ON | OFF | OFF | OFF |
| Shift Sensor SW-MJ | ON | ON | ON | ON | ON |
Check if DTCs are output.
Turn the power switch off.
|
| ||||
| OK | |
 |
| 2.CHECK FOR INTERMITTENT PROBLEMS |
|
| ||||
| OK | ||
 | ||
| ||
| 3.CHECK SHIFT LEVER POSITION SENSOR |
Turn the power switch on (IG).
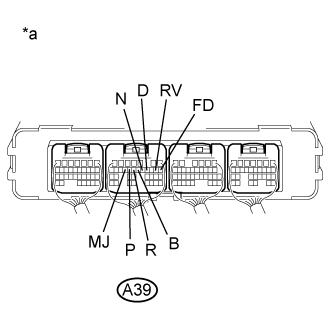 |
Measure the voltage according to the value(s) in the table below.
| Tester Connection | Condition | Specified Condition |
| A39-15 (P) - Body ground | Power switch on (IG) Shift lever in P | 11 to 14 V |
| A39-15 (P) - Body ground | Power switch on (IG) Any position except shift lever in P | 0 to 1.5 V |
| A39-14 (R) - Body ground | Power switch on (IG) Shift lever in R | 11 to 14 V |
| A39-14 (R) - Body ground | Power switch on (IG) Any position except shift lever in R | 0 to 1.5 V |
| A39-12 (N) - Body ground | Power switch on (IG) Shift lever in N | 11 to 14 V |
| A39-12 (N) - Body ground | Power switch on (IG) Any position except shift lever in N | 1.2 to 2.8 V |
| A39-11 (D) - Body ground | Power switch on (IG) Shift lever in D | 11 to 14 V |
| A39-11 (D) - Body ground | Power switch on (IG) Any position except shift lever in D | 0 to 1.5 V |
| A39-13 (B) - Body ground | Power switch on (IG) Shift lever in B | 11 to 14 V |
| A39-13 (B) - Body ground | Power switch on (IG) Any position except shift lever in B | 0 to 1.5 V |
| A39-16 (MJ) - Body ground | Power switch on (IG) Shift lever in P, R, N, D, or B | 11 to 14 V |
| A39-8 (FD) - Body ground | Power switch on (IG) Shift lever in D or B | 11 to 14 V |
| A39-8 (FD) - Body ground | Power switch on (IG) Any position except shift lever in D and B | 0 to 1.5 V |
| A39-9 (RV) - Body ground | Power switch on (IG) Shift lever in R | 11 to 14 V |
| A39-9 (RV) - Body ground | Power switch on (IG) Any position except shift lever in R | 0 to 1.5 V |
| *a | Component with harness connected (Power Management Control ECU) |
Turn the power switch off.
|
| ||||
| OK | ||
| ||
| ||
| 4.CHECK HARNESS AND CONNECTOR (POWER SOURCE CIRCUIT) |
Disconnect the shift lever position sensor connector.
Turn the power switch on (IG).
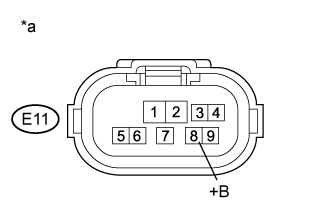 |
Measure the voltage according to the value(s) in the table below.
| Tester Connection | Switch Condition | Specified Condition |
| E11-8 (+B) - Body ground | Power switch on (IG) | 11 to 14 V |
| *a | Front view of wire harness connector (to Shift Lever Position Sensor) |
Turn the power switch off.
Connect the shift lever position sensor connector.
|
| ||||
| OK | |
|
| 5.INSPECT SHIFT LEVER POSITION SENSOR |
Disconnect the shift lever position sensor connector.
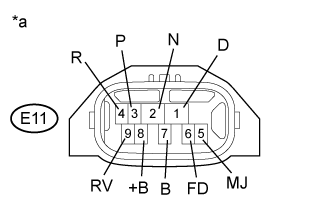 |
Measure the resistance according to the value(s) in the table below.
| Tester Connection | Condition | Specified Condition |
| E11-8 (+B) - E11-3 (P) | Shift lever in P | Below 1 Ω |
| E11-8 (+B) - E11-5 (MJ) | ||
| E11-8 (+B) - E11-4 (R) | Shift lever in R | Below 1 Ω |
| E11-8 (+B) - E11-5 (MJ) | ||
| E11-8 (+B) - E11-9 (RV) | ||
| E11-8 (+B) - E11-2 (N) | Shift lever in N | Below 1 Ω |
| E11-8 (+B) - E11-5 (MJ) | ||
| E11-8 (+B) - E11-1 (D) | Shift lever in D | Below 1 Ω |
| E11-8 (+B) - E11-6 (FD) | ||
| E11-8 (+B) - E11-5 (MJ) | ||
| E11-8 (+B) - E11-7 (B) | Shift lever in B | Below 1 Ω |
| E11-8 (+B) - E11-6 (FD) | ||
| E11-8 (+B) - E11-5 (MJ) |
| Tester Connection | Condition | Specified Condition |
| E11-8 (+B) or E11-3 (P) - Body ground and other terminals | Shift lever in P | 10 kΩ or higher*1 |
| E11-8 (+B) or E11-5 (MJ) - Body ground and other terminals | ||
| E11-8 (+B) or E11-4 (R) - Body ground and other terminals | Shift lever in R | 10 kΩ or higher*1 |
| E11-8 (+B) or E11-5 (MJ) - Body ground and other terminals | ||
| E11-8 (+B) or E11-9 (RV) - Body ground and other terminals | ||
| E11-8 (+B) or E11-2 (N) - Body ground and other terminals | Shift lever in N | 10 kΩ or higher |
| E11-8 (+B) or E11-5 (MJ) - Body ground and other terminals | ||
| E11-8 (+B) or E11-1 (D) - Body ground and other terminals | Shift lever in D | 10 kΩ or higher*1 |
| E11-8 (+B) or E11-6 (FD) - Body ground and other terminals | ||
| E11-8 (+B) or E11-5 (MJ) - Body ground and other terminals | ||
| E11-8 (+B) or E11-7 (B) - Body ground and other terminals | Shift lever in B | 10 kΩ or higher*1 |
| E11-8 (+B) or E11-6 (FD) - Body ground and other terminals | ||
| E11-8 (+B) or E11-5 (MJ) - Body ground and other terminals |
| *a | Component without harness connected (Shift Lever Position Sensor) |
Connect the shift lever position sensor connector.
|
| ||||
| OK | ||
| ||
| ||

