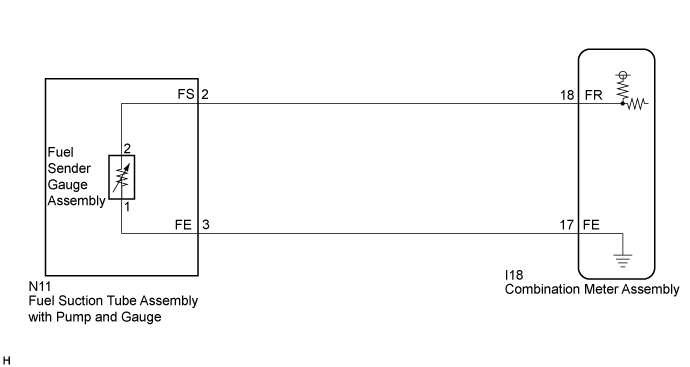
METER / GAUGE SYSTEM > Fuel Receiver Gauge Malfunction |
| 1.PERFORM ACTIVE TEST USING INTELLIGENT TESTER (FUEL METER OPERATION) |
Connect the intelligent tester to the DLC3.
Turn the power switch on (IG).
Turn the intelligent tester on.
Enter following menus: Body / Combination Meter / Active Test.
Check the operation by referring to the table below.
| Tester Display | Test Part | Control Range | Diagnostic Note |
| Fuel Meter Operation | Fuel receiver gauge | Empty, 1/2, Full | - |
|
| ||||
| OK | |
 |
| 2.READ VALUE USING INTELLIGENT TESTER (FUEL INPUT) |
Connect the intelligent tester to the DLC3.
Turn the power switch on (IG).
Turn the intelligent tester on.
Enter following menus: Body / Combination Meter / Data List.
Check the values by referring to the table below.
| Tester Display | Measurement Item/Range | Normal Condition | Diagnostic Note |
| Fuel Input | Fuel input/Min.: 0, Max.: 127.5 | Fuel receiver gauge indicates F: 57.0 | Unit: Liter |
| Fuel receiver gauge indicates 3/4: 46.5 | |||
| Fuel receiver gauge indicates 1/2: 31.6 | |||
| Fuel receiver gauge indicates 1/4: 14.7 | |||
| Fuel receiver gauge indicates E: 5.5 |
| Result | Proceed to |
| Fuel level data displayed on the intelligent tester is almost same as the fuel receiver gauge indication. | A |
| Fuel level data displayed on the intelligent tester differs from the fuel receiver gauge indication. | B |
|
| ||||
| OK | |
|
| 3.CHECK HARNESS AND CONNECTOR (COMBINATION METER ASSEMBLY - FUEL SUCTION TUBE ASSEMBLY WITH PUMP AND GAUGE) |
Disconnect the I18 combination meter assembly and N11 fuel suction tube assembly with pump and gauge connectors.
Measure the resistance according to the value(s) in the table below.
| Tester Connection | Condition | Specified Condition |
| I18-18 (FR) - N11-2 (FS) | Always | Below 1 Ω |
| I18-17 (FE) - N11-3 (FE) | Always | Below 1 Ω |
| I18-18 (FR) - Body ground | Always | 10 kΩ or higher |
| I18-17 (FE) - Body ground | Always | 10 kΩ or higher |
|
| ||||
| OK | |
|
| 4.INSPECT FUEL SENDER GAUGE ASSEMBLY |
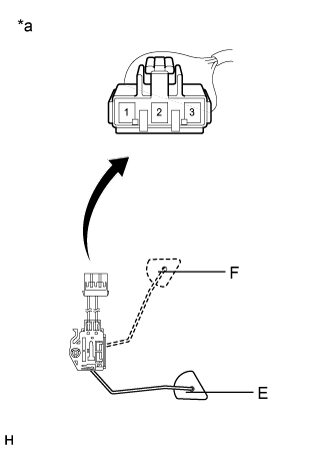 |
Remove the fuel sender gauge assembly (Click here for 2AR-FXE).
Check that the float moves smoothly between F and E.
Check if the fuel sender gauge arm is deformed.
Measure the resistance according to the value(s) in the table below.
| Tester Connection | Condition | Specified Condition |
| 1 - 2 | Float level is F (upper) | 13.5 to 16.5 Ω |
| 1 - 2 | Float level is between F (upper) and E (lower) | 13.5 to 414.5 Ω (Gradually changes) |
| 1 - 2 | Float level is E (lower) | 405.5 to 414.5 Ω |
| Result | Proceed to |
| OK | A |
| NG (for 2AR-FXE) | B |
| *a | Front view of wire harness connector (to Fuel Sender Gauge Assembly) |
|
| ||||
| A | |
|
| 5.CHECK FUEL SUCTION TUBE ASSEMBLY WITH PUMP AND GAUGE |
Visually check for deformation on the fuel suction tube assembly with pump and gauge connector.
|
| ||||
| OK | ||
 | ||
| ||
