FRONT DRIVE SHAFT ASSEMBLY > INSTALLATION |
| 1. INSTALL FRONT DRIVE SHAFT ASSEMBLY LH |
Coat the spline of the front drive inboard joint assembly with ATF.
Coat the lip of the hybrid vehicle transaxle assembly type T oil seal with MP grease.
![]() |
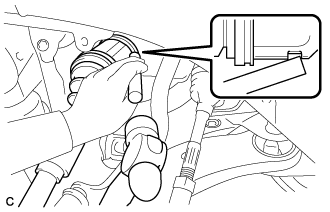
Align the inboard joint splines, and using a brass bar and a hammer, install the front drive shaft assembly LH.
![]() |
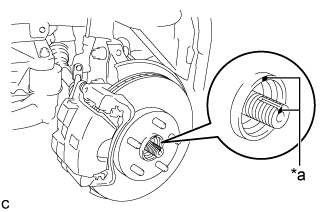
Align the matchmarks and install the front drive shaft assembly LH to the front axle hub sub-assembly.
| *a | Matchmark |
| 2. INSTALL FRONT DRIVE SHAFT ASSEMBLY RH |
Coat the spline of the front drive inboard joint assembly with ATF.
Coat the lip of the hybrid vehicle transaxle assembly type T oil seal with MP grease.
Install a new bearing bracket hole snap ring to the front drive shaft assembly RH.
Install the front drive shaft assembly RH.
![]() |
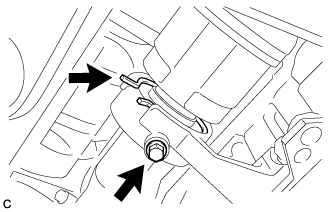
Install the bearing bracket hole snap ring and a new bolt.
![]() |
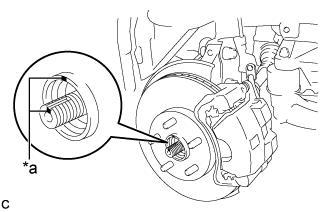
Align the matchmarks and install the front drive shaft assembly RH to the front axle hub sub-assembly.
| *a | Matchmark |
| 3. CONNECT FRONT LOWER NO. 1 SUSPENSION ARM SUB-ASSEMBLY |
Connect the front lower No. 1 suspension arm sub-assembly to the front lower ball joint assembly with the bolt and 2 nuts.
| 4. CONNECT TIE ROD ASSEMBLY |
Connect the tie rod assembly LH to the steering knuckle with the nut.
Install a new cotter pin.
| 5. INSTALL FRONT SPEED SENSOR |
Install the front speed sensor and front flexible hose to the front shock absorber assembly with the bolt and clamp.
Install the front speed sensor to the steering knuckle with the bolt.
| 6. INSTALL FRONT STABILIZER LINK ASSEMBLY |
Install the front stabilizer link assembly to the front shock absorber assembly with the nut.
| 7. INSTALL FRONT AXLE SHAFT NUT |
Clean the threaded parts on the front drive shaft assembly and a new axle shaft nut using a non-residue solvent.
![]() |
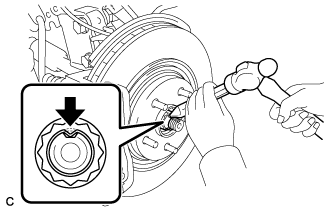
Using a socket wrench (30 mm), install the front axle shaft nut.
Using a chisel and hammer, stake the front axle shaft nut.
| 8. INSTALL FRONT WHEELS |
| 9. ADD HYBRID TRANSAXLE FLUID |
![]() |
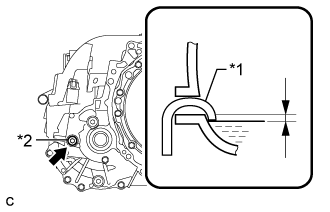
Add transaxle fluid until the fluid level is between 0 to 5 mm (0 to 0.197 in.) from the bottom lip of the filler plug opening.
| *1 | Filler Nozzle |
| *2 | Filler Plug |
After adding fluid, leave it for 30 seconds so that the fluid surface can become still again, and then check that the fluid level is between 0 to 5 mm (0 to 0.197 in.) from the bottom lip of the filler plug opening. (If the fluid level is too low, return to the Add Hybrid Transaxle Fluid procedure.)
| 10. INSPECT HYBRID TRANSAXLE FLUID |
![]() |
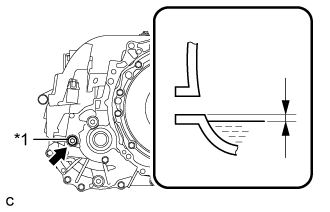
Using a 10 mm hexagon socket wrench, remove the filler plug and gasket.
| *1 | Filler Plug |
Check that the fluid level is between 0 to 5 mm (0 to 0.197 in.) from the bottom lip of the filler plug opening. (If the fluid level is too low, return to the Add Hybrid Transaxle Fluid procedure.)
Check for leaks if the quantity of transaxle fluid is low.
Using a 10 mm hexagon socket wrench, install the filler plug with a new gasket.
| 11. INSPECT FOR TRANSAXLE FLUID LEAK |
| 12. INSTALL FRONT FENDER APRON SEAL LH |
| 13. INSTALL FRONT FENDER APRON SEAL RH |
| 14. INSTALL ENGINE UNDER COVER LH |
| 15. INSTALL FRONT WHEEL OPENING EXTENSION PAD LH |
| 16. INSTALL ENGINE UNDER COVER RH |
| 17. INSTALL FRONT WHEEL OPENING EXTENSION PAD RH |
| 18. ADJUST FRONT WHEEL ALIGNMENT |
| 19. CHECK FOR SPEED SENSOR SIGNAL |