 |
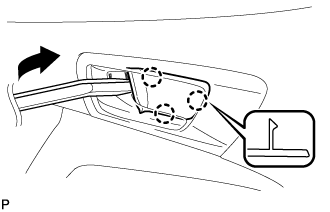
Using a moulding remover, disengage the 3 claws and remove the front door inside handle bezel plug as shown in the illustration.
FRONT DOOR SPEAKER > REMOVAL |
| 1. REMOVE FRONT DOOR INSIDE HANDLE BEZEL PLUG |
|
Using a moulding remover, disengage the 3 claws and remove the front door inside handle bezel plug as shown in the illustration.
| 2. REMOVE FRONT DOOR LOWER FRAME BRACKET GARNISH |
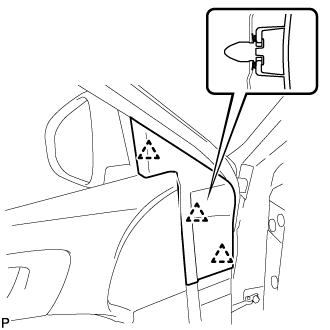 |
Disengage the 3 clips and remove the front door lower frame bracket garnish.
| 3. REMOVE MULTIPLEX NETWORK MASTER SWITCH ASSEMBLY WITH FRONT DOOR ARMREST BASE PANEL (for Driver Side) |
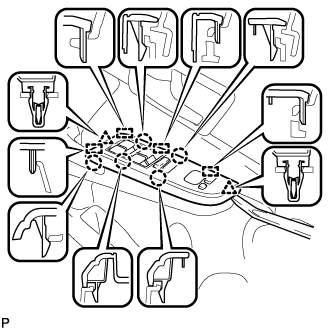 |
Using a moulding remover, disengage the 2 clips, 5 claws and 4 guides as shown in the illustration.
Disconnect each connector and remove the multiplex network master switch assembly with front door armrest base panel.
| 4. REMOVE POWER WINDOW REGULATOR SWITCH ASSEMBLY WITH FRONT DOOR ARMREST BASE PANEL (for Front Passenger Side) |
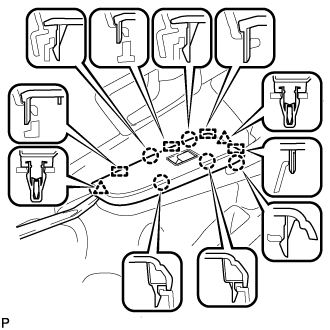 |
Using a moulding remover, disengage the 2 clips, 5 claws and 4 guides as shown in the illustration.
Disconnect the connector and remove the power window regulator switch assembly with front door armrest base panel.
| 5. REMOVE FRONT ARMREST ASSEMBLY |
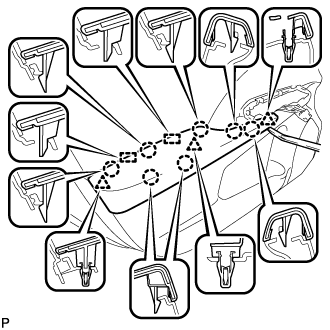 |
Using a moulding remover, disengage the 3 clips, 7 claws and 2 guides and remove the front armrest assembly.
| 6. REMOVE COURTESY LIGHT ASSEMBLY |
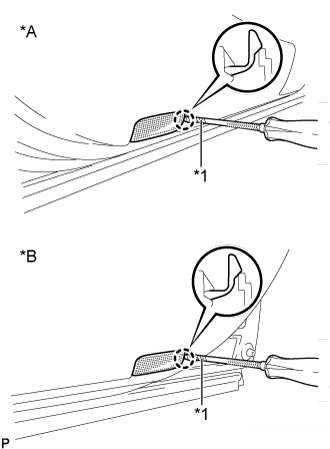 |
Using a screwdriver with its tip wrapped with protective tape, disengage the claw.
| *A | for LH Side |
| *B | for RH Side |
| *1 | Protective Tape |
Disconnect the connector and remove the courtesy light assembly.
| 7. REMOVE FRONT DOOR TRIM BOARD SUB-ASSEMBLY |
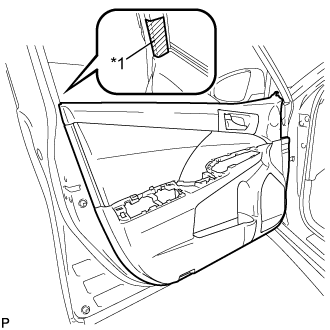 |
Put protective tape around the front door panel.
| *1 | Protective Tape |
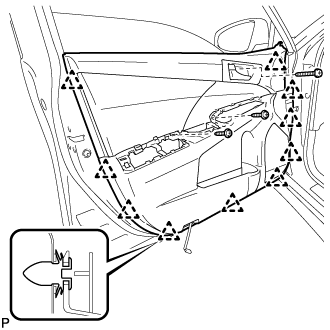 |
Remove the 3 screws.
Using a clip remover, disengage the 10 clips.
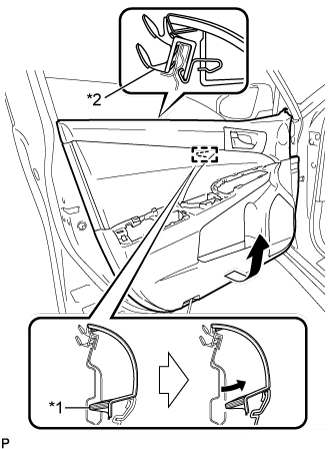 |
Pull out the front door trim board sub-assembly in the direction indicated by the arrow as shown in the illustration.
| *1 | Reference Boss |
| *2 | Front Door Inner Glass Weatherstrip |
Disengage the reference boss from the front door panel.
Raise the front door trim board sub-assembly to remove the front door trim board sub-assembly together with the front door inner glass weatherstrip.
Disconnect the connector.
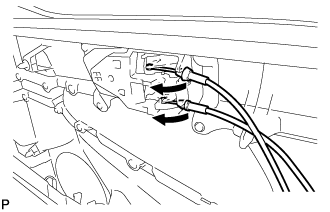 |
Disconnect the front door lock remote control cable assembly and front door inside locking cable assembly.
| 8. REMOVE FRONT DOOR INNER GLASS WEATHERSTRIP |
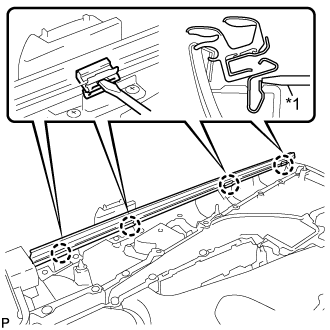 |
Using a screwdriver, disengage the 4 claws and remove the front door inner glass weatherstrip from the front door trim board sub-assembly as shown in the illustration.
| *1 | Screwdriver |
| 9. REMOVE FRONT NO. 1 SPEAKER ASSEMBLY |
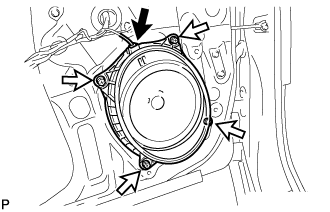 |
Disconnect the connector.
Remove the 4 screws.
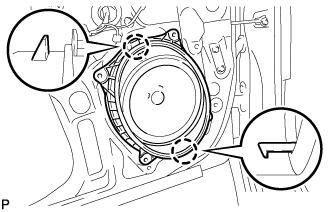 |
Disengage the 2 claws and remove the front No. 1 speaker assembly.