 |
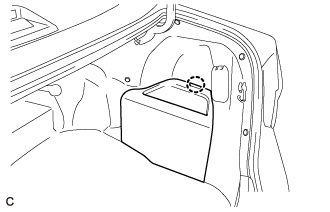
Disengage the claw to remove the luggage trim service hole cover.
ROOF HEADLINING > REMOVAL |
| 1. PRECAUTION |
| 2. REMOVE LUGGAGE TRIM SERVICE HOLE COVER |
|
Disengage the claw to remove the luggage trim service hole cover.
| 3. DISCONNECT CABLE FROM NEGATIVE AUXILIARY BATTERY TERMINAL |
| 4. REMOVE FRONT DOOR SCUFF PLATE LH |
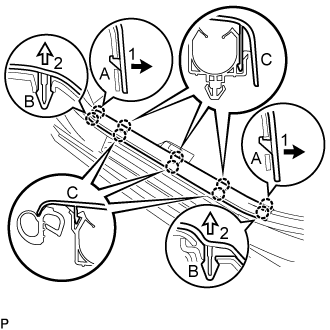 |
Disengage the 2 claws (A) in the direction indicated by the arrows (1) shown in the illustration.
Disengage the 2 claws (B) in the direction indicated by the arrows (2) shown in the illustration.
Disengage the 6 claws (C) to remove the front door scuff plate LH.
| 5. REMOVE COWL SIDE TRIM SUB-ASSEMBLY LH |
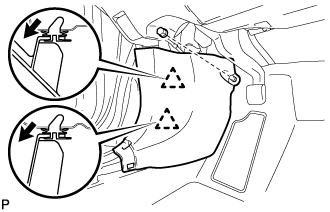 |
Remove the clip.
Pull the cowl side trim sub-assembly LH in the direction indicated by the arrow shown in the illustration to disengage the 2 clips and remove the cowl side trim sub-assembly LH.
| 6. REMOVE FRONT DOOR OPENING TRIM WEATHERSTRIP LH |
Remove the front door opening trim weatherstrip LH.
| 7. REMOVE FRONT PILLAR GARNISH LH |
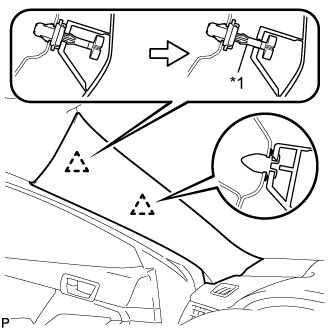 |
Pull the upper part of the garnish toward the inside of the cabin and disengage the garnish from the base of the 2 clips.
| *1 | Front Pillar Garnish Clip |
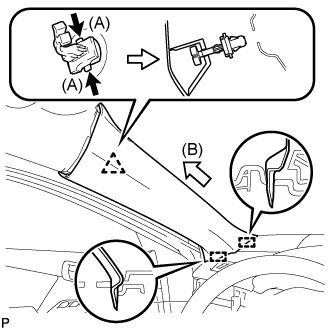 |
While pushing the tabs on the front pillar garnish clip in the direction indicated by the arrow (A) shown in the illustration, disengage the front pillar garnish clip.
Pull the garnish in the direction indicated by the arrow (B) shown in the illustration to disengage the 2 guides and remove the front pillar garnish LH.
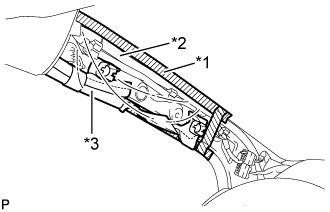 |
Protect the curtain shield airbag assembly.
| *1 | Adhesive Tape |
| *2 | Protective Cover |
| *3 | Curtain Shield Airbag Assembly |
Cover the airbag with a piece of cloth or nylon and secure the edges of the cover with tape as shown in the illustration.
| 8. REMOVE FRONT DOOR SCUFF PLATE RH |
| 9. REMOVE COWL SIDE TRIM SUB-ASSEMBLY RH |
| 10. REMOVE FRONT DOOR OPENING TRIM WEATHERSTRIP RH |
| 11. REMOVE FRONT PILLAR GARNISH RH |
| 12. REMOVE REAR SEAT HEADREST ASSEMBLY |
| 13. REMOVE REAR SEAT CUSHION ASSEMBLY |
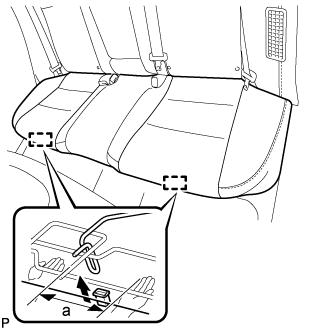 |
Disengage the hook of the seat cushion from the vehicle body as shown in the illustration.
| a | 100 mm (3.94 in.) or less |
Choose a hook to disengage first. Place your hands near the hook as shown in the illustration. Then lift the seat cushion to disengage the hook.
Repeat the step above for the other hook.
Remove the rear seat cushion assembly.
| 14. REMOVE REAR SEAT CUSHION LOCK HOOK |
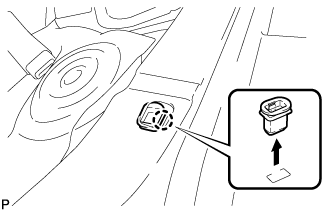 |
Disengage the claw and remove the rear seat cushion lock hook.
| 15. REMOVE REAR SEATBACK ASSEMBLY RH |
Fold down the rear seatback assembly RH.
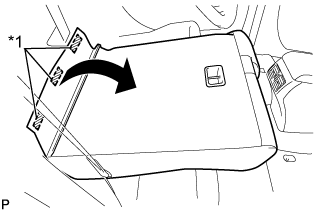 |
Disengage the 3 fasteners as shown in the illustration.
| *1 | Fastener |
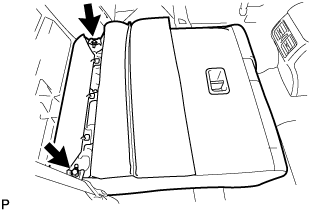 |
Remove the 2 bolts and rear seatback assembly RH.
| 16. REMOVE NO. 2 ROOM PARTITION COVER |
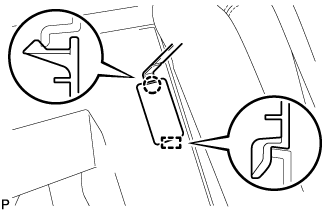 |
Using a moulding remover, disengage the claw and guide, and remove the No. 2 room partition cover.
| 17. REMOVE REAR SEATBACK ASSEMBLY LH |
Disconnect the rear seat outer belt from the rear seat center shoulder belt guide.
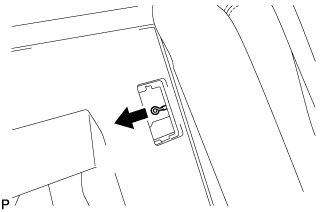 |
Pull the cable in the direction shown in the illustration to release the rear seatback lock and then fold the rear seatback assembly LH forward.
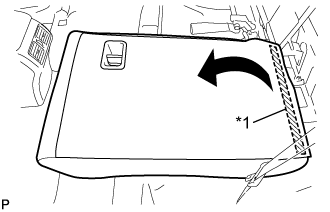 |
Disengage the fastener as shown in the illustration.
| *1 | Fastener |
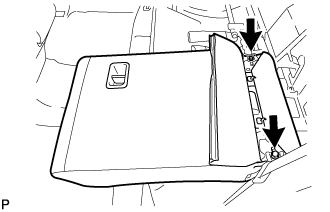 |
Remove the 2 bolts and rear seatback assembly LH.
| 18. REMOVE REAR SIDE SEATBACK ASSEMBLY LH |
Disconnect the rear seat outer belt from the rear seat shoulder belt guide LH.
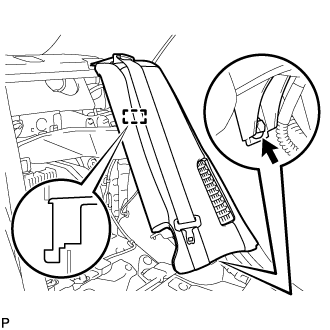 |
Remove the bolt.
Disengage the hook and remove the rear side seatback assembly LH.
| 19. REMOVE REAR SIDE SEATBACK ASSEMBLY RH |
Disconnect the rear seat outer belt from the rear seat shoulder belt guide RH.
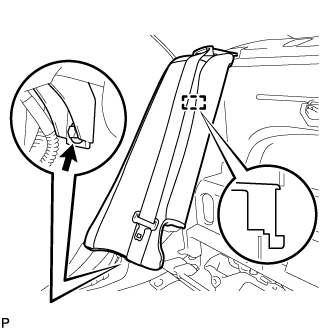 |
Remove the bolt.
Disengage the hook and remove the rear side seatback assembly RH.
| 20. REMOVE REAR DOOR SCUFF PLATE LH |
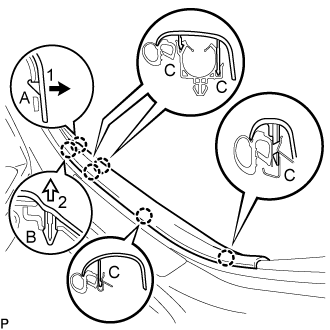 |
Disengage the claw (A) in the direction indicated by the arrow (1) shown in the illustration.
Disengage the claw (B) in the direction indicated by the arrow (2) shown in the illustration.
Disengage the 4 claws (C) to remove the rear door scuff plate LH.
| 21. REMOVE REAR DOOR OPENING TRIM WEATHERSTRIP LH |
Remove the rear door opening trim weatherstrip LH.
| 22. REMOVE LAP BELT OUTER ANCHOR COVER (for LH Side) |
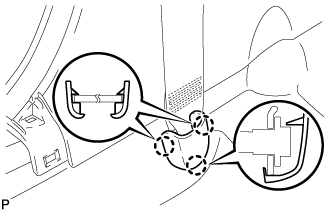 |
Disengage the 3 claws and remove the lap belt outer anchor cover.
| 23. DISCONNECT FRONT SEAT OUTER BELT ASSEMBLY LH |
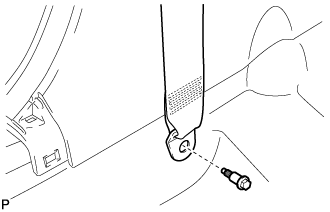 |
Remove the bolt and disconnect the floor anchor of the front seat outer belt assembly.
| 24. REMOVE CENTER PILLAR LOWER GARNISH LH |
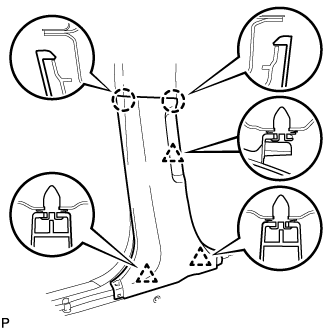 |
Disengage the 2 claws and 3 clips, and remove the center pillar lower garnish LH.
| 25. REMOVE CENTER PILLAR UPPER GARNISH LH |
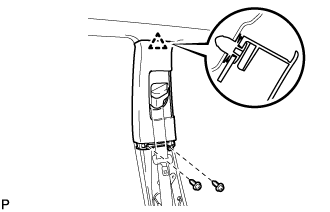 |
Remove the 2 screws.
Disengage the clip.
Pass the floor anchor of the front seat outer seat belt assembly LH through the center pillar upper garnish LH and remove the center pillar upper garnish LH.
| 26. REMOVE ROOF SIDE INNER GARNISH LH |
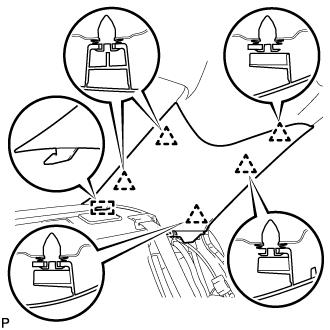 |
Disengage the 5 clips.
Disengage the guide and remove the roof side inner garnish LH.
| 27. REMOVE REAR DOOR SCUFF PLATE RH |
| 28. REMOVE REAR DOOR OPENING TRIM WEATHERSTRIP RH |
| 29. REMOVE LAP BELT OUTER ANCHOR COVER (for RH Side) |
| 30. DISCONNECT FRONT SEAT OUTER BELT ASSEMBLY RH |
| 31. REMOVE CENTER PILLAR LOWER GARNISH RH |
| 32. REMOVE CENTER PILLAR UPPER GARNISH RH |
| 33. REMOVE ROOF SIDE INNER GARNISH RH |
| 34. REMOVE FRONT SEAT ASSEMBLY LH |
| 35. REMOVE FRONT SEAT ASSEMBLY RH |
| 36. REMOVE INSTRUMENT PANEL SAFETY PAD |
| 37. REMOVE INNER REAR VIEW MIRROR STAY HOLDER COVER |
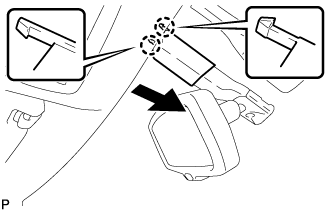 |
Disengage the 2 claws and slide the inner rear view mirror stay holder cover in the direction indicated by the arrow shown in the illustration.
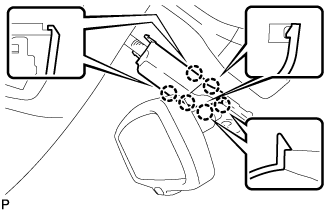 |
Disengage the 6 claws and remove the inner rear view mirror stay holder cover.
| 38. REMOVE RAIN SENSOR COVER |
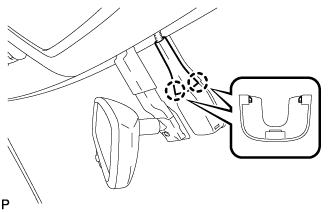 |
Disengage the 2 claws and remove the rain sensor cover as shown in the illustration.
| 39. REMOVE ROOF CONSOLE BOX ASSEMBLY (w/o Sliding Roof) |
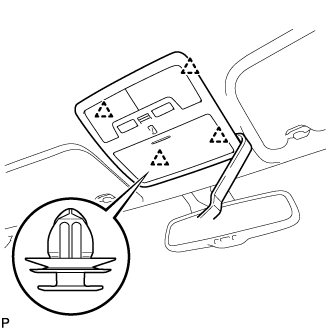 |
Using a moulding remover, disengage the 4 clips.
Disconnect the connector and remove the roof console box assembly.
| 40. REMOVE ROOF CONSOLE BOX ASSEMBLY (w/ Sliding Roof) |
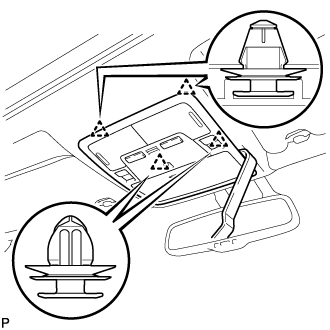 |
Using a moulding remover, disengage the 4 clips.
Disconnect the connector and remove the roof console box assembly.
| 41. REMOVE SPOT LIGHT ASSEMBLY |
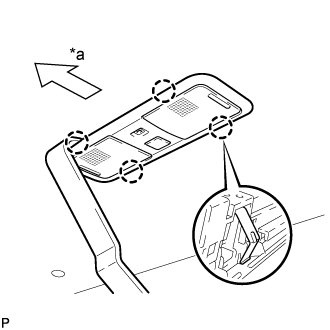 |
Using a moulding remover, disengage the 4 claws.
| *a | Front |
Disconnect the connector and remove the spot light assembly.
| 42. REMOVE ASSIST GRIP SUB-ASSEMBLY |
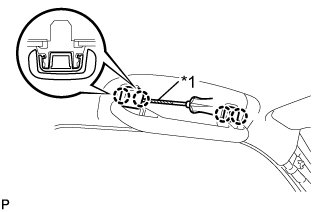 |
Using a screwdriver, disengage the 4 claws and remove the 2 assist grip covers.
| *1 | Protective Tape |
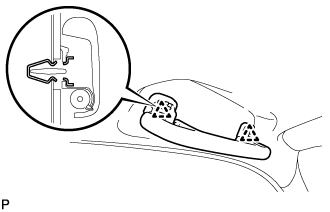 |
Disengage the 2 clips and remove the assist grip sub-assembly.
Remove the 2 clips from the vehicle body.
| 43. REMOVE REAR ASSIST GRIP ASSEMBLY LH |
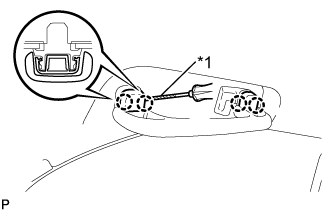 |
Using a screwdriver, disengage the 4 claws and remove the 2 assist grip covers.
| *1 | Protective Tape |
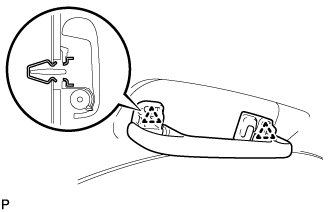 |
Disengage the 2 clips and remove the rear assist grip assembly LH.
Remove the 2 clips from the vehicle body.
| 44. REMOVE REAR ASSIST GRIP ASSEMBLY RH |
| 45. REMOVE SLIDING ROOF OPENING TRIM MOULDING (w/ Sliding Roof) |
Remove the sliding roof opening trim moulding.
| 46. REMOVE VISOR BRACKET COVER (for LH Side) |
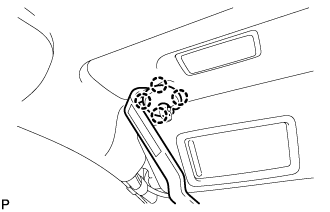 |
Using a moulding remover, disengage the 4 claws and remove the visor bracket cover.
| 47. REMOVE VISOR ASSEMBLY LH |
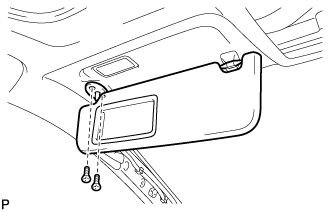 |
Remove the 2 screws and visor assembly LH.
| 48. REMOVE VISOR BRACKET COVER (for RH Side) |
| 49. REMOVE VISOR ASSEMBLY RH |
| 50. REMOVE VISOR HOLDER |
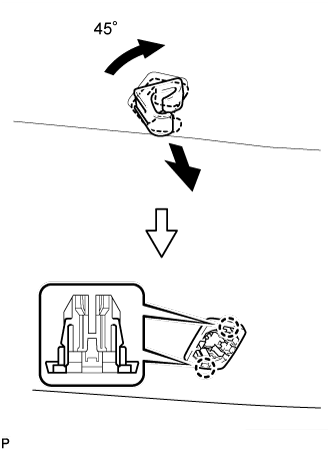 |
Turn the visor holder approximately 45° and pull it out as shown in the illustration.
Disengage the 2 claws and remove the visor holder.
| 51. REMOVE ROOF HEADLINING ASSEMBLY (w/o Sliding Roof) |
Disconnect the connector from the inner rear view mirror.
Disconnect the connector from the rain sensor.
Remove the bolt and disconnect the bracket from the front pillar RH.
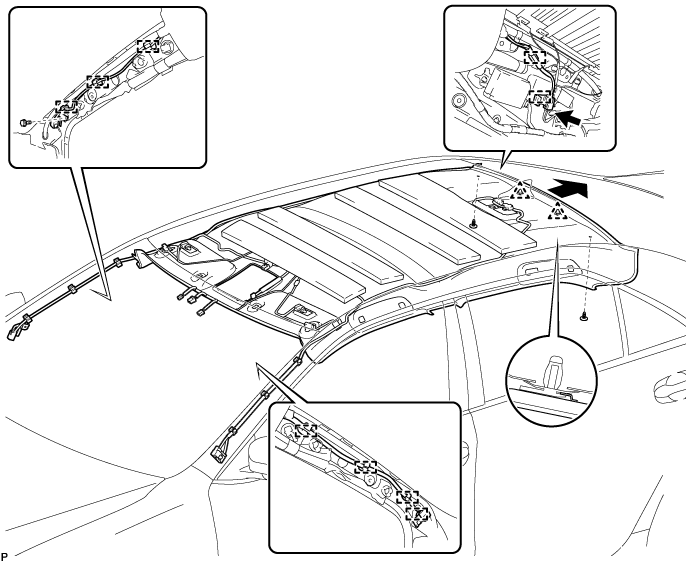
Disengage the 3 clamps from the front pillar RH.
Disengage the 4 clamps from the front pillar LH.
Disengage the 2 clamps and disconnect the connector from the rear pillar RH.
Remove the 2 clips.
Slide the roof headlining assembly to disengage the 2 clips as shown in the illustration.
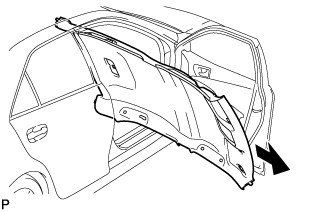 |
Remove the roof headlining assembly from the vehicle through the front passenger side door.
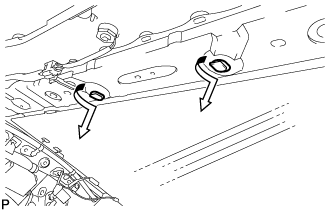 |
Remove the 2 clips from the vehicle body as shown in the illustration.
| 52. REMOVE ROOF HEADLINING ASSEMBLY (w/ Sliding Roof) |
Disconnect the connector from the inner rear view mirror.
Disconnect the connector from the rain sensor.
Disconnect the connector from the sliding roof drive gear assembly.
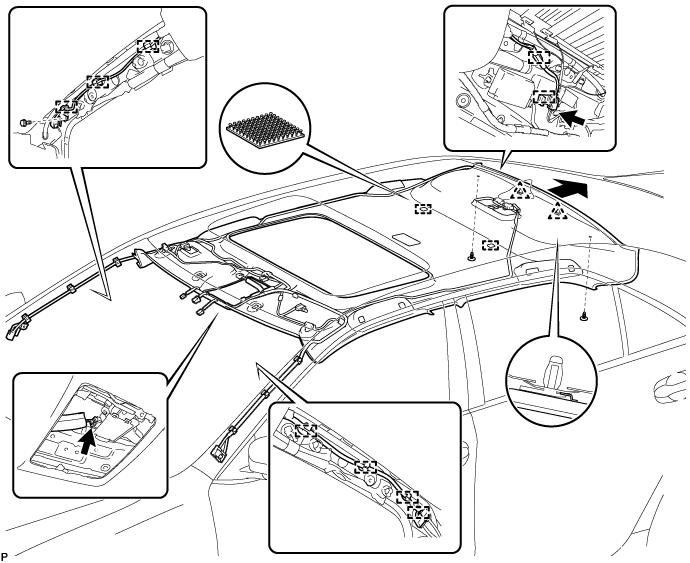
Remove the bolt and disconnect the bracket from the front pillar RH.
Disengage the 3 clamps from the front pillar RH.
Disengage the 4 clamps from the front pillar LH.
Disengage the 2 clamps and disconnect the connector from the rear pillar RH.
Remove the 2 clips.
Disengage the 2 fasteners.
Slide the roof headlining assembly to disengage the 2 clips as shown in the illustration.
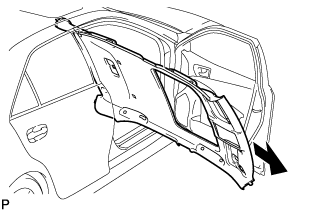 |
Remove the roof headlining assembly from the vehicle through the front passenger side door.
|
Remove the 2 clips from the vehicle body as shown in the illustration.